Deprecated: Required parameter $query follows optional parameter $post in /var/www/html/wp-content/plugins/elementor-extras/modules/breadcrumbs/widgets/breadcrumbs.php on line 1215
setPIDconstantparameter() - Quarky Advance Line Following Library - Python Function
Table of Contents
[PythonExtension]

setPIDconstantparameter()

Function Definition: setPIDconstantparameter(kp = 0.8, ki = 0.01, kd = 0.2)

Parameters

NameTypeDescriptionExpected ValuesDefault Value
kpintProportional, Integral, and Derivative (PID) functions are used to improve the feedback (analog inputs from the IR Sensors) to improve the robot's movement. 0 to 100.8
kiintProportional, Integral, and Derivative (PID) functions are used to improve the feedback (analog inputs from the IR Sensors) to improve the robot's movement. 0 to 10.01
kdintProportional, Integral, and Derivative (PID) functions are used to improve the feedback (analog inputs from the IR Sensors) to improve the robot's movement. 0 to 10.2

Description

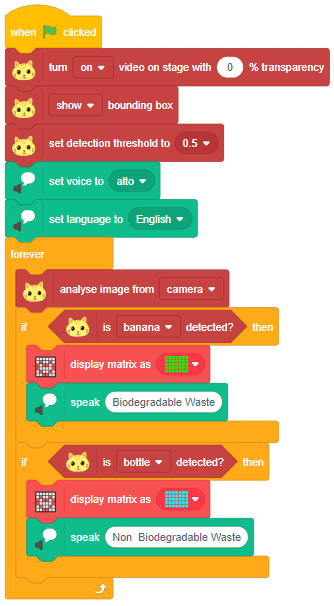
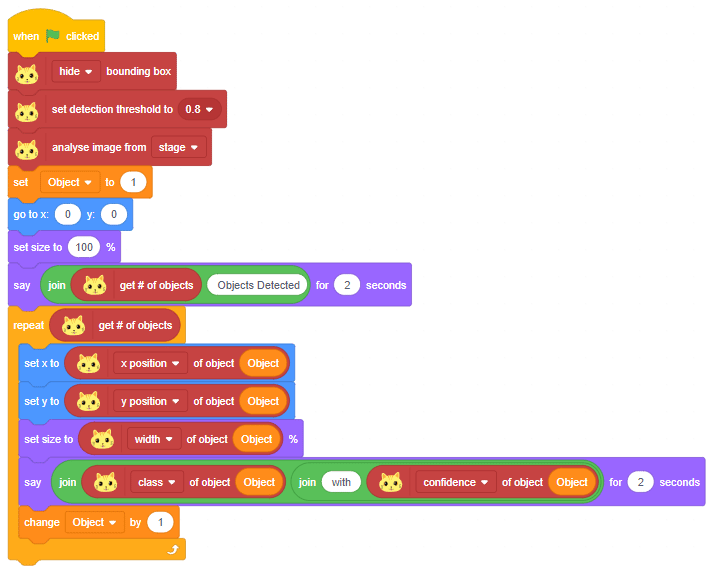
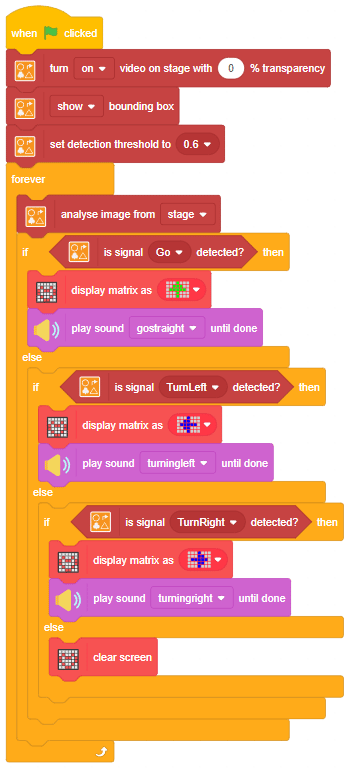
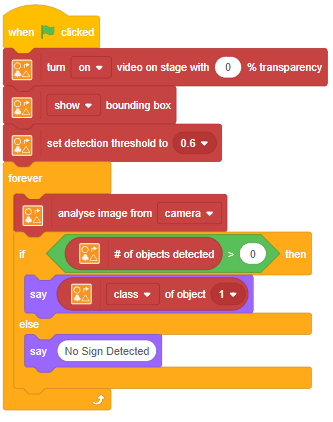
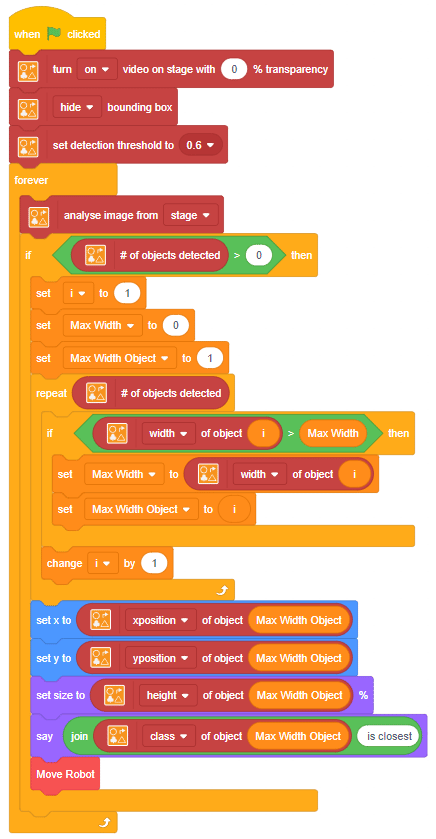
PID control of line follower is a method consisting of proportional, integral, and derivative functions to improve the robot’s movement

A PID line follower is like a smart robot that can follow a line on the ground. Imagine drawing a black line on a white surface, and you want a robot to stay on that line as it moves. That’s where PID (Proportional, Integral, Derivative) control comes in.

  1. Proportional (P): This part helps the robot make small adjustments based on how far it is from the line. If it’s too far to the right, it steers left, and if it’s too far to the left, it steers right.
  2. Integral (I): The integral part looks at how long the robot has been off the line. If it has been off for a while, the integral part helps to make a bigger correction to bring it back on track.
  3. Derivative (D): The derivative part predicts future errors by looking at the rate at which the robot is moving away from the line. This helps the robot make smooth adjustments and avoid overshooting the line.

So, the PID controller combines these three components to continuously adjust the robot’s movements, keeping it as close to the line as possible. It’s like a robot that’s always learning and fine-tuning its path to stay on track.

Think of it as a smart system that balances and corrects itself as it moves, ensuring it follows the line accurately. PID line followers are commonly used in robotics competitions and educational settings to teach about control systems and automation.

if you initialize a three-IR line following use kp >= 7 for a better result

setPIDconstantparameter(0.8,0.01,0.2)

Example

The example demonstrates using the Quarky touch display to make touch piano.

Script


Output

Touch-Numbers

Read More
The example demonstrates how to run different actions with the Quarky touch sensor to make a disco party in PictoBlox.

Script

Output

Read More
The example demonstrates how to use an ultrasonic sensor with Quarky.

Connections

Now we will connect the Ultrasonic Sensor to the Robot. The sensor and the robot have the following pins:

  1. Ultrasonic Sensor Pins:
    1.  VCC
    2. GND
    3. Trig
    4. Echo
  2. Quarky Pins:
    1. GND
    2. V
    3. D1
    4. D2

We will start with connecting the ultrasonic sensor with Quarky using the 4 set wire provided in the kit. But, first, make the connection in the following way:

  • First, connect the VCC of the ultrasonic sensor with the V pin on the Quarky.
  • Connect the GND of the ultrasonic sensor with the Ground pin on the Quarky.
  • Connect Trig of the ultrasonic sensor with D1 pin on the Quarky.
  • Finally, connect the Echo of the ultrasonic sensor with the D2 pin on the Quarky.

Script

Output

Read More
The example demonstrates how to make the sprite movement with Quarky buttons.

Code

sprite = Sprite('Tobi')
quarky=Quarky()

while True:
  if quarky.readpushbutton("L"):
    sprite.move(-10)
  elif quarky.readpushbutton("R"):
    sprite.move(10)

Output

Read More
The example demonstrates using the Quarky touch display to make a touch piano in the Python Coding Mode.

Code

sprite = Sprite('Tobi')
quarky = Quarky()

while True:
  if quarky.ispadtouched("T1"):
    quarky.drawpattern("bbbjjbjjbjjbbjjbjjjbjjbjjjbjjbjjbbb")
    quarky.playtone("C4", 8)

  if quarky.ispadtouched("T2"):
    quarky.drawpattern("cccjcccjcjjjjcjcjjcccjcjjcjjjcjjccc")
    quarky.playtone("D4", 8)

  if quarky.ispadtouched("T3"):
    quarky.drawpattern("fffjfffjfjjjjfjfjjfffjfjjjjfjfjjfff")
    quarky.playtone("E4", 8)

  if quarky.ispadtouched("T4"):
    quarky.drawpattern("dddjdjdjdjjdjdjdjjdddjdjjjjdjdjjjjd")
    quarky.playtone("F4", 8)

  if quarky.ispadtouched("T5"):
    quarky.drawpattern("gggjgggjgjjgjjjgjjgggjgjjjjgjgjjggg")
    quarky.playtone("G4", 8)

Output

Read More
The example demonstrates how to use an ultrasonic sensor with Quarky.

Connections

Now we will connect the Ultrasonic Sensor to the Robot. The sensor and the robot have the following pins:

We will start with connecting the ultrasonic sensor with Quarky using the 4 set wire provided in the kit. But, first, make the connection in the following way:

  • First, connect the VCC of the ultrasonic sensor with the V pin on the Quarky.
  • Connect the GND of the ultrasonic sensor with the Ground pin on the Quarky.
  • Connect Trig of the ultrasonic sensor with D1 pin on the Quarky.
  • Finally, connect the Echo of the ultrasonic sensor with the D2 pin on the Quarky.

Code

sprite = Sprite('Tobi')
quarky = Quarky()

quarky.setultrasonicpins(1, 18, 19)
while True:
  sprite.say(quarky.getdistance(1))


Output

Read More
The example demonstrates how to run different actions with the Quarky touch sensor to make a disco party in Python Coding Environment.

Code

sprite = Sprite('Cassy Dance')
quarky = Quarky()

import time

sprite.switchcostume('cassy-a')
sprite.gotoxy(0, 0)

while True:
  if quarky.ispadtouched("T1"):
    quarky.playsound("QuarkyIntro")

  if quarky.ispadtouched("T2"):
    quarky.showpattern("party colors")

  if quarky.ispadtouched("T3"):
    time.sleep(0.2)
    sprite.nextcostume()

  if quarky.ispadtouched("T4"):
    quarky.stopaudio()

Output

Read More
A waste management system that will differentiate the waste based on its type. If it detects biodegradable waste, the LEDs Quarky’s matrix will turn green. If it’s non-biodegradable waste, the LEDs will turn blue.

Script

Output

Read More
The example demonstrates how to run an object detection on the stage and show all the objects with confidence.

Script

Output

  1. Detection at 0.3
  2. Detection at 0.5
  3. Detection at 0.8
Read More
The example demonstrates how to detect persons on the stage with different confidence thresholds.

Script

Output

Read More
waste
A waste management system that will differentiate the waste based on its type in Python Coding Environment. If it detects biodegradable waste, the LEDs Quarky’s matrix will turn green. If it’s non-biodegradable waste, the LEDs will turn blue.

Code

sprite = Sprite('Tobi')
od = ObjectDetection()
speech = TexttoSpeech()
quarky = Quarky()

od.video("on", 1)
od.enablebox()
od.setthreshold(0.5)

speech.setvoice('alto')
speech.setlanguage('en')

while True:
  od.analysecamera()
  
  if od.isdetected('banana'):
    quarky.drawpattern("ccccccccccccccccccccccccccccccccccc")
    speech.speak("Biodegradable Waste")
  
  if od.isdetected('bottle'):
    quarky.drawpattern("fffffffffffffffffffffffffffffffffff")
    speech.speak("Non Biodegradable Waste")

Output

waste

Read More
The example demonstrates how to run an object detection on the stage and show all the objects with confidence.

Code

sprite = Sprite('Square Box')
obj = ObjectDetection()

obj.disablebox()
obj.setthreshold(0.5)
obj.analysestage()

sprite.gotoxy(0, 0)
sprite.setsize(100)
sprite.say(str(obj.count()) + " Object Detected", 2)

for object in range(1, obj.count() + 1):
  sprite.setx(obj.x(object))
  sprite.sety(obj.y(object))
  sprite.setsize(obj.width(object))
  sprite.say(obj.classname(object) + " with " + str(obj.confidence(object)), 2)

Output

  1. Detection at 0.3
  2. Detection at 0.5
  3. Detection at 0.8
Read More
The example demonstrates how to detect persons on the stage with different confidence thresholds.

Code

sprite = Sprite('Tobi')
obj = ObjectDetection()

obj.enablebox()
sprite.gotoxy(-180, -110)
sprite.setsize(100)

obj.setthreshold(0.3)
obj.analysestage()
sprite.say(str(obj.detectedcount("person")) + " Person Detected at 0.3 Threshold", 2)

obj.setthreshold(0.5)
obj.analysestage()
sprite.say(str(obj.detectedcount("person")) + " Person Detected at 0.5 Threshold", 2)

obj.setthreshold(0.9)
obj.analysestage()
sprite.say(str(obj.detectedcount("person")) + " Person Detected at 0.9 Threshold", 2)

Output

Read More
The examples show how to use Pose Recognition in PictoBlox to count the number of body parts detected in the body.

Script

Output

Read More
The example demonstrates how to use hand recognition and pen extensions to make an air draw game.

Script

Output

Read More
The example demonstrates how to use hand recognition to track the different parts of the fingers.

Script

Output

Read More
The example demonstrates how to use human body detection to track the nose and make someone clown.

Script

Output

Read More
The example demonstrates how to use hand recognition to track the different parts of the fingers in Python Coding Environment.

Code

thumb = Sprite('Thumb')
index = Sprite('Index')
middle = Sprite('Middle')
ring = Sprite('Ring')
pinky = Sprite('Pinky')

hand = Posenet()
hand.video("on", 0)
hand.enablebox()

thumb.switchcostume("ball-a")
thumb.setsize(50)
index.switchcostume("ball-b")
index.setsize(50)
middle.switchcostume("ball-c")
middle.setsize(50)
ring.switchcostume("ball-d")
ring.setsize(50)
pinky.switchcostume("ball-e")
pinky.setsize(50)

while True:
  hand.analysehand()
  
  if hand.ishanddetected():
    thumb.setx(hand.gethandposition(1, 4))
    thumb.sety(hand.gethandposition(2, 4))
    thumb.show()
    
    index.setx(hand.gethandposition(1, 8))
    index.sety(hand.gethandposition(2, 8))
    index.show()
    
    middle.setx(hand.gethandposition(1, 12))
    middle.sety(hand.gethandposition(2, 12))
    middle.show()
    
    ring.setx(hand.gethandposition(1, 16))
    ring.sety(hand.gethandposition(2, 16))
    ring.show()
    
    pinky.setx(hand.gethandposition(1, 20))
    pinky.sety(hand.gethandposition(2, 20))
    pinky.show()
  
  else:
    thumb.hide()
    index.hide()
    middle.hide()
    ring.hide()
    pinky.hide()

Output

Read More
The examples show how to use Pose Recognition in PictoBlox to count the number of body parts detected in the body in Python Coding Environment.

Code

sprite = Sprite('Tobi')
pose = Posenet()

pose.video("on", 0)
pose.enablebox()

while True:
  pose.analysecamera()
  bodyPartCount = 0
  
  for i in range(21):
    if pose.isdetected(i, 1):
      bodyPartCount += 1
  
  sprite.say(str(bodyPartCount) + " Parts Detected")

Output

Read More
The example demonstrates how to use human body detection to track the nose and make someone clown.

Code

sprite = Sprite('Ball')
pose = Posenet()

pose.video("on", 0)
pose.enablebox()

while True:
  pose.analysestage()
  
  if (pose.isdetected(0, 1)):
    sprite.setx(pose.x(0, 1))
    sprite.sety(pose.y(0, 1))
    sprite.show()
  
  else:
    sprite.hide()

Output

Read More
The example demonstrates how to use hand recognition and pen extensions to make an air draw game in the Python Coding Environment.

Code

sprite = Sprite('Pencil')

hand = Posenet()
pen = Pen()

hand.video("on", 0)
hand.disablebox()

pen.clear()
pen.setcolor([0, 255, 0])
pen.setsize(2)

while True:
  hand.analysehand()
  if hand.ishanddetected():
    if sprite.iskeypressed("space"):
      pen.down()
      sprite.setx(hand.gethandposition(1, 8))
      sprite.sety(hand.gethandposition(2, 8))
    else:
      pen.up()

Output

Read More
The example demonstrates how to use sign detection and make the Quarky show the detection on the LED.

Script

Output

Read More
The example demonstrates how to implement sign detection in PictoBlox.

Script

Output

Read More
The example demonstrates how to find the closest sign from multiple sign detection and make the decision accordingly.

Script

Output

Read More
The example demonstrates how to make an object-tracking robot.

Script

Output

Read More
Speech Recognition
The example demonstrates how to make smart home automation for light control using NLP and Speech Recognition.

Script

Output

Read More
The example demonstrates how to make a QR Code reader.

Script

Output

Read More
The example demonstrates how to make a QR Code reader in the Python Coding Environment.

Code

sprite = Sprite('Square Box')
qr = QRCodeScanner()

qr.video("on flipped", 0)
qr.disablebox()

while True:
  qr.analysecamera()
  if qr.isdetected():
    sprite.setx(qr.xpos("center"))
    sprite.sety(qr.ypos("center"))
    sprite.setdirection(qr.angle())
    sprite.say(qr.codedata())
    sprite.show()
  else:
    sprite.hide()

Output

Read More
The example demonstrates how to make a sprite be fixed to a point but can rotate. The wand is hanging like a pendulum.

The example demonstrates how to make a sprite be fixed to a point but can rotate. The wand is hanging like a pendulum.

The center of the wand in the costume is the point of rotation.

The following code creates the simulation of the pendulum.

Output

Read More
In this example, you understand the effect of the density, roughness, and bounce properties of the sprites. The ball falls from the top randomly, and the bell is fixed but can rotate. 

In this example, you understand the effect of the density, roughness, and bounce properties of the sprites. The ball falls from the top randomly, and the bell is fixed but can rotate.

Script of Bell

The bell center is changed to make it swing from the top.

Script for Ball

This script creates clones of the ball every 0.5 seconds.

This script assigns the properties of the clone.

Output

We will change the density of the bell and the ball in the block – set sprite density () roughness () bounce (). This will result in different simulations.

  1. Bell is very light and the balls are very heavy: The inertia of the balls will affect the bell too much.
  2. Bell is very light and balls are also very light: The bell is less affected by the ball. Gradually the bell slows down.
  3. Bell is very heavy and the balls are very light: The bell is not affected at all. The balls are thrown without adding any effect on the bell.
  4. Bell is very heavy and the balls are also very heavy: Same as option 2 – The bell is less affected by the ball. Gradually the bell slows down.
Read More
All articles loaded
No more articles to load
[PictoBloxExtension]