The function initializes the Mars Rover object in Python and maps the 5 servos to the specified pins.
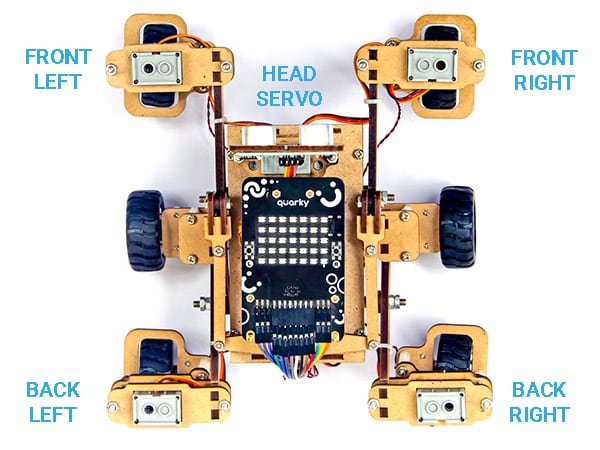
By default the following configuration is added:
- Head Servo – 4
- Front Left Servo – 1
- Front Right Servo – 5
- Back Left Servo – 2
- Back Right Servo – 6
Function Definition: MarsRover(Head = 4, Front Left = 1, Front Right = 7, Back Left = 2, Back Right = 6)
| Name | Type | Description | Expected Values | Default Value |
|---|---|---|---|---|
| Head | int | Servo Port Number at which the Head Servo Motor is connected. | 1-8 | 4 |
| Front Left | int | Servo Port Number at which the Front Left Servo Motor is connected. | 1-8 | 1 |
| Front Right | int | Servo Port Number at which the Front Right Servo Motor is connected. | 1-8 | 7 |
| Back Left | int | Servo Port Number at which the Back Left Servo Motor is connected. | 1-8 | 2 |
| Back Right | int | Servo Port Number at which the Back Right Servo Motor is connected. | 1-8 | 6 |
The function initializes the Mars Rover object in Python and maps the 5 servos to the specified pins.
By default the following configuration is added:
This Python code allows users to input a numerator and denominator and checks if it forms an improper fraction. If it is an improper fraction, the code calls a function called mixedFraction() to display the mixed fraction. If the fraction evaluates to a whole number, it will display a message indicating that.
#Function to display mixed fraction for an improper fraction
#The requirements are listed below:
 #1. Input numerator and denominator from the user.
 #2. Check if the entered numerator and denominator form a proper fraction.
 #3. If they do not form a proper fraction, then call mixedFraction().
 #4. mixedFraction()display a mixed fraction only when the fraction does not evaluate to a whole number.
def mixedFraction(num,deno = 1):
 remainder = num % deno
#check if the fraction does not evaluate to a whole number
 if remainder!= 0:
  quotient = int(num/deno)
  print("The mixed fraction=", quotient,"(",remainder, "/", deno,")")
 else:
  print("The given fraction evaluates to a whole number")
#function ends here
num = int(input("Enter the numerator: "))
deno = int(input("Enter the denominator: "))
print("You entered:",num,"/",deno)
if num > deno: #condition to check whether the fraction is improper
 mixedFraction(num,deno) #function call
else:
print("It is a proper fraction")The output of this code will be the display of the entered fraction and whether it is a proper fraction or an improper fraction. If it is an improper fraction, the mixed fraction will be displayed.
Enter the numerator: 10
Enter the denominator: 7
>> You entered: 10 / 7
>> The mixed fraction= 1 ( 3 / 7 )
This Python program calculates the result of raising a given base to a given exponent. It defines a function that accepts the base and exponent as arguments, calculates the result, and returns it. The program then prompts the user to enter the values for the base and exponent, calls the function with these values, and displays the result.
#Function to calculate and display base raised to the power exponent
#The requirements are listed below:
 #1. Base and exponent are to be accepted as arguments.
 #2. Calculate Baseexponent
 #3. Return the result (use return statement )
 #4. Display the returned value.
def calcpow(number,power): #function definition
 result = 1
 for i in range(1,power+1):
  result = result * number
 return result

base = int(input("Enter the value for the Base: "))
expo = int(input("Enter the value for the Exponent: "))
answer = calcpow(base,expo) #function call
print(base,"raised to the power",expo,"is",answer)Enter the value for the Base: 2
Enter the value for the Exponent: 3
>> 2 raised to the power 3 is 8
In this Python code example, we are exploring the concept of functions. Functions are blocks of code that can be defined and called multiple times, allowing for code organization and reusability. In this example, we have a function called `helloPython()` that simply prints the message “I love Programming”. However, we encounter a common error when trying to call the function. Let’s analyze the code and fix the error.
#print using functions
helloPython() #Function Call
def helloPython(): #Function definition
print("I love Programming")>> I love Programming
This Python code demonstrates how to create a function to calculate the area and perimeter of a rectangle. The function accepts two parameters – length and breadth. It calculates the area and perimeter using the given formulae and returns a tuple containing the area and perimeter values. The user is prompted to enter the length and breadth of the rectangle, and the area and perimeter values are then displayed.
#Function to calculate area and perimeter of a rectangle
#The requirements are listed below:
 #1. The function should accept 2 parameters.
 #2. Calculate area and perimeter.
 #3. Return area and perimeter.
def calcAreaPeri(Length,Breadth):
 area = l*b
 perimeter = 2*(l+b)
 #a tuple is returned consisting of 2 values area and perimeter
 return (area,perimeter)
l = float(input("Enter length of the rectangle: "))
b = float(input("Enter breadth of the rectangle: "))
#value of tuples assigned in order they are returned
area,perimeter = calcAreaPeri(l,b)
print("Area is:",area,"\nPerimeter is:",perimeter)Enter length of the rectangle: 100
Enter breadth of the rectangle: 80
>> Area is: 8000.0
>> Perimeter is: 360.0
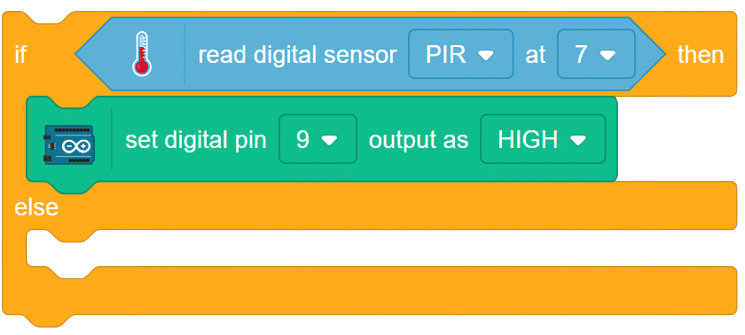
A Passive Infrared (PIR) motion sensor is a device commonly used in security systems, lighting control, and other applications to detect the presence of a moving object or person by measuring changes in infrared radiation. It’s called “passive” because it doesn’t emit any energy itself; it only detects the infrared radiation emitted by objects in its field of view.

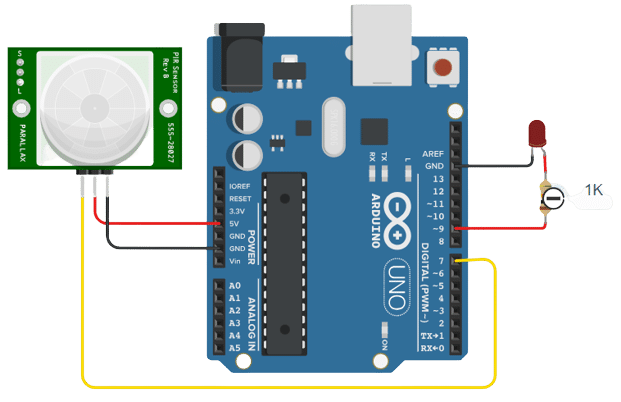
connection
IR_VCC – 5v
IR_GND – GND
IR_OUTPUT – D7
LED+ to D9
LED- to GND
Resistance -270
Create a circuit as per the above circuit diagram
OUTPUT will be updated soon
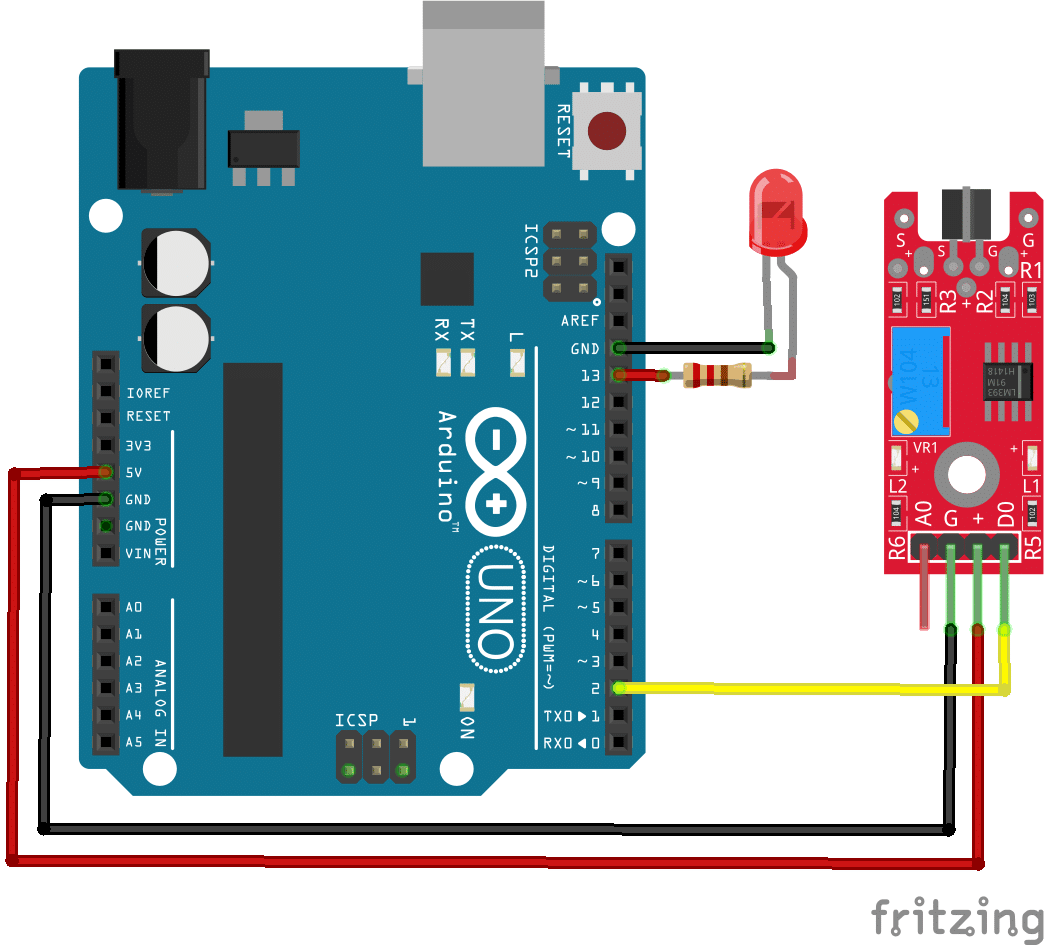
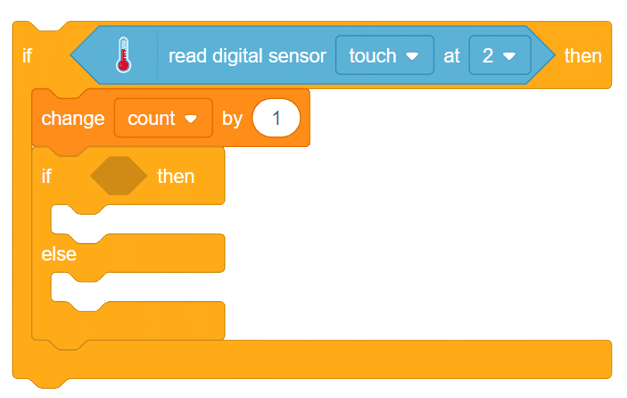
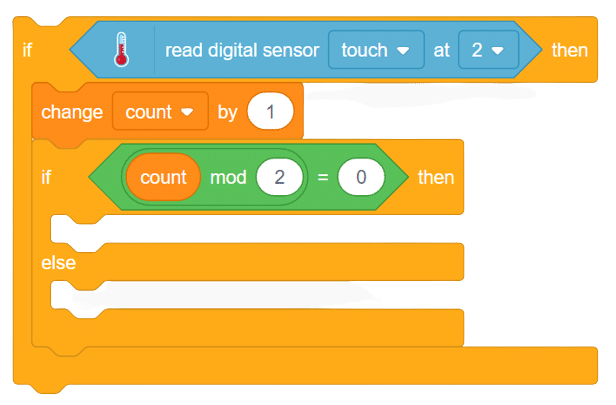
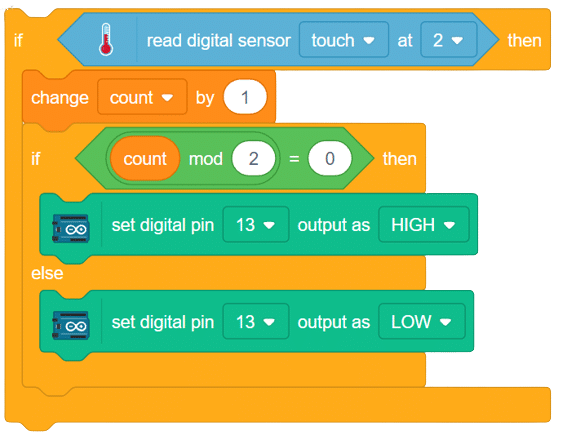
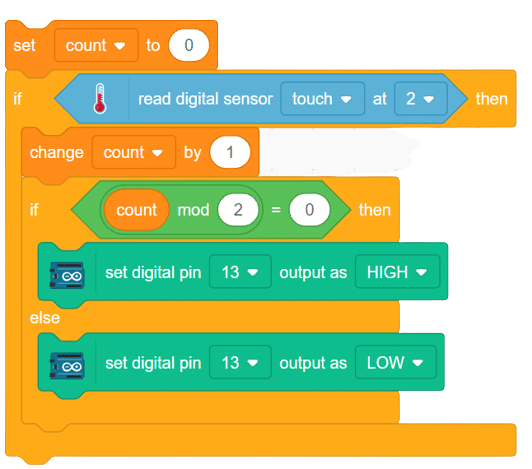
A metal touch sensor is a type of sensor that generates signals when touched by any charged object. it has a transistor-like element which sensor the external touch on it, based on thee signal generated we can use this sensor as a switch or any other application.
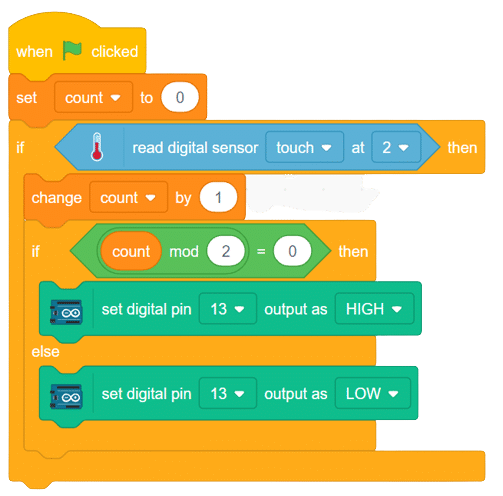
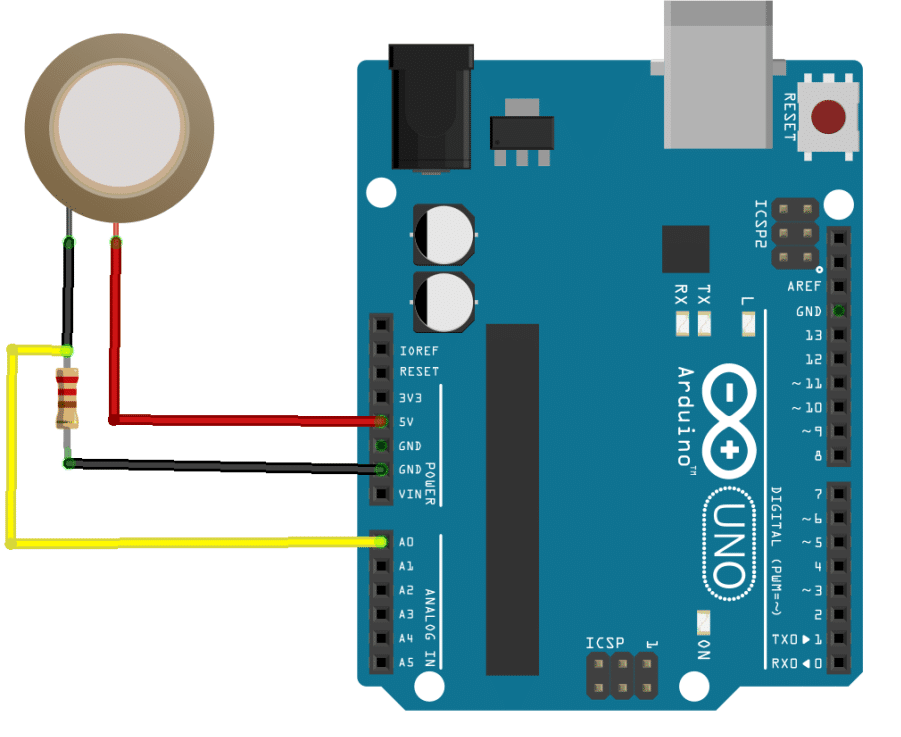
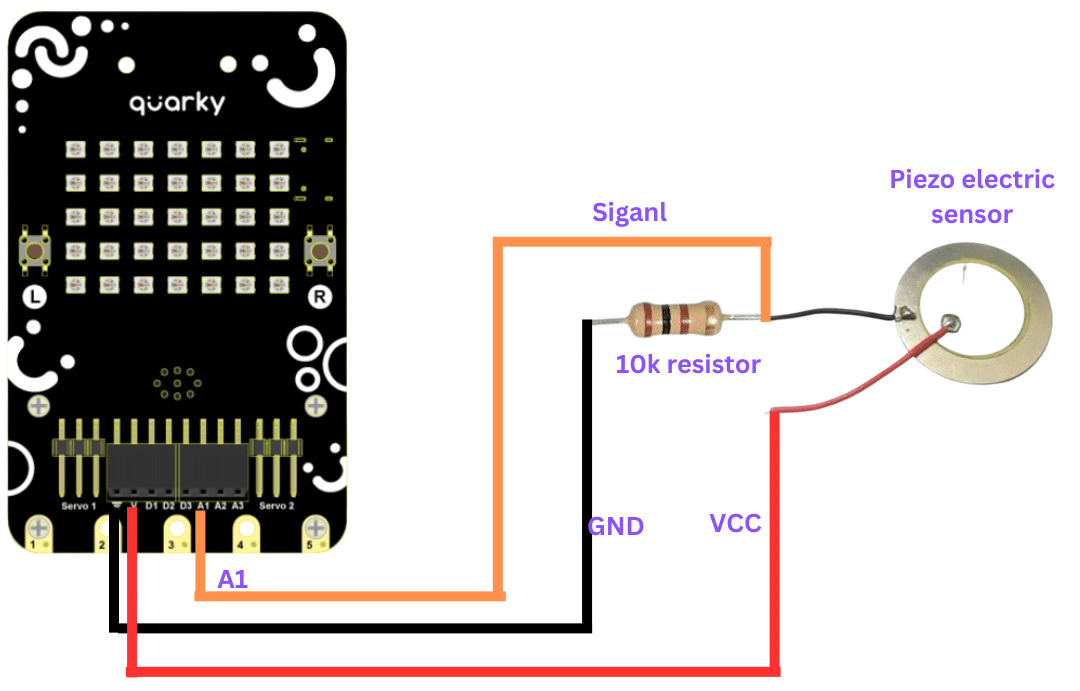
A piezoelectric sensor is a type of sensor that uses the piezoelectric effect to measure changes in pressure, acceleration, force, temperature, and other physical quantities. The piezoelectric effect is a phenomenon in which certain materials generate an electric charge in response to mechanical stress or deformation. This property makes piezoelectric sensors useful for a wide range of applications where accurate measurements of mechanical changes are required. Here’s how piezoelectric sensors work:


OUTPUT Gifs will be updated soon.
A Passive Infrared (PIR) motion sensor is a device commonly used in security systems, lighting control, and other applications to detect the presence of a moving object or person by measuring changes in infrared radiation. It’s called “passive” because it doesn’t emit any energy itself; it only detects the infrared radiation emitted by objects in its field of view.
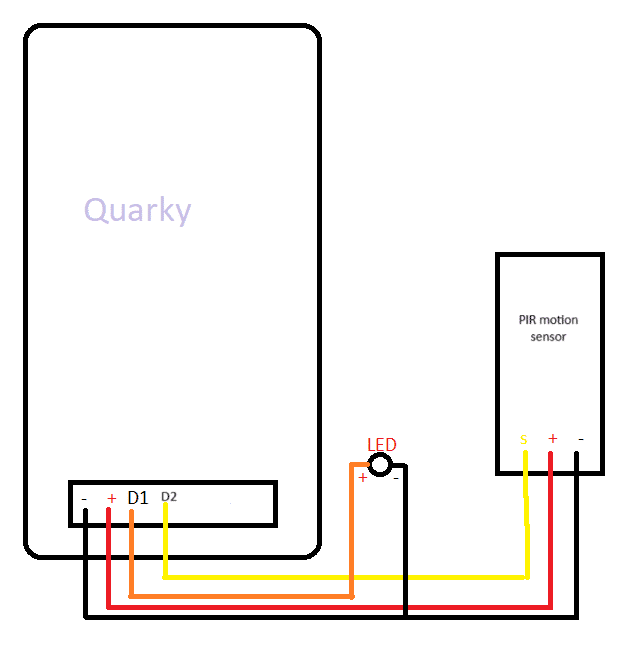
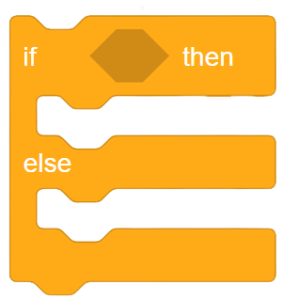
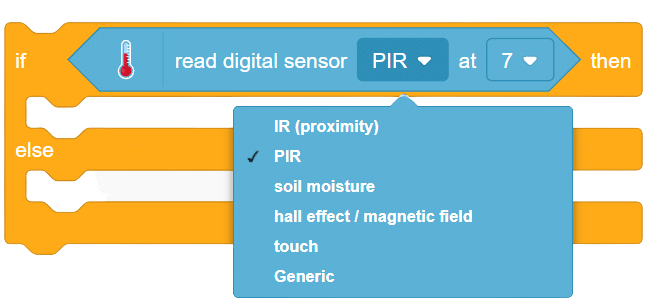
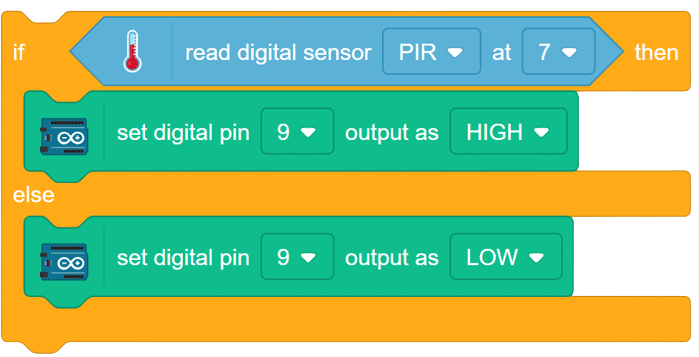
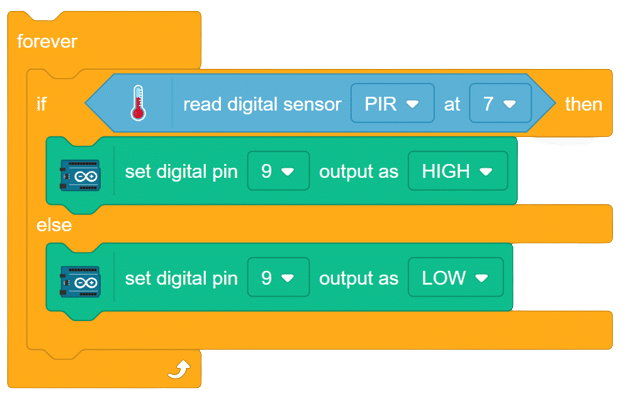
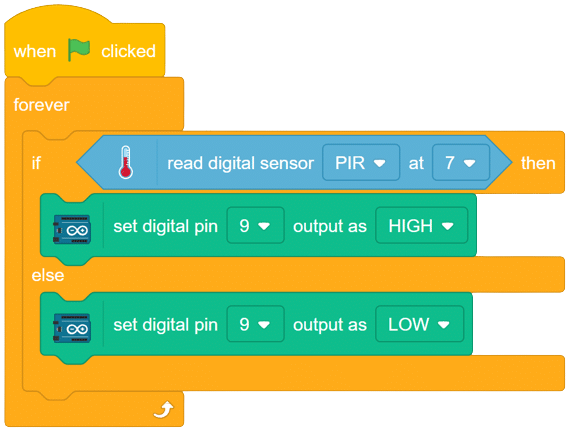
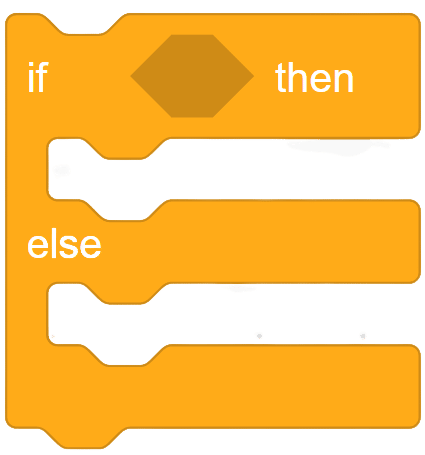
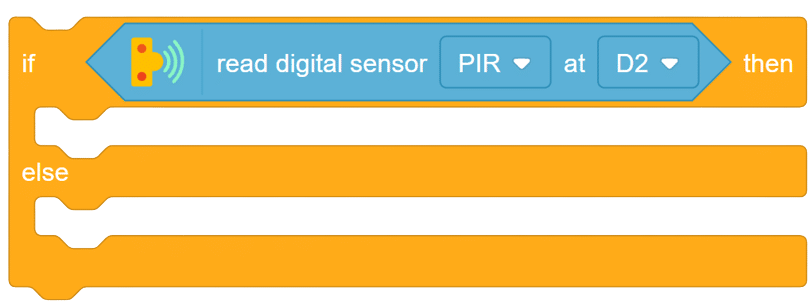
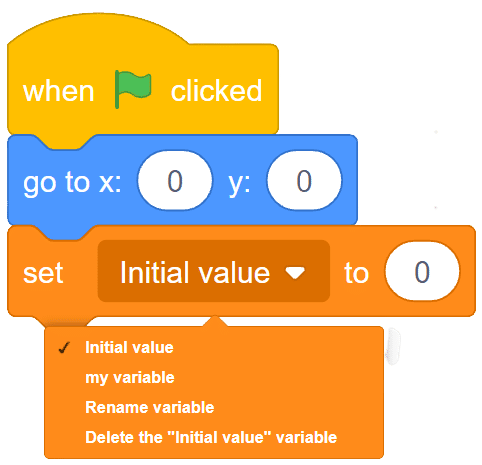
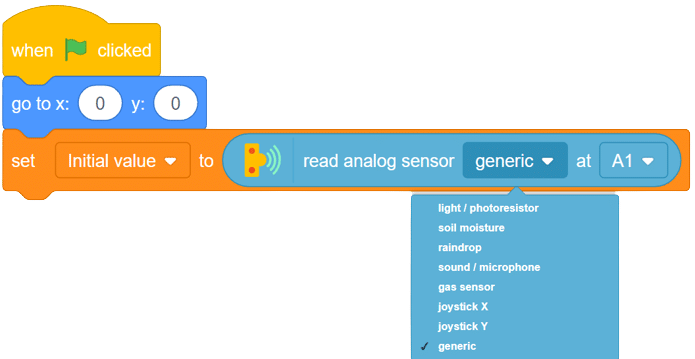
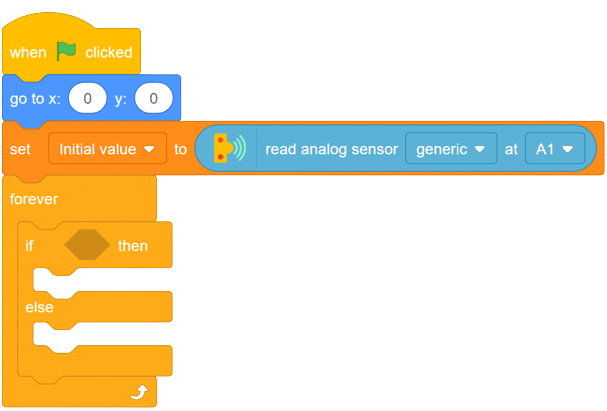
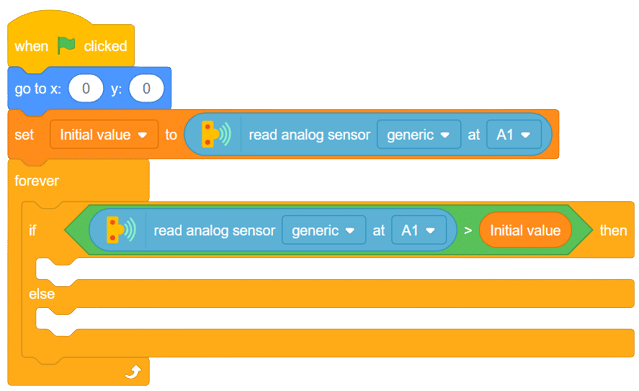
Follow these steps to implement the code using Pictoblox for Quarky to control the LED based on the PIR sensor’s readings:
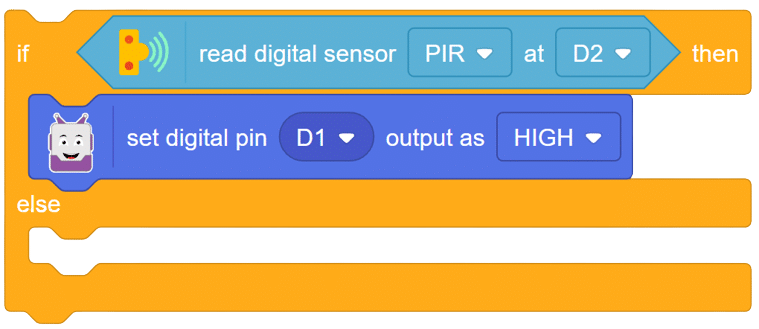

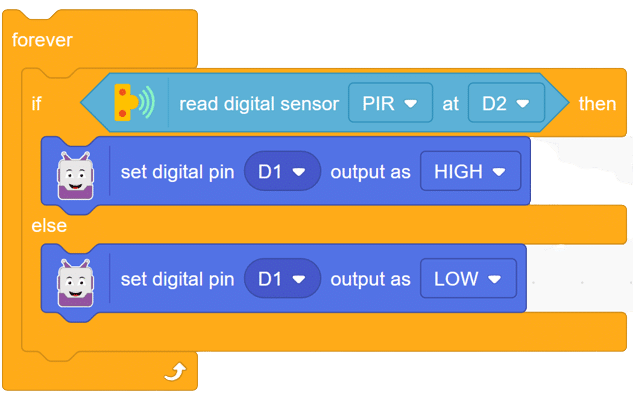
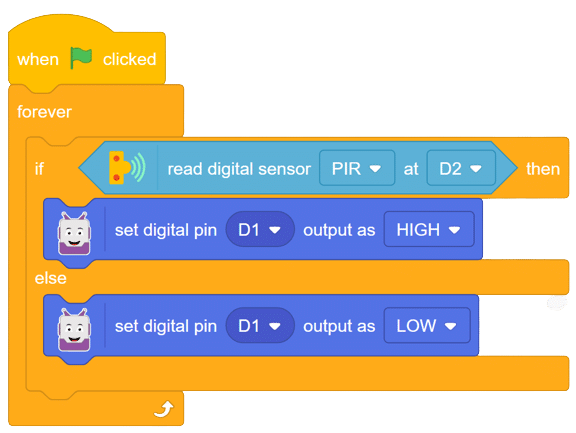
In this comprehensive introduction, you have learned about Quarky, the versatile microcontroller, and its potential in robotics and AI projects. Explore its various features, sensors, and plug-and-play functionality. Follow our step-by-step guide to set up the circuit with the PIR sensor and LED, and program Quarky using Pictoblox’s block coding. Witness the successful implementation through the final script and output, experiencing the magic of Quarky in action!
A piezoelectric sensor is a type of sensor that uses the piezoelectric effect to measure changes in pressure, acceleration, force, temperature, and other physical quantities. The piezoelectric effect is a phenomenon in which certain materials generate an electric charge in response to mechanical stress or deformation. This property makes piezoelectric sensors useful for a wide range of applications where accurate measurements of mechanical changes are required. Here’s how piezoelectric sensors work:


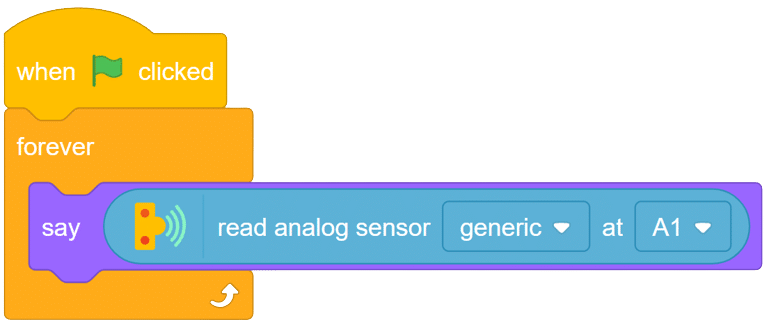
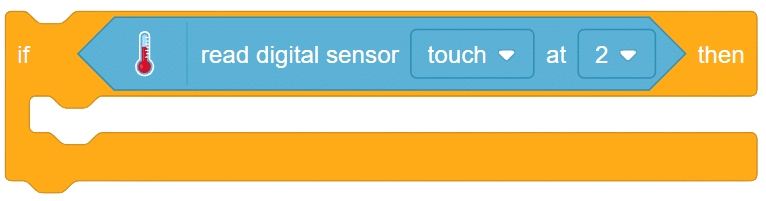
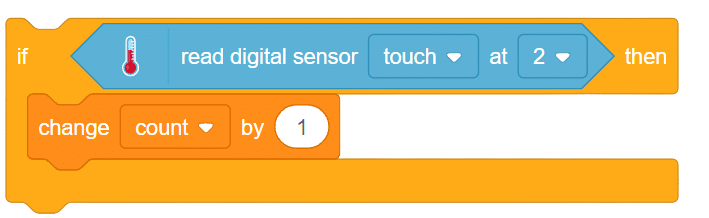
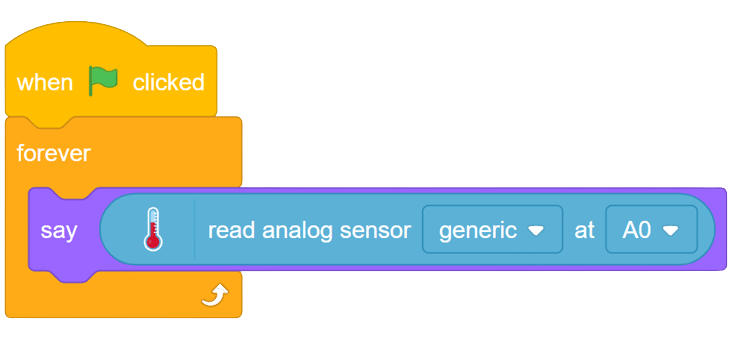
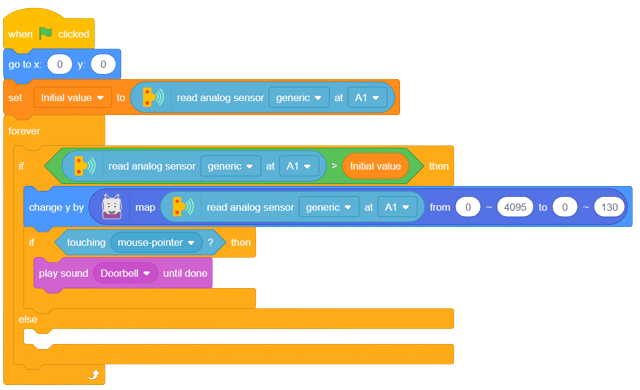
Now to read the different changes from the sensor, hit the sensor with your punch and you will see the change in sensor value shown by your sprite.
OUTPUT Gifs will be updated soon.
This Python code simulates a traffic light using two user-defined functions. The first function, trafficLight(), prompts the user to enter the color of the traffic light and then calls the second function, light(), to determine the corresponding message. The second function, light(), returns a value based on the color input, which is used to display the appropriate message. Make sure to enter the traffic light color in CAPITALS. After running the code, a safety message is printed.
#Function to simulate a traffic light
#It is required to make 2 user defined functions trafficLight() and light().
def trafficLight():
 signal = input("Enter the colour of the traffic light: ")
 if (signal not in ("RED","YELLOW","GREEN")):
  print("Please enter a valid Traffic Light colour in CAPITALS")
 else:
  value = light(signal) #function call to light()
 if (value == 0):
  print("STOP, Your Life is Precious.")
 elif (value == 1):
  print ("PLEASE GO SLOW.")
 else:
  print("GO!,Thank you for being patient.")
#function ends here

def light(colour):
 if (colour == "RED"):
  return(0);
 elif (colour == "YELLOW"):
  return (1)
 else:
  return(2)
#function ends here

trafficLight()
print("SPEED THRILLS BUT KILLS")>> Enter the colour of the traffic light: RED
>> STOP, Your Life is Precious.
>> SPEED THRILLS BUT KILLS
In Python, variable scope refers to the accessibility of variables within different parts of a program. There are two types of variable scope: global and local. Global variables are accessible throughout the entire program, while local variables are only accessible within a specific function or block of code.
#To access any variable outside the function
num = 5

def myFunc1( ):
 y = num + 5
 print("Accessing num -> (global) in myFunc1, value = ",num)
 print("Accessing y-> (local variable of myFunc1) accessible, value=",y)
#function call myFunc1()
myFunc1()

print("Accessing num outside myFunc1 ",num)
print("Accessing y outside myFunc1 ",y)>> Accessing num -> (global) in myFunc1, value = 5
>> Accessing y-> (local variable of myFunc1) accessible, value= 10
>> Accessing num outside myFunc1 5
Note: NameError: name ‘y’ is not defined, because num is a global variable defined outside and y is a local variable that is defined inside user defined function – myFunc1()
In Python, we can declare variables as global so that they can be accessed and updated outside of functions. This allows us to use variables across different scopes within a program. In this code example, we demonstrate how to use the “global” keyword to access and update a global variable.
#To access any variable outside the function
num = 5
def myfunc1():
 #Prefixing global informs Python to use the updated global
 #variable num outside the function
 global num
 print("Accessing num =",num)
 num = 10
 print("num reassigned =",num)
#function ends here
myfunc1()
print("Accessing num outside myfunc1",num)>> Accessing num = 5
>> num reassigned = 10
>> Accessing num outside myfunc1 10
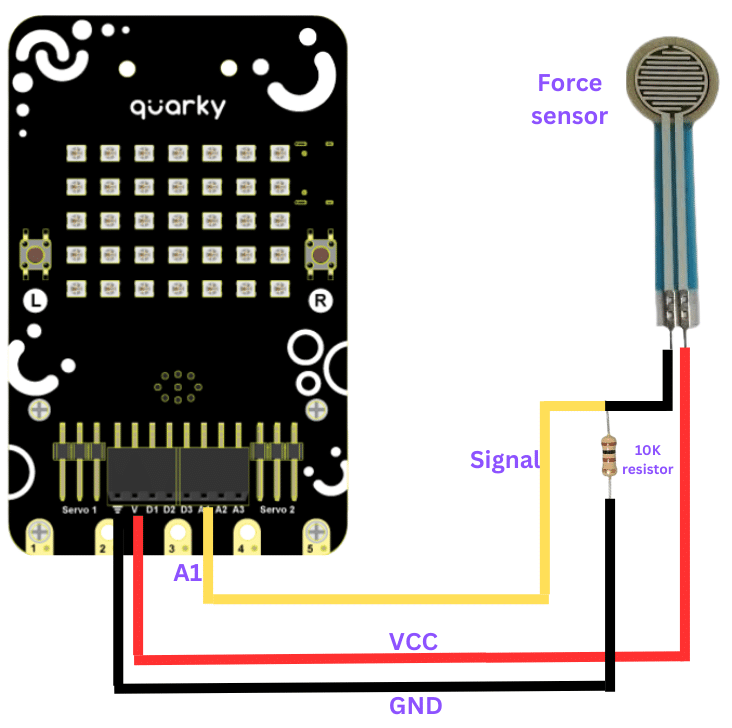
A force sensor, also known as a load cell or force transducer, is a device designed to measure the force or load applied to it. It’s used in various applications to quantify the magnitude of forces in different directions. Force sensors are utilized in fields such as engineering, manufacturing, robotics, healthcare, and more.
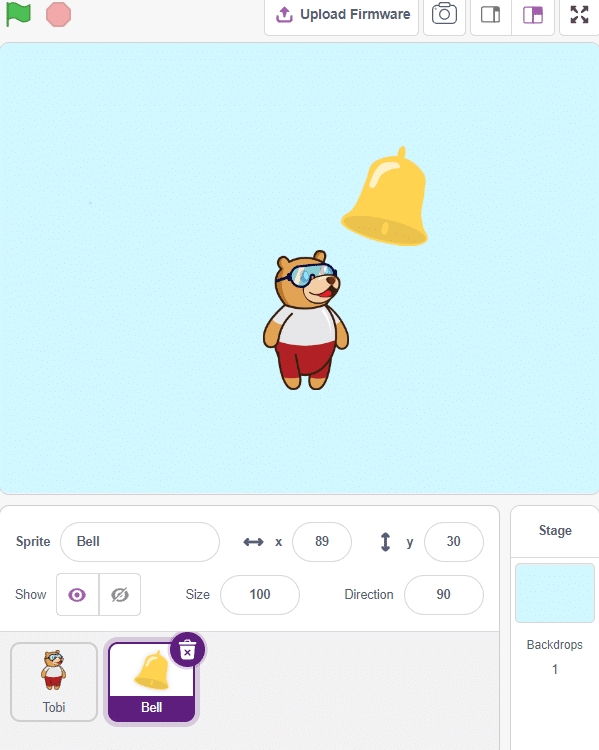


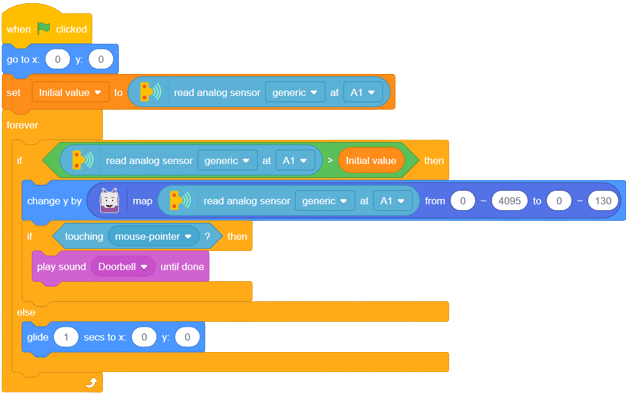
with this, your script is complete now.
Output Gif will be updated soon.
The “basic_math” module is designed to perform basic arithmetic operations on numbers. It contains user-defined functions for addition, subtraction, multiplication, and division. This module is useful for performing simple calculations in various applications.
#The requirement is:
 #1. Write a docstring describing the module.
 #2. Write user defined functions as per the specification.
 #3. Save the file.
 #4. Import at shell prompt and execute the functions.
"""
 basic_math Module
 *******************
This module contains basic arithmetic operations
that can be carried out on numbers
"""
#Beginning of module
def addnum(x,y):
 return(x + y)
def subnum(x,y):
 return(x - y)
def multnum(x,y):
 return(x * y)
def divnum(x,y):
 if y == 0:
  print ("Division by Zero Error")
 else:
  return (x/y)
#End of module
This code checks whether a given string is a palindrome or not. A palindrome is a word, phrase, number, or other sequence of characters that reads the same forward and backward. The logic of the code is to compare the characters at the beginning and end of the string and move towards the center, checking if they are equal. The output of the code will tell you whether the given string is a palindrome or not.
#Function to check if a string is palindrome or not
def checkPalin(st):
 i = 0
 j = len(st) - 1
 while(i <= j):
  if(st[i] != st[j]):
    return False
  i += 1
  j -= 1
 return True
#end of function
st = input("Enter a String: ")
result = checkPalin(st)
if result == True:
 print("The given string",st,"is a palindrome")
else:
print("The given string",st,"is not a palindrome")>> Enter a String: noon
>> The given string noon is a palindrome
>> Enter a String: racecar
>> The given string racecar is a palindrome
In this code, we have a function called charCount() that takes two parameters: ch (the character to be counted) and st (the string in which we want to count the occurrences of the character). The function uses a for loop to iterate through each character in the string. If the character matches the character we are searching for, the count variable is incremented. Finally, the function returns the count. The main part of the code prompts the user to enter a string and a character, calls the charCount() function, and then displays the result.
#Function to count the number of times a character occurs in a
#string
def charCount(ch,st):
 count = 0
 for character in st:
  if character == ch:
    count += 1
 return count
#end of function
st = input("Enter a string: ")
ch = input("Enter the character to be searched: ")
count = charCount(ch,st)
print("Number of times character",ch,"occurs in the string is:",count)Enter a string: Hello World
Enter the character to be searched: o
>> Number of times character o occurs in the string is: 2
In this Python code example, we will learn how to replace all the vowels in a given string with ‘*’. This is a common string manipulation task, and this code will provide a solution to achieve it.
#Function to replace all vowels in the string with '*'
def replaceVowel(st):
 #create an empty string
 newstr = ''
 for character in st:
  #check if next character is a vowel
  if character in 'aeiouAEIOU':
    #Replace vowel with *
    newstr += '*'
  else:
    newstr += character
 return newstr
#end of function
st = input("Enter a String: ")
st1 = replaceVowel(st)
print("The original String is:",st)
print("The modified String is:",st1)
Enter a String: Hello World
>> The original String is: Hello World
>> The modified String is: H*ll* W*rld
This program takes a string as input from the user and prints it in reverse order.
#Program to display string in reverse order
st = input("Enter a string: ")
for i in range(-1,-len(st)-1,-1):
print(st[i],end='')The program uses a for loop to iterate through the given string in reverse order, starting from the last character, and prints each character using the end parameter of the print() function to avoid printing a new line after each character.
Enter a string: Hello World
>> dlroW olleH
This Python code demonstrates how to reverse a given string using a string reversal function. By inputting a string, you will receive the reversed string as an output. This code is user-friendly and efficient.
#Function to reverse a string
def reverseString(st):
 newstr = '' #create a new string
 length = len(st)
 for i in range(-1,-length-1,-1):
  newstr += st[i]
 return newstr
#end of function
st = input("Enter a String: ")
st1 = reverseString(st)
print("The original String is:",st)
print("The reversed String is:",st1)
Enter a String: Hello
>>The original String is: Hello
>>The reversed String is: olleH
This Python code demonstrates how to increment the elements of a list by a certain amount. The code defines a function called “increment” that takes a list as an argument and adds 5 to each element in the list. The main function creates a list and then calls the “increment” function, passing the list as a parameter. The code shows the list before and after the function call to demonstrate the effect of modifying a list in a function.
#Function to increment the elements of the list passed as argument
def increment(list2):
 for i in range(0,len(list2)):
 #5 is added to individual elements in the list
  list2[i] += 5
 print('Reference of list Inside Function',id(list2))
#end of function
list1 = [10,20,30,40,50] #Create a list
print("Reference of list in Main",id(list1))
print("The list before the function call")
print(list1)
increment(list1) #list1 is passed as parameter to function
print("The list after the function call")
print(list1)>> Reference of list in Main 140446246092360
>> The list before the function call
>> [10, 20, 30, 40, 50]
>> Reference of list Inside Function 140446246092360
>> The list after the function call
>> [15, 25, 35, 45, 55]
The output shows the reference (id) of the original list before the function call and the reference of the modified list inside the function call. It also displays the original list before calling the function and the modified list after the function call. The elements of the list have been incremented by 5.
This Python code demonstrates a function that takes a list as an argument and increments its elements. It shows the changes in the ID of the list before and after the function call.
#Function to increment the elements of the list passed as argument
def increment(list2):
 print("\nID of list inside function before assignment:",
id(list2))
 list2 = [15,25,35,45,55] #List2 assigned a new list
 print("ID of list changes inside function after assignment:",
id(list2))
 print("The list inside the function after assignment is:")
 print(list2)
#end of function
list1 = [10,20,30,40,50] #Create a list
print("ID of list before function call:",id(list1))
print("The list before function call:")
print(list1)
increment(list1) #list1 passed as parameter to function
print('\nID of list after function call:',id(list1))
print("The list after the function call:")
print(list1)>> ID of list before function call: [ID of list1]
>> The list before function call: [10, 20, 30, 40, 50]
>>
>> ID of list inside function before assignment: [ID of list1]
>> ID of list changes inside function after assignment: [ID of new list2]
>> The list inside the function after assignment is: [15, 25, 35, 45, 55]
>>
>> ID of list after function call: [ID of list1]
>> The list after the function call: [10, 20, 30, 40, 50]
This is a menu-driven program written in Python that allows the user to perform various operations on a list. The user can choose options like appending an element, inserting an element at a desired position, deleting an element by its position or value, modifying an element, sorting the list, and displaying the list. The program provides a menu with numbered options for the user to select from.
#Menu driven program to do various list operations
myList = [22,4,16,38,13] #myList already has 5 elements
choice = 0
while True:
 print("The list 'myList' has the following elements", myList)
 print("\nL I S T O P E R A T I O N S")
 print(" 1. Append an element")
 print(" 2. Insert an element at the desired position")
 print(" 3. Append a list to the given list")
 print(" 4. Modify an existing element")
 print(" 5. Delete an existing element by its position")
 print(" 6. Delete an existing element by its value")
 print(" 7. Sort the list in ascending order")
 print(" 8. Sort the list in descending order")
 print(" 9. Display the list")
 print(" 10. Exit")
 choice = int(input("ENTER YOUR CHOICE (1-10): "))
 #append element
 if choice == 1:
  element = int(input("Enter the element to be appended: "))
  myList.append(element)
  print("The element has been appended\n")
 #insert an element at desired position
 elif choice == 2:
  element = int(input("Enter the element to be inserted: "))
  pos = int(input("Enter the position:"))
  myList.insert(pos,element)
  print("The element has been inserted\n")
 #append a list to the given list
 elif choice == 3:
  newList = eval(input( "Enter the elements separated by commas"))
  myList.extend(list(newList))
  print("The list has been appended\n")
 #modify an existing element
 elif choice == 4:
  i = int(input("Enter the position of the element to be modified: "))
  if i < len(myList):
    newElement = int(input("Enter the new element: "))
    oldElement = myList[i]
    myList[i] = newElement
    print("The element",oldElement,"has been modified\n")
  else:
    print("Position of the element is more than the length of list")
 #delete an existing element by position
 elif choice == 5:
  i = int(input("Enter the position of the element to be deleted: "))
  if i < len(myList):
    element = myList.pop(i)
    print("The element",element,"has been deleted\n")
  else:
    print("\nPosition of the element is more than the length of list")
 #delete an existing element by value
 elif choice == 6:
  element = int(input("\nEnter the element to be deleted: "))
  if element in myList:
    myList.remove(element)
    print("\nThe element",element,"has been deleted\n")
  else:
    print("\nElement",element,"is not present in the list")
 #list in sorted order
 elif choice == 7:
  myList.sort()
  print("\nThe list has been sorted")
 #list in reverse sorted order
 elif choice == 8:
  myList.sort(reverse = True)
  print("\nThe list has been sorted in reverse order")
 #display the list
 elif choice == 9:
  print("\nThe list is:", myList)
 #exit from the menu
 elif choice == 10:
  break
 else:
  print("Choice is not valid")
  print("\n\nPress any key to continue..............")
ch = input()The program provides feedback for each operation. For example, when appending an element, the program prompts the user to enter the element and informs them that it has been appended. Similarly, for operations like inserting, deleting, modifying, sorting, or displaying the list, the program provides appropriate feedback. If the user enters an invalid choice, the program displays a message stating that it is not valid.
This Python code calculates the average marks of a given number of students using a function. It takes input from the user for the number of students and their respective marks, and then calculates and displays the average marks.
#Function to calculate average marks of n students
def computeAverage(list1,n):
 #initialize total
 total = 0
 for marks in list1:
  #add marks to total
  total = total + marks
 average = total / n
 return average
#create an empty list
list1 = []
print("How many students marks you want to enter: ")
n = int(input())
for i in range(0,n):
 print("Enter marks of student",(i+1),":")
 marks = int(input())
 #append marks in the list
 list1.append(marks)
average = computeAverage(list1,n)
print("Average marks of",n,"students is:",average)>> How many students marks you want to enter: 5
>> Enter marks of student 1 :100
>> Enter marks of student 2 :98
>> Enter marks of student 3 :89
>> Enter marks of student 4 :78
>> Enter marks of student 5 :65
>> Average marks of 5 students is: 86.0
In this Python code example, we’ll learn how to implement a linear search algorithm to check if a number is present in a list. Linear search is a basic search algorithm that sequentially checks each element in a list until a match is found or all the elements have been exhausted. We’ll define a function called `linearSearch()` that takes a number and a list as input and returns the position of the number if it is present in the list, or None if it is not.
#Function to check if a number is present in the list or not
def linearSearch(num,list1):
 for i in range(0,len(list1)):
  if list1[i] == num: #num is present
    return i #return the position
 return None #num is not present in the list
#end of function
list1 = [] #Create an empty list
print("How many numbers do you want to enter in the list: ")
maximum = int(input())
print("Enter a list of numbers: ")
for i in range(0,maximum):
 n = int(input())
 list1.append(n) #append numbers to the list
num = int(input("Enter the number to be searched: "))
result = linearSearch(num,list1)
if result is None:
 print("Number",num,"is not present in the list")
else:
print("Number",num,"is present at",result + 1, "position")>> How many numbers do you want to enter in the list:5
>> Enter a list of numbers:
1
2
3
4
5
Enter the number to be searched:4
Number 4 is present at 4 position
This Python code shows how to store records of students in a tuple and print them. Each record contains the student’s serial number, roll number, name, and marks.
#To store records of students in tuple and print them
st=((101,"Aman",98),(102,"Geet",95),(103,"Sahil",87),(104,"Pawan",79))
print("S_No"," Roll_No"," Name"," Marks")
for i in range(0,len(st)):
print((i+1),'\t',st[i][0],'\t',st[i][1],'\t',st[i][2])>> S_No Roll_No Name Marks
>> 1 101 Aman 98
>> 2 102 Geet 95
>> 3 103 Sahil 87
>> 4 104 Pawan 79
This Python program takes two numbers as input and swaps their values using tuple assignments. The program then displays the numbers before and after swapping.
#Program to swap two numbers
num1 = int(input('Enter the first number: '))
num2 = int(input('Enter the second number: '))
print("\nNumbers before swapping:")
print("First Number:",num1)
print("Second Number:",num2)
(num1,num2) = (num2,num1)
print("\nNumbers after swapping:")
print("First Number:",num1)
print("Second Number:",num2)Enter the first number: 10
Enter the second number: 5
>>>> Numbers before swapping:
>> First Number: 10
>> Second Number: 5
>>
>> Numbers after swapping:
>> First Number: 5
>> Second Number: 10
This code defines a Python function that calculates the area and circumference of a circle. It takes the radius as input and returns a tuple containing the area and circumference. The user is prompted to enter the radius and the results are displayed on the console.
#Function to compute area and circumference of the circle.
def circle(r):
 area = 3.14*r*r
 circumference = 2*3.14*r
 #returns a tuple having two elements area and circumference
 return (area,circumference)
#end of function
radius = int(input('Enter radius of circle: '))
area,circumference = circle(radius)
print('Area of circle is:',area)
print('Circumference of circle is:',circumference)Enter radius of circle: 4
>> Area of circle is: 50.24
>> Circumference of circle is: 25.12
This Python program takes user input for n numbers and stores them in a tuple. It then finds and prints the maximum and minimum numbers from the tuple.
#Program to input n numbers from the user. Store these numbers
#in a tuple. Print the maximum and minimum number from this tuple.
numbers = tuple() #create an empty tuple 'numbers'
n = int(input("How many numbers you want to enter?: "))
for i in range(0,n):
 num = int(input())
 #it will assign numbers entered by user to tuple 'numbers'
 numbers = numbers +(num,)
print('\nThe numbers in the tuple are:')
print(numbers)
print("\nThe maximum number is:")
print(max(numbers))
print("The minimum number is:")
print(min(numbers))How many numbers you want to enter?: 5
10
15
20
25
30
>>
>> The numbers in the tuple are:
>> (10, 15, 20, 25, 30)
>>
>> The maximum number is:
>> 30
>> The minimum number is:
>> 10
This Python program allows us to create a dictionary to store the names and salaries of employees. By inputting the number of employees, their names, and salaries, the program will display the data in a tabular format.
#Program to create a dictionary which stores names of the employee
#and their salary
num = int(input("Enter the number of employees whose data to be stored: "))
count = 1
employee = dict() #create an empty dictionary
while count <= num:
 name = input("Enter the name of the Employee: ")
 salary = int(input("Enter the salary: "))
 employee[name] = salary
 count += 1
print("\n\nEMPLOYEE_NAME\tSALARY")
for k in employee:
print(k,'\t\t',employee[k])The program will display the names and salaries of the employees in a tabular format.
Enter the number of employees whose data to be stored: 3
Enter the name of the Employee: Ashish
Enter the salary: 20000
Enter the name of the Employee: Farman Ahmed
Enter the salary: 23000
Enter the name of the Employee: Maheshwari Peruri
Enter the salary: 22000
>>
>>
>> EMPLOYEE_NAME SALARY
>> Ashish 20000
>> Farman Ahmed 23000
>> Maheshwari Peruri 22000
This code helps you count the number of times each character appears in a given string. By using a Python dictionary, the code creates a key-value pair where the character is the key and the frequency of its appearance is the corresponding value. The output is displayed by printing each key-value pair.
#Count the number of times a character appears in a given string
st = input("Enter a string: ")
dic = {} #creates an empty dictionary
for ch in st:
 if ch in dic: #if next character is already in the dictionary
  dic[ch] += 1
 else:
  dic[ch] = 1 #if ch appears for the first time
for key in dic:
print(key,':',dic[key])The output of the code will be a list of key-value pairs, where each key represents a character from the input string, and the corresponding value represents the frequency of its appearance in the string.
Enter a string: Hello World
>> H : 1
>> e : 1
>> l : 3
>> o : 2
>> : 1
>> W : 1
>> r : 1
>> d : 1


Copyright 2025 – Agilo Research Pvt. Ltd. All rights reserved – Terms & Condition | Privacy Policy