The function initializes the Mars Rover object in Python and maps the 5 servos to the specified pins.
By default the following configuration is added:
- Head Servo – 4
- Front Left Servo – 1
- Front Right Servo – 5
- Back Left Servo – 2
- Back Right Servo – 6
Function Definition: MarsRover(Head = 4, Front Left = 1, Front Right = 7, Back Left = 2, Back Right = 6)
| Name | Type | Description | Expected Values | Default Value |
|---|---|---|---|---|
| Head | int | Servo Port Number at which the Head Servo Motor is connected. | 1-8 | 4 |
| Front Left | int | Servo Port Number at which the Front Left Servo Motor is connected. | 1-8 | 1 |
| Front Right | int | Servo Port Number at which the Front Right Servo Motor is connected. | 1-8 | 7 |
| Back Left | int | Servo Port Number at which the Back Left Servo Motor is connected. | 1-8 | 2 |
| Back Right | int | Servo Port Number at which the Back Right Servo Motor is connected. | 1-8 | 6 |
The function initializes the Mars Rover object in Python and maps the 5 servos to the specified pins.
By default the following configuration is added:
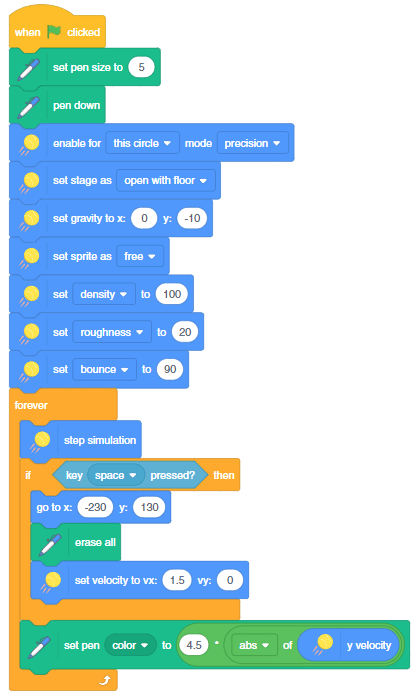
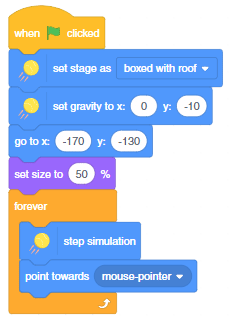
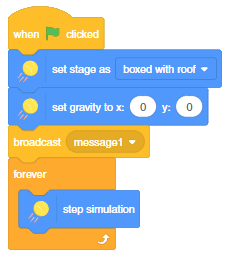
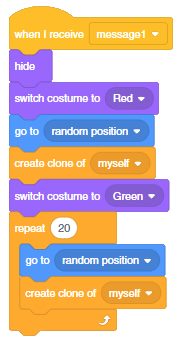
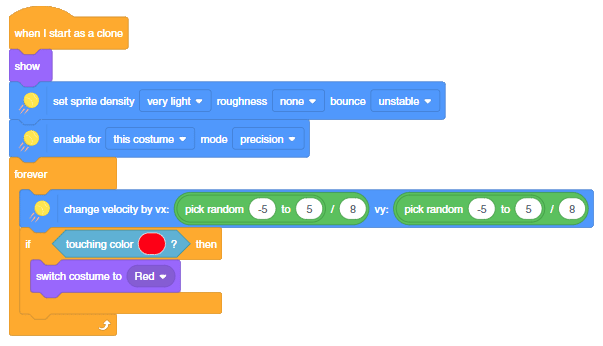
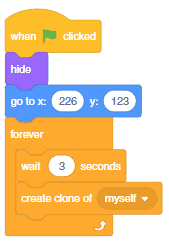
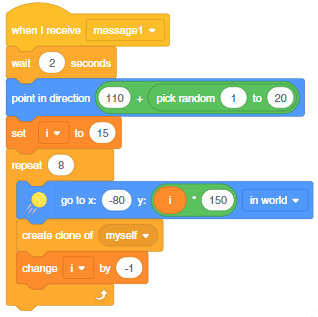
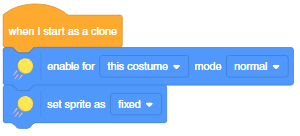
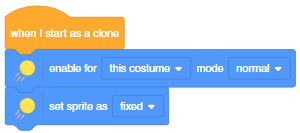
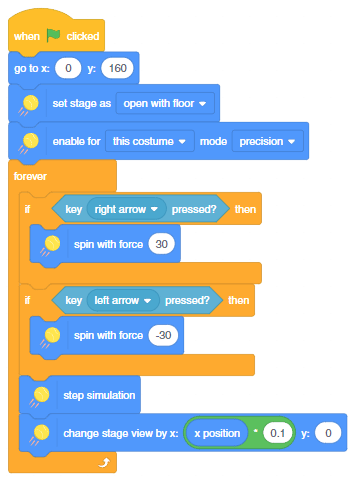
The example demonstrates the ball falling in gravity in a box. Using the pen extension we are also tracking the trajectory of the ball.
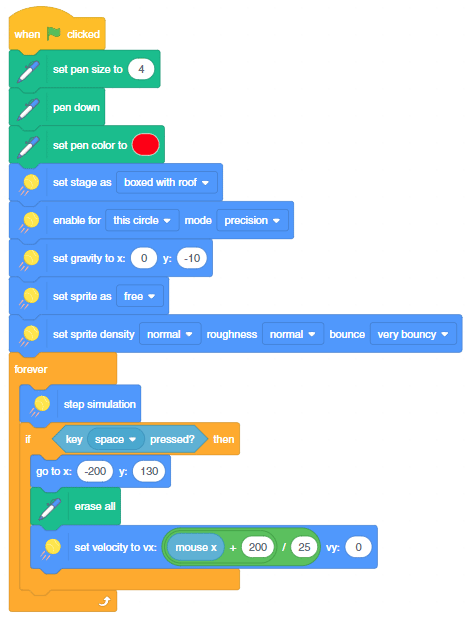

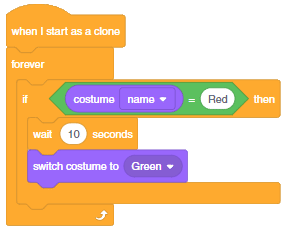
In this example, we will analyze the effect of the bounce property of the sprite using a ball. We will track the ball using the pen extension and the color will change with the y velocity of the ball.
The coefficient of restitution is the ratio of the final to the initial relative speed between two objects after they collide. In PictoBlox it is controlled with bounce property. It varies from 0 to 100%.
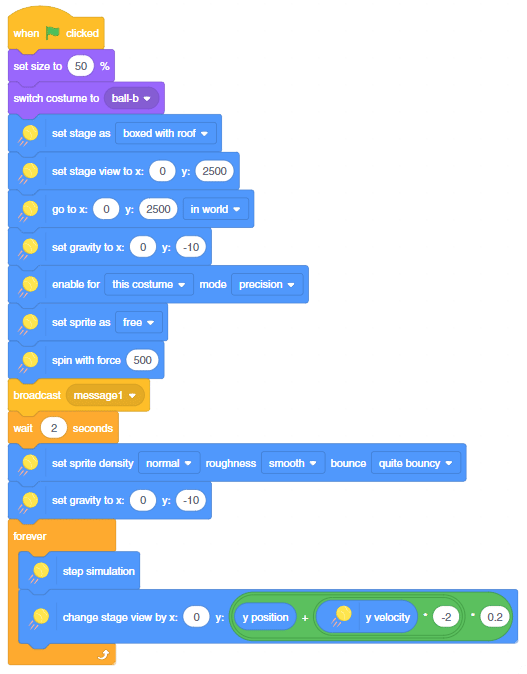
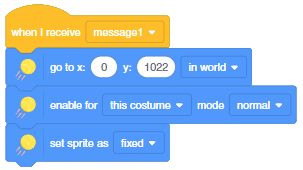
The following is the code we will use:
Let’s see how the code work will various bounce values:


If we change the gravity with a bounce value equal to 90, we can simulate how the ball will work on the moon.


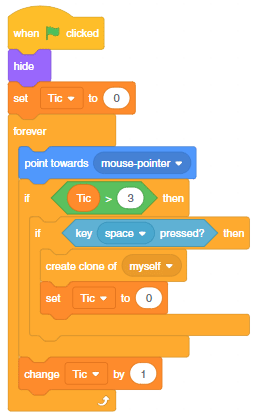
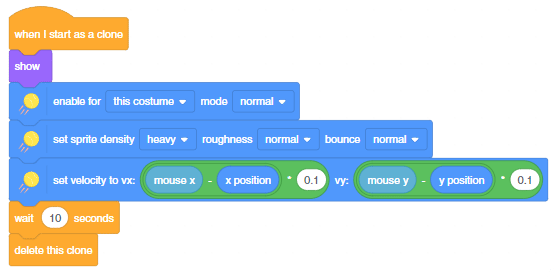
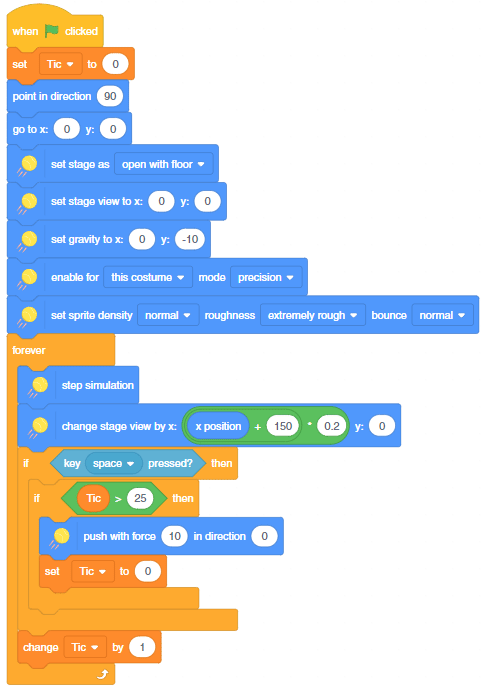
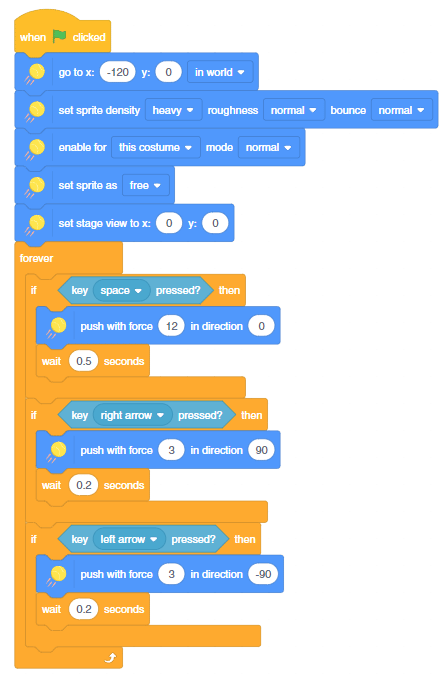
In this example, we are making a rocket shoot bullets to the mouse pointer when the space key is pressed.
In this example, we simulate the covid experiment using the physics simulation. Following is what we are doing:

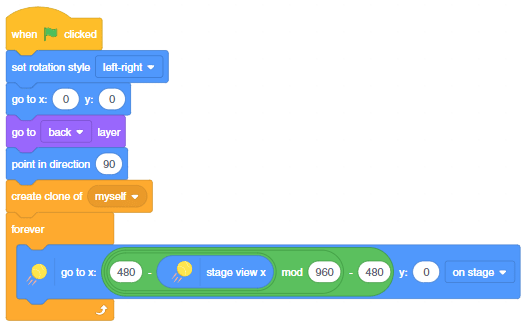
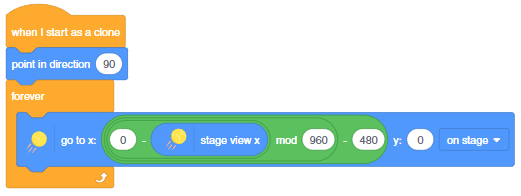
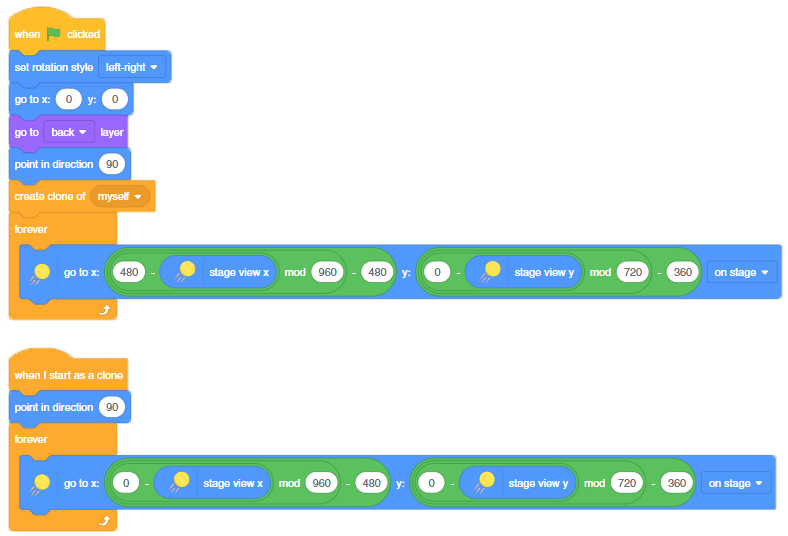
In this example, we are making a scrolling background that can be used in games.
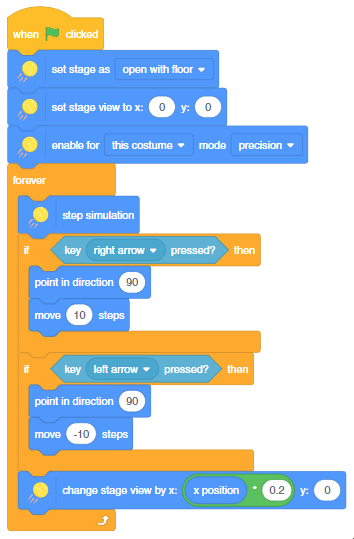


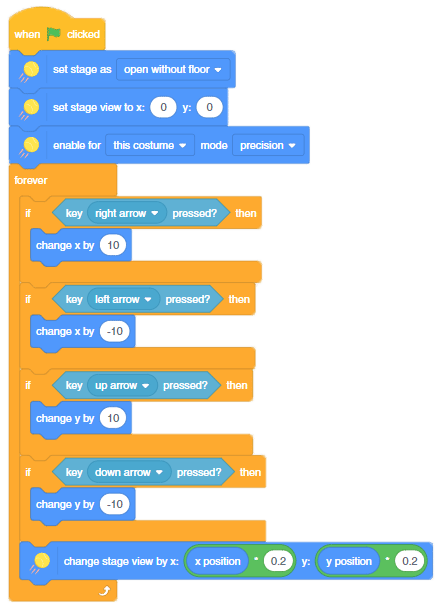
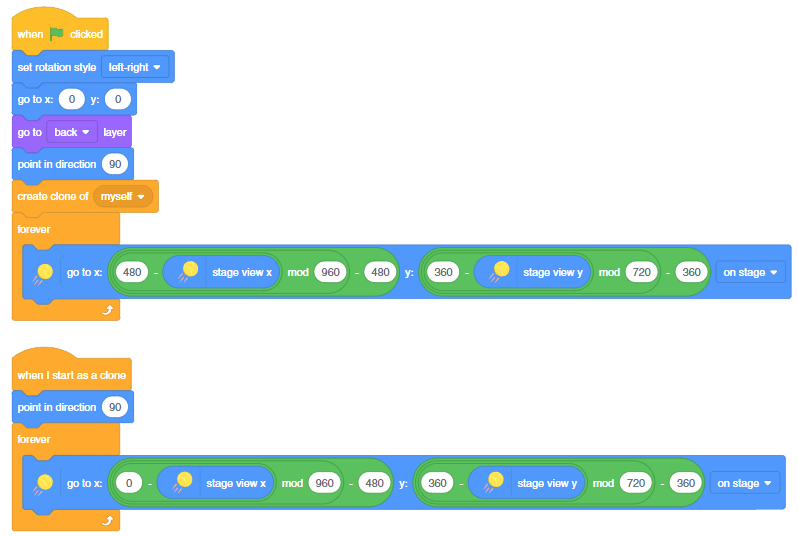
In this example, we are making a scrolling background in 2 dimensions that can be used in games.

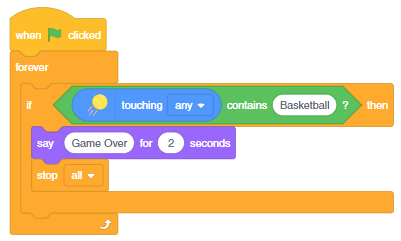
This example demonstrates the use of Physics simulation in a game where Tobi has to dodge the random ball coming towards it by jumping.
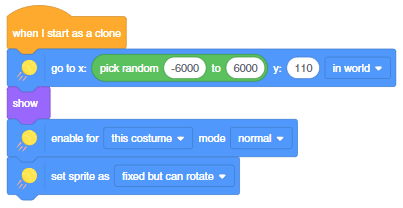
The example demonstrates how to set up the stage with obstacles and make a ball fall on a series of inclines.


This example demonstrates the use of Physics simulation in a game where Tobi has to navigate across the obstacles by spinning.

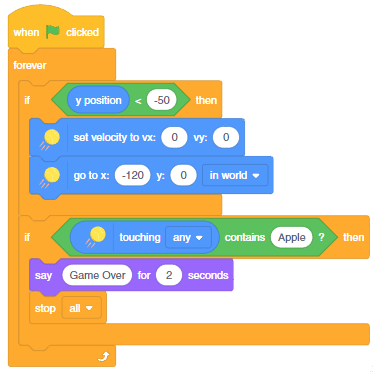
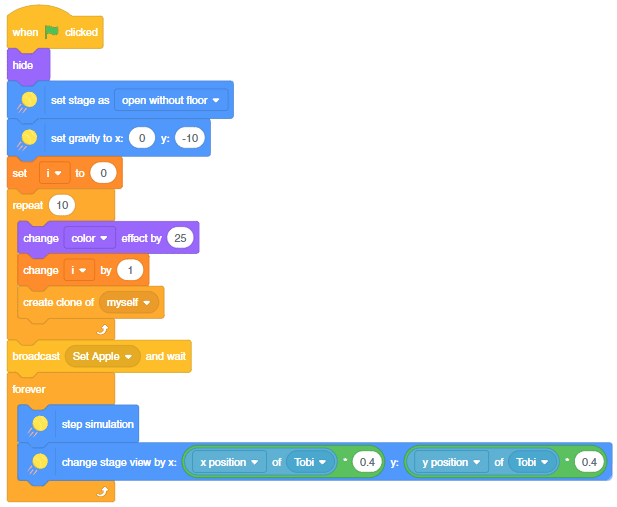
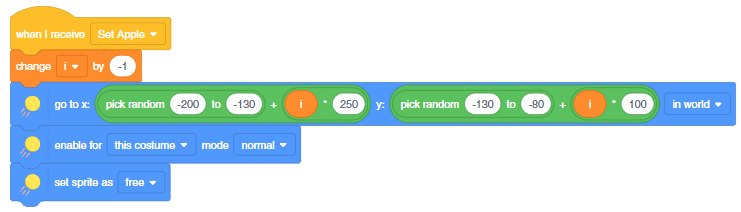
This example demonstrates the use of Physics simulation in a game where Tobi has to go to the apple by jumping on the slabs.

In this example, we are going to learn how to control the flame sensor to detect flame and start the exit alarm sequence that includes opening the gate, alarm beeping, and the fan being turned ON.
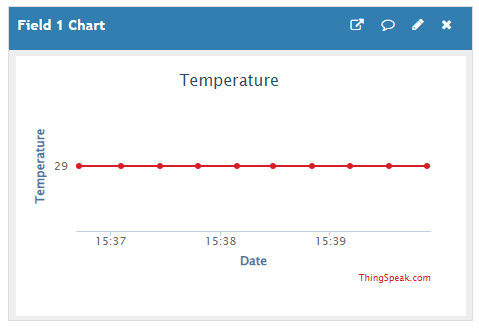
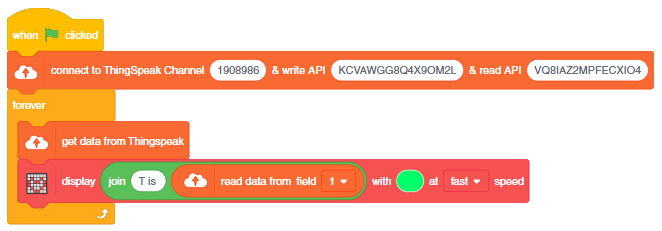
In this example, we will learn how to retrieve the temperature data from the ThingSpeak channel and display it on the Quarky display.
Create a channel on ThingSpeak with 2 fields – Temperature and Humidity. Send some data to the channel.
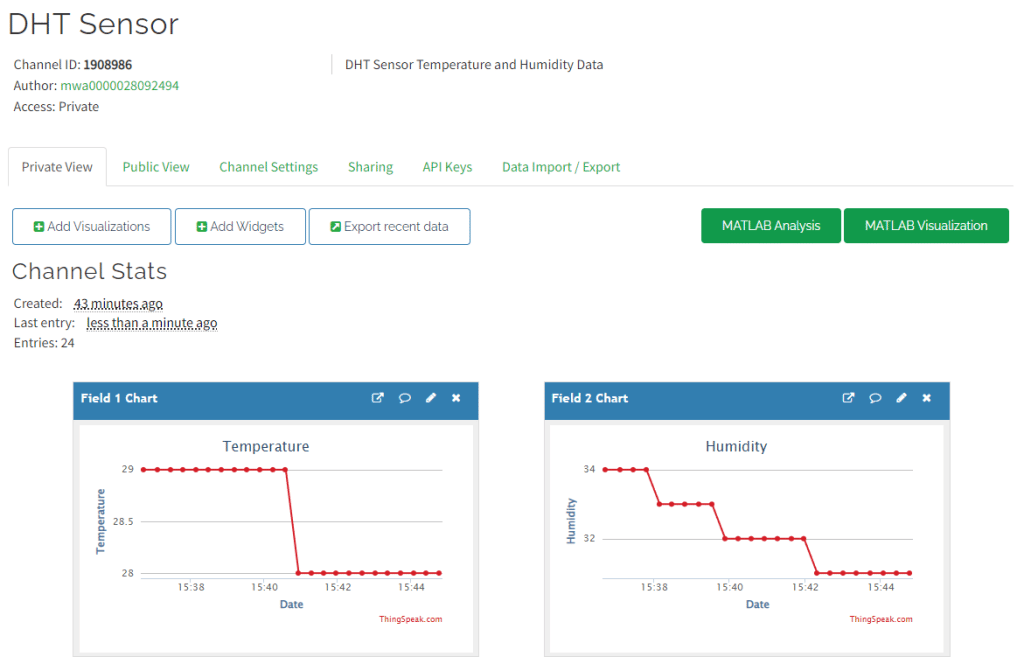
The following script reads the temperature data from the cloud and shows it on the Quarky display.

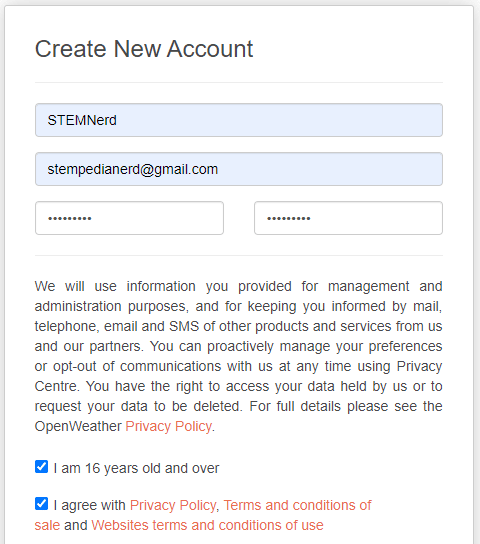
In this example, we will understand how to use HTTP requests to get weather data from OpenWeatherMap API.
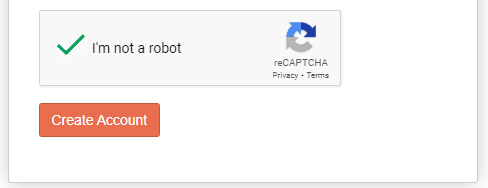
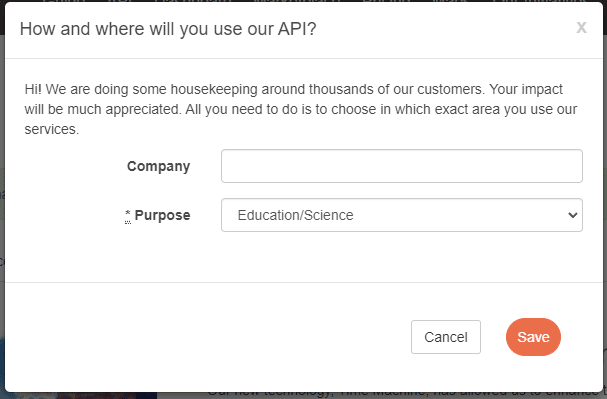
Create the account with the following method:
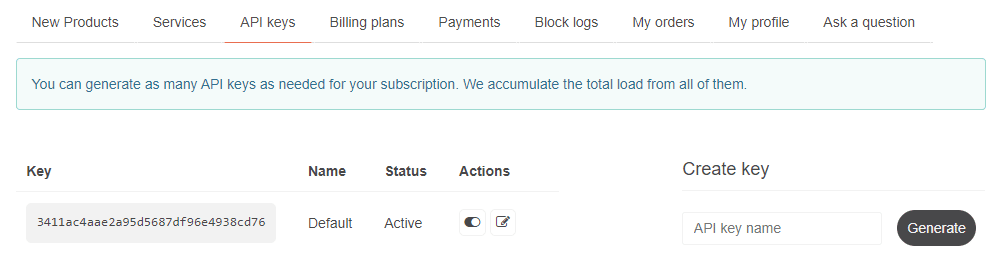
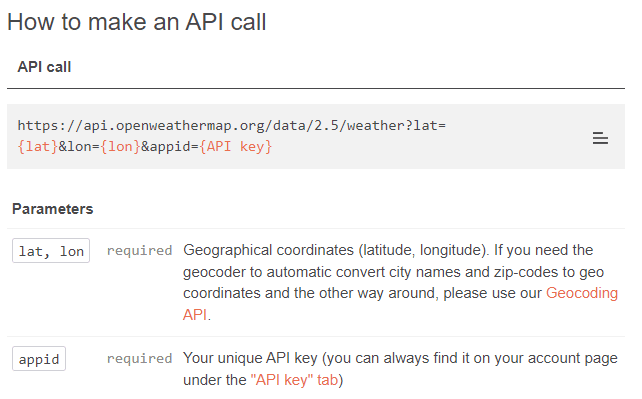
The following is the method provided by OpenWeatherMaps for fetching the weather data using the lat and longitude of the location.
On making the HTTP Request, we get the following data:
{
    "coord": {
        "lon": 77.4977,
        "lat": 27.2046
    },
    "weather": [
        {
            "id": 800,
            "main": "Clear",
            "description": "clear sky",
            "icon": "01d"
        }
    ],
    "base": "stations",
    "main": {
        "temp": 304.66,
        "feels_like": 303.14,
        "temp_min": 304.66,
        "temp_max": 304.66,
        "pressure": 1012,
        "humidity": 27,
        "sea_level": 1012,
        "grnd_level": 992
    },
    "visibility": 10000,
    "wind": {
        "speed": 1.09,
        "deg": 3,
        "gust": 1.17
    },
    "clouds": {
        "all": 0
    },
    "dt": 1666781571,
    "sys": {
        "country": "IN",
        "sunrise": 1666745753,
        "sunset": 1666786313
    },
    "timezone": 19800,
    "id": 1276128,
    "name": "Bharatpur",
    "cod": 200
}
The data is in JSON format, which we can use in PictoBlox.
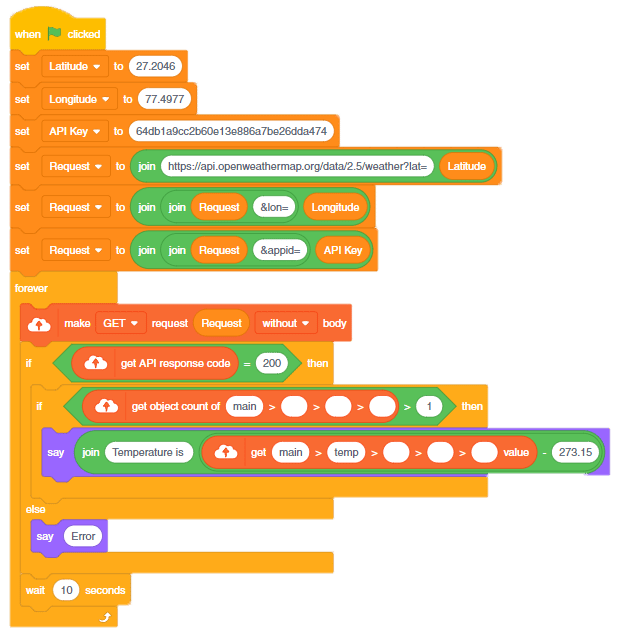
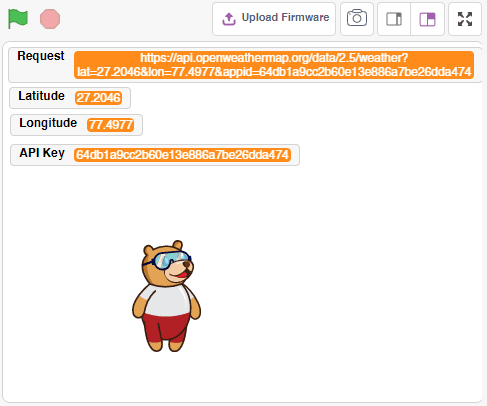
The following script makes the HTTP request and makes the Tobi say the temperature of the location.
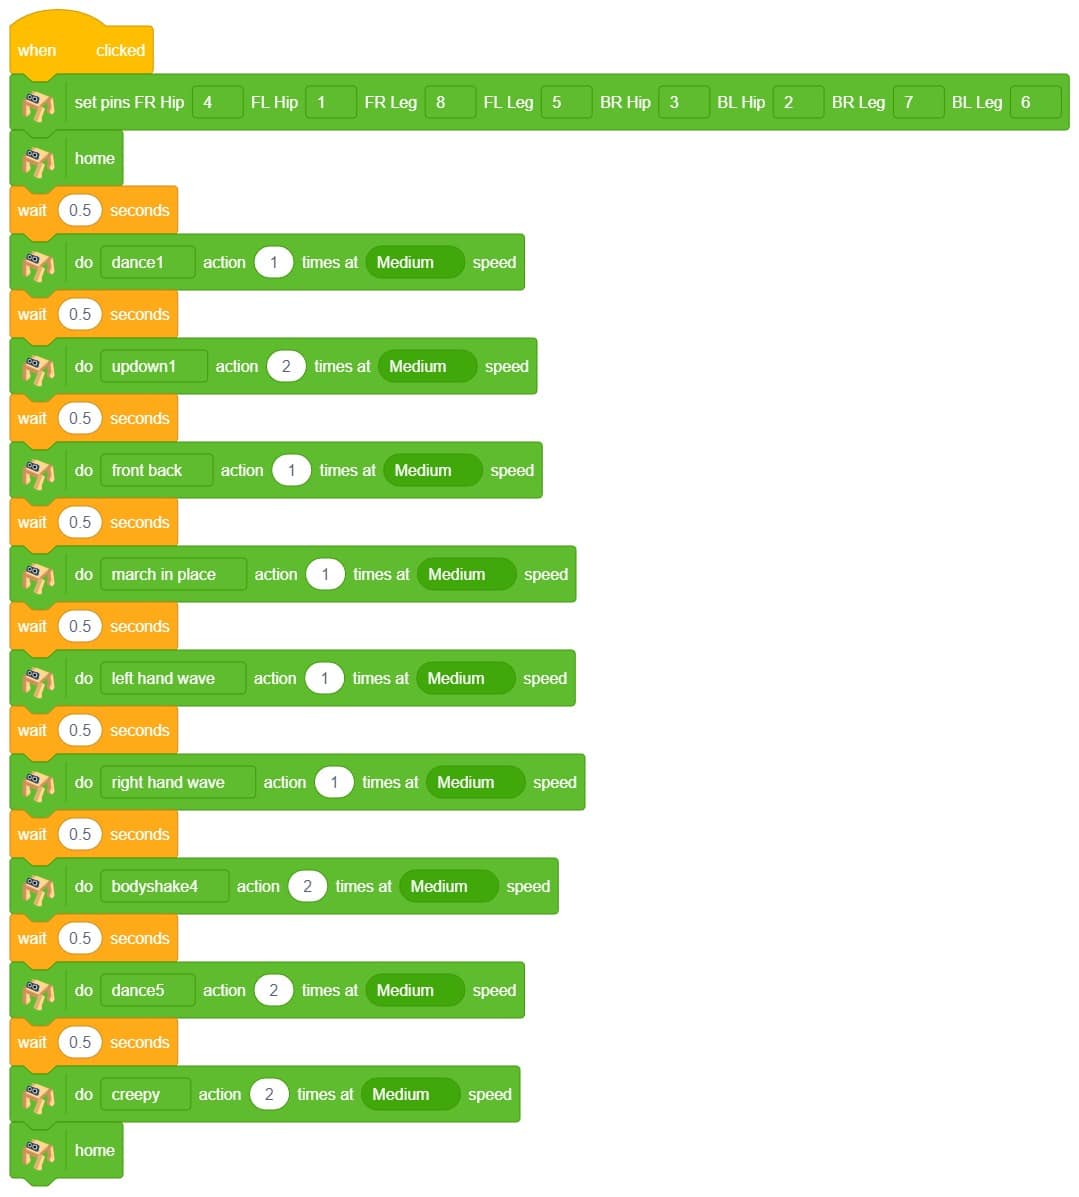
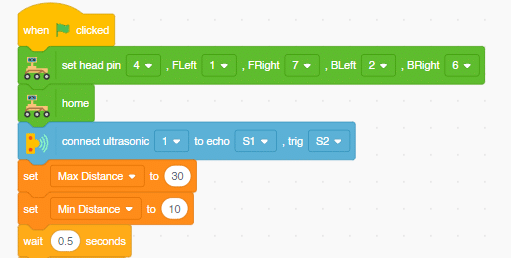
In this project, we will explain how to run predefined actions for Quadruped. By the end of the tutorial, learners will have gained knowledge and practical experience in programming a quadruped robot and controlling its movements using PictoBlox.
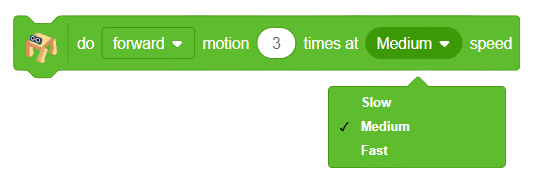
There are seventeen predefined actions for Quadruped in PictoBlox which can be accessed through do () action () times at () speed block.
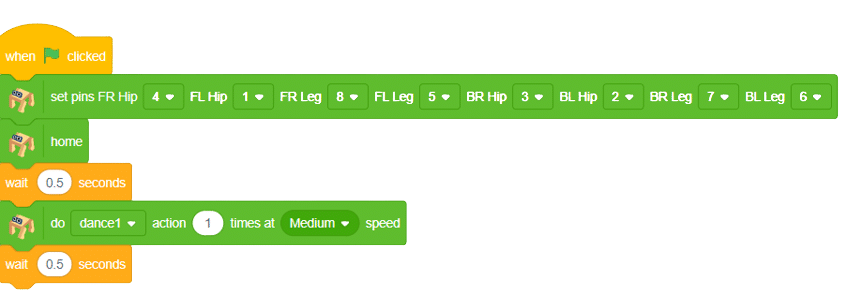
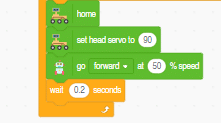
Click on the green flag to run the motion sequence.
Using the do () action () times at () speed block, we can control the number of times the action has to be executed.

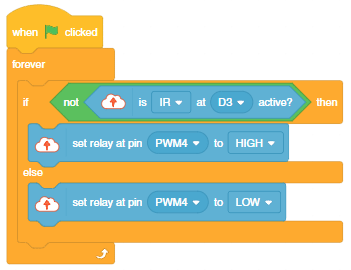
The project demonstrates how to make an IR sensor–activated coke dispenser.
We are using 2 devices in this project:
The script is simple. The relay turns ON when the IR sensor is active, else OFF.
The Internet of Things is the network of physical objects or “things” embedded with sensors, actuators, and internet connectivity, which enables these objects to collect and exchange data.
A “Thing” in the context of the IoT, is an entity or physical object that has a Unique identifier, which is a unique sequence of characters used to identify or refer to it, combined with an embedded system, and has the ability to transfer data over the internet.
These devices collect useful data and then autonomously flow and share it between other devices.

Now we know in brief, what is IoT, let’s understand how the IoT ecosystem works in the real world using what is known as an IoT lifecycle.
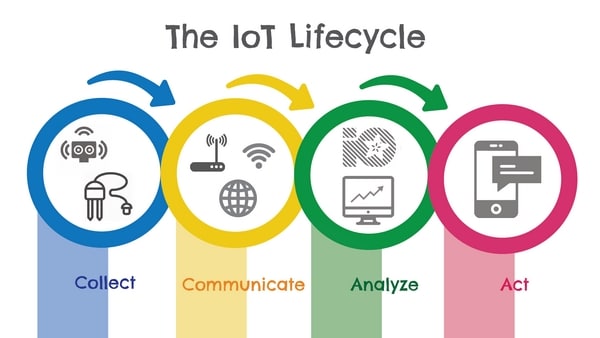
The IoT life cycle comprises systems for
 The destination devices could be
 It could be
 The actions based on the information and data could be
We use IoT in normally all fields of life.
In an IoT system, the most important component is the cloud service on which we can store or retrieve data as per the applications. A cloud service is any service made available to users on demand through the internet. Cloud services are designed to provide easy & scalable access to applications, resources, and services. Cloud is the collection of data servers used to provide services like computing, analyzing, networking, etc.
There are a number of cloud service providers out there, like Amazon, Microsoft, Salesforce, Apple, etc. One such cloud service is Adafruit.io which we are going to use.
Adafruit.io is a cloud service – that just means we run it for you and you don’t have to manage it. You can connect to it over the Internet. It’s meant primarily for storing and then retrieving data but it can do a lot more than just that!
PictoBlox supports the IoT applications for Adafruit IO in this extension.
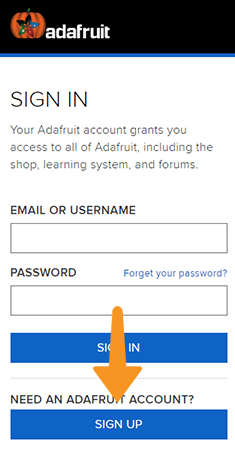
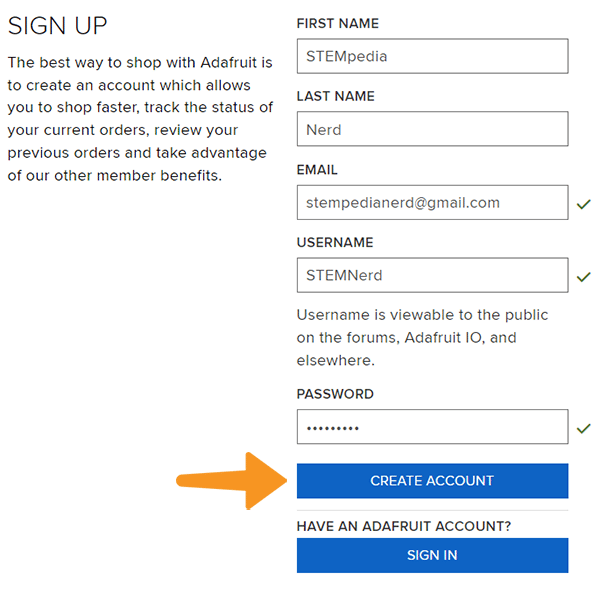
Create an Account in Adafruit IO
Follow the steps:

From here, you’ll want to learn about two important features of Adafruit IO before proceeding further – Feeds and Dashboards
Feeds
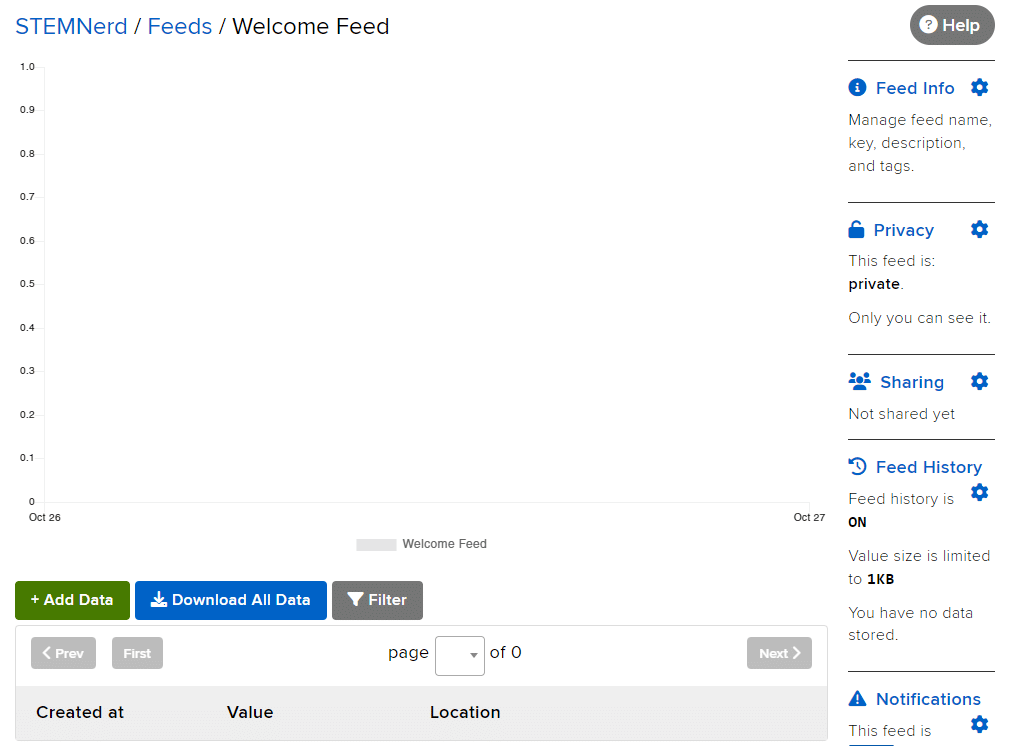
Feeds are the core of the Adafruit IO system. The feed holds metadata about the data you push to Adafruit IO. This includes settings for whether the data is public or private, what license the stored sensor data falls under, and a general description of the data. The feed also contains the sensor data values that get pushed to Adafruit IO from your device.
You will need to create one feed for each unique source of data you send to the system. For example, if you have a project with one temperature sensor and two humidity sensors, you would need to create three feeds. One feed for the temperature sensor, and one feed for each humidity sensor.
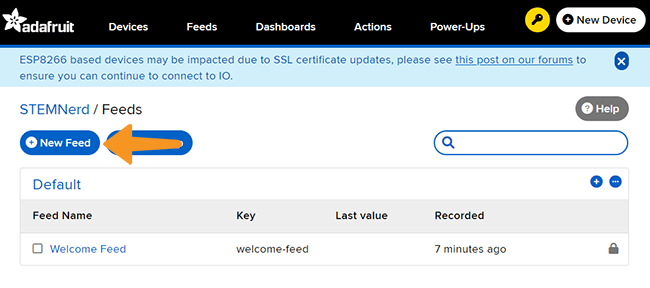
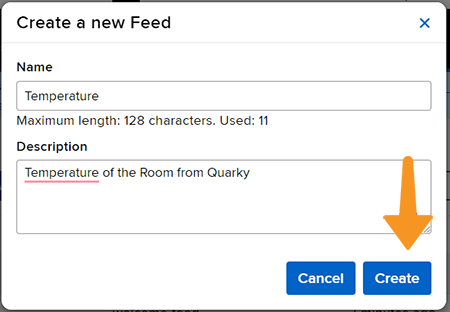
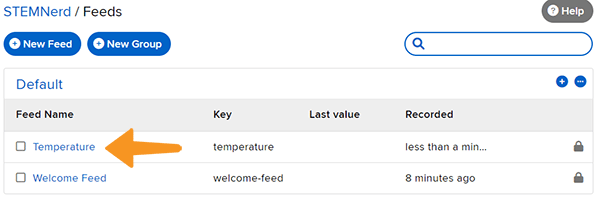
Creating a Feed
Follow the steps:
In this activity, we will make the computer program that controls the Mars Rover. It’s like a remote-control car. You can press different keys on the keyboard to make the Mars Rover move forward, backward, turn left and turn right.
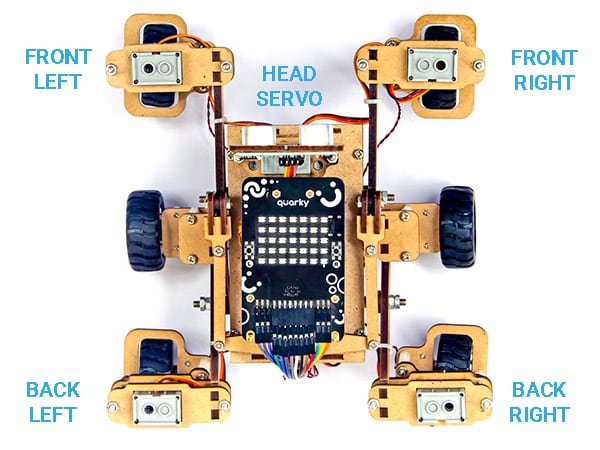
In our Mars rover, there are a total of 6 motors and 5 servo motors.
The motors provide rotation to the wheels which helps the rover to attain motion in both forward and backward directions. All the left side motors (3 motors) are connected to the left motor port of Quarky and all the right side motors (3 motors) are connected to the right motor port of Quarky using a 3 port wire. This means that to control the Mars rover we have to control only 2 motors – Left and Right.
Also, there are 2 parameters to control – Direction (Forward or Backward) and Speed. With this control, the Mars rover can do all the desired motions.
The servo motors help in providing rotation to the complete wheel assembly so that the rover can change its wheel alignments and its path. These play a major role in turning cases of the Mars Rover.
We will need to turn the servo motors to the Inside Servo Position to make Mars Rover turn left and right.
sprite=Sprite('Tobi')
import time
quarky = Quarky()
rover = MarsRover(4, 1, 7, 2, 6)
while True:
  if sprite.iskeypressed("up arrow"):
	  rover.home()
	  rover.setinangle(0)
	  quarky.runtimedrobot("F",100,3)

  if sprite.iskeypressed("down arrow"):
    rover.home()
    rover.setinangle(0)
    quarky.runtimedrobot("B",100,3)

  if sprite.iskeypressed("right arrow"):
    rover.home()
    rover.setinangle(40)
    quarky.runtimedrobot("R",100,3)

  if sprite.iskeypressed("left arrow"):
    rover.home()
    rover.setinangle(40)
    quarky.runtimedrobot("L",100,3)
This project of obstacle avoidance is for a robot that will move around and look for obstacles. It uses an ultrasonic sensor to measure the distance. If the distance is less than 20 cm, it will stop and look in both directions to see if it can move forward. If it can, it will turn left or right. If not, it will make a U-turn.
This project of obstacle avoidance is for a robot that will move around and look for obstacles. It uses an ultrasonic sensor to measure the distance. If the distance is less than 20 cm, it will stop and look in both directions to see if it can move forward. If it can, it will turn left or right. If not, it will make a U-turn.
Main Initialization:
Main Logic:

Final Condition Check:
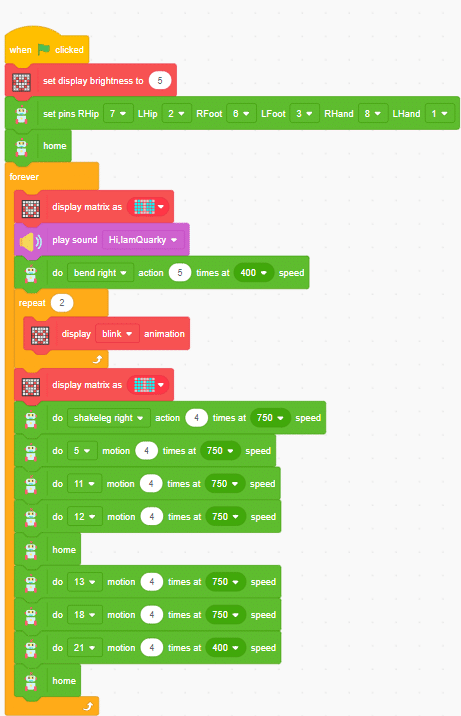
Dance motion with humanoid refers to using a robot that has a human-like appearance to perform dance movements. These robots are pre-programmed with various dance sequences and can also be customized to create unique dance routines.
To make the robot move, we need to use code to control its motors and servos. The code can be created using a programming tools/language such Pictoblox, Python, or Arduino. The code tells the robot which movements to make, such as lifting its arms, bending its knees, or spinning around.
Different actions can be used to create different dance moves, and the dance can be accompanied by music or sound effects. The robot can also be programmed to display different colors or patterns on its body as it moves.
Humanoid robots is a fun and creative way to explore the intersection between technology and the arts.


Learn how to code logic for speech-recognized control of Mars Rover with this example block code. You will be able to direct your own Mars Rover easily by just speaking commands.
A speech-recognized controlled Mars Rover robot is a robot that can recognize and interpret our speech, and verbal commands, given by a human. The code uses the speech recognition model that will be able to record and analyze your speech given and react accordingly on the Mars Rover.
Speech recognition robots can be used in manufacturing and other industrial settings to control machinery, perform quality control checks, and monitor equipment.
They are also used to help patients with disabilities to communicate with their caregivers, or to provide medication reminders and other health-related information.
sprite=Sprite('Tobi')
import time
rover = MarsRover(4, 1, 7, 2, 6)
quarky = Quarky()
sr = SpeechRecognition()
ts = TexttoSpeech()
sr.analysespeech(4, "en-US")
command = sr.speechresult()
command = command.lower()
if 'forward' in command:
  rover.home()
  rover.setinangle(0)
  quarky.runtimedrobot("F",100,3)
elif 'back' in command:
  rover.home()
  rover.setinangle(0)
  quarky.runtimedrobot("B",100,3)
elif 'right' in command:
  rover.home()
  rover.setinangle(40)
  quarky.runtimedrobot("R",100,3)
elif 'left' in command:
  rover.home()
  rover.setinangle(40)
  quarky.runtimedrobot("L",100,3)

time.sleep(10)
sprite.stopallsounds()Forward-Backward Motions:

Right-Left Motions:
AI-based face expression detection refers to the use of artificial intelligence algorithms and computer vision techniques to analyze images or videos of human faces and recognize the emotions or expressions being displayed. The technology can detect and analyze subtle changes in facial features, such as eye movement, mouth shape, and eyebrow position, to determine whether a person is happy, sad, angry, surprised, or expressing other emotions.
Discover the various fields that utilize this technology, including psychology, marketing, and human-computer interaction. Additionally, read about the logic and code behind face detection with a camera feed, including the initialization of parameters, face detection library, loop execution, and if-else conditions. Explore how the technology continuously analyzes emotions, and how the humanoid responds with different facial expressions and movements.
sprite = Sprite('Tobi')

fd = FaceDetection()

quarky = Quarky()

import time

humanoid = Humanoid(7, 2, 6, 3, 8, 1)

# Turn the video ON with 0% transparency
fd.video("ON", 0)
fd.enablebox()

# Run this script forever
while 1:
  fd.analysecamera()          # Analyse image from camera
  sprite.say(fd.expression()) # Say the face expressions

  if fd.isexpression(1, "happy"): # if face expression is happy
    quarky.showemotion("happy")   # show happy emotion on Quarky
    humanoid.action("dance2", 1000, 1)

  if fd.isexpression(1, 'sad'):
    quarky.showemotion("crying")
    humanoid.action("updown", 1000, 1)

  if fd.isexpression(1, 'surprise'):
    quarky.showemotion('surprise')
    humanoid.action("moonwalker", 1000, 1)

  if fd.isexpression(1, 'angry'):
    quarky.showemotion('angry')
    humanoid.action("flapping2", 1000, 1)
  else:
    humanoid.home()

# Comment the above script, uncomment the below script and
# run this script to clear the stage and quarky display

fd.disablebox()
fd.video("off")
quarky.cleardisplay()The example demonstrates how to use face detection with a camera feed. Following are the key steps happening:
if statement. If the expression is happy, the Quarky device displays a happy emotion, and the humanoid performs the “dance2” action for specific time. Similarly, for sad, surprised, and angry expressions, Quarky displays the respective emotion, and the humanoid performs the associated action.

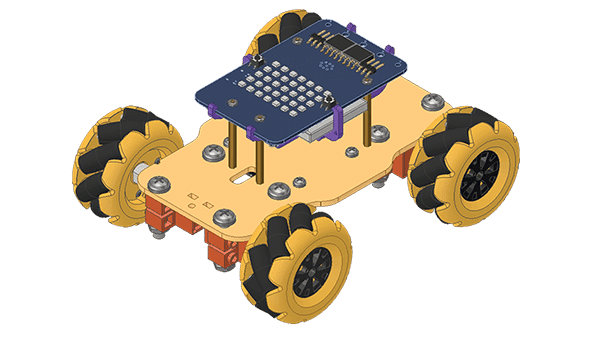
In this activity, we will make the computer program that controls the Mecanum Robot. It’s like a remote-control car. You can press different keys on the keyboard to make the Mecanum move forward, backward, left and right.
The Quarky Mecanum Wheel Robot is a type of robot that uses a special type of wheel to move. The wheel is made of four rollers mounted at 45-degree angles to the wheel‘s hub. Each roller has its own motor and can spin in either direction. This allows the wheel to move in any direction, making it an ideal choice for navigating around obstacles and tight spaces. The mecanum wheel robot can also turn on the spot, allowing it to make sharp turns without having to reverse direction.
Follow the steps:
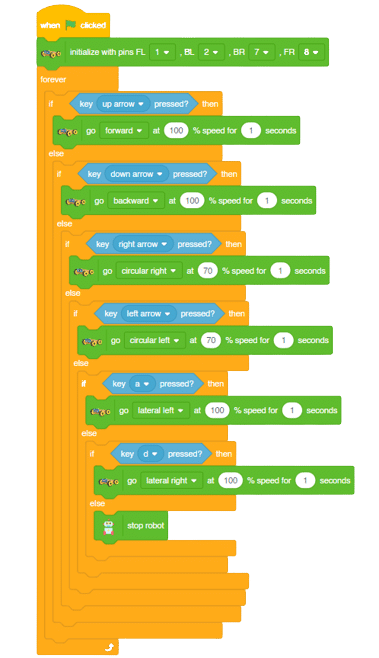
Forward-Backward Motion:
Lateral Right-Left Motion:
Circular Right-Left Motion:

In this activity, we will make the computer program that controls the Mecanum Robot. It’s like a remote-control car. You can press different keys on the keyboard to make the Mecanum move forward, backward, left, and right.
The Quarky Mecanum Wheel Robot is a type of robot that uses a special type of wheel to move. The wheel is made of four rollers mounted at 45- degree angles to the wheel‘s hub. Each roller has its own motor and can spin in either direction. This allows the wheel to move in any direction, making it an ideal choice for navigating around obstacles and tight spaces. The Mecanum wheel robot can also turn on the spot, allowing it to make sharp turns without having to reverse direction.
Follow the steps:
sprite=Sprite('Tobi')
import time
quarky = Quarky()
robot = Mecanum(1, 2, 7, 8)
while True:
  if sprite.iskeypressed("up arrow"):
	  robot.runtimedrobot("forward",100,2)

  if sprite.iskeypressed("down arrow"):
    robot.runtimedrobot("backward",100,1)

  if sprite.iskeypressed("right arrow"):
    robot.runtimedrobot("circular right",70,1)

  if sprite.iskeypressed("left arrow"):
    robot.runtimedrobot("circular left",70,1)

  if sprite.iskeypressed("a"):
    robot.runtimedrobot("lateral left",100,1)
  if sprite.iskeypressed("d"):
robot.runtimedrobot("lateral right",100,1)Forward-Backward Motion:
Lateral Right-Left Motion:
Circular Right-Left Motion:
In this example, we will make the computer program that controls a “quadruped” (a four-legged robot). It’s like a remote control car, except with four legs instead of four wheels. You can press different keys on the keyboard to make the quadruped move forward, backward, turn left and turn right.

The Quadruped will move according to the following logic:
The program uses the up, down, left, and right arrows to control the robot and make it move forward, backward, left, and right. Every time you press one of the arrows, Quadruped will move in the direction you choose for specific steps.
sprite = Sprite('Tobi')
quarky = Quarky()
import time

quad=Quadruped(4,1,8,5,3,2,7,6)
quad.home()

while True:
  if sprite.iskeypressed("up arrow"):
    quad.move("forward",1000,1)
    time.sleep(1)

  if sprite.iskeypressed("down arrow"):
    quad.move("backward",1000,1)

  if sprite.iskeypressed("left arrow"):
    quad.move("turn left",1000,1)

  if sprite.iskeypressed("right arrow"):
    quad.move("turn right",1000,1)

This project demonstrates how to use Machine Learning Environment to make a machine–learning model that identifies hand gestures and makes the quadruped move accordingly.
To test the model, simply enter the input values in the “Testing” panel and click on the “Predict” button.
The model will return the probability of the input belonging to the classes.
Click on the “Export Model” button on the top right of the Testing box, and PictoBlox will load your model into the Python Coding Environment if you have opened the ML Environment in Python Coding.
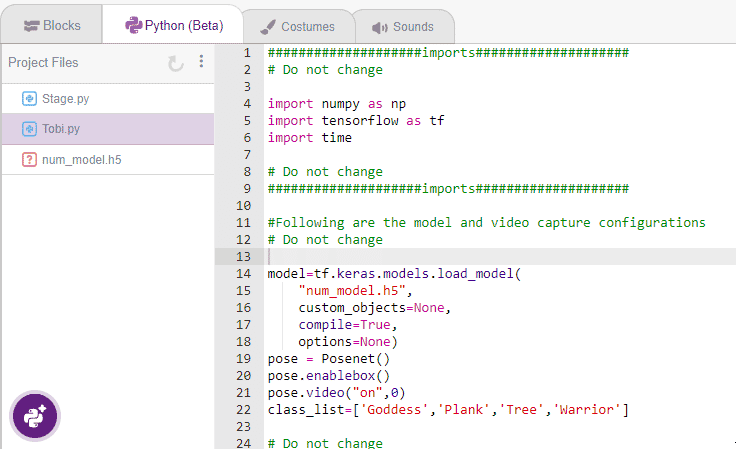
The following code appears in the Python Editor of the selected sprite.
####################imports####################
# Do not change

import numpy as np
import tensorflow as tf
import time
quarky=Quarky

quad=Quadruped(4,1,8,5,3,2,7,6)

# Do not change
####################imports####################

#Following are the model and video capture configurations
# Do not change

model=tf.keras.models.load_model(
    "num_model.h5",
    custom_objects=None,
    compile=True,
    options=None)
pose = Posenet()                                                    # Initializing Posenet
pose.enablebox()                                                    # Enabling video capture box
pose.video("on",0)                                                  # Taking video input
class_list=['Forward','Backward','Left','Right','Stop']                  # List of all the classes

# Do not change
###############################################

#This is the while loop block, computations happen here
# Do not change

while True:
  pose.analysehand()                                             # Using Posenet to analyse hand pose
  coordinate_xy=[]

    # for loop to iterate through 21 points of recognition
  for i in range(21):
    if(pose.gethandposition(1,i,0)!="NULL"  or pose.gethandposition(2,i,0)!="NULL"):
      coordinate_xy.append(int(240+float(pose.gethandposition(1,i,0))))
      coordinate_xy.append(int(180-float(pose.gethandposition(2,i,0))))
    else:
      coordinate_xy.append(0)
      coordinate_xy.append(0)

  coordinate_xy_tensor = tf.expand_dims(coordinate_xy, 0)        # Expanding the dimension of the coordinate list
  predict=model.predict(coordinate_xy_tensor)                    # Making an initial prediction using the model
  predict_index=np.argmax(predict[0], axis=0)                    # Generating index out of the prediction
  predicted_class=class_list[predict_index]                      # Tallying the index with class list
  print(predicted_class)


  # Do not change
Add this code in
def runQuarky(predicted_class):
    if pose.ishanddetected():
      if predicted_class == "Forward":
        quad.move("forward",1000,1)

      elif predicted_class == "Backward":
        quad.move("backward",1000,1)

      elif predicted_class == "Left":
        quad.move("turn left",1000,1)

      elif predicted_class == "Right":
        quad.move("turn right",1000,1)

      elif predicted_class == "Stop":
quad.home()####################imports####################
# Do not change
import numpy as np
import tensorflow as tf
import time
quarky=Quarky
quad=Quadruped(4,1,8,5,3,2,7,6)
# Do not change
####################imports####################
#Following are the model and video capture configurations
# Do not change
model=tf.keras.models.load_model(
"num_model.h5",
custom_objects=None,
compile=True,
options=None)
pose = Posenet() # Initializing Posenet
pose.enablebox() # Enabling video capture box
pose.video("on",0) # Taking video input
class_list=['Forward','Backward','Left','Right','Stop'] # List of all the classes
def runQuarky(predicted_class):
if pose.ishanddetected():
if predicted_class == "Forward":
quad.move("forward",1000,1)
elif predicted_class == "Backward":
quad.move("backward",1000,1)
elif predicted_class == "Left":
quad.move("turn left",1000,1)
elif predicted_class == "Right":
quad.move("turn right",1000,1)
elif predicted_class == "Stop":
quad.home()
# Do not change
###############################################
#This is the while loop block, computations happen here
# Do not change
while True:
pose.analysehand() # Using Posenet to analyse hand pose
coordinate_xy=[]
# for loop to iterate through 21 points of recognition
for i in range(21):
if(pose.gethandposition(1,i,0)!="NULL" or pose.gethandposition(2,i,0)!="NULL"):
coordinate_xy.append(int(240+float(pose.gethandposition(1,i,0))))
coordinate_xy.append(int(180-float(pose.gethandposition(2,i,0))))
else:
coordinate_xy.append(0)
coordinate_xy.append(0)
coordinate_xy_tensor = tf.expand_dims(coordinate_xy, 0) # Expanding the dimension of the coordinate list
predict=model.predict(coordinate_xy_tensor) # Making an initial prediction using the model
predict_index=np.argmax(predict[0], axis=0) # Generating index out of the prediction
predicted_class=class_list[predict_index] # Tallying the index with class list
print(predicted_class)
runQuarky(predicted_class)
# Do not change
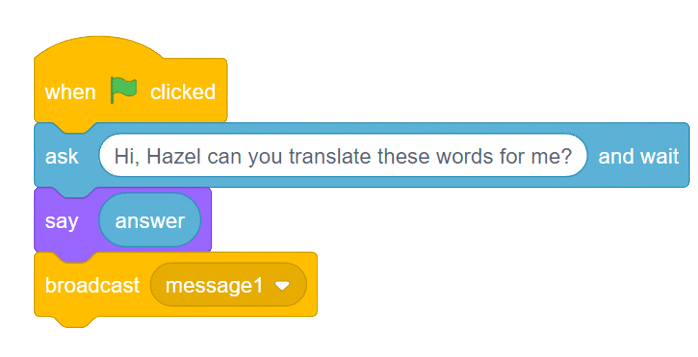
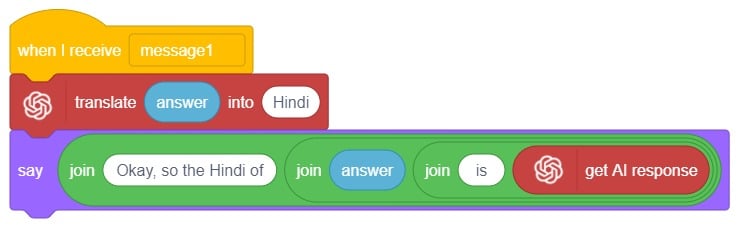
The Language Translator with ChatGPT and Speech Recognition is a system that helps people communicate across languages by providing real-time translation and conversation support. It combines language translation, chatbot capabilities, and speech recognition to facilitate multilingual communication.
Language Translator Using ChatGPT is a project that trains the ChatGPT language model with multilingual data to enable it to understand and translate text between different languages. It utilizes ChatGPT’s natural language processing abilities to generate human-like responses, making it ideal for building a language translation system. The training data includes sentence pairs in different languages and their corresponding translations.
Initially, two characters engage in a conversation. One character asks a question, and the other character converts it into a different language before answering it and providing a response.


![]()
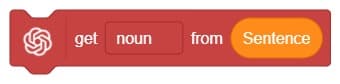
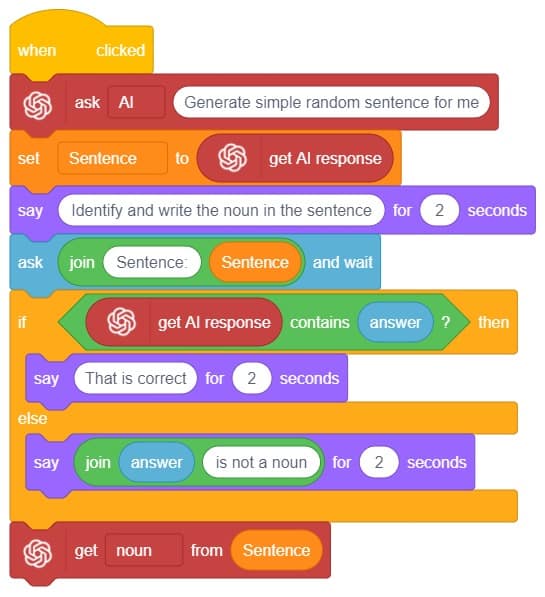
A noun detector is a tool or algorithm designed to identify and extract nouns from a given text or speech input. Nouns are a type of word that typically represent people, places, things, or ideas. In the context of chat-based applications, a noun detector can be useful for extracting key information or identifying specific entities mentioned in a conversation. It can help in tasks such as named entity recognition, information retrieval, sentiment analysis, and many more.
A noun detector serves as a valuable component in language processing systems, helping to extract and utilize meaningful information from text or speech inputs in chat-based interactions.
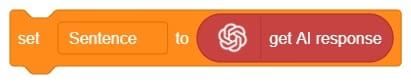
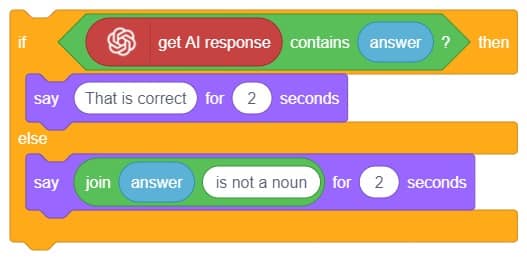
First, ChatGPT generates random sentences, and we save this response in a variable. Then, it asks users to identify a noun from the given sentence. If the user’s answer matches the response generated by ChatGPT, it will say “Correct.” Otherwise, it will say “Incorrect answer.”


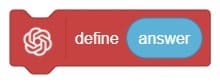
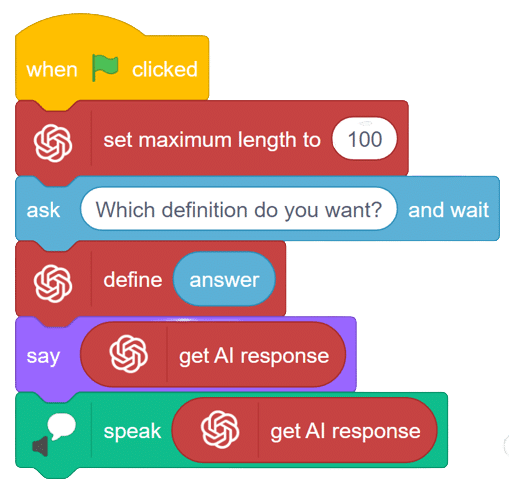
We ask the user which definition they want, and based on their input, ChatGPT generates the definition of the particular word. The sprite then uses the text-to-speech extension to speak out the definition.
Follow the steps below:

We ask the user which definition they want, and based on their input, ChatGPT generates the definition of the particular word. The sprite then uses the text-to-speech extension to speak out the definition.
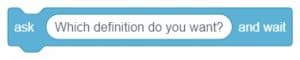
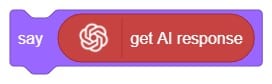
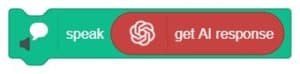
The code represents a conversation between the sprite character “Tobi” and the AI models. The sprite asks the user for a definition, the user responds, the AI generates a result based on the response, and the sprite says and speaks the result.
Follow the steps below:

sprite = Sprite('Tobi')
gpt = ChatGPT()
speech = TexttoSpeech()

sprite.input("Which definition do you want?")
l = str(sprite.answer())

data=gpt.askdefination(l)

result=gpt.chatGPTresult()
sprite.say(result,10)
speech.speak(result)


Copyright 2025 – Agilo Research Pvt. Ltd. All rights reserved – Terms & Condition | Privacy Policy