The function initializes the Mars Rover object in Python and maps the 5 servos to the specified pins.
By default the following configuration is added:
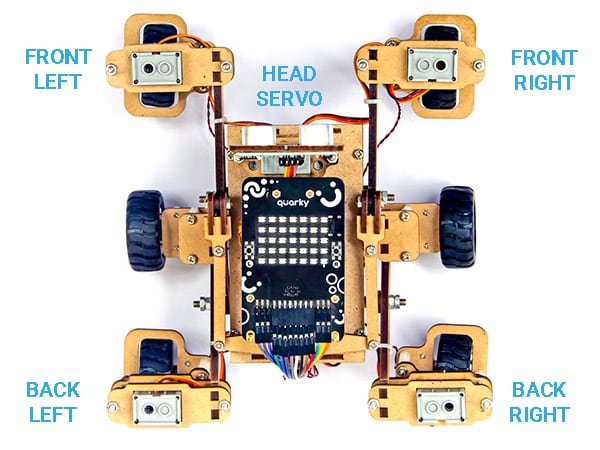
- Head Servo – 4
- Front Left Servo – 1
- Front Right Servo – 5
- Back Left Servo – 2
- Back Right Servo – 6
Function Definition: MarsRover(Head = 4, Front Left = 1, Front Right = 7, Back Left = 2, Back Right = 6)
| Name | Type | Description | Expected Values | Default Value |
|---|---|---|---|---|
| Head | int | Servo Port Number at which the Head Servo Motor is connected. | 1-8 | 4 |
| Front Left | int | Servo Port Number at which the Front Left Servo Motor is connected. | 1-8 | 1 |
| Front Right | int | Servo Port Number at which the Front Right Servo Motor is connected. | 1-8 | 7 |
| Back Left | int | Servo Port Number at which the Back Left Servo Motor is connected. | 1-8 | 2 |
| Back Right | int | Servo Port Number at which the Back Right Servo Motor is connected. | 1-8 | 6 |
The function initializes the Mars Rover object in Python and maps the 5 servos to the specified pins.
By default the following configuration is added:


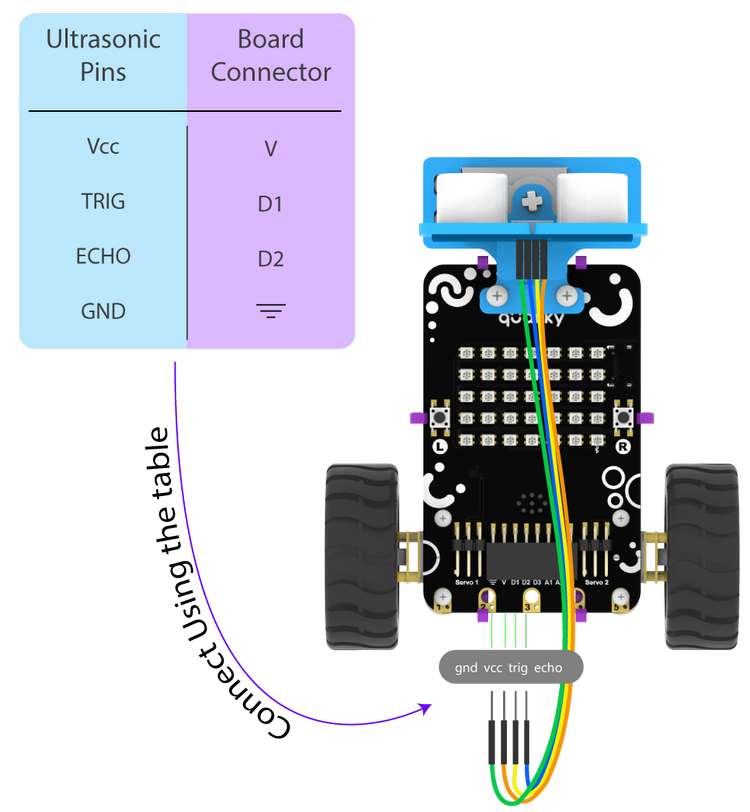
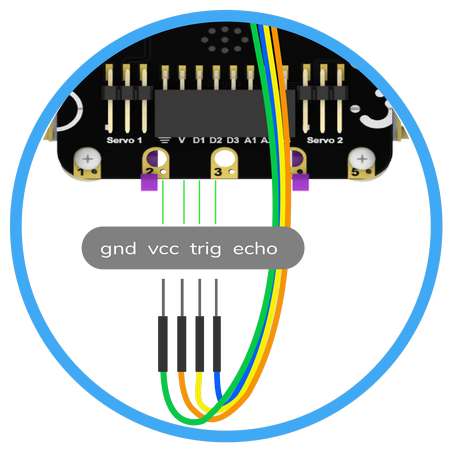
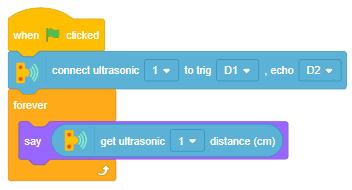
Now we will connect the Ultrasonic Sensor to the Robot. The sensor and the robot have the following pins:
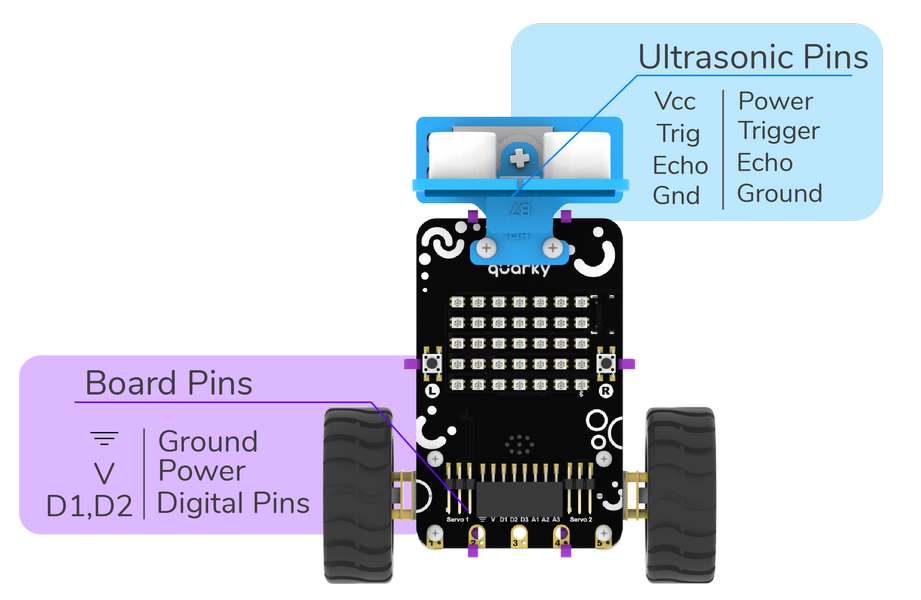
We will start with connecting the ultrasonic sensor with Quarky using the 4 set wire provided in the kit. But, first, make the connection in the following way:

sprite = Sprite('Tobi')
quarky=Quarky()

while True:
  if quarky.readpushbutton("L"):
    sprite.move(-10)
  elif quarky.readpushbutton("R"):
    sprite.move(10)
sprite = Sprite('Tobi')
quarky = Quarky()
while True:
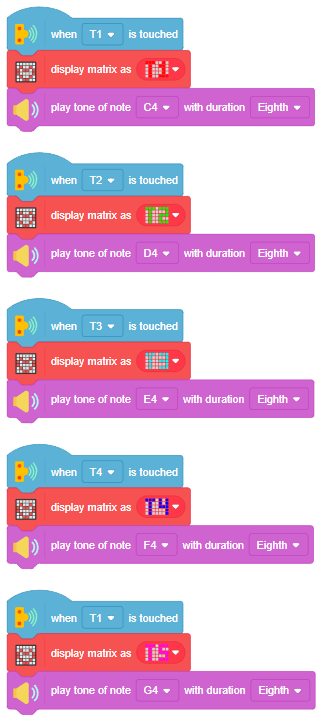
if quarky.ispadtouched("T1"):
quarky.drawpattern("bbbjjbjjbjjbbjjbjjjbjjbjjjbjjbjjbbb")
quarky.playtone("C4", 8)
if quarky.ispadtouched("T2"):
quarky.drawpattern("cccjcccjcjjjjcjcjjcccjcjjcjjjcjjccc")
quarky.playtone("D4", 8)
if quarky.ispadtouched("T3"):
quarky.drawpattern("fffjfffjfjjjjfjfjjfffjfjjjjfjfjjfff")
quarky.playtone("E4", 8)
if quarky.ispadtouched("T4"):
quarky.drawpattern("dddjdjdjdjjdjdjdjjdddjdjjjjdjdjjjjd")
quarky.playtone("F4", 8)
if quarky.ispadtouched("T5"):
quarky.drawpattern("gggjgggjgjjgjjjgjjgggjgjjjjgjgjjggg")
quarky.playtone("G4", 8)
Now we will connect the Ultrasonic Sensor to the Robot. The sensor and the robot have the following pins:
We will start with connecting the ultrasonic sensor with Quarky using the 4 set wire provided in the kit. But, first, make the connection in the following way:
sprite = Sprite('Tobi')
quarky = Quarky()

quarky.setultrasonicpins(1, 18, 19)
while True:
  sprite.say(quarky.getdistance(1))
sprite = Sprite('Cassy Dance')
quarky = Quarky()
import time
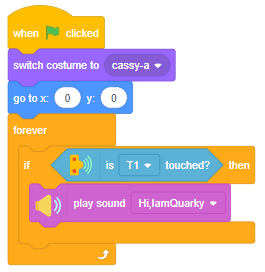
sprite.switchcostume('cassy-a')
sprite.gotoxy(0, 0)
while True:
if quarky.ispadtouched("T1"):
quarky.playsound("QuarkyIntro")
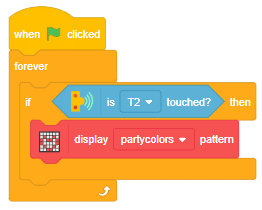
if quarky.ispadtouched("T2"):
quarky.showpattern("party colors")
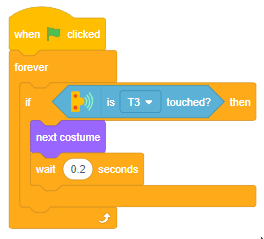
if quarky.ispadtouched("T3"):
time.sleep(0.2)
sprite.nextcostume()
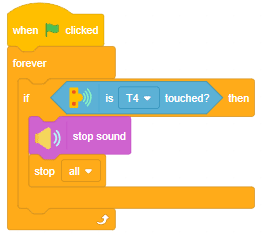
if quarky.ispadtouched("T4"):
quarky.stopaudio()

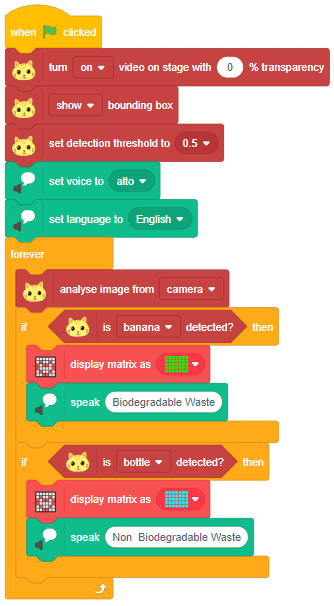


sprite = Sprite('Tobi')
od = ObjectDetection()
speech = TexttoSpeech()
quarky = Quarky()

od.video("on", 1)
od.enablebox()
od.setthreshold(0.5)

speech.setvoice('alto')
speech.setlanguage('en')

while True:
  od.analysecamera()

  if od.isdetected('banana'):
    quarky.drawpattern("ccccccccccccccccccccccccccccccccccc")
    speech.speak("Biodegradable Waste")

  if od.isdetected('bottle'):
    quarky.drawpattern("fffffffffffffffffffffffffffffffffff")
    speech.speak("Non Biodegradable Waste")
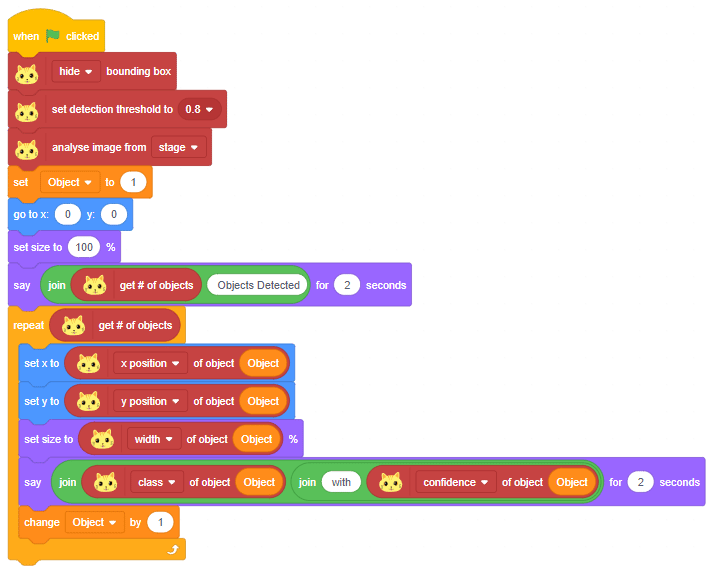
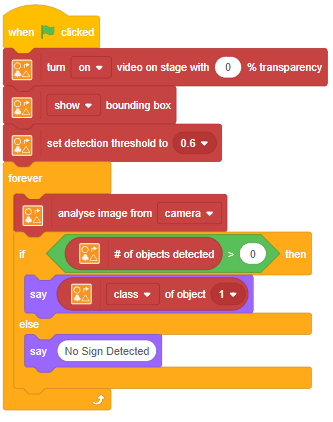
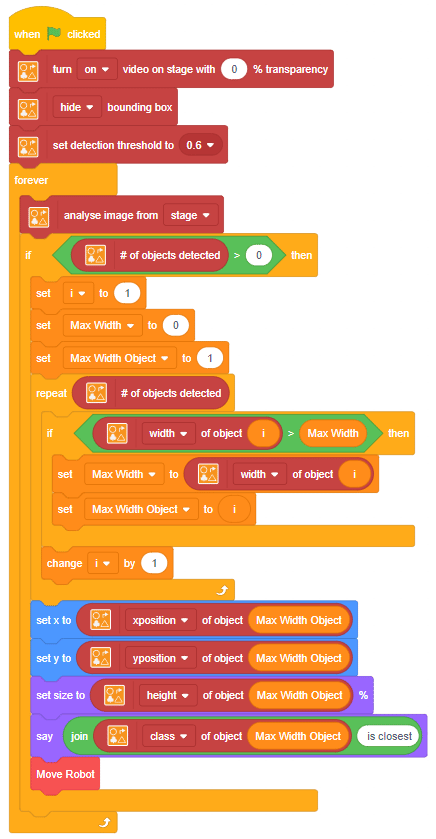
sprite = Sprite('Square Box')
obj = ObjectDetection()

obj.disablebox()
obj.setthreshold(0.5)
obj.analysestage()

sprite.gotoxy(0, 0)
sprite.setsize(100)
sprite.say(str(obj.count()) + " Object Detected", 2)

for object in range(1, obj.count() + 1):
  sprite.setx(obj.x(object))
  sprite.sety(obj.y(object))
  sprite.setsize(obj.width(object))
sprite.say(obj.classname(object) + " with " + str(obj.confidence(object)), 2)sprite = Sprite('Tobi')
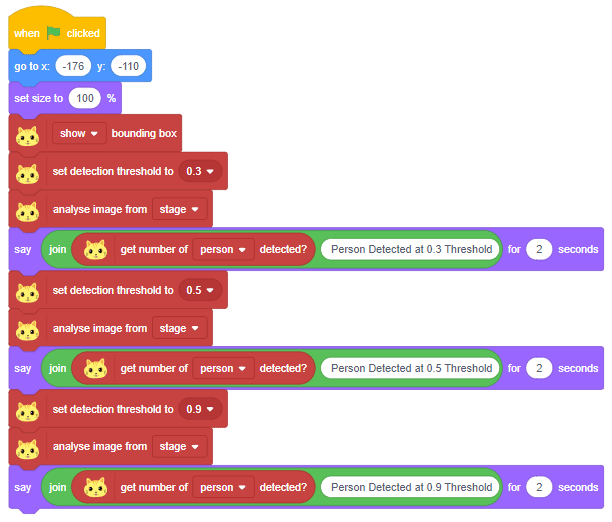
obj = ObjectDetection()
obj.enablebox()
sprite.gotoxy(-180, -110)
sprite.setsize(100)
obj.setthreshold(0.3)
obj.analysestage()
sprite.say(str(obj.detectedcount("person")) + " Person Detected at 0.3 Threshold", 2)
obj.setthreshold(0.5)
obj.analysestage()
sprite.say(str(obj.detectedcount("person")) + " Person Detected at 0.5 Threshold", 2)
obj.setthreshold(0.9)
obj.analysestage()
sprite.say(str(obj.detectedcount("person")) + " Person Detected at 0.9 Threshold", 2)


![]()
![]()
![]()
![]()
![]()


thumb = Sprite('Thumb')
index = Sprite('Index')
middle = Sprite('Middle')
ring = Sprite('Ring')
pinky = Sprite('Pinky')

hand = Posenet()
hand.video("on", 0)
hand.enablebox()

thumb.switchcostume("ball-a")
thumb.setsize(50)
index.switchcostume("ball-b")
index.setsize(50)
middle.switchcostume("ball-c")
middle.setsize(50)
ring.switchcostume("ball-d")
ring.setsize(50)
pinky.switchcostume("ball-e")
pinky.setsize(50)

while True:
  hand.analysehand()

  if hand.ishanddetected():
    thumb.setx(hand.gethandposition(1, 4))
    thumb.sety(hand.gethandposition(2, 4))
    thumb.show()

    index.setx(hand.gethandposition(1, 8))
    index.sety(hand.gethandposition(2, 8))
    index.show()

    middle.setx(hand.gethandposition(1, 12))
    middle.sety(hand.gethandposition(2, 12))
    middle.show()

    ring.setx(hand.gethandposition(1, 16))
    ring.sety(hand.gethandposition(2, 16))
    ring.show()

    pinky.setx(hand.gethandposition(1, 20))
    pinky.sety(hand.gethandposition(2, 20))
    pinky.show()

  else:
    thumb.hide()
    index.hide()
    middle.hide()
    ring.hide()
    pinky.hide()
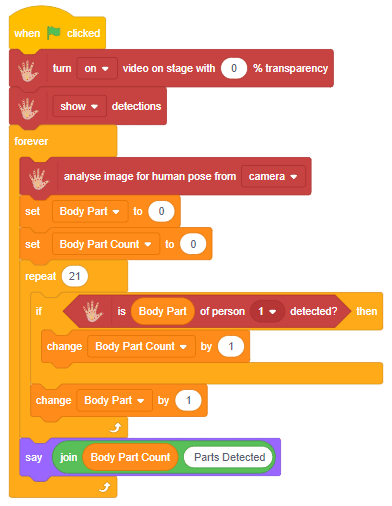
sprite = Sprite('Tobi')
pose = Posenet()

pose.video("on", 0)
pose.enablebox()

while True:
  pose.analysecamera()
  bodyPartCount = 0

  for i in range(21):
    if pose.isdetected(i, 1):
      bodyPartCount += 1

  sprite.say(str(bodyPartCount) + " Parts Detected")
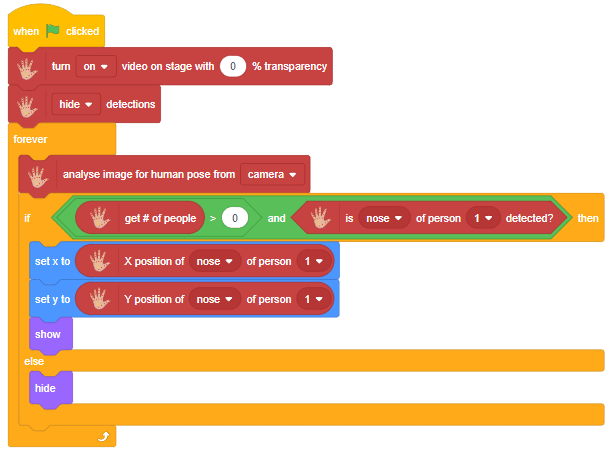
sprite = Sprite('Ball')
pose = Posenet()

pose.video("on", 0)
pose.enablebox()

while True:
  pose.analysestage()

  if (pose.isdetected(0, 1)):
    sprite.setx(pose.x(0, 1))
    sprite.sety(pose.y(0, 1))
    sprite.show()

  else:
    sprite.hide()
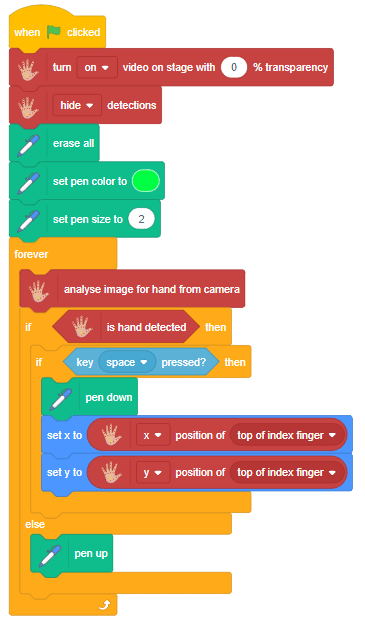
sprite = Sprite('Pencil')

hand = Posenet()
pen = Pen()

hand.video("on", 0)
hand.disablebox()

pen.clear()
pen.setcolor([0, 255, 0])
pen.setsize(2)

while True:
  hand.analysehand()
  if hand.ishanddetected():
    if sprite.iskeypressed("space"):
      pen.down()
      sprite.setx(hand.gethandposition(1, 8))
      sprite.sety(hand.gethandposition(2, 8))
    else:
      pen.up()


![]()
![]()
![]()
![]()

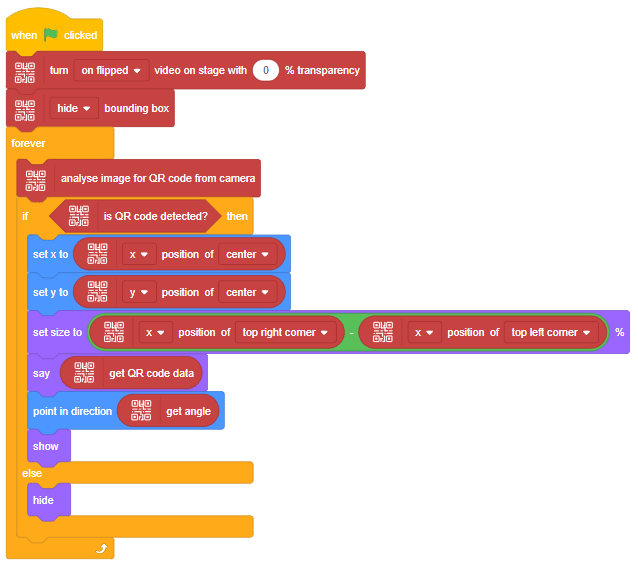

sprite = Sprite('Square Box')
qr = QRCodeScanner()

qr.video("on flipped", 0)
qr.disablebox()

while True:
  qr.analysecamera()
  if qr.isdetected():
    sprite.setx(qr.xpos("center"))
    sprite.sety(qr.ypos("center"))
    sprite.setdirection(qr.angle())
    sprite.say(qr.codedata())
    sprite.show()
  else:
    sprite.hide()
The example demonstrates how to make a sprite be fixed to a point but can rotate. The wand is hanging like a pendulum.
The center of the wand in the costume is the point of rotation.

The following code creates the simulation of the pendulum.
![]()

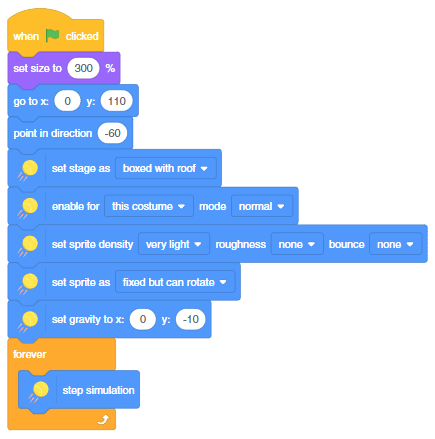
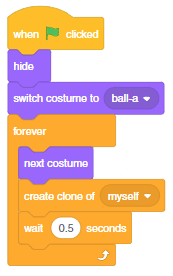
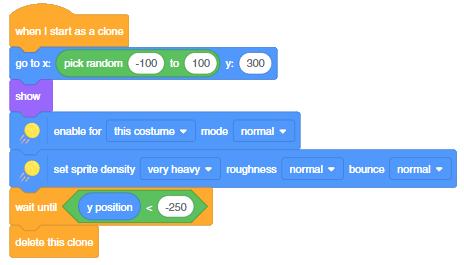
In this example, you understand the effect of the density, roughness, and bounce properties of the sprites. The ball falls from the top randomly, and the bell is fixed but can rotate.

The bell center is changed to make it swing from the top.

This script creates clones of the ball every 0.5 seconds.
This script assigns the properties of the clone.
We will change the density of the bell and the ball in the block – set sprite density () roughness () bounce (). This will result in different simulations.


Copyright 2025 – Agilo Research Pvt. Ltd. All rights reserved – Terms & Condition | Privacy Policy