The block reports the selected field data from the last read request from ThingSpeak.
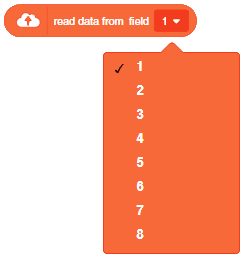
The block reports the selected field data from the last read request from ThingSpeak.

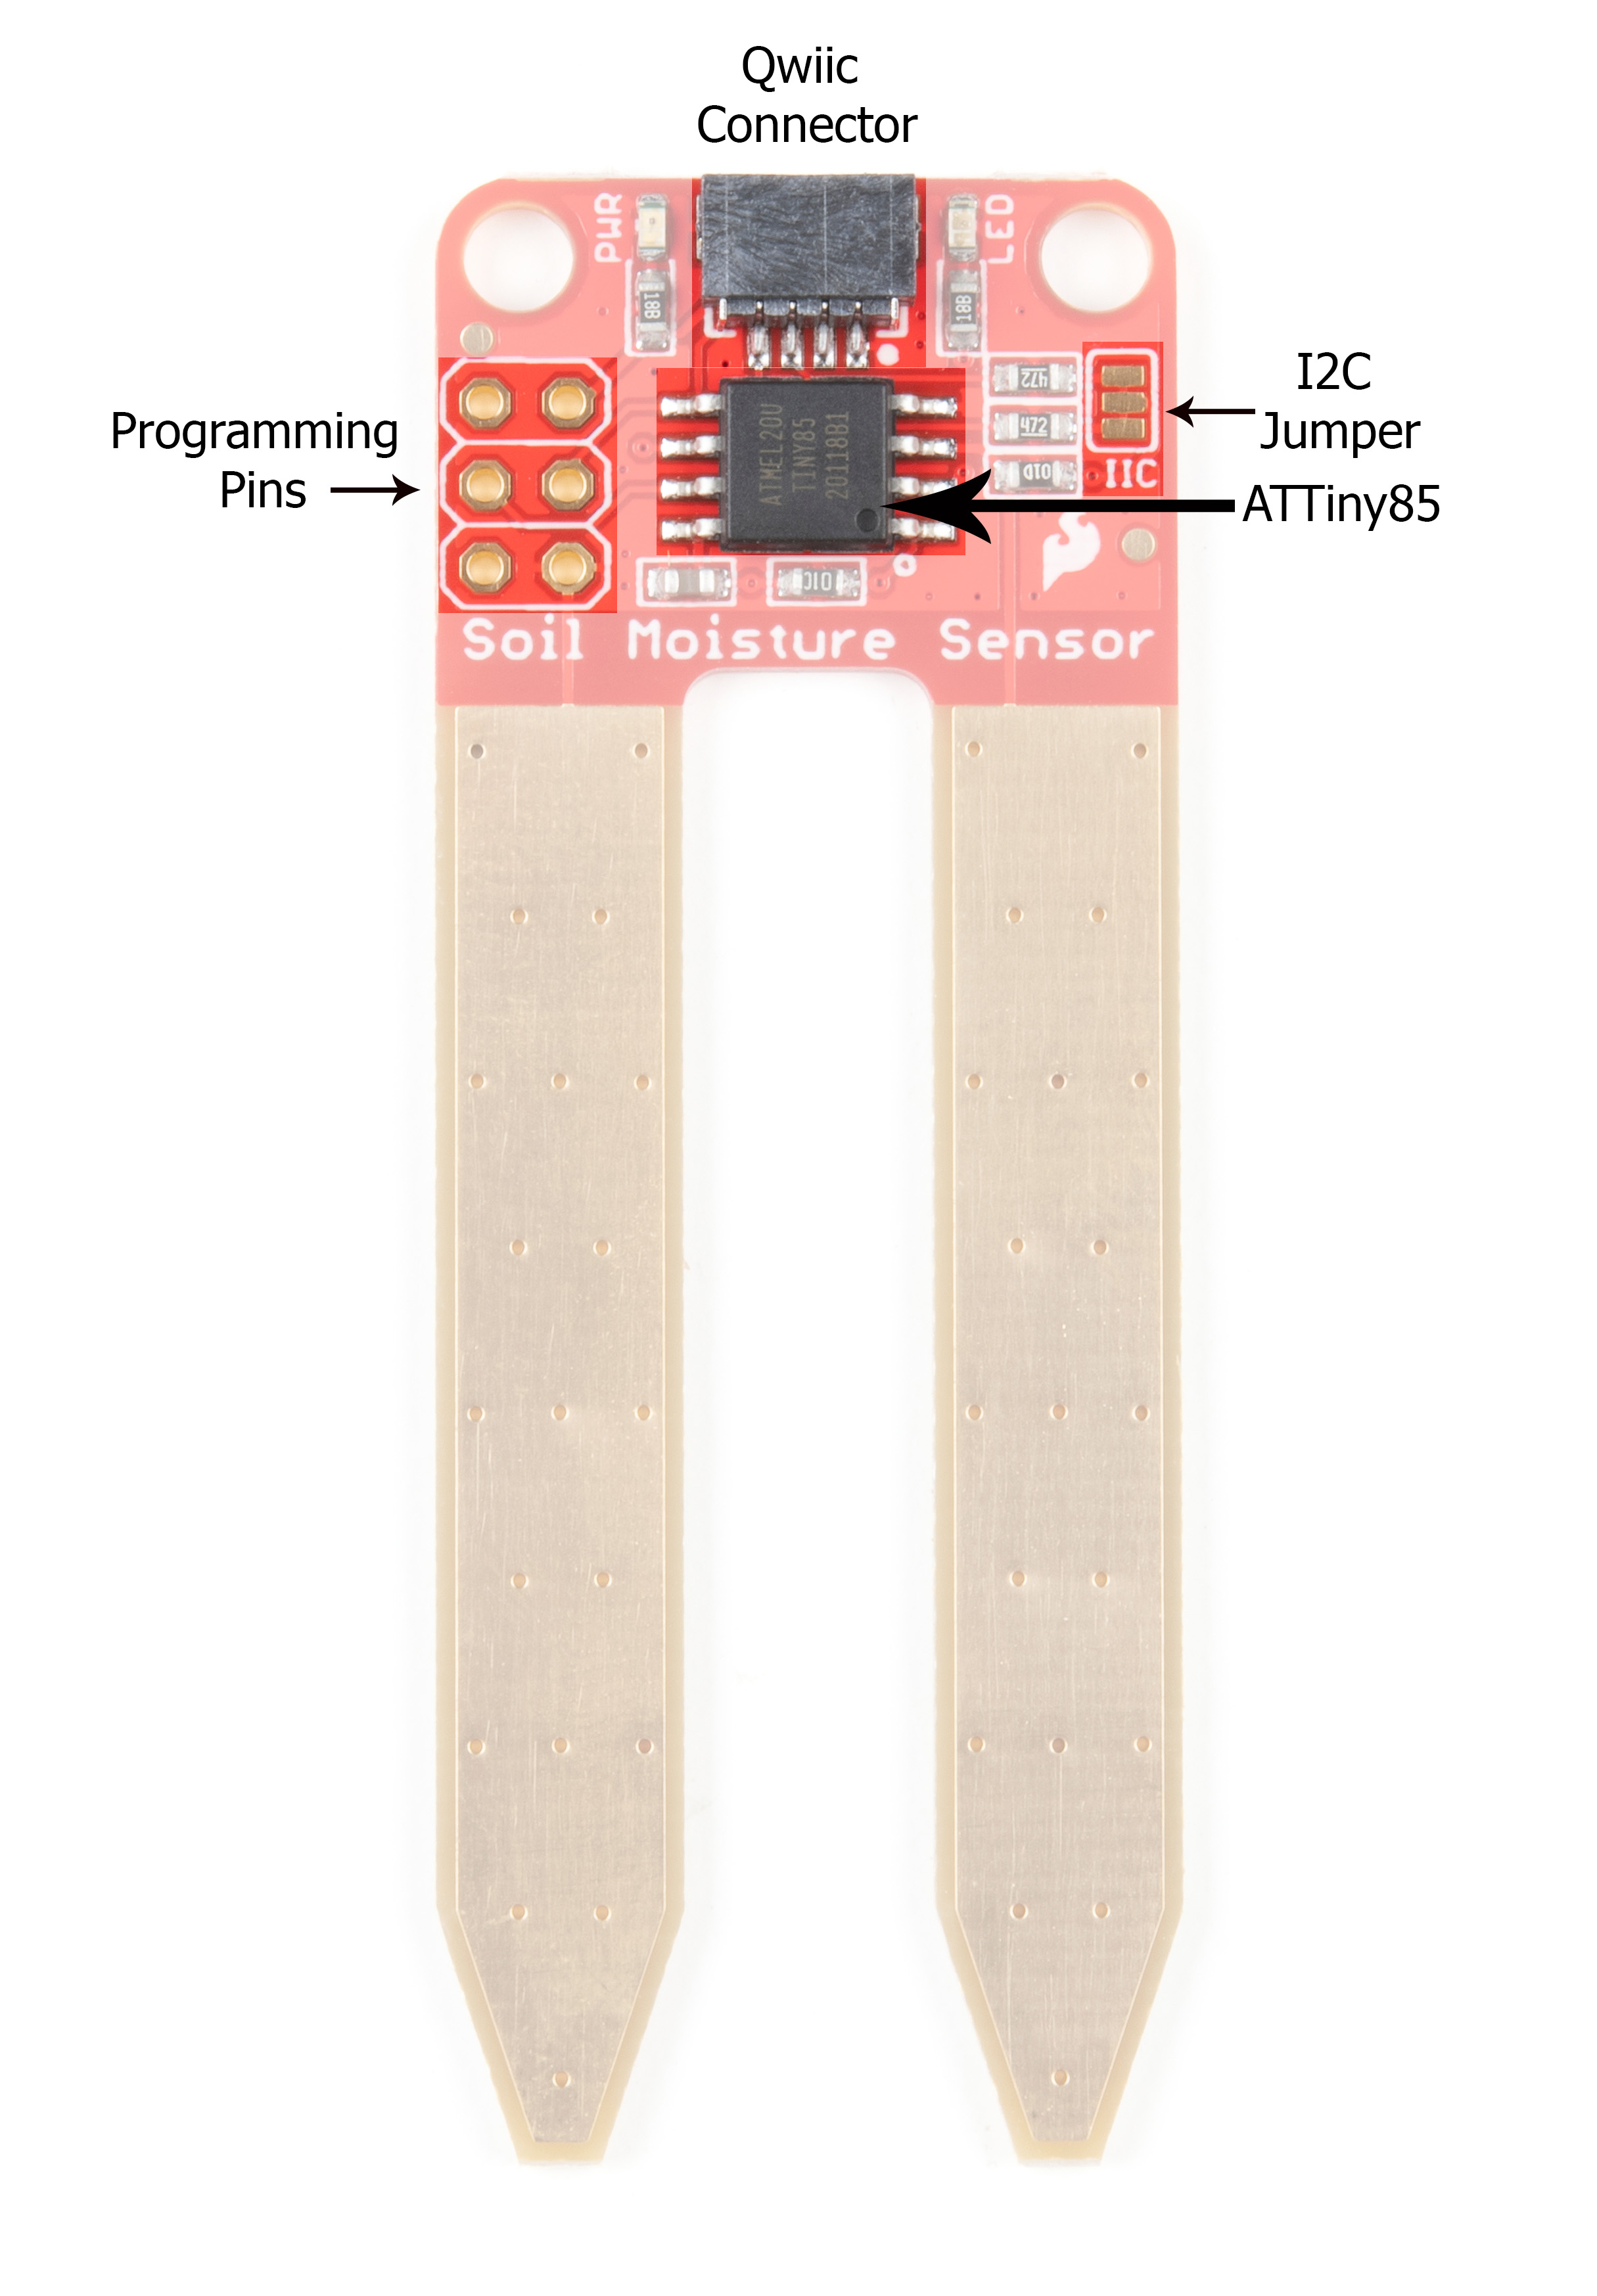
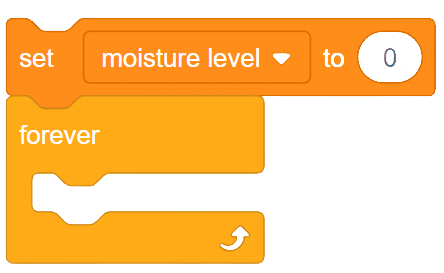
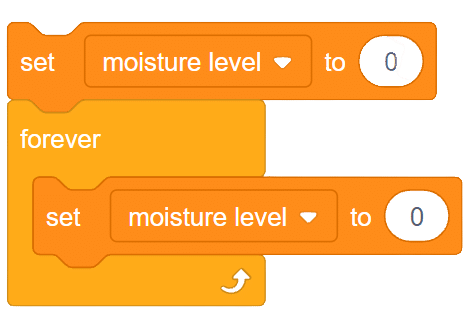
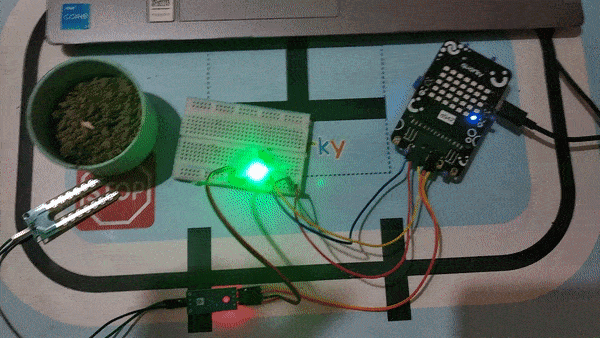
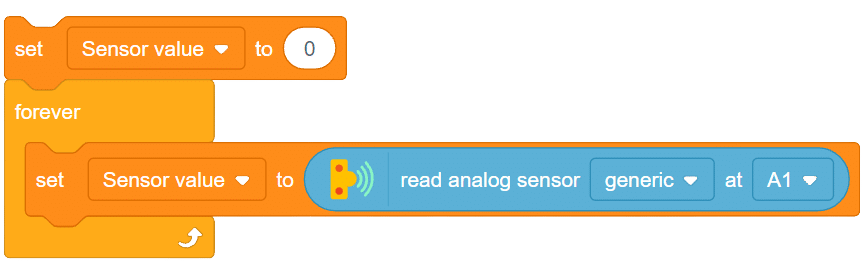
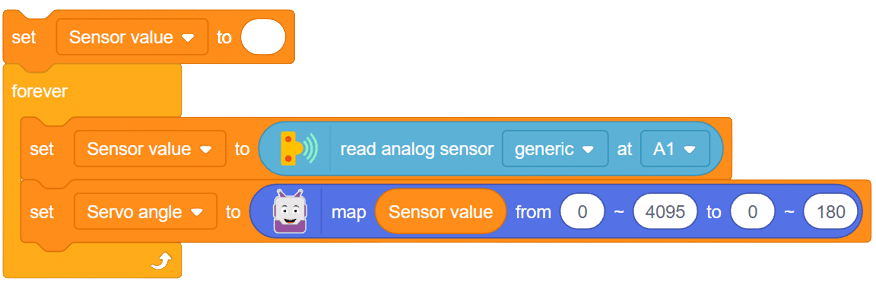
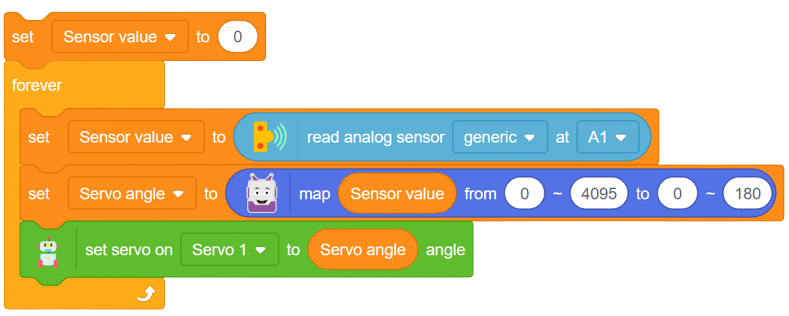
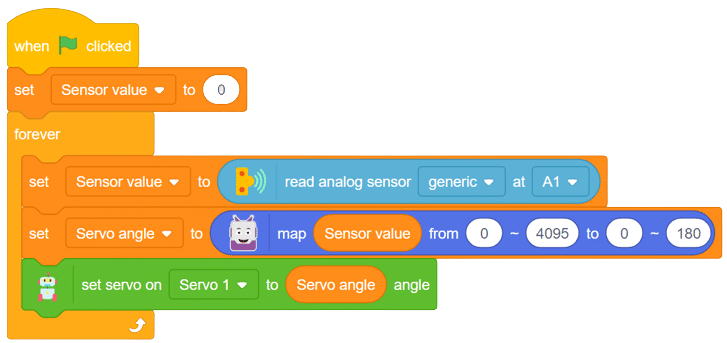
A soil moisture sensor is a valuable tool used to determine the moisture content in the soil, crucial for efficient gardening, farming, and agricultural practices. This analog sensor generates varying output values depending on the moisture level present in the soil. Typically, it operates as a two-pin circuit, with these pins responsible for powering up the sensor module. To obtain soil moisture readings, a voltage divider circuit is employed on the negative pin of the sensor, resulting in a signal pin that provides the moisture level data. Alternatively, some sensor modules come with a controller circuit that automatically converts the 2-pin connection into a 3-pin output, simplifying the process of accessing moisture values.
Below is a simple circuit diagram and code to get you started with monitoring soil moisture using an Arduino board. By following these steps, you can create your own moisture monitoring system with ease. Let’s begin!

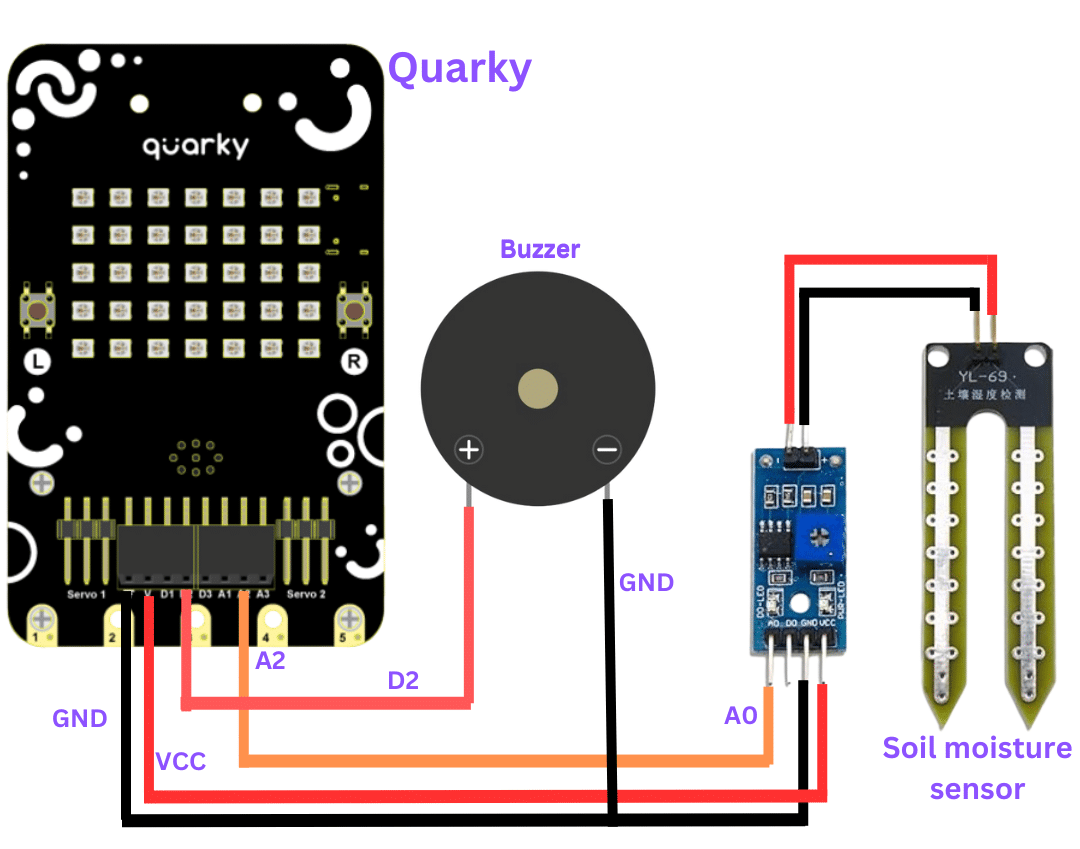
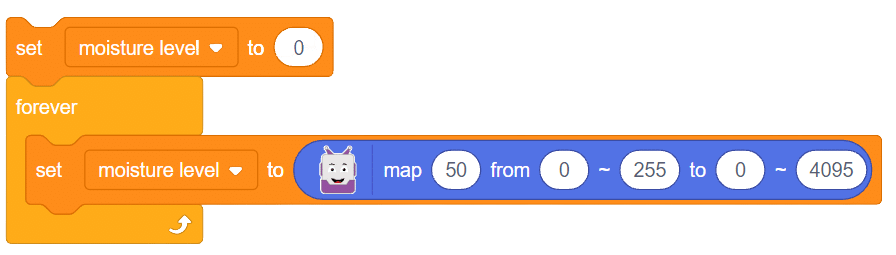

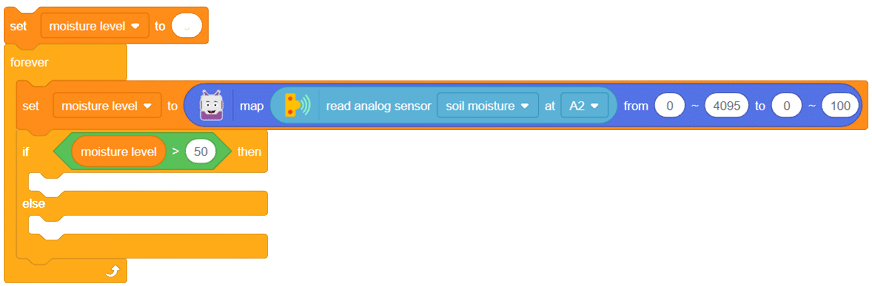

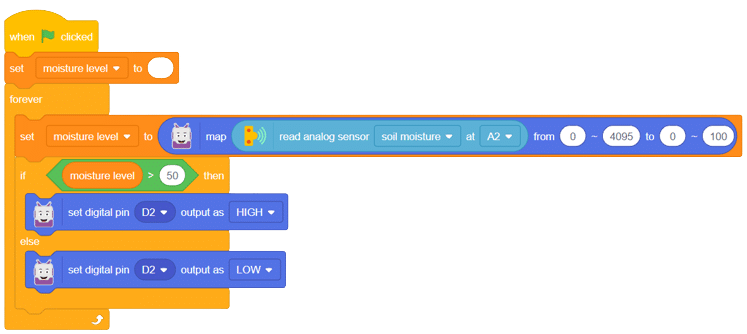
With these steps, your script is complete, and you can now monitor the soil moisture effectively using the soil moisture sensor and Arduino board. Happy gardening and farming!
Exception handling is a fundamental aspect of Python programming to manage errors gracefully. In this tutorial, we delve into handling exceptions without specifying a particular exception type. We demonstrate the use of a generic except block to catch any unanticipated exceptions. With a practical example, you’ll gain valuable insights into managing unforeseen errors in your Python code.
print("Handling exceptions without naming them")
try:
 numerator=50
 denom=int(input("Enter the denominator"))
 quotient=(numerator/denom)
 print("Division performed successfully")
except ValueError:
 print("Only INTEGERS should be entered")
except:
print(" OOPS.....SOME EXCEPTION RAISED")>>Handling exceptions without naming them
>>Enter the denominator: 5
>>Division performed successfully
>>Enter the denominator: abc
>>Only INTEGERS should be entered
>>Enter the denominator: 0
>>OOPS…..SOME EXCEPTION RAISED
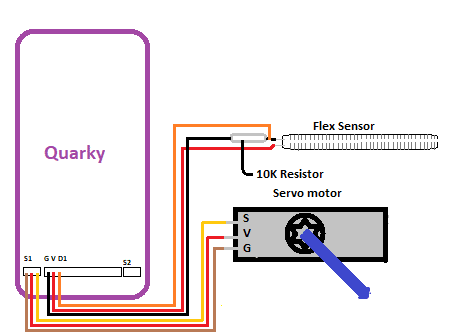
The flex sensor is an ingenious device employing carbon on a plastic strip to serve as a variable resistor. As the sensor bends in one direction, its resistance varies accordingly. The more it bends, the higher the resistance becomes. This unique property makes it an ideal choice for applications where detecting bending or flexing is necessary.
In this example, we will be interfacing a flex sensor with Quarky and based on the change in its resistance we’ll be controlling the movement of our servomotor.
Circuit Diagram


Output GIFs are need to be updated
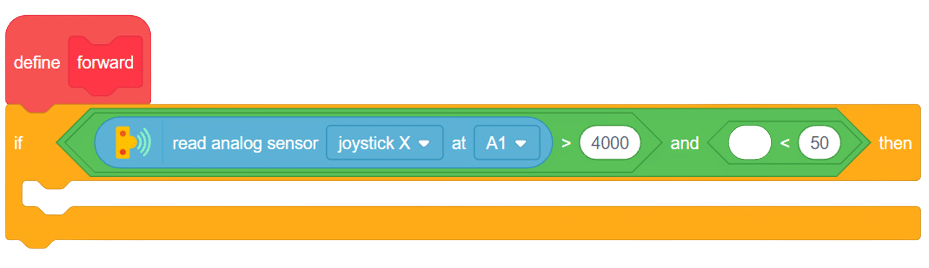
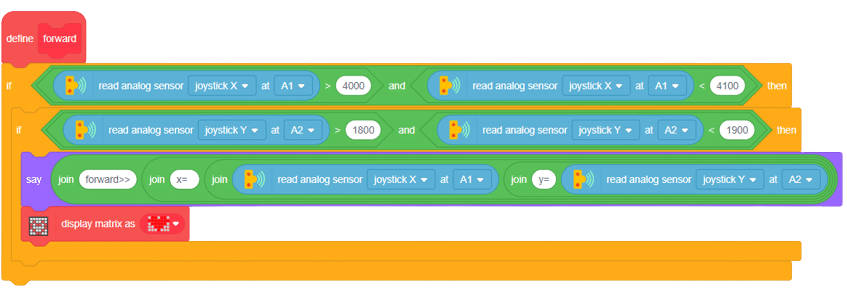
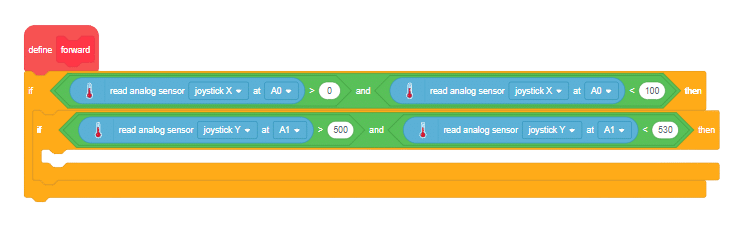
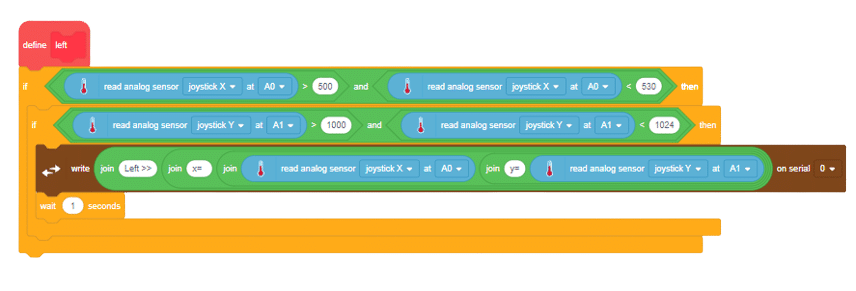
A joystick is an input device used to control the movement or actions of a computer, video game console, or other electronic device. In gaming, joysticks are often used to control the movement of characters or vehicles in a virtual environment. They provide analog input, meaning the degree of movement can vary based on how far the handle is pushed in a particular direction. In aviation and flight simulation, joysticks are commonly used to simulate the control of aircraft, providing pitch, roll, and yaw inputs. Some advanced joysticks also come with additional features such as throttle controls, programmable buttons, and force feedback to enhance the gaming or simulation experience. below is a simple animation of a joystick.

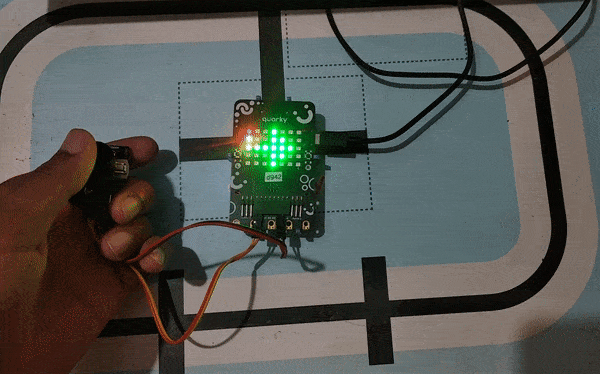
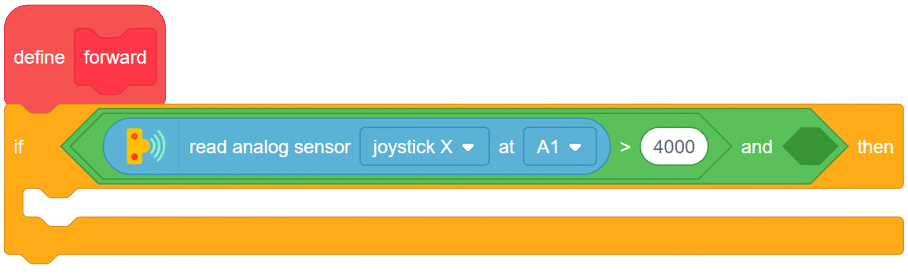
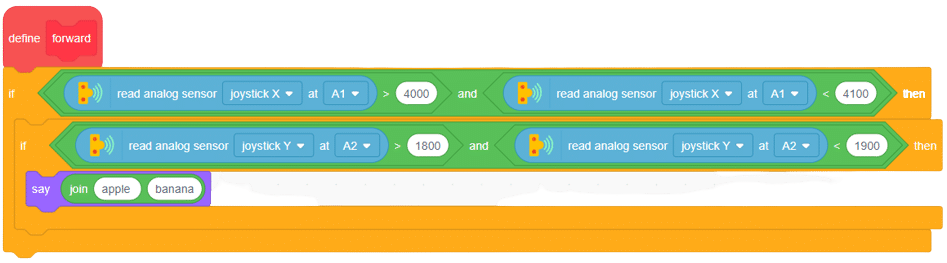
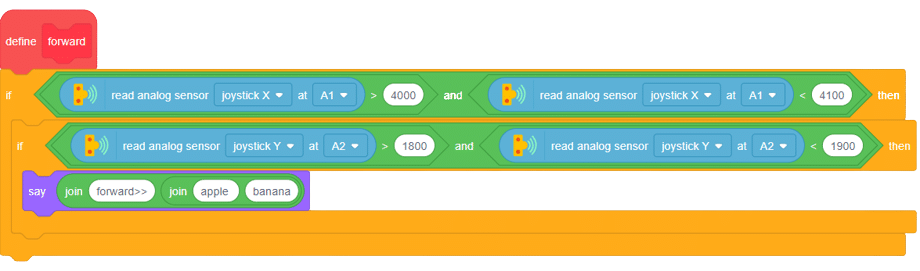
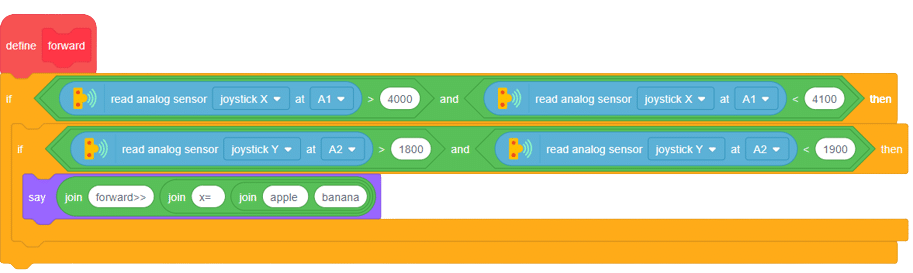
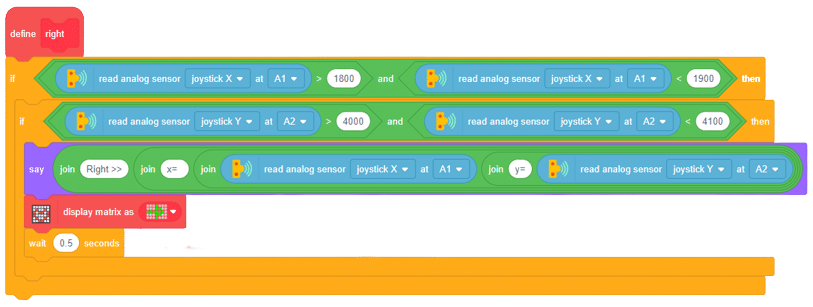
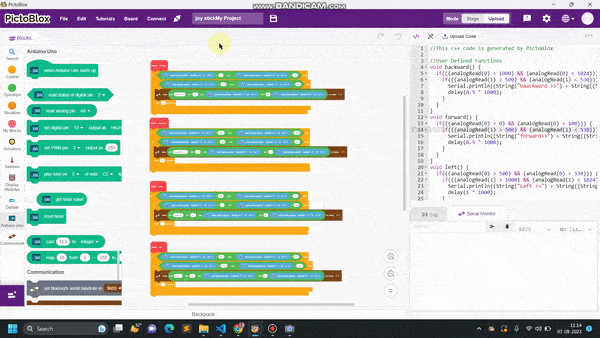
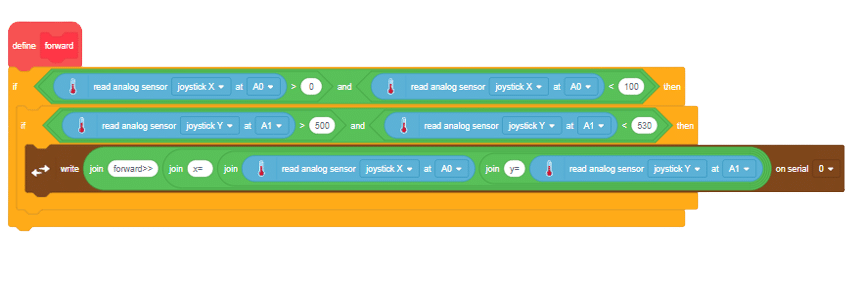
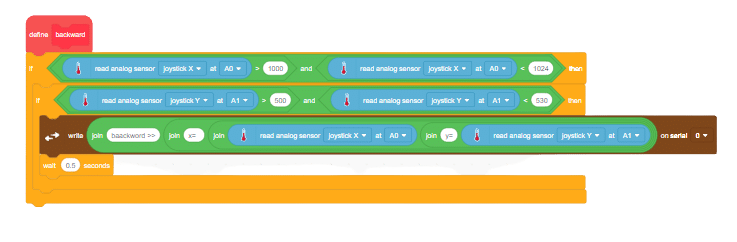
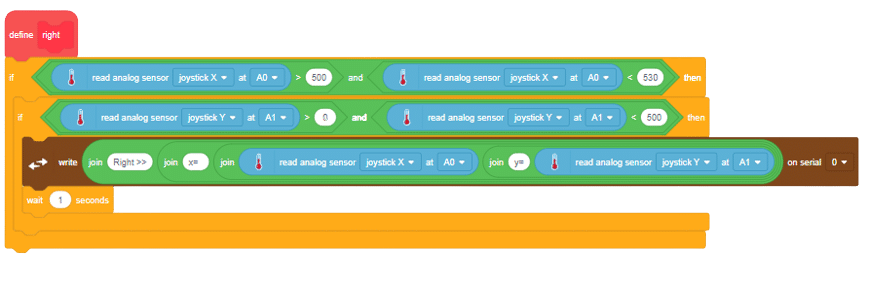
In this example, we’ll be interfacing a joystick with Quarky and try to find different directions for our robot by moving the joystick along the x and y axis let’s begin!!
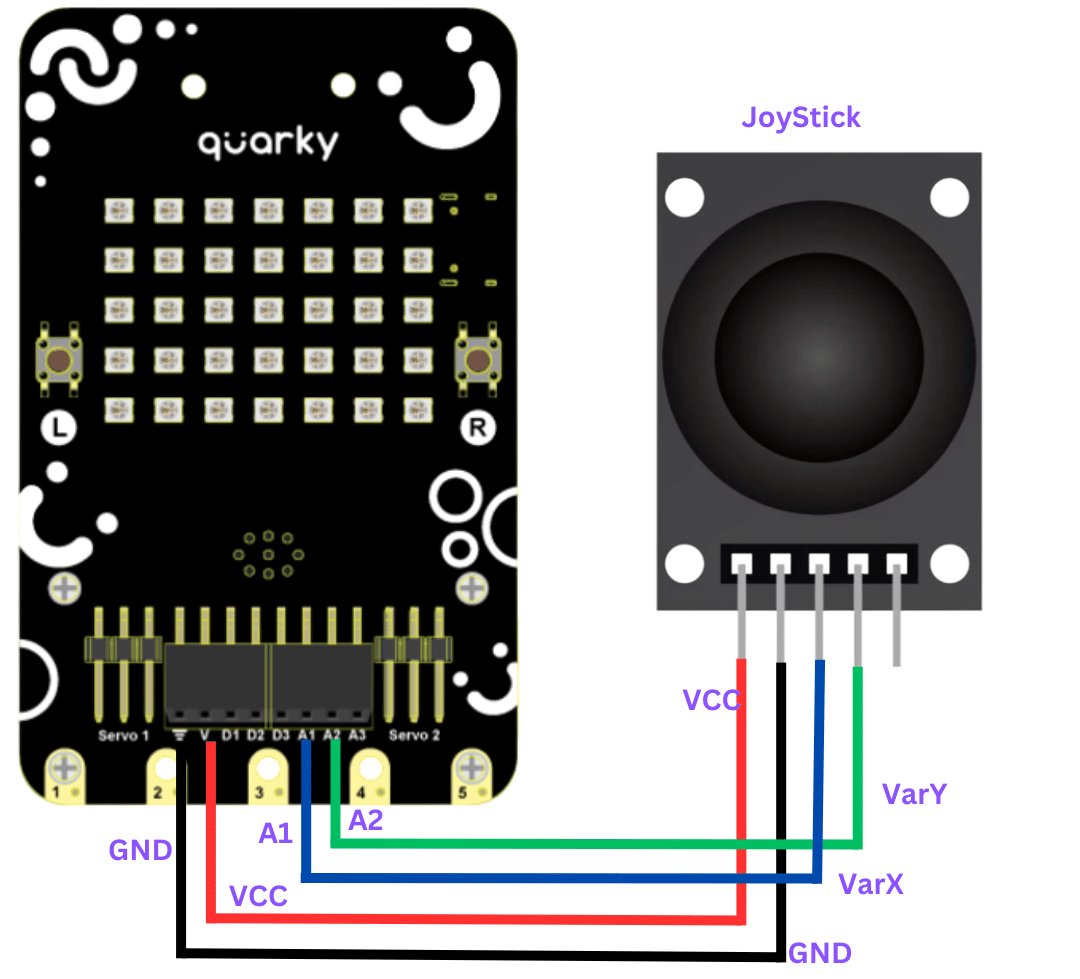
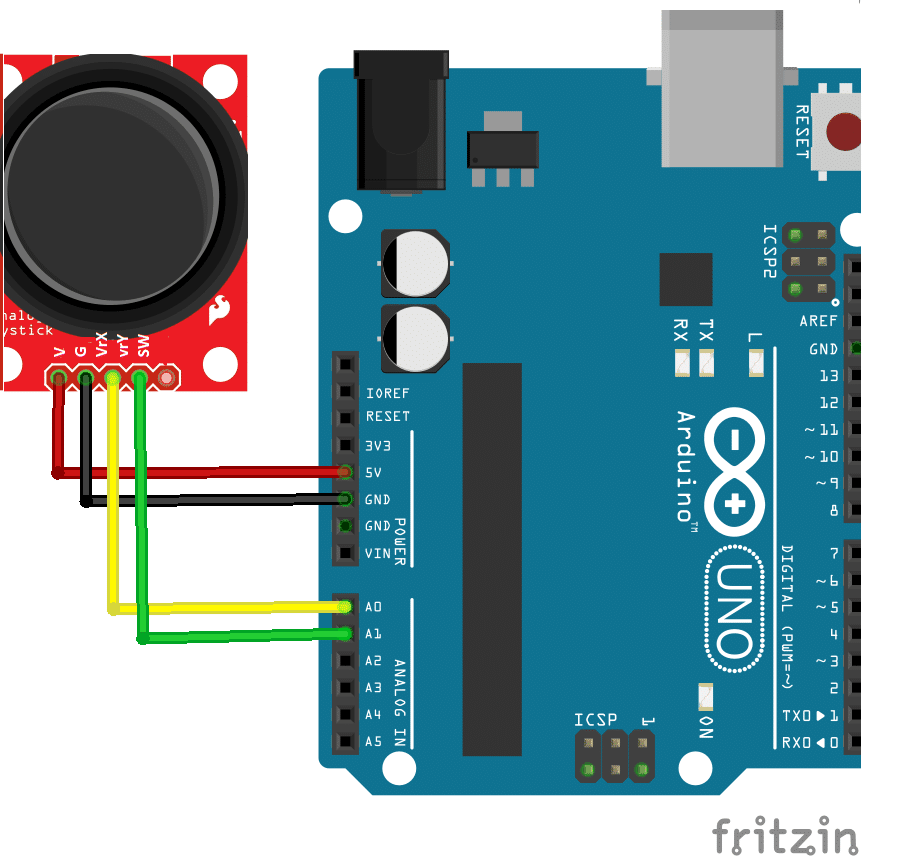
connection
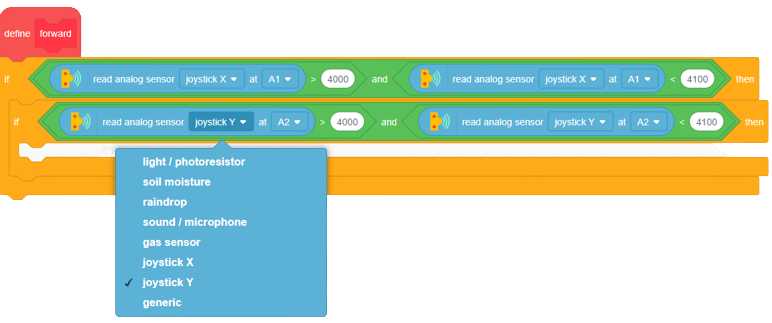
JoyStick Quarky
GND GND
5V V
VarX A1
VarY A2
this is logic we will be using
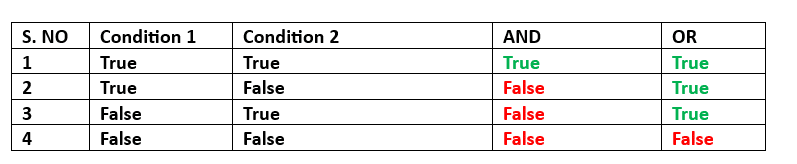
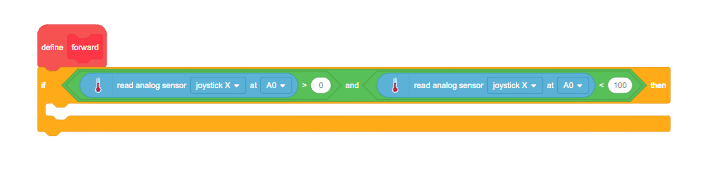
Remember that whenever we are moving the joystick in any direction, the value of both X and Y axis changes simultaneously, so we will be defining a range for both the X-axis and Y-axis so that when their values lie under this range our system must be able to decide the direction as forward,backward, left or right. based on the ranges and logic.

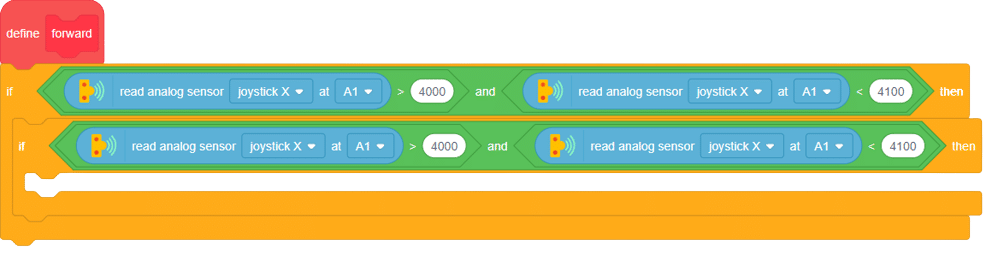
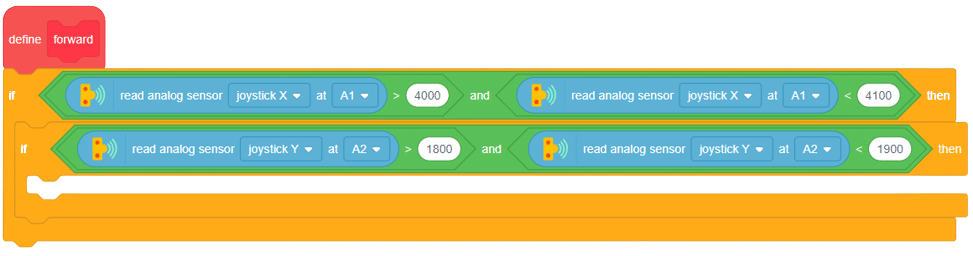

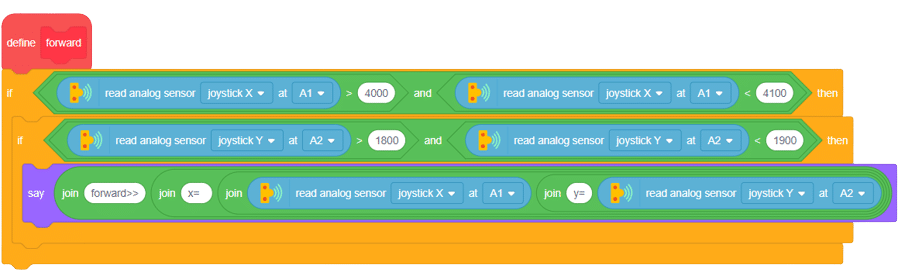

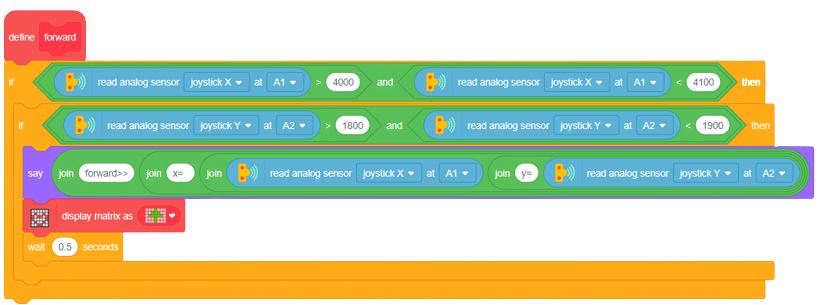
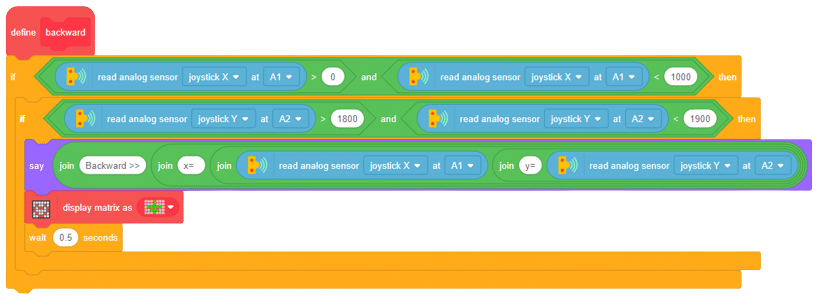
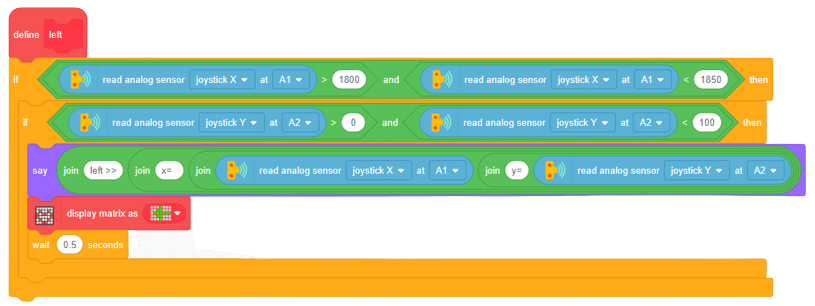


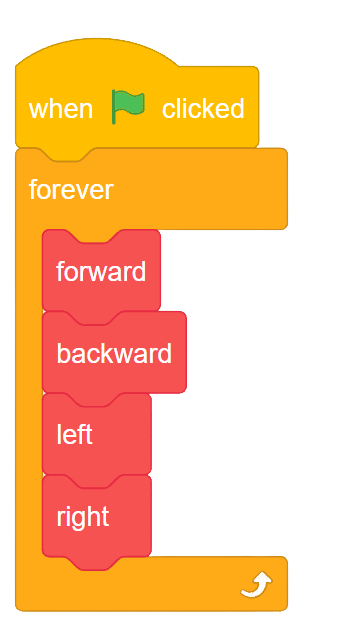
By following all the above steps, you will be able to control the robotic car in any direction you want.

Joystick Is Basically Input Device That Will Be Used TO Control The Robotics And It Has Been Also Used In Gaming. The Joystick Are Different Types And Uses In Different Purposes. The Above Images Shows The Pins That Will Be Used For Interfacing With Hardware. We Know About The First Two Pin That Is Basic Pins Which Is Used In Every Hardware. That Is +5V And Another Is Ground. Another Three Pins Are Input And Output Pins. The VRx And VRy Are The Input Pin And SW Is The Output Pines Will Briefly Understand About The Interfacing Joystick With Arduino.
 click on communication extensions and drag “set serial () baud rate to () ” into the scripting area.
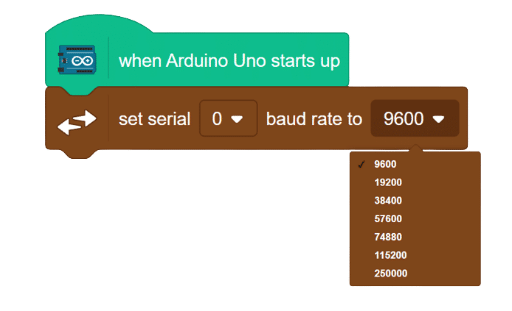

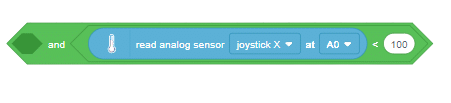
 Again from the operator palette drag less then operator and insert in second space if the AND operator.


Effective exception handling is vital for reliable Python code. In this guide, we delve into the finally clause, a potent construct for ensuring code cleanup regardless of exceptions. You’ll see how to manage division errors, including division by zero and non-integer inputs, all while executing essential tasks with the finally clause.
print("Handling exception using try...except...else...finally")
try:
  numerator=50
  denom=int(input("Enter the denominator: "))
  quotient=(numerator/denom)
  print("Division performed successfully")
except ZeroDivisionError:
  print("Denominator as ZERO is not allowed")
except ValueError:
  print("Only INTEGERS should be entered")
else:
  print("The result of division operation is ", quotient)
finally:
print("OVER AND OUT")>>Handling exception using try…except…else…finally
>>Enter the denominator: 5
>>Division performed successfully
>>The result of the division operation is 10.0
>>OVER AND OUT
Exception handling is a vital aspect of writing reliable Python code. In this guide, we delve into the powerful finally clause, which allows you to recover from exceptions while ensuring essential code cleanup. Through a practical example, you’ll learn how to handle division errors gracefully and execute necessary post-exception tasks.
print("Practicing for try block")
try:
  numerator=50
  denom=int(input("Enter the denominator"))
  quotient=(numerator/denom)
  print("Division performed successfully")
except ZeroDivisionError:
  print("Denominator as ZERO is not allowed")
else:
  print("The result of division operation is ", quotient)
finally:
print("OVER AND OUT")>>Practicing for try block Enter the denominator: 5
>>Division performed successfully
>>The result of division operation is 10.0
>>OVER AND OUT
File manipulation is a crucial skill for programmers working with data and files. In this tutorial, we delve into the seek() and tell() methods in Python, which allow you to navigate and extract data from files with precision. Through a practical example, you’ll learn how to move a file object, set its position, and retrieve content efficiently.
print("Learning to move the file object")
fobject = open("testfile.txt", "r+")
str = fobject.read()
print(str)
print("Initially, the position of the file object is: ", fobject.tell())

# Seek back to the beginning of the file before reading again
fobject.seek(0)
print("Now the file object is at the beginning of the file: ", fobject.tell())
fobject.seek(10)
print("We are moving to the 10th byte position from the beginning of the file")
print("The position of the file object is at", fobject.tell())
str = fobject.read()
print(str)

fobject.close()>>Learning to move the file object
>>roll_numbers = [1, 2, 3, 4, 5, 6]
>> Initially, the position of the file object is: 33
>> Now the file object is at the beginning of the file: 0
> We are moving to the 10th byte position from the beginning of the file
>> The position of the file object is at 10 >> rs = [1, 2, 3, 4, 5, 6]
In the realm of data storage, the Python pickle module plays a crucial role. This tutorial delves into pickling, a process that converts Python objects into a byte stream for secure storage or transmission. We’ll explore a practical example of pickling data, shedding light on how to serialize and deserialize complex structures using this versatile module.
import pickle
listvalues=[1,"Geetika",'F', 26]
fileobject=open("mybinary.dat", "wb")
pickle.dump(listvalues,fileobject)
fileobject.close()The code snippet itself doesn’t generate any visible output. However, it successfully pickles the listvalues data into the “mybinary.dat” file using the pickle.dump() function. This process involves converting the Python data structure (in this case, the list) into a byte stream that can be stored in a file.
Text file manipulation is a fundamental skill for Python programmers. In this tutorial, we provide a comprehensive guide on creating text files and writing data to them. Through a step-by-step example, you’ll learn how to interact with users to input data and populate a text file, enhancing your Python programming capabilities.
# program to create a text file and add data
fileobject=open("practice.txt","w+")
while True:
 data= input("Enter data to save in the text file: ")
 fileobject.write(data)
 ans=input("Do you wish to enter more data?(y/n): ")
 if ans=='n': break
fileobject.close()>> Enter data to save in the text file: python
>>Do you wish to enter more data?(y/n): y
>>Enter data to save in the text file: i love
>>Do you wish to enter more data?(y/n): n
Effectively reading and displaying data from text files is a vital skill for any Python developer. In this tutorial, we delve into file reading techniques, guiding you through opening files, reading lines, and user interactions. Through a step-by-step example, you’ll grasp how to access and present file data in an organized manner.
# program to create a text file and add data
fileobject=open("practice.txt","w+")
while True:
 data= input("Enter data to save in the text file: ")
 fileobject.write(data)
 ans=input("Do you wish to enter more data?(y/n): ")
 if ans=='n': break
fileobject=open("practice.txt","r")
str = fileobject.readline()
while str:
 print(str)
 str=fileobject.readline()
fileobject.close() >>Enter data to save in the text file: i love
>>Do you wish to enter more data?(y/n): y
>>Enter data to save in the text file: python
>>Do you wish to enter more data?(y/n): n
>>i lovepython
Binary file manipulation is a key skill for programmers dealing with data storage and retrieval. In this tutorial, we delve into binary file operations in Python, showcasing how to write and read employee records. By leveraging the pickle module, you’ll explore practical examples that demonstrate data serialization and deserialization, allowing you to store and retrieve complex data structures efficiently.
# Program to write and read employee records in a binary file
import pickle
print("WORKING WITH BINARY FILES")
bfile=open("empfile.dat","ab")
recno=1
print ("Enter Records of Employees")
print()
#taking data from user and dumping in the file as list object
while True:
 print("RECORD No.", recno)
 eno=int(input("\tEmployee number : "))
 ename=input("\tEmployee Name : ")
 ebasic=int(input("\tBasic Salary : "))
 allow=int(input("\tAllowances : "))
 totsal=ebasic+allow
 print("\tTOTAL SALARY : ", totsal)
 edata=[eno,ename,ebasic,allow,totsal]
 pickle.dump(edata,bfile)
 ans=input("Do you wish to enter more records (y/n)? ")
 recno=recno+1
 if ans.lower()=='n':
    print("Record entry OVER ")
    print()
    break
# retrieving the size of file
print("Size of binary file (in bytes):",bfile.tell())
bfile.close()
# Reading the employee records from the file using load() module
print("Now reading the employee records from the file")
print()
readrec=1
try:
  with open("empfile.dat","rb") as bfile:
    while True:
      edata=pickle.load(bfile)
      print("Record Number : ",readrec)
      print(edata)
      readrec=readrec+1
except EOFError:
 pass
bfile.close()>>WORKING WITH BINARY FILES
>>Enter Records of Employees
>>RECORD No. 1
>>Employee number : 2
Employee Name : shad
Basic Salary : 12000
Allowances : 1200
TOTAL SALARY : 13200>>Do you wish to enter more records (y/n)? y
>>RECORD No. 2
>>Employee number : 5
Employee Name : anand
Basic Salary : 12000
Allowances : 1300
TOTAL SALARY : 13300>>Do you wish to enter more records (y/n)? n
>>Record entry OVER
>>Size of binary file (in bytes): 241
>>Now reading the employee records from the file
>>Record Number : 1
>>[2, ‘shad’, 12000, 1200, 13200]
>>Record Number : 2
>>[5, ‘anand’, 12000, 1300, 13300]
Data retrieval is a vital aspect of programming, and Python’s pickle module simplifies the process through unpickling. This tutorial dives into the art of unpickling, explaining how to extract serialized data from binary files. By demonstrating the process with practical examples, you’ll gain insights into how to effectively retrieve stored data using Python.
import pickle
print("The data that were stored in file are: ")
fileobject=open("mybinary.dat","rb")
objectvar=pickle.load(fileobject)
fileobject.close()
print(objectvar)>>The data that were stored in file are:
>>[1, ‘Geetika’, ‘F’, 26]
Text file handling is a core skill for programmers managing data. In this tutorial, we dive into writing and reading data to and from text files. Through a step-by-step example, you’ll grasp how to create, write, and read text files using Python. Enhance your programming prowess with these essential techniques.
fobject=open("testfile.txt","w") # creating a data file
sentence=input("Enter the contents to be written in the file: ")
fobject.write(sentence) # Writing data to the file
fobject.close() # Closing a file
print("Now reading the contents of the file: ")
fobject=open("testfile.txt","r")
#looping over the file object to read the file
for str in fobject:
  print(str)
fobject.close()>>Enter the contents to be written in the file: happy
>>Now reading the contents of the file:
>>happy
Visualizing the contents of a stack is essential for understanding how stack data structures work. In this tutorial, we introduce the display function, which enables the visualization of stack elements. By providing a hands-on example, you’ll gain insight into printing stack elements in reverse order, improving your grasp of Python stack operations.
def display(glassStack):
  x=len(glassStack)
  print("Current elements in the stack are: ")
  for i in range(x-1,-1,-1):
     print(glassStack[i])
# First, create a glassStack list
glassStack = [1, 2, 3, 4]

# Call the display function to print the elements in the stack
display(glassStack)>>Current elements in the stack are:
>>4
>>3
>>2
>>1
Understanding stack data structures is crucial for various applications. In this tutorial, we explore the implementation of a stack in Python and introduce the isEmpty function, which helps assess whether a stack is empty or not. By providing practical examples, you’ll delve into the core concepts of stack operations and gain valuable insights into managing data using Python.
def isEmpty(glassStack):
    return len(glassStack) == 0

glassStack = []
print(isEmpty(glassStack))  # Output: True

glassStack = [1, 2, 3]
print(isEmpty(glassStack)) # Output: False>> True
>>False
Manipulating stack elements is a crucial skill in programming. In this tutorial, we delve into the opPop function, which facilitates the removal of the top element from a stack. Through practical examples, you’ll learn how to utilize this function to pop elements and handle underflow situations, enhancing your understanding of stack data structures in Python.
def isEmpty(glassStack):
    return len(glassStack) == 0

def opPop(glassStack):
    if isEmpty(glassStack):
        print('underflow')
        return None
    else:
        return glassStack.pop()

# Test the opPop function
glassStack = [1, 2, 3, 4]
result = opPop(glassStack)
print(result)  # Output: 4
print(glassStack)  # Output: [1, 2, 3] (the last element 4 is removed)

empty_stack = []
result_empty = opPop(empty_stack)
print(result_empty) # Output: underflow>>4
>>[1, 2, 3]
>>underflow
Stack operations are fundamental in computer science and programming. In this tutorial, we delve into various stack operations implemented in Python. From adding and removing elements to checking stack status and displaying contents, you’ll gain a solid understanding of stack manipulation. Through hands-on examples, you’ll enhance your Python programming skills and grasp the essence of stack data structures.
def isEmpty(glassStack):
    return len(glassStack) == 0

def opPush(glassStack, element):
    glassStack.append(element)

def size(glassStack):
    return len(glassStack)

def opPop(glassStack):
    if isEmpty(glassStack):
        print('underflow')
        return None
    else:
        return glassStack.pop()

def top(glassStack):
    if isEmpty(glassStack):
        print('Stack is empty')
        return None
    else:
        x = len(glassStack)
        return glassStack[x - 1]

def display(glassStack):
    x = len(glassStack)
    print("Current elements in the stack are:")
    for i in range(x - 1, -1, -1):
        print(glassStack[i])

# Initialize the stack
glassStack = list()

# add elements to stack
element = 'glass1'
print("Pushing element ", element)
opPush(glassStack, element)

element = 'glass2'
print("Pushing element ", element)
opPush(glassStack, element)

# display number of elements in stack
print("Current number of elements in stack is", size(glassStack))

# delete an element from the stack
element = opPop(glassStack)
print("Popped element is", element)

# add a new element to the stack
element = 'glass3'
print("Pushing element ", element)
opPush(glassStack, element)

# display the last element added to the stack
print("Top element is", top(glassStack))

# display all elements in the stack
display(glassStack)

# delete all elements from the stack
while True:
    item = opPop(glassStack)
    if item is None:
        print("Stack is empty now")
        break
    else:
        print("Popped element is", item)
>>Pushing element glass1
>>Pushing element glass2
>>Current number of elements in stack is 2
>>Popped element is glass2
>>Pushing element glass3
>>Top element is glass3
>>Current elements in the stack are:
>>glass3
>>glass1
>>Popped element is glass3
>>Popped element is glass1
>>Stack is empty now
The top function in Python plays a crucial role in accessing the top element of a stack without removing it. In this tutorial, we delve into the implementation and usage of the top function, which ensures efficient stack element retrieval. Through practical examples and explanations, you’ll gain insights into managing and navigating stack data structures using Python.
def isEmpty(glassStack):
    return len(glassStack) == 0

def top(glassStack):
    if isEmpty(glassStack):
        print('Stack is empty')
        return None
    else:
        x = len(glassStack)
        element = glassStack[x - 1]
        return element

# Test the top function
glassStack = [1, 2, 3, 4]
result = top(glassStack)
print(result)  # Output: 4

empty_stack = []
result_empty = top(empty_stack)
print(result_empty) # Output: Stack is empty>>4
>>Stack is empty
Queues play a pivotal role in managing data structures. This tutorial delves into the implementation of queues in Python, covering key operations like enqueue and dequeue. Through real-world examples, you’ll learn how to create, manipulate, and efficiently manage queues, enhancing your Python programming skills along the way.
def isEmpty(myQueue):
    return len(myQueue) == 0

def enqueue(myQueue, element):
    myQueue.append(element)

def dequeue(myQueue):
    if isEmpty(myQueue):
        print('Queue is empty')
        return None
    else:
        return myQueue.pop(0)

def size(myQueue):
    return len(myQueue)

# Initialize the queue
myQueue = list()

# each person to be assigned a code as P1, P2, P3,...
element = input("Enter person’s code to enter in the queue: ")
enqueue(myQueue, element)

element = input("Enter person’s code for insertion in the queue: ")
enqueue(myQueue, element)

print("Person removed from the queue is:", dequeue(myQueue))
print("Number of people in the queue is:", size(myQueue))

element = input("Enter person’s code to enter in the queue: ")
enqueue(myQueue, element)

element = input("Enter person’s code to enter in the queue: ")
enqueue(myQueue, element)

element = input("Enter person’s code to enter in the queue: ")
enqueue(myQueue, element)

print("Now we are going to remove remaining people from the queue")
while not isEmpty(myQueue):
    print("Person removed from the queue is", dequeue(myQueue))
print("queue is empty")>>Enter person’s code to enter in the queue: P1
>>Enter person’s code for insertion in the queue: P2
>>Person removed from the queue is: P1
>>Number of people in the queue is: 1
>>Enter person’s code to enter in the queue: P3
>>Enter person’s code to enter in the queue: P4
>>Enter person’s code to enter in the queue: P5
>>Now we are going to remove remaining people from the queue
>>Person removed from the queue is P2
>>Person removed from the queue is P3
>>Person removed from the queue is P4
>>Person removed from the queue is P5
>>queue is empty
Python deques (double-ended queues) offer versatile data structure capabilities. In this tutorial, you’ll delve into deque implementation, covering key operations such as insertion, retrieval, and deletion. Through practical examples and explanations, you’ll learn how to create and manage deques effectively, enhancing your Python programming skills.
def insertFront(myDeque, element):
    myDeque.insert(0, element)

def getFront(myDeque):
    if not isEmpty(myDeque):
      return myDeque[0]
      print("Queue underflow")
      return None

def getRear(myDeque):
    if not isEmpty(myDeque):
      return myDeque[len(myDeque) - 1]
      print("Queue underflow")
      return None

def insertRear(myDeque, element):
    myDeque.append(element)

def isEmpty(myDeque):
    return len(myDeque) == 0

def deletionRear(myDeque):
    if not isEmpty(myDeque):
      return myDeque.pop()
      print("Queue underflow")
      return None

def deletionFront(myDeque):
    if not isEmpty(myDeque):
      return myDeque.pop(0)
      print("Queue underflow")
      return None

def main():
    dQu = list()
    choice = int(input('Enter 1 to use as normal queue, 2 otherwise: '))
    if choice == 1:
        element = input("Data for insertion at rear: ")
        insertRear(dQu, element)
        element = getFront(dQu)
        if element is not None:
          print("Data at the beginning of queue is", element)
        element = input("Data for insertion at rear: ")
        insertRear(dQu, element)
        data = deletionFront(dQu)
        if data is not None:
          print('Data removed from front of queue is', data)
        data = deletionFront(dQu)
        if data is not None:
          print('Data removed from front of queue is', data)
    else:
        element = input("Data for insertion at front: ")
        insertFront(dQu, element)
        element = getRear(dQu)
        if element is not None:
          print("Data at the end of queue is", element)
        element = input("Data for insertion at front: ")
        insertFront(dQu, element)
        data = deletionRear(dQu)
        if data is not None:
          print('Data removed from rear of queue is', data)
        data = deletionRear(dQu)
        if data is not None:
          print('Data removed from rear of queue is', data)

if __name__ == "__main__":
    main()
>>Enter 1 to use as normal queue, 2 otherwise: 1
>>Data for insertion at rear: A
>>Data at the beginning of queue is A
>>Data for insertion at rear: B
>>Data removed from front of queue is A
>>Data removed from front of queue is B
Bubble sort is a fundamental sorting algorithm that can be implemented using Python. This tutorial provides a comprehensive guide to implementing the bubble sort algorithm. Through practical examples and explanations, you’ll understand the logic behind bubble sort and how it efficiently sorts a list of elements in ascending order.
def bubble_Sort(list1):  # Number of passes
    n = len(list1)
    for i in range(n):
        for j in range(0, n-i-1): # size -i-1 because last i elements are already sorted
            if list1[j] > list1[j+1]: # Swap element at jth position with (j+1)th position
                list1[j], list1[j+1] = list1[j+1], list1[j]

numList = [8, 7, 13, 1, -9, 4]
bubble_Sort(numList)
print("The sorted list is:")
for i in range(len(numList)):
print(numList[i], end=" ")>The sorted list is:
>>-9 1 4 7 8 13
Insertion sort is a classic sorting algorithm that can be effectively implemented using Python. This tutorial provides a detailed guide to implementing the insertion sort algorithm. By following practical examples and explanations, you’ll grasp the inner workings of insertion sort and how it efficiently organizes elements in ascending order.
def insertion_Sort(list3):
    n = len(list3)
    for i in range(n):  # Traverse through all elements
        temp = list3[i]  # Store the current element in a temporary variable
        j = i - 1  # Initialize the index of the previous element

        # Move elements of list3[0..i-1], that are greater than temp,
        # to one position ahead of their current position
        while j >= 0 and temp < list3[j]:
            list3[j + 1] = list3[j]  # Shift the element to the right
            j = j - 1

        # The loop above will stop when we find the correct position for temp
        # (i.e., when temp is not smaller than the element to its left).
        # Now, place temp in its correct position
        list3[j + 1] = temp

# Example usage
numList = [8, 7, 13, 1, -9, 4]
insertion_Sort(numList)

print("The sorted list is:")
for i in range(len(numList)):
print(numList[i], end=" ")>The sorted list is:
>>-9 1 4 7 8 13
Selection sort is a simple yet effective sorting algorithm that can be implemented using Python. This tutorial provides a comprehensive guide to implementing the selection sort algorithm. Through practical examples and explanations, you’ll grasp the inner workings of selection sort and how it efficiently organizes elements in ascending order.
def selection_Sort(list2):
    n = len(list2)
    for i in range(n):  # Traverse through all list elements
        min = i
        for j in range(i + 1, len(list2)):  # The left elements are already sorted in previous passes
            if list2[j] < list2[min]:
                min = j
        if min != i:  # Next smallest element is found
            list2[min], list2[i] = list2[i], list2[min]

numList = [8, 7, 13, 1, -9, 4]
selection_Sort(numList)
print("The sorted list is:")
for i in range(len(numList)):
print(numList[i], end=" ")>>The sorted list is:
>>-9 1 4 7 8 13
Binary search is a highly efficient search algorithm used to find a specific element within a sorted list. This tutorial provides a comprehensive guide to implementing the binary search algorithm in Python. You’ll learn the step-by-step process of binary search, its underlying logic, and how it quickly locates elements in a sorted list.
def binarySearch(list, key):
    # Initialize the pointers for the search range.
    first = 0
    last = len(list) - 1

    # Perform binary search while the search range is valid.
    while first <= last:
        # Calculate the index of the middle element in the current search range.
        mid = (first + last) // 2

        # If the middle element is equal to the key, the key is found at index 'mid'.
        if list[mid] == key:
            return mid

        # If the key is greater than the middle element, search the right half of the list.
        elif key > list[mid]:
            first = mid + 1

        # If the key is smaller than the middle element, search the left half of the list.
        elif key < list[mid]:
            last = mid - 1

    # If the key is not found within the loop, return -1 to indicate that it's not present in the list.
    return -1

list1 = []  # Create an empty list

# Ask the user to enter elements in ascending order, stop when they enter -999.
print("Create a list by entering elements in ascending order")
print("Press enter after each element, press -999 to stop")
num = int(input())
while num != -999:
    list1.append(num)
    num = int(input())

# Ask the user to enter the key they want to search for.
n = int(input("Enter the key to be searched: "))

# Call the binarySearch function with the list and key as arguments.
pos = binarySearch(list1, n)

# Check the result of the binarySearch function and print appropriate messages.
if pos != -1:
    print(n, "is found at position", pos + 1)
else:
print(n, "is not found in the list")>>Create a list by entering elements in ascending order
>>Press enter after each element, press –999 to stop
>>1
>>3
>>5
>>7
>>9
>>11
>>13
>>15
>>-999
>>Enter the key to be searched: 7
>>7 is found at position 4
This Python code demonstrates the implementation of the linear search algorithm. Linear search is a simple searching algorithm that sequentially checks each element in a list until a match is found or the entire list has been searched. It’s a straightforward method but might not be efficient for large datasets.
def linearSearch(list, key):
    # function to perform the search
    for index in range(0, len(list)):
        if list[index] == key:  # key is present
            return index + 1  # position of key in list
    return None  # key is not in list
# end of function

list1 = []  # Create an empty list
maximum = int(input("How many elements in your list? "))
print("Enter each element and press enter: ")
for i in range(0, maximum):
    n = int(input())
    list1.append(n)  # append elements to the list
print("The List contents are:", list1)
key = int(input("Enter the number to be searched:"))
position = linearSearch(list1, key)
if position is None:
    print("Number", key, "is not present in the list")
else:
print("Number", key, "is present at position", position)>>How many elements in your list? 5
>>Enter each element and press enter:
>>12
>>45
>>8
>>3
>>67
>>The List contents are: [12, 45, 8, 3, 67]
>>Enter the number to be searched: 8
>>Number 8 is present at position 3
This Python code demonstrates the use of a hash table to perform a search for an element using a hash function. A hash table is a data structure that stores key-value pairs and provides fast retrieval of values based on their keys. In this example, we use a simple hash function to map keys to positions in the hash table.
# Function to check if a key is present in the hash table
def hashFind(key, hashTable):
    if (hashTable[key % 10] == key):  # key is present
        return key % 10 + 1  # return the position
    else:
        return None  # key is not present
# end of function

# Create hashTable with 10 empty positions
hashTable = [None, None, None, None, None, None, None, None, None, None]
print("We have created a hashTable of 10 positions:")
print(hashTable)

# Given list
L = [34, 16, 2, 93, 80, 77, 51]
print("The given list is", L)

# Apply the hash function and populate the hash table
for i in range(0, len(L)):
    hashTable[L[i] % 10] = L[i]

# Print the contents of the hash table
print("The hash table contents are:")
for i in range(0, len(hashTable)):
    print("hashindex=", i, ", value =", hashTable[i])

# Ask the user to enter the number they want to search for
key = int(input("Enter the number to be searched:"))
position = hashFind(key, hashTable)

# Check the result of the hashFind function and print appropriate messages
if position is None:
    print("Number", key, "is not present in the hash table")
else:
    print("Number", key, "present at", position, "position")
>>We have created a hashTable of 10 positions:
>>[None, None, None, None, None, None, None, None, None, None]
>>The given list is [34, 16, 2, 93, 80, 77, 51]
>>The hash table contents are: hashindex= 0 , value = 80
>>hashindex= 1 , value = 51
>>hashindex= 2 , value = 2
>>hashindex= 3 , value = 93
>>hashindex= 4 , value = 34
>>hashindex= 5 , value = 16
>>hashindex= 6 , value = 77
>>hashindex= 7 , value = None
>>hashindex= 8 , value = None
>>hashindex= 9 , value = None
>>Enter the number to be searched: 93
>>Number 93 present at 4 position
This code defines a Python function that calculates the mean of a list of floating point values. The function takes one parameter – a list containing floating point values. It then adds all the numbers in the list and divides the total by the number of elements to compute the mean value. Finally, it prints the calculated mean.
#Function to calculate mean
#The requirements are listed below:
#1. The function should have 1 parameter (list containing floating point values)
#2. To calculate mean by adding all the numbers and dividing by total number of elements

def myMean(myList): #function to compute means of values in list
 total = 0
 count = 0
 for i in myList:
  total = total + i #Adds each element i to total
  count = count + 1 #Counts the number of elements
 mean = total/count #mean is calculated
 print("The calculated mean is:",mean)
myList = [1.3,2.4,3.5,6.9]
#Function call with list "myList" as an argument
myMean(myList)>> The calculated mean is: 3.5250000000000004
This Python code calculates the factorial of a given number using a for loop and displays the result.
#Function to calculate factorial
#The requirements are listed below:
 #1. The function should accept one integer argument from user.
 #2. Calculate factorial. For example:
 #3. Display factorial
def calcFact(num):
 fact = 1
 for i in range(num,0,-1):
  fact = fact * i
 print("Factorial of",num,"is",fact)

num = int(input("Enter the number: "))
calcFact(num)The code prompts the user to enter a number, calculates the factorial of the input number using the ‘calcFact’ function, and displays the factorial as “Factorial of [num] is [fact]”.
Enter the number: 10
>> Factorial of 10 is 3628800
This Python code demonstrates a simple function that accepts a first name and a last name as parameters. It then concatenates the first name and last name using the + operator and a space to create a full name. Finally, it displays the full name using the print() function.
#Function to display full name
#The requirements are listed below:
 #1. The function should have 2 parameters to accept first name and
 #last name.
 #2. Concatenate names using + operator with a space between first
 #name and last name.
 #3. Display full name.
def fullname(first,last):
#+ operator is used to concatenate strings
 fullname = first + " " + last
 print("Hello",fullname)
#function ends here
first = input("Enter first name: ")
last = input("Enter last name: ")
#function call
fullname(first,last)The output of this code will be “Hello [Full Name]”. The full name will be displayed by concatenating the first name and last name entered by the user using the + operator with a space between them. The greeting “Hello” will be displayed before the full name.
Enter first name: STEM
Enter last name: Learners
>> Hello STEM Learners


Copyright 2025 – Agilo Research Pvt. Ltd. All rights reserved – Terms & Condition | Privacy Policy