The block reports the selected field data from the last read request from ThingSpeak.
The block reports the selected field data from the last read request from ThingSpeak.

In this example project, we are going to create a Machine Learning Model where beetle automatically feed on randomly generated food in space.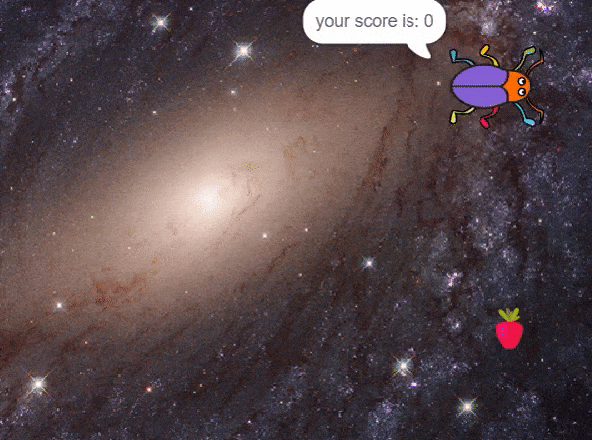


sprite = Sprite('Beetle')sprite1 = Sprite('Strawberry')import random
import time
import tensorflow as tf
import pandas as pd
import oscurr_x = -170
curr_y = 138
mov_f= 5
score = 0
angle = 90sprite.setx(curr_x)
sprite.sety(curr_y)
sprite.setdirection(DIRECTION=angle)def settarget(t):
x = random.randrange(-200, 200, t)
y = random.randrange(-155, 155, t)
time.sleep(0.1)
sprite1.setx(x)
sprite1.sety(y)
return x, y target_x, target_y = settarget(40) if(os.path.isfile('Chase_Data.csv')):
data=pd.read_csv('Chase_Data.csv')
else:
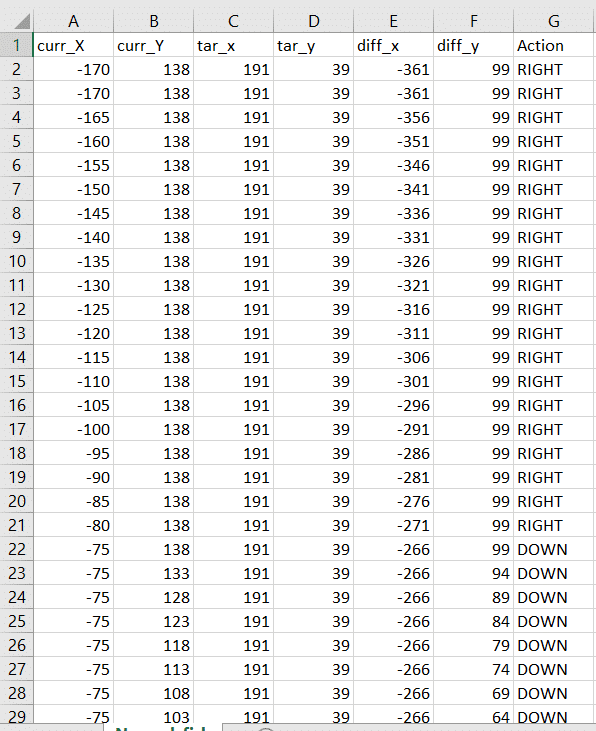
data = pd.DataFrame({"curr_X": curr_x, "curr_Y": curr_y, "tar_x": target_x, "tar_y": target_y, "diff_x":curr_x-target_x, "diff_y":curr_y-target_y, "Action": "RIGHT"}, index=[0])
while True: if sprite.iskeypressed("up arrow"):
data = data.append({"curr_X": curr_x, "curr_Y": curr_y, "tar_x": target_x, "tar_y": target_y, "diff_x":curr_x-target_x, "diff_y":curr_y-target_y, "Action": "UP"}, ignore_index=True)
curr_y = curr_y + beetle_m
sprite.setdirection(DIRECTION=0)
sprite.setx(curr_x)
sprite.sety(curr_y)if sprite.iskeypressed("down arrow"):
data = data.append({"curr_X": curr_x, "curr_Y": curr_y, "tar_x": target_x, "tar_y": target_y, "diff_x":curr_x-target_x, "diff_y":curr_y-target_y, "Action": "DOWN"}, ignore_index=True)
curr_y = curr_y - beetle_m
sprite.setdirection(DIRECTION=-180)
sprite.setx(curr_x)
sprite.sety(curr_y)
if sprite.iskeypressed("left arrow"):
data = data.append({"curr_X": curr_x, "curr_Y": curr_y, "tar_x": target_x, "tar_y": target_y, "diff_x":curr_x-target_x, "diff_y":curr_y-target_y, "Action": "LEFT"}, ignore_index=True)
curr_x = curr_x - beetle_m
sprite.setdirection(DIRECTION=-90)
sprite.setx(curr_x)
sprite.sety(curr_y)
if sprite.iskeypressed("right arrow"):
data = data.append({"curr_X": curr_x, "curr_Y": curr_y, "tar_x": target_x, "tar_y": target_y, "diff_x":curr_x-target_x, "diff_y":curr_y-target_y, "Action": "RIGHT"}, ignore_index=True)
curr_x = curr_x + beetle_m
sprite.setdirection(DIRECTION=90)
sprite.setx(curr_x)
sprite.sety(curr_y)if(score>0 and score%10==0):
data.to_csv('Chase_Data.csv',index=False)if abs(curr_x-target_x)<20 and abs(curr_y-target_y)<20:
score = score + 1
sprite.say(("your score is: {}".format(score)))if (score >= 20):
print(data)
data.to_csv('Chase Data.csv')
break
target_x, target_y = settarget()sprite = Sprite('Fish')
sprite1 = Sprite('Orange')
import random
import time
import numpy as np
import tensorflow as tf
import pandas as pd
import os
curr_x = -170
curr_y = 138
score=0
angle=90
beetle_m=5
sprite.say(("your score is: {}".format(score)))
sprite.setx(-170)
sprite.sety(138)
sprite.setdirection(DIRECTION=angle)
def settarget(t):
x = random.randrange(-200, 200, t)
y = random.randrange(-155, 155, t)
time.sleep(0.1)
sprite1.setx(x)
sprite1.sety(y)
return x, y
target_x, target_y = settarget(40)
if(os.path.isfile('Chase_Data.csv')):
  data=pd.read_csv('Chase_Data.csv')
else:
  data = pd.DataFrame({"curr_X": curr_x, "curr_Y": curr_y, "tar_x": target_x, "tar_y": target_y, "diff_x":curr_x-target_x, "diff_y":curr_y-target_y, "Action": "RIGHT"}, index=[0])
while True:
 if sprite.iskeypressed("up arrow"):
    data = data.append({"curr_X": curr_x, "curr_Y": curr_y, "tar_x": target_x, "tar_y": target_y, "diff_x":curr_x-target_x, "diff_y":curr_y-target_y, "Action": "UP"}, ignore_index=True)
    curr_y = curr_y + beetle_m
    sprite.setdirection(DIRECTION=0)
    sprite.setx(curr_x)
    sprite.sety(curr_y)
if sprite.iskeypressed("down arrow"):
    data = data.append({"curr_X": curr_x, "curr_Y": curr_y, "tar_x": target_x, "tar_y": target_y, "diff_x":curr_x-target_x, "diff_y":curr_y-target_y, "Action": "DOWN"}, ignore_index=True)
    curr_y = curr_y - beetle_m
    sprite.setdirection(DIRECTION=-180)
    sprite.setx(curr_x)
    sprite.sety(curr_y)

  if sprite.iskeypressed("left arrow"):
    data = data.append({"curr_X": curr_x, "curr_Y": curr_y, "tar_x": target_x, "tar_y": target_y, "diff_x":curr_x-target_x, "diff_y":curr_y-target_y, "Action": "LEFT"}, ignore_index=True)
    curr_x = curr_x - beetle_m
    sprite.setdirection(DIRECTION=-90)
    sprite.setx(curr_x)
    sprite.sety(curr_y)

  if sprite.iskeypressed("right arrow"):
    data = data.append({"curr_X": curr_x, "curr_Y": curr_y, "tar_x": target_x, "tar_y": target_y, "diff_x":curr_x-target_x, "diff_y":curr_y-target_y, "Action": "RIGHT"}, ignore_index=True)
    curr_x = curr_x + beetle_m
    sprite.setdirection(DIRECTION=90)
    sprite.setx(curr_x)
    sprite.sety(curr_y)
if(score>0 and score%10==0):
    data.to_csv('Chase_Data.csv',index=False)
if abs(curr_x-target_x)<20 and abs(curr_y-target_y)<20:
    score = score + 1
    sprite.say(("your score is: {}".format(score)))
if (score >= 20):
data.to_csv('Chase_Data.csv',index=False)
break
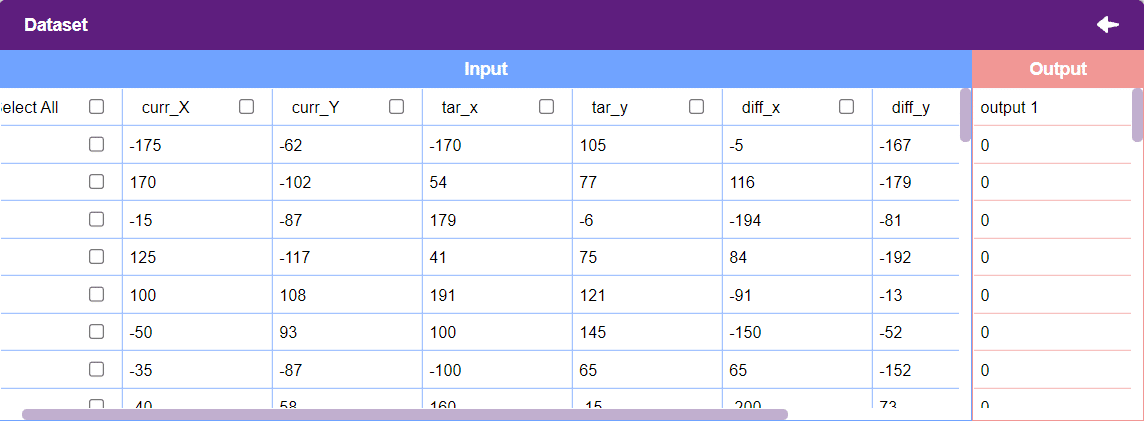
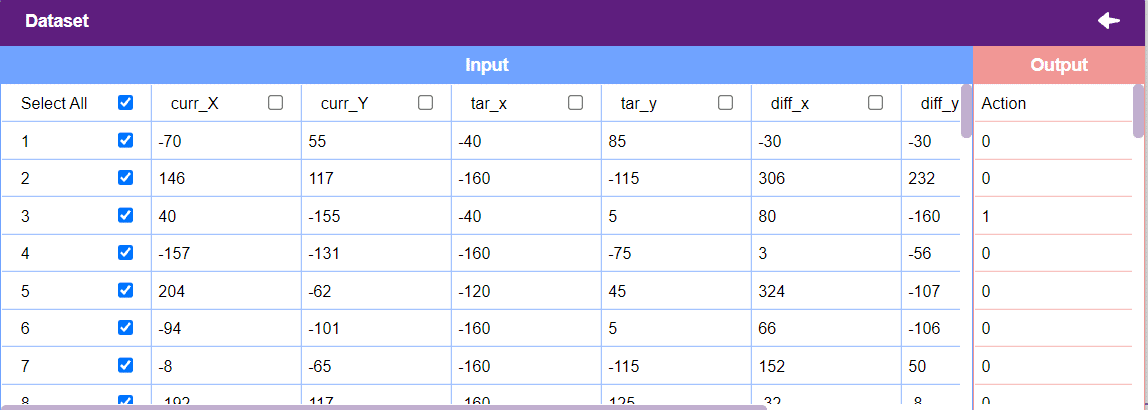
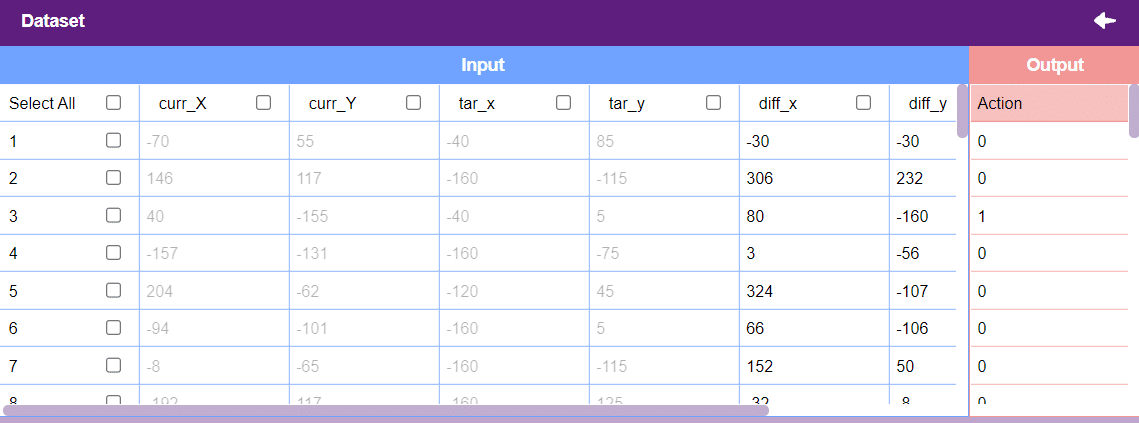
target_x, target_y = settarget(40)Datasets on the internet are hardly ever fit to directly train on. Programmers often have to take care of unnecessary columns, text data, target columns, correlations, etc. Thankfully, PictoBlox’s ML Environment is packed with features to help us pre-process the data as per our liking.
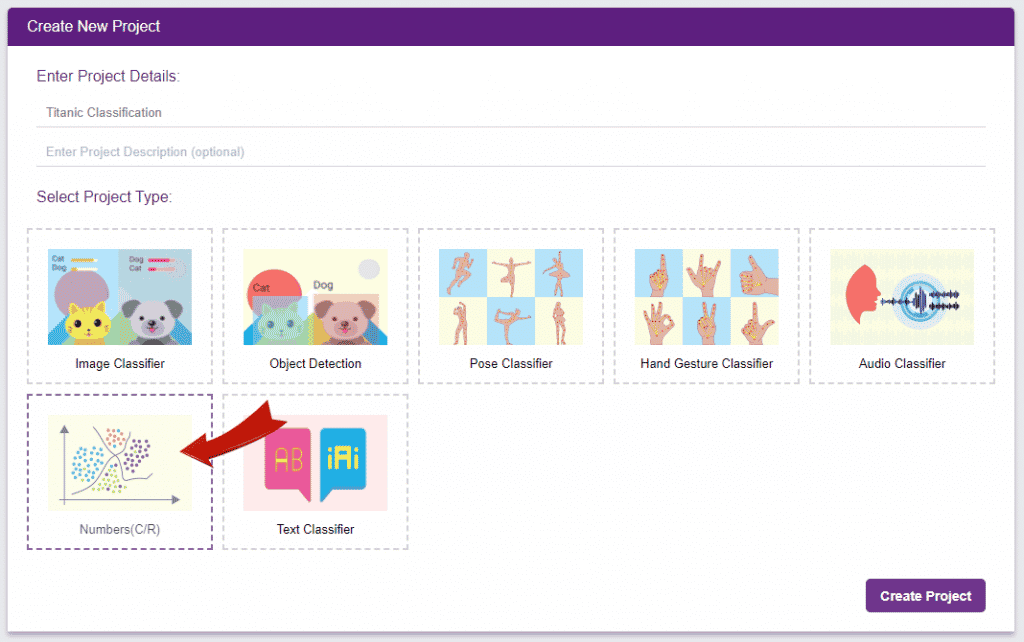
Let’s create the ML model.

Alert: The Machine Learning Environment for model creation is available in the only desktop version of PictoBlox for Windows, macOS, or Linux. It is not available in Web, Android, and iOS versions.
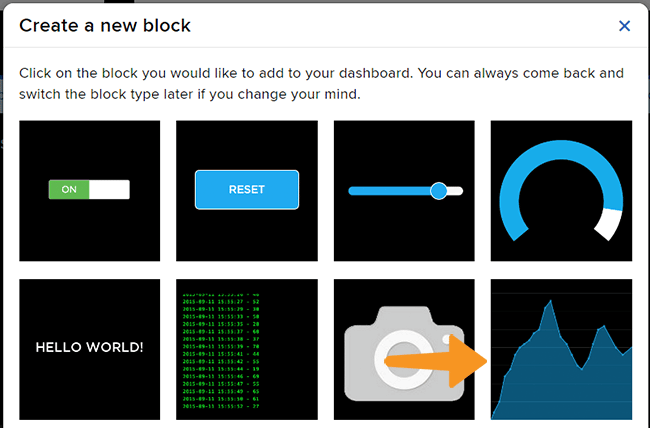
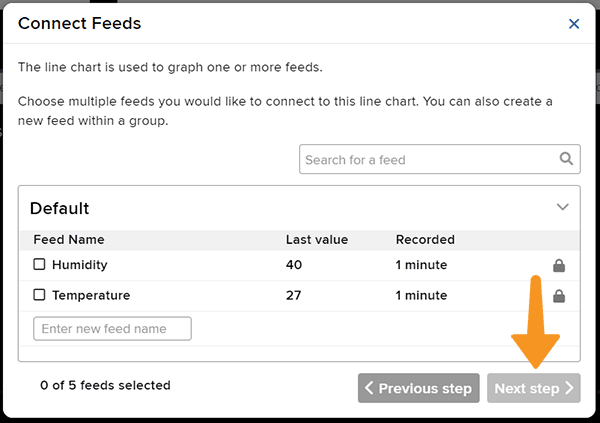
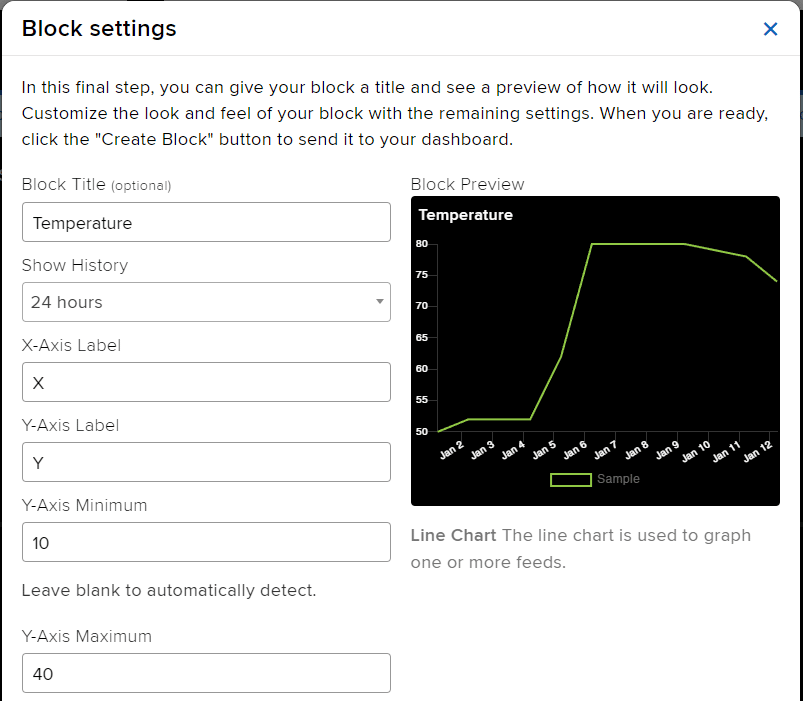
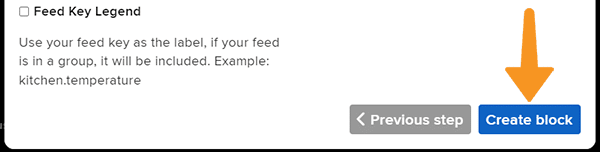
Follow the steps below:
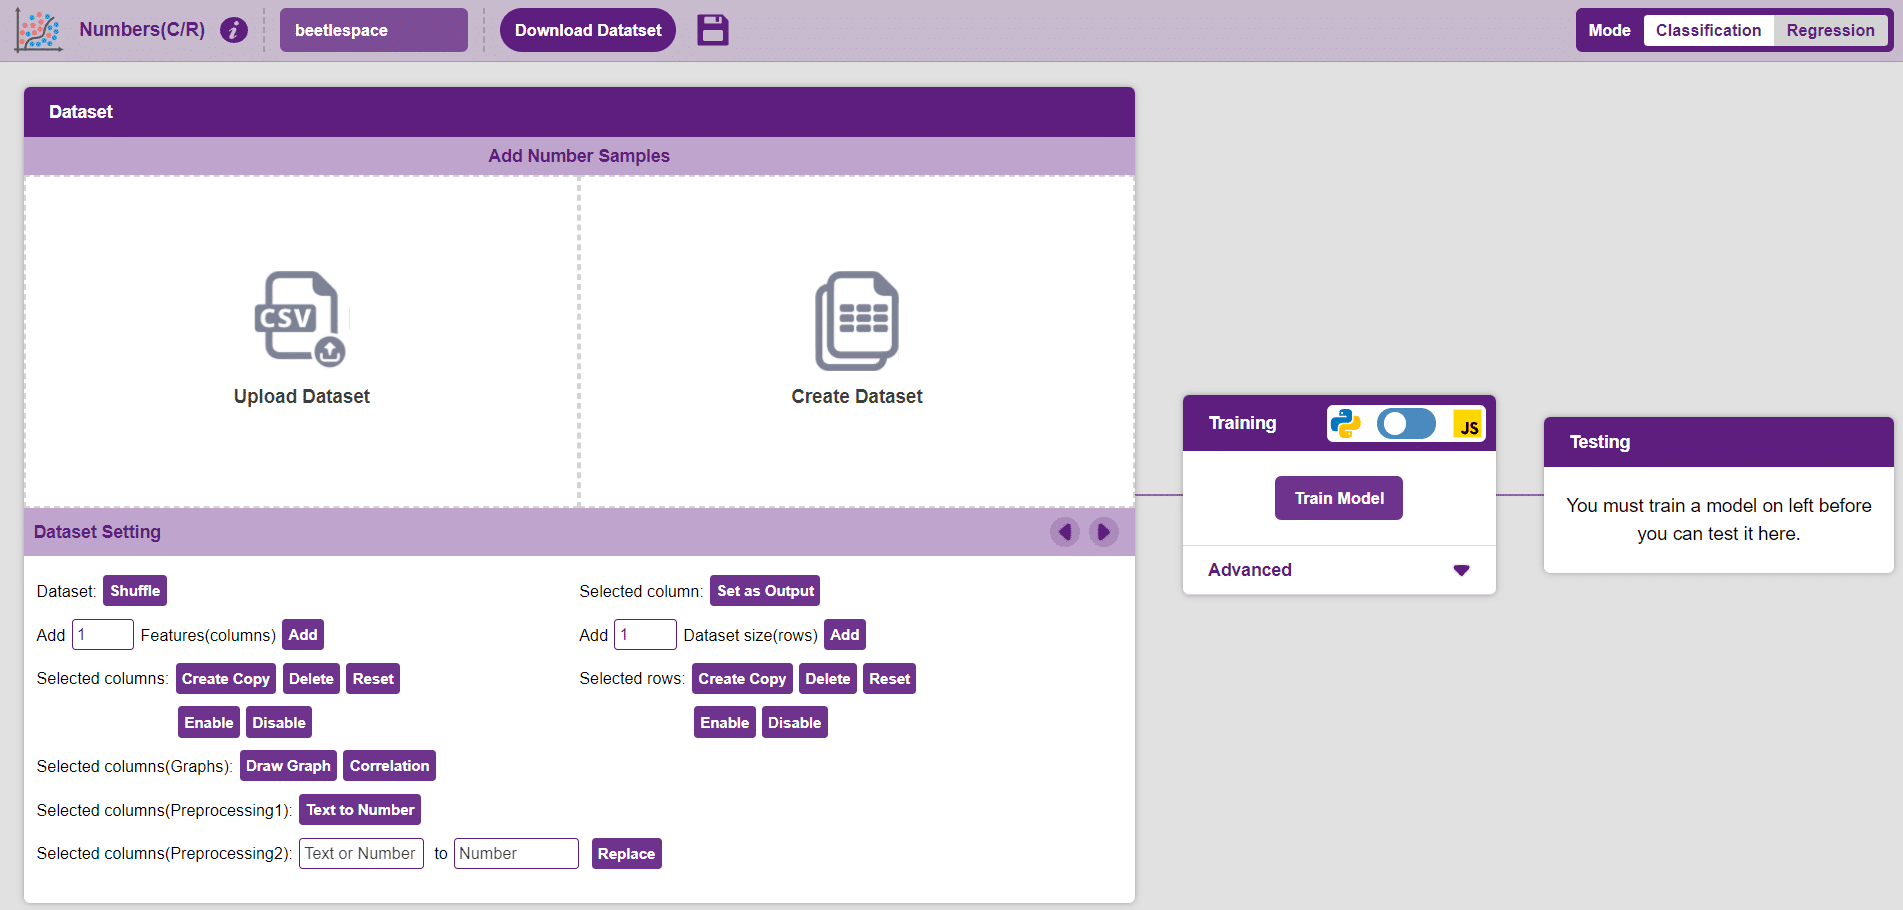
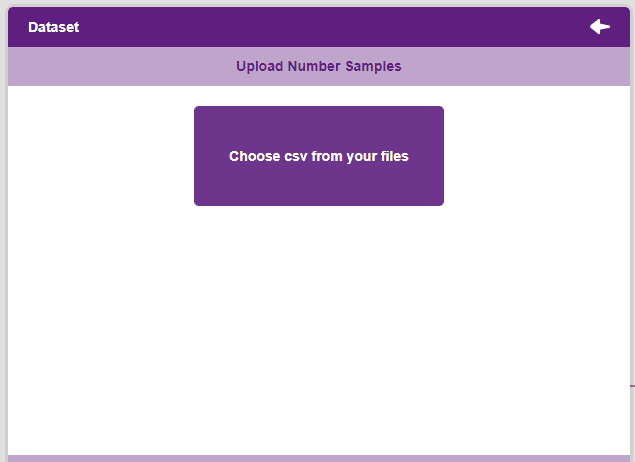
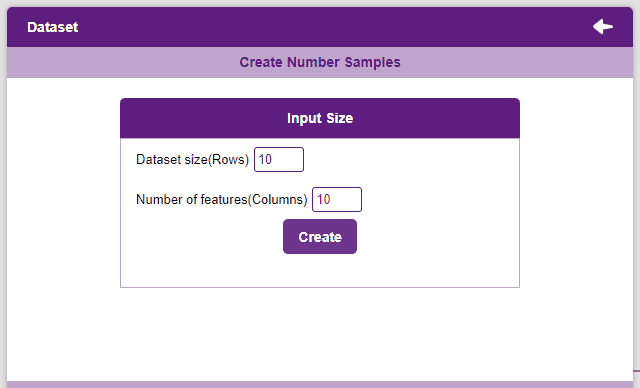
Datasets can either be uploaded or created on the ML Environment. Lets see how it is done.

Notes:
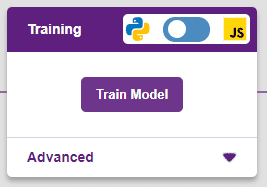
After data is pre-processed and optimized, it’s fit to be used in model training. To train the model, simply click the “Train Model” button found in the “Training” panel.
By training the model, meaningful information is extracted from the numbers, and that in turn updates the weights. Once these weights are saved, the model can be used to make predictions on data previously unseen.
The model’s function is to use the input data and predict the output. The target column must always contain numbers.
However, before training the model, there are a few hyperparameters that need to be understood. Click on the “Advanced” tab to view them.
There are three hyperparameters that can be altered in the Numbers(C/R) Extension:
It’s a good idea to train a numeric classification model for a high number of epochs. The model can be trained in both JavaScript and Python. In order to choose between the two, click on the switch on top of the Training panel.
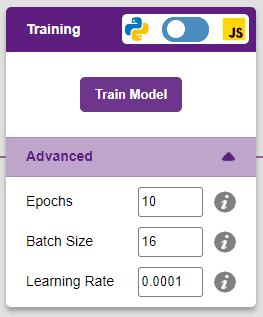
The accuracy of the model should increase over time. The x-axis of the graph shows the epochs, and the y-axis represents the accuracy at the corresponding epoch.
A window will open. Type in a project name of your choice and select the “Numbers(C/R)” extension. Click the “Create Project” button to open the Numbers(C/R) window.
To test the model, simply enter the input values in the “Testing” panel and click on the “Predict” button.
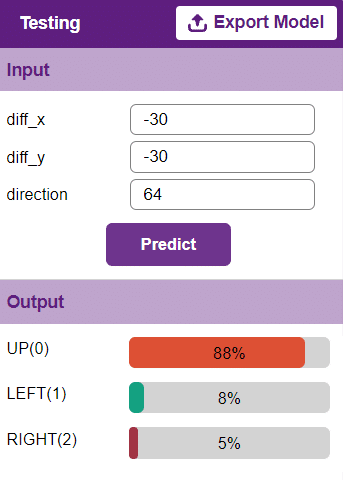
The model will return the probability of the input belonging to the classes.
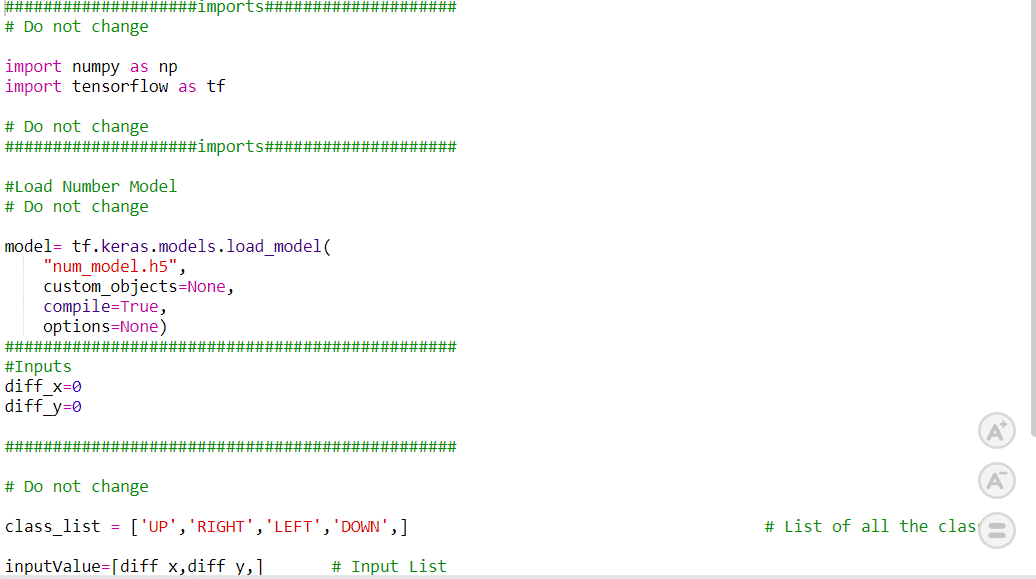
Click on the “PictoBlox” button, and PictoBlox will load your model into the Python Coding Environment if you have opened the ML Environment in Python Coding.
sprite = Sprite('Beetle')sprite1 = Sprite('Strawberry')import random
import time
import tensorflow as tf
import pandas as pdcurr_x = -170
curr_y = 138
beetle_m= 15
angle = 90
score = 0sprite.setx(curr_x)
sprite.sety(curr_y)
sprite.setdirection(DIRECTION=90)def settarget(t):
x = random.randrange(-200, 200, t)
y = random.randrange(-155, 155, t)
time.sleep(0.1)
sprite1.setx(x)
sprite1.sety(y)
return x, y target_x, target_y = settarget(40) def runprediction(diff_x, diff_y):
inputValue=[diff_x, diff_y]
#Input Tensor
inputTensor = tf.expand_dims(inputValue, 0)
#Predict
predict = model.predict(inputTensor)
predict_index = np.argmax(predict[0], axis=0)
#Output
predicted_class = class_list[predict_index]
return predicted_class
while True:angle=sprite.direction()
move = runprediction(curr_x- target_x, curr_y-target_y, angle)if move == "UP": curr_y = curr_y + beetle_m sprite.setdirection(DIRECTION=0) sprite.setx(curr_x) sprite.sety(curr_y) if move == "LEFT": curr_x = curr_x - beetle_m sprite.setdirection(DIRECTION=-90) sprite.setx(curr_x) sprite.sety(curr_y) if move == "RIGHT": curr_x = curr_x + beetle_m sprite.setdirection(DIRECTION=90) sprite.setx(curr_x) sprite.sety(curr_y)if move == "DOWN": curr_y = curr_y - beetle_m sprite.setdirection(DIRECTION=-180) sprite.setx(curr_x) sprite.sety(curr_y)
if abs(curr_x-target_x)<20 and abs(curr_y-target_y)<20:
score = score + 1
sprite.say(("your score is: {}".format(score)))
target_x, target_y = settarget()time.sleep(0.02)sprite = Sprite('Beetle')
sprite1 = Sprite('Strawberry')
import random
import time
import numpy as np
import tensorflow as tf
#Load Number Model
model= tf.keras.models.load_model(
"num_model.h5",
custom_objects=None,
compile=True,
options=None)
#List of classes
class_list = ['RIGHT','LEFT','DOWN','UP',]
curr_x = -170
curr_y = 138
score=0
beetle_m=30
angle=90
sprite.say(("your score is: {}".format(score)))
sprite.setx(-170)
sprite.sety(138)
sprite.setdirection(DIRECTION=angle)
def settarget():
x = random.randrange(-200, 200, 1)
y = random.randrange(-155, 155, 1)
time.sleep(0.1)
sprite1.setx(x)
sprite1.sety(y)
return x, y
target_x, target_y = settarget()
def runprediction(diff_x, diff_y):
  inputValue=[diff_x, diff_y]
  #Input Tensor
  inputTensor = tf.expand_dims(inputValue, 0)
  #Predict
  predict = model.predict(inputTensor)
  predict_index = np.argmax(predict[0], axis=0)
  #Output
  predicted_class = class_list[predict_index]
  return predicted_class
while True:
move = runprediction(curr_x- target_x, curr_y-target_y)
if move == "UP":
curr_y = curr_y + beetle_m
sprite.setdirection(DIRECTION=0)
sprite.setx(curr_x)
sprite.sety(curr_y)
if move == "DOWN":
curr_y = curr_y - beetle_m
sprite.setdirection(DIRECTION=-180)
sprite.setx(curr_x)
sprite.sety(curr_y)
if move == "LEFT":
curr_x = curr_x - beetle_m
sprite.setdirection(DIRECTION=-90)
sprite.setx(curr_x)
sprite.sety(curr_y)
if move == "RIGHT":
curr_x = curr_x + beetle_m
sprite.setdirection(DIRECTION=90)
sprite.setx(curr_x)
sprite.sety(curr_y)
if abs(curr_x-target_x)<20 and abs(curr_y-target_y)<20:
    score = score + 1
    sprite.say(("your score is: {}".format(score)))
target_x, target_y = settarget()
time.sleep(0.2)
Creating a Machine Learning Model of “Beetle’s Cosmic Feast: Strawberry Space Adventure” can be both complex and time-consuming. Through the steps demonstrated in this project, you can create your own Machine Learning Model of automated game. Once trained, you can export the model into the Python Coding Environment, where you can tweak it further to give you the desired output. Try creating a Machine Learning Model of your own today and explore the possibilities of Number Classifier in PictoBlox!

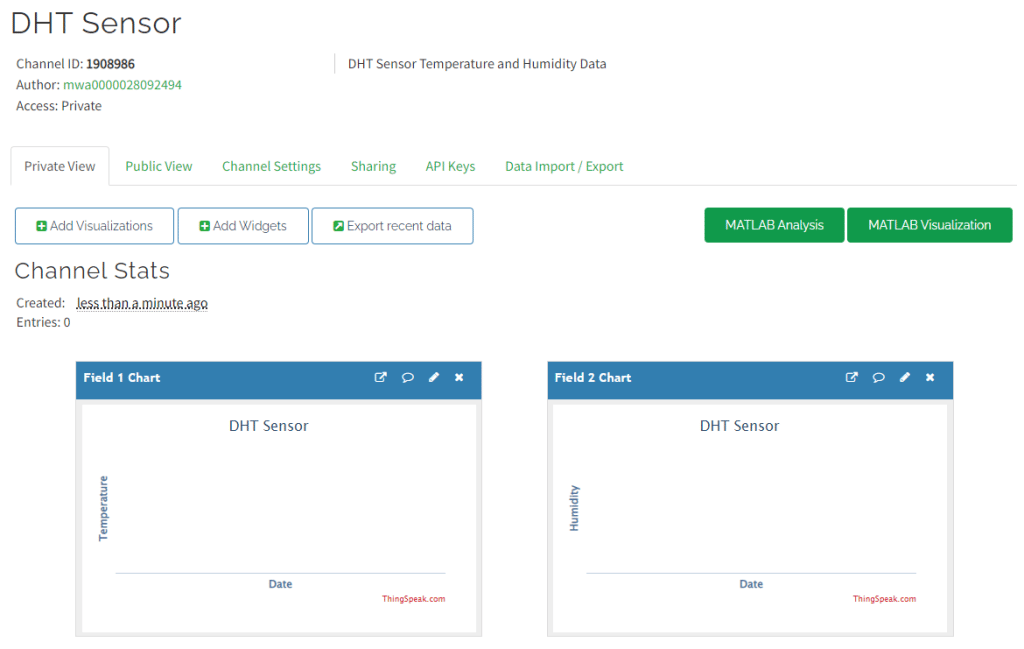
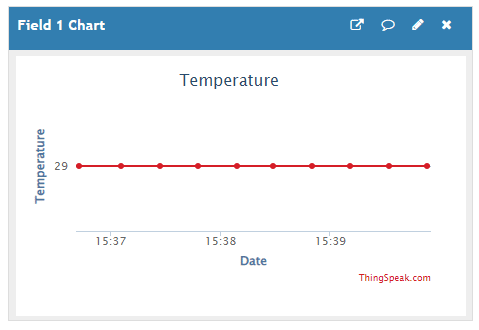
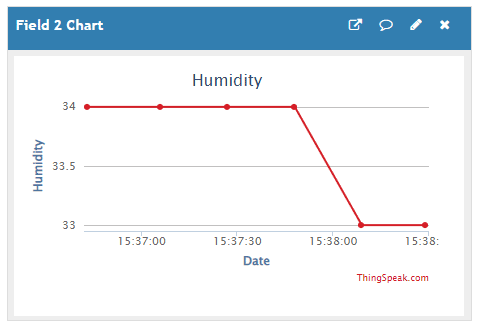
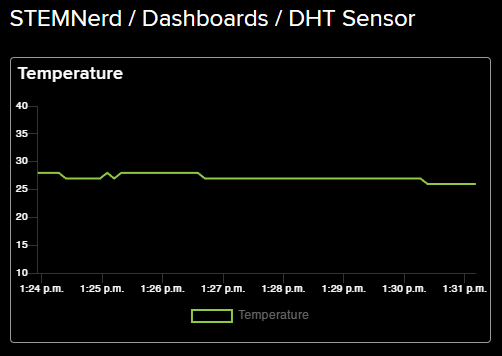
In this example, we will send the humidity and temperature sensor data to the cloud on the ThingSpeak servers.
Create a channel on ThingSpeak with 2 fields – Temperature and Humidity.
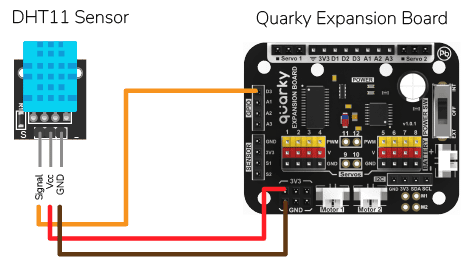
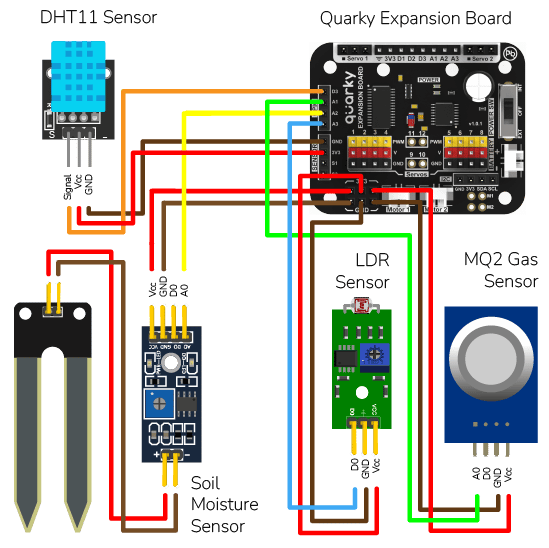
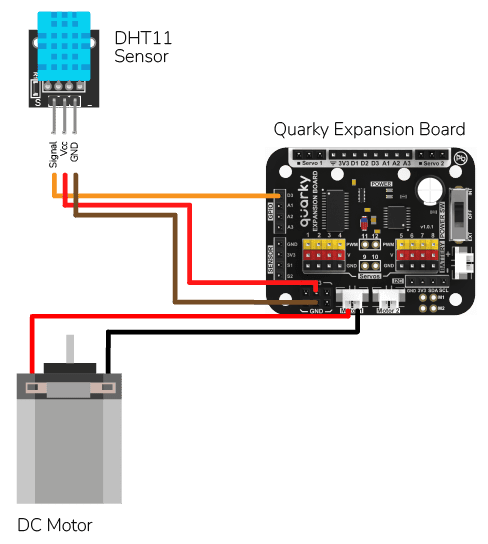
DHT sensors have 3 pins: GND, VCC, and Signal. You have to connect the following 3 pins to the Quarky Expansion Board:
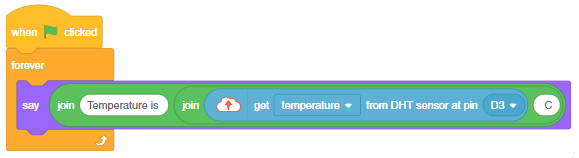
The following script reads the temperature and humidity reading from the DHT sensor and sends them to the ThingSpeak channel.
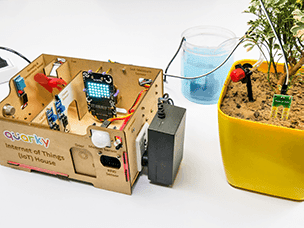
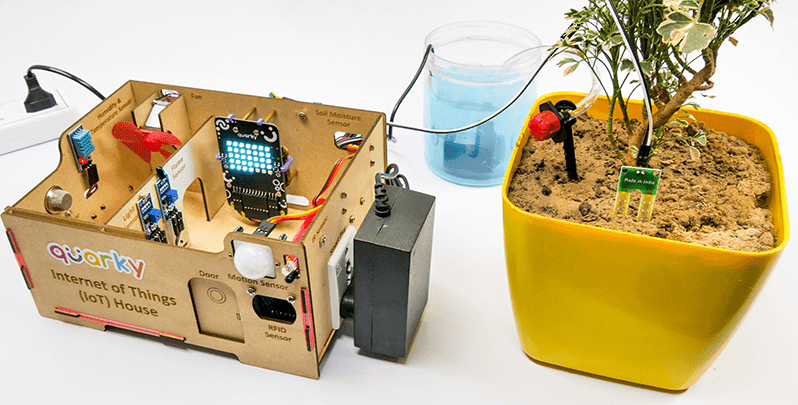
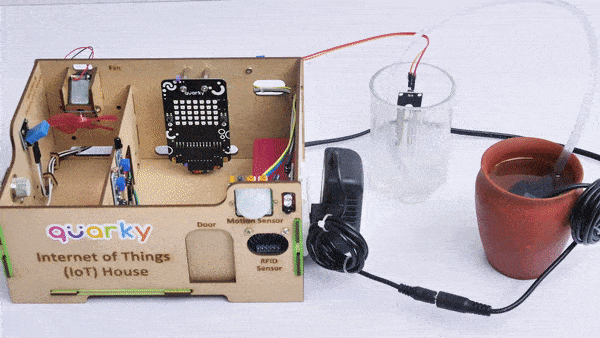
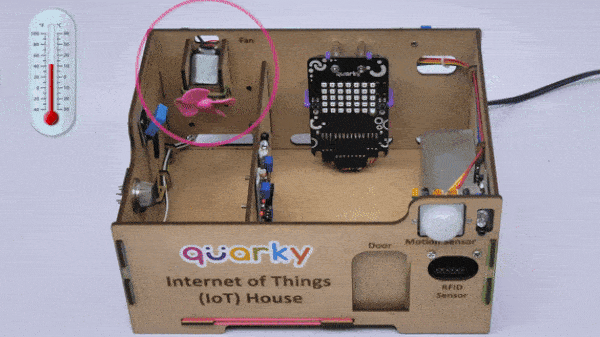
This example shows how to create an IoT House Monitoring system that sends humidity, temperature, plant soil moisture, gas, and light sensor data to the cloud on Adafruit IO servers.

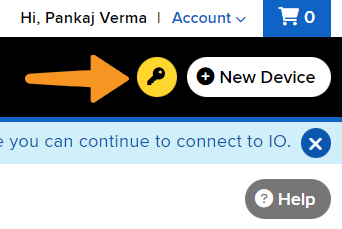
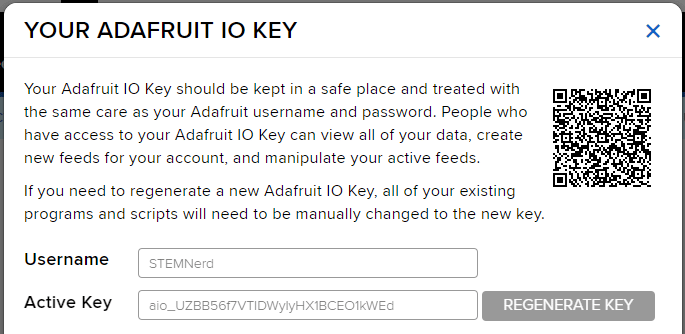
You can find the information about your account once you log in from here:
We are using 4 sensors in this project:


Follow the steps:
This example shows how to create an IoT House Monitoring system that sends humidity, temperature, plant soil moisture, gas, and light sensor data to the cloud on Adafruit IO servers in PictoBloc Python Environment.
You can find the information about your account once you log in from here:
You can find the information about your account once you log in from here:
We are using 4 sensors in this project:
# The following code connects to a device, reads sensor values and sends them to a data storage.
# First, the necessary packages are imported.
import time
import math
# Then, three objects are created: one for the IoT house with the sensors and one for the AdaIO and one for Quarky.
house = IoTHouse()
adaio = AdaIO()
quarky = Quarky()
# Variables used by the code are created and initialized.
RS_of_Air = 0
R0 = 0
b = 1.413
m = -0.473
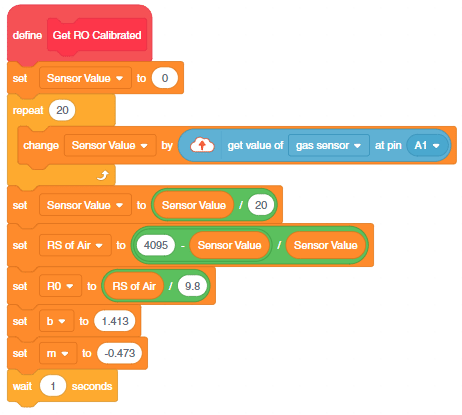
# User Defined Functions
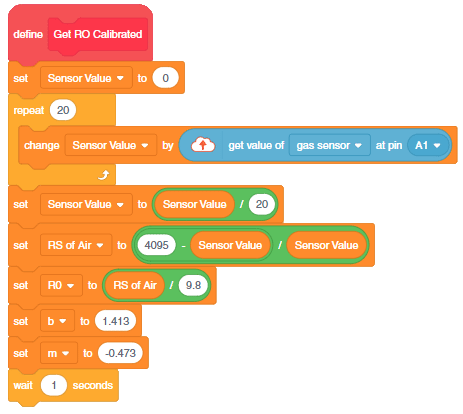
# This function calibrates the gas sensor.
def Get_RO_Calibrated():
Sensor_Value = 0.1
# This loop reads the sensor value 20 times.
for i in range(0, 20):
Sensor_Value += house.gassensorvalue("A1")
# This line calculates the average of the 20 readings.
Sensor_Value = (Sensor_Value / 20)
# This line calculates the RS_of_Air variable.
RS_of_Air = ((4095 - Sensor_Value) / Sensor_Value)
# This line calculates the R0 variable.
R0 = (RS_of_Air / 9.8)
time.sleep(1)
# This function reads the gas sensor.
def Get_Gas_Sensor_Reading():
# This line reads the sensor value.
Sensor_Value = house.gassensorvalue("A1")
# This line checks if the sensor value is 0.
if (Sensor_Value == 0):
# This line returns 0 if the sensor value is 0.
return 0
else:
# This line calculates the RS_of_Air variable.
RS_of_Air = ((4095 - Sensor_Value) / Sensor_Value)
# This line calculates the RS_RO_Ratio variable.
RS_RO_Ratio = (RS_of_Air / R0)
# This line calculates the PPM_in_Log variable.
PPM_in_Log = (((math.log(RS_RO_Ratio)) - b) / m)
# This line calculates the PPM variable.
PPM = (pow(10, PPM_in_Log))
# This line returns the PPM value.
return PPM
# This line calls the Get_RO_Calibrated() function.
Get_RO_Calibrated()
# This line connects the program to the AdaIO data storage.
adaio.connecttoadafruitio("STEMNerd", "aio_UZBB56f7VTIDWyIyHX1BCEO1kWEd")
# This line sets the pin to read the moisture sensor.
house.setmoisturepin("A3")
# This loop reads the sensors, prints their values and sends them to the data storage.
while True:
# This line reads the temperature from the DHT sensor on pin D3 and sends it to the data storage.
Temperature = house.dhtmeasure(1, "D3")
adaio.createdata("Temperature", Temperature)
time.sleep(4)
# This line reads the humidity from the DHT sensor on pin D3 and sends it to the data storage.
Humidity = house.dhtmeasure(2, "D3")
adaio.createdata("Humidity", Humidity)
time.sleep(4)
# This line reads the light from the light sensor on pin A2 and sends it to the data storage.
Light = house.ldrvalue("A2")
adaio.createdata("Light", Light)
time.sleep(4)
# This line reads the moisture from the moisture sensor and sends it to the data storage.
Moisture = house.readmoisture()
adaio.createdata("Moisture", Moisture)
time.sleep(4)
# This line calls the Get_Gas_Sensor_Reading() function to read the gas sensor and sends the value to the data storage.
PPM = Get_Gas_Sensor_Reading()
adaio.createdata("Gas Sensor", PPM)
time.sleep(4)Follow the steps:
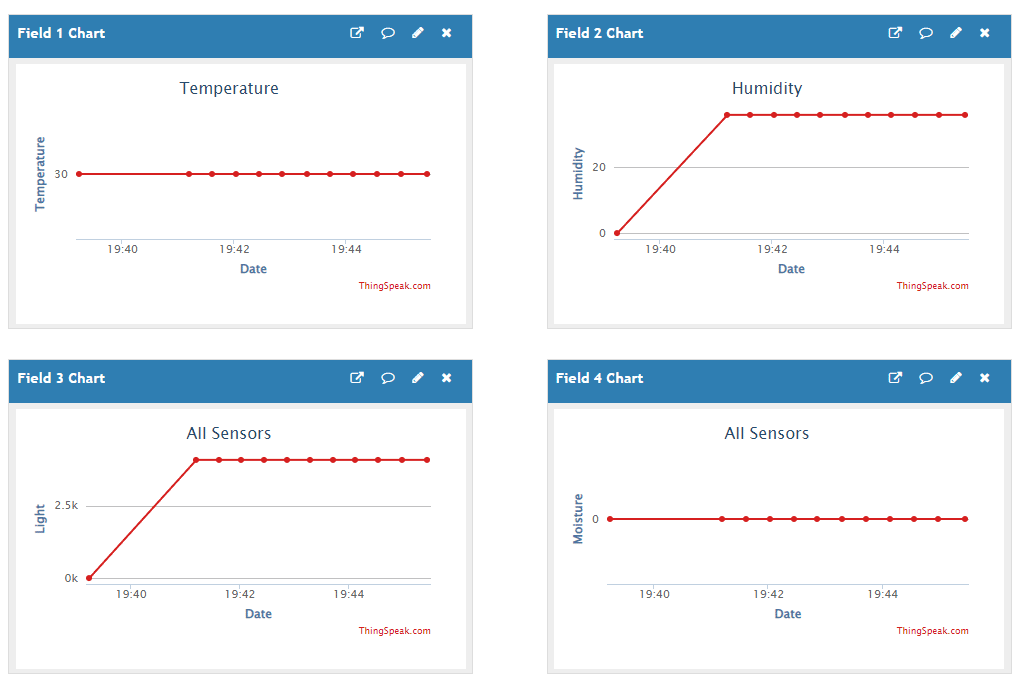
This example shows how to create an IoT House Monitoring system that sends humidity, temperature, plant soil moisture, gas, and light sensor data to the cloud on the ThingSpeak channel.
Create a channel on ThingSpeak with 5 fields – Temperature, Humidity, Light, Gas, and Moisture.

We are using 4 sensors in this project:
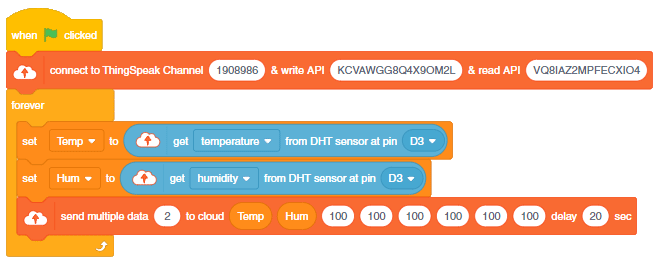
In this example, we will send the humidity and temperature sensor data to the cloud on the ThingSpeak servers using PictoBlox Python Environment.
Create a channel on ThingSpeak with 2 fields – Temperature and Humidity.
DHT sensors have 3 pins: GND, VCC, and Signal. You have to connect the following 3 pins to the Quarky Expansion Board:
This code helps to send temperature and humidity data from an IoT house to the ThingSpeak cloud every 20 seconds:
# The following code connects to the ThingSpeak cloud and sends temperature and humidity data from an IoT house every 20 seconds.
# The code first creates objects for the Quarky, ThingSpeak and IoTHouse classes.
quarky = Quarky()
import time
ts = ThingSpeak()
house = IoTHouse()

# Next, the code connects to the ThingSpeak cloud using the given channel number, read key and write key.
ts.connecttoThingSpeak(1908986, "KCVAWGG8Q4X9OM2L", "VQ8IAZ2MPFECXIO4")

# Then, the code enters a while loop and measures the temperature and humidity from the IoT house and sends the data to the cloud.
while True:
  Temp = house.dhtmeasure(1, "D3")
  Hum = house.dhtmeasure(2, "D3")
  ts.sendmultipledatatocloud(2, Temp, Hum, 100, 100, 100, 100, 100, 100)
  time.sleep(20)  # The code then waits for 20 seconds before sending the next set of data.
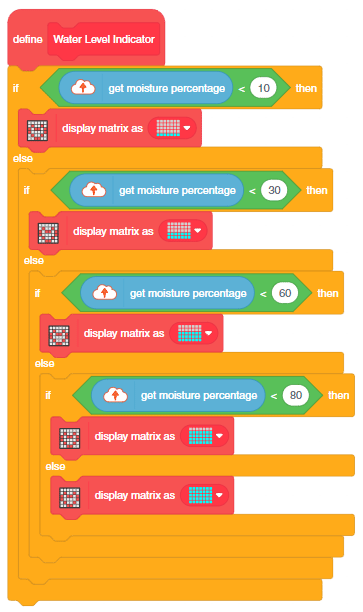
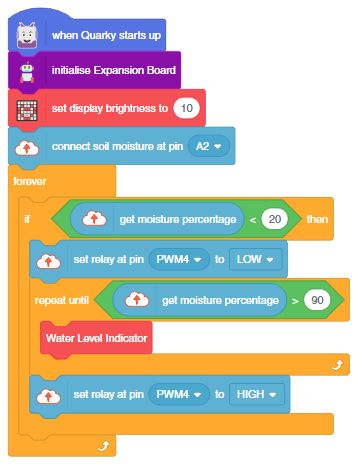
In this example, we will demonstrate how to use the Moisture sensor to detect how much the tank is filled and start the pump whenever the water level is low.
We are using 2 devices in this project:

The project has 2 scripts:
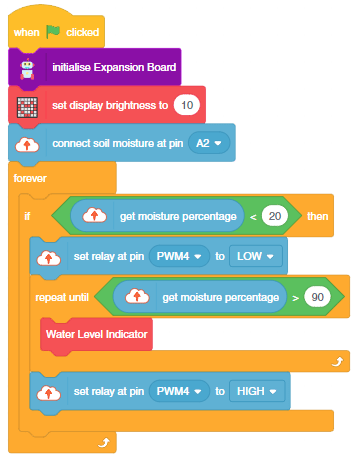

You can also make the script work independently of PictoBlox using the Upload Mode. For that switch to upload mode and replace the when green flag clicked block with when Quarky starts up the block.

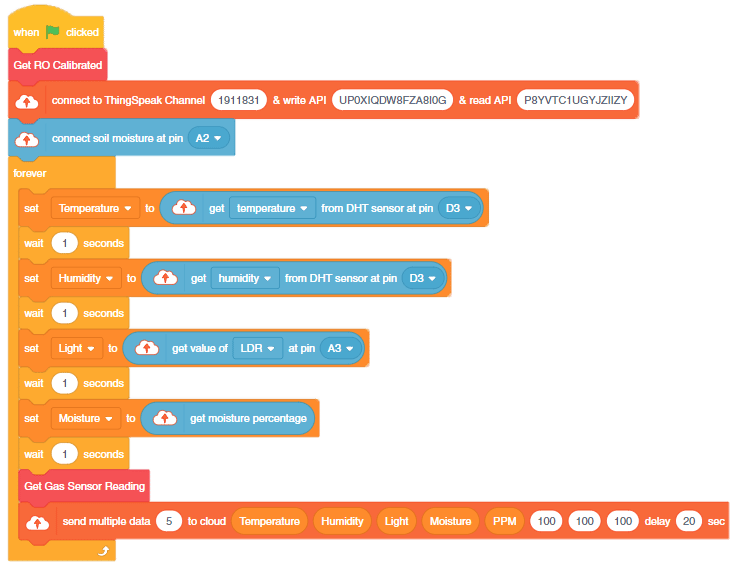
This example shows how to create an IoT House Monitoring system that sends humidity, temperature, plant soil moisture, gas, and light sensor data to the cloud on the ThingSpeak channel.
Create a channel on ThingSpeak with 5 fields – Temperature, Humidity, Light, Gas, and Moisture.
We are using 4 sensors in this project:
This code connects to an IoT house with sensors, reads the sensor values, prints them, and sends them to data storage:
# The following code connects to a device, reads sensor values and sends them to a data storage.
# First, the necessary packages are imported.
import time
import math
# Then, three objects are created: one for the IoT house with the sensors and one for the ThinkSpeak and one for Quarky.
house = IoTHouse()
ts = ThingSpeak()
quarky = Quarky()
# Next, the code connects to the ThingSpeak cloud using the given channel number, read key and write key.
ts.connecttoThingSpeak(1911831, "P8YVTC1UGYJZIIZY", "UP0XIQDW8FZA8I0G")
# Variables used by the code are created and initialized.
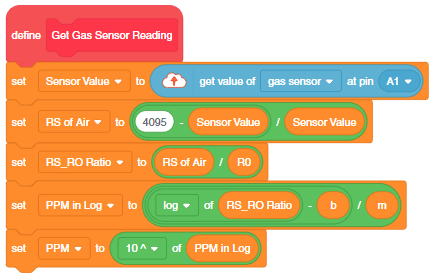
b = 1.413
m = -0.473
# User Defined Functions
Sensor_Value = 0.1
# This loop reads the sensor value 20 times.
for i in range(0, 20):
Sensor_Value += house.gassensorvalue("A1")
# This line calculates the average of the 20 readings.
Sensor_Value = (Sensor_Value / 20)
# This line calculates the RS_of_Air variable.
RS_of_Air = (4095 - Sensor_Value) / Sensor_Value
# This line calculates the R0 variable.
R0 = RS_of_Air / 9.8
time.sleep(1)
# This function reads the gas sensor.
def Get_Gas_Sensor_Reading():
# This line reads the sensor value.
Sensor_Value = house.gassensorvalue("A1")
# This line checks if the sensor value is 0.
if (Sensor_Value == 0):
# This line returns 0 if the sensor value is 0.
return 0
else:
# This line calculates the RS_of_Air variable.
RS_of_Air = ((4095 - Sensor_Value) / Sensor_Value)
# This line calculates the RS_RO_Ratio variable.
RS_RO_Ratio = (RS_of_Air / R0)
# This line calculates the PPM_in_Log variable.
PPM_in_Log = (((math.log(RS_RO_Ratio)) - b) / m)
# This line calculates the PPM variable.
PPM = (pow(10, PPM_in_Log))
# This line returns the PPM value.
return PPM
# This line sets the pin to read the moisture sensor.
house.setmoisturepin("A3")
# This loop reads the sensors, prints their values and sends them to the data storage.
while True:
# This line reads the temperature from the DHT sensor on pin D3 and sends it to the data storage.
Temperature = house.dhtmeasure(1, "D3")
# This line reads the humidity from the DHT sensor on pin D3.
Humidity = house.dhtmeasure(2, "D3")
# This line reads the light from the light sensor on pin A2.
Light = house.ldrvalue("A2")
# This line reads the moisture from the moisture sensor.
Moisture = house.readmoisture()
# This line calls the Get_Gas_Sensor_Reading() function to read the gas sensor.
PPM = Get_Gas_Sensor_Reading()
ts.sendmultipledatatocloud(5, Temperature, Humidity, Light, Moisture, PPM, 100, 100, 100)
time.sleep(20) # The code then waits for 20 seconds before sending the next set of data.

In this example, we are going to learn how to program Quarky to detect the temperature (using DHT Sensor) and make the fan ON and OFF accordingly.
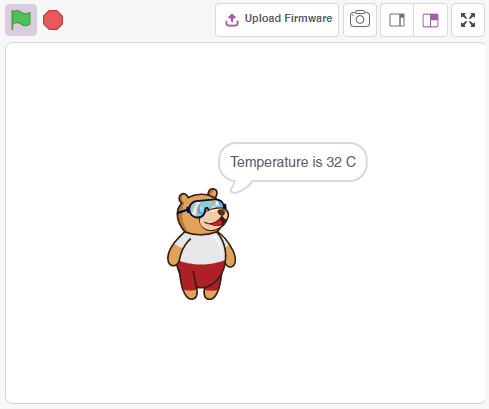
The following script displays the real-time sensor reading.
Download Code: https://pictoblox.page.link/eHAFsRRW6CoEifmn9
Connect Quarky and you will start getting the readings.
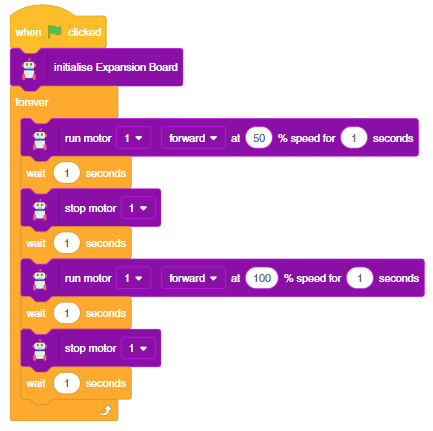
The following makes the fan motor turn ON at 50% speed for 1 second, then turn OFF for 1 second, then turn ON at 100% speed for 1 second and finally turn OFF for 1 second. This will repeat in a loop.
Download Code: https://pictoblox.page.link/vWTfiWkgi2w8BhsNA
The following scripts, make the fan turn ON whenever the temperature is greater than 26 degrees.
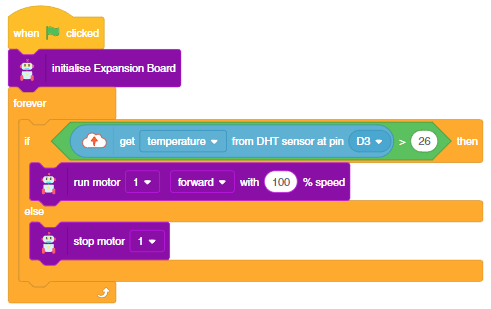
You can also make the automatic lighting work independent of PictoBlox using the Upload Mode. For that switch to upload mode and replace the when green flag clicked block with when Quarky starts up block.
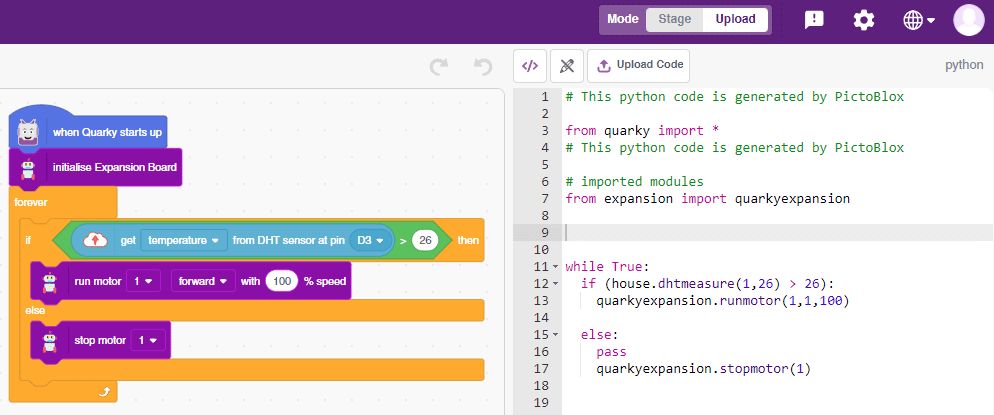
Click on the Upload Code button.


Copyright 2025 – Agilo Research Pvt. Ltd. All rights reserved – Terms & Condition | Privacy Policy