The block reports the selected field data from the last read request from ThingSpeak.
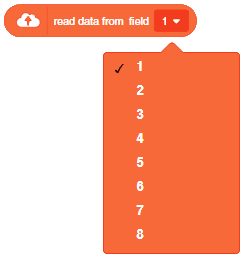
The block reports the selected field data from the last read request from ThingSpeak.

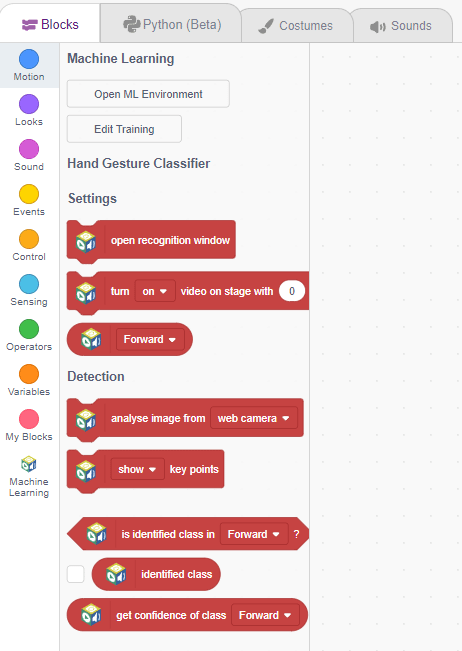
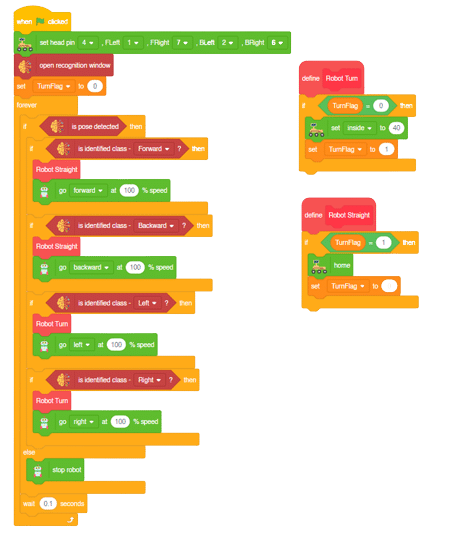
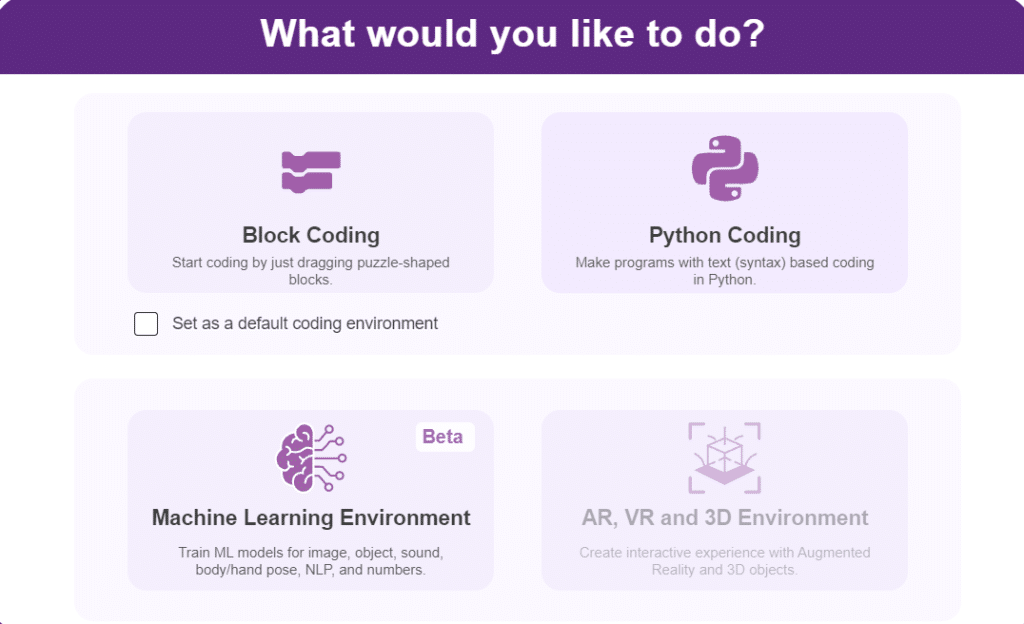
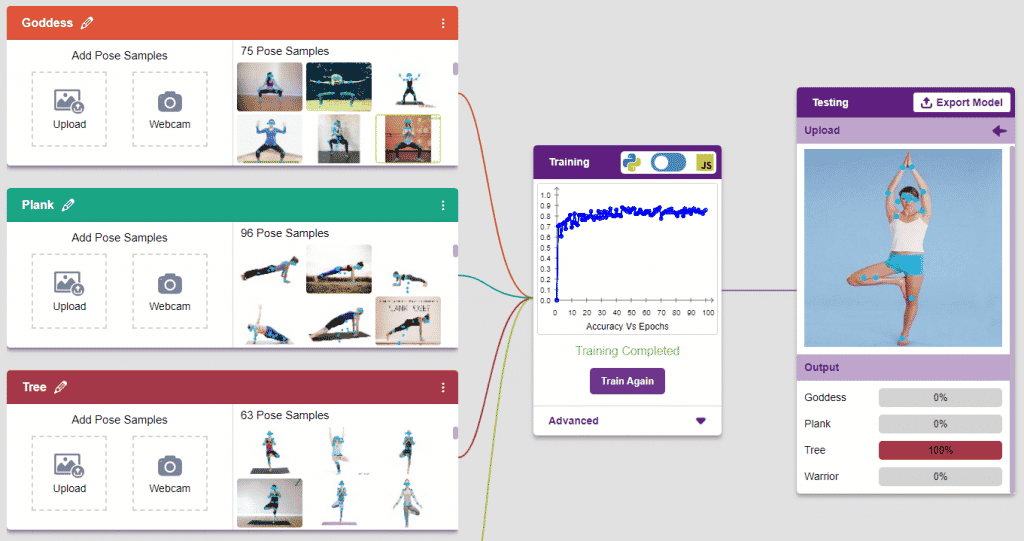
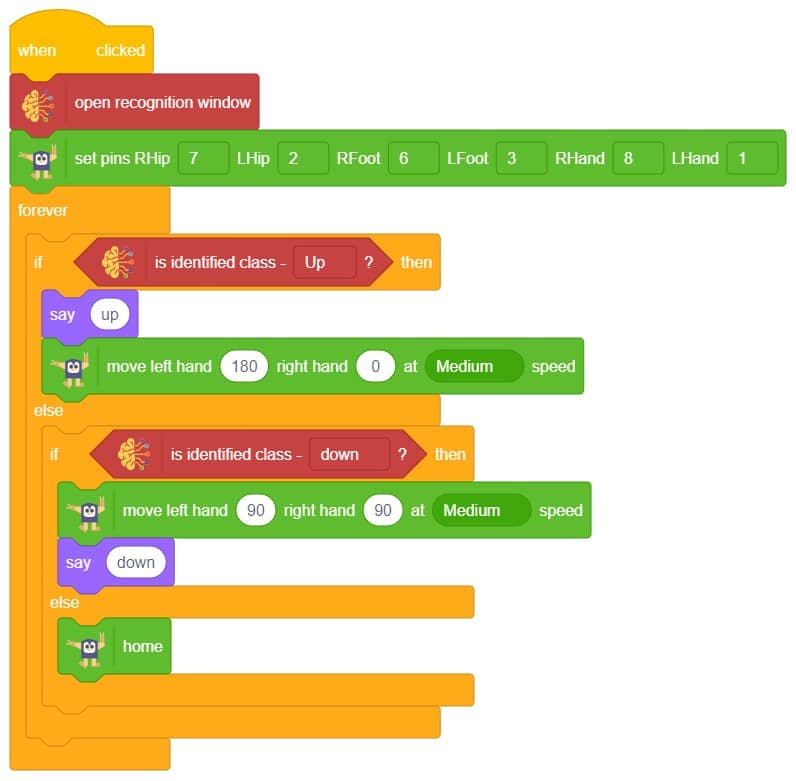
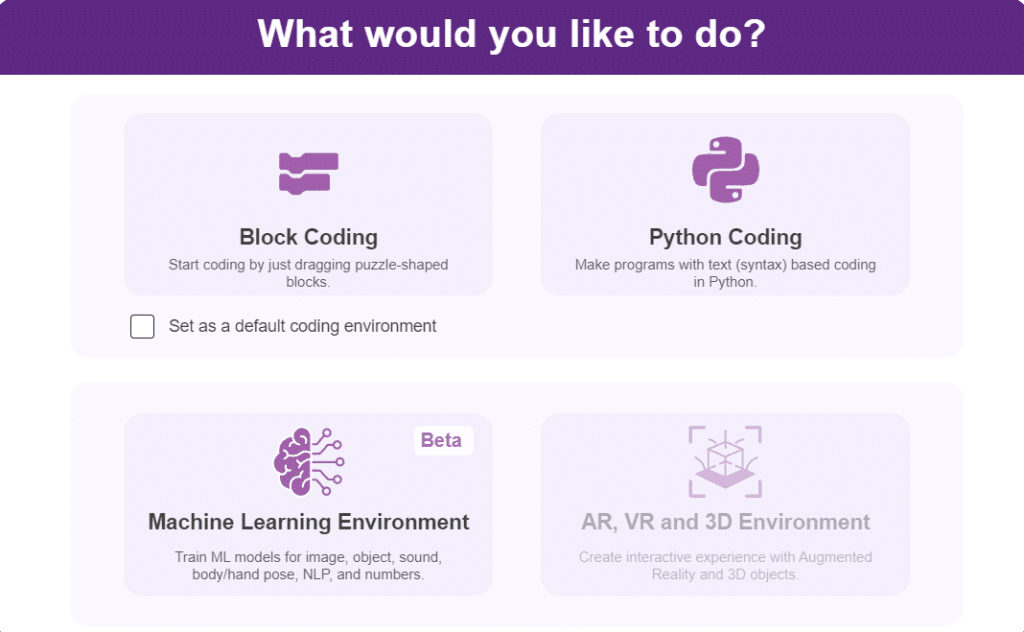
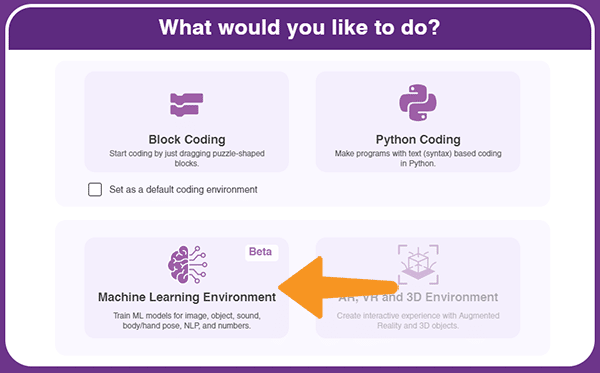
This project demonstrates how to use Machine Learning Environment to make a machine–learning model that identifies hand gestures and makes the Mars Rover move accordingly.
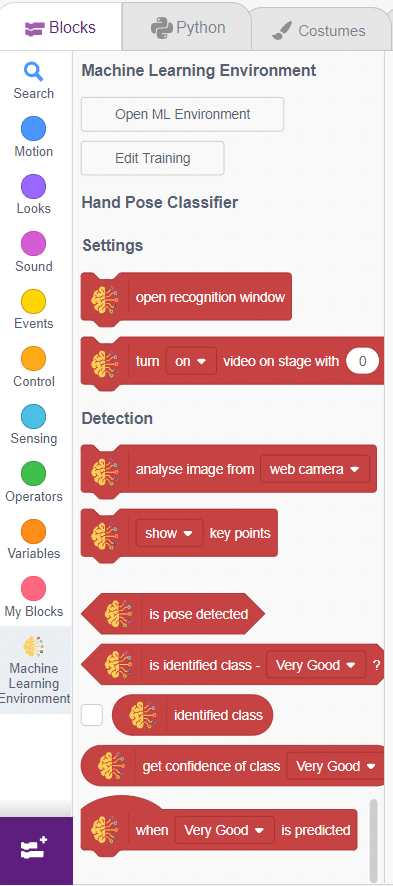
We are going to use the Hand Classifier of the Machine Learning Environment. The model works by analyzing your hand position with the help of 21 data points.
Follow the steps below:


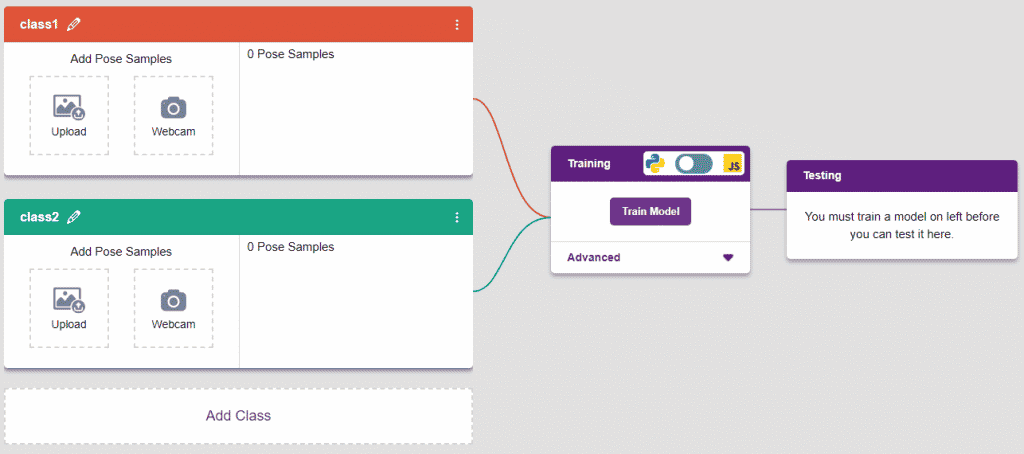
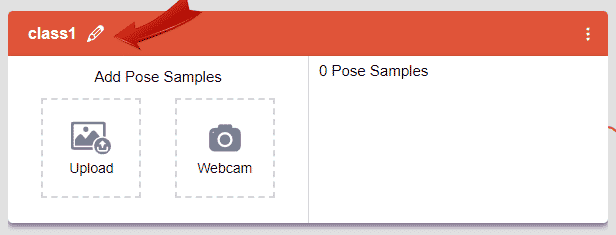
There are 2 things that you have to provide in a class:


You can perform the following operations to manipulate the data into a class.
After data is added, it’s fit to be used in model training. In order to do this, we have to train the model. By training the model, we extract meaningful information from the hand pose, and that in turn updates the weights. Once these weights are saved, we can use our model to make predictions on data previously unseen.

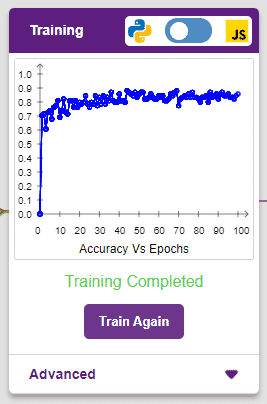
The accuracy of the model should increase over time. The x-axis of the graph shows the epochs, and the y-axis represents the accuracy at the corresponding epoch. Remember, the higher the reading in the accuracy graph, the better the model. The range of the accuracy is 0 to 1.

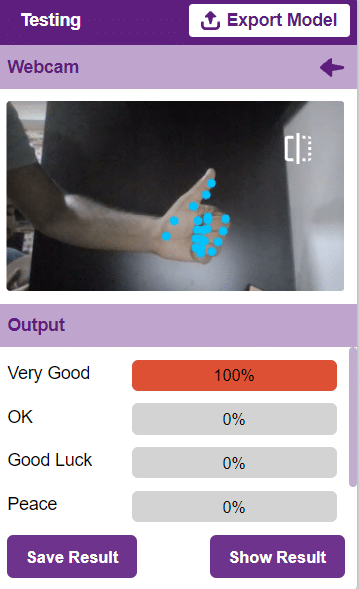
To test the model, simply enter the input values in the “Testing” panel and click on the “Predict” button.
The model will return the probability of the input belonging to the classes.
Click on the “Export Model” button on the top right of the Testing box, and PictoBlox will load your model into the Block Coding Environment if you have opened the ML Environment in the Block Coding.
The Mars Roverwill move according to the following logic:
In this activity, we will control the Mecanum Pick and Place according to our needs using the Dabble application on our own Devices.
We will first understand how to operate Dabble and how to modify our code according to the requirements. The following image is the front page of the Dabble Application.
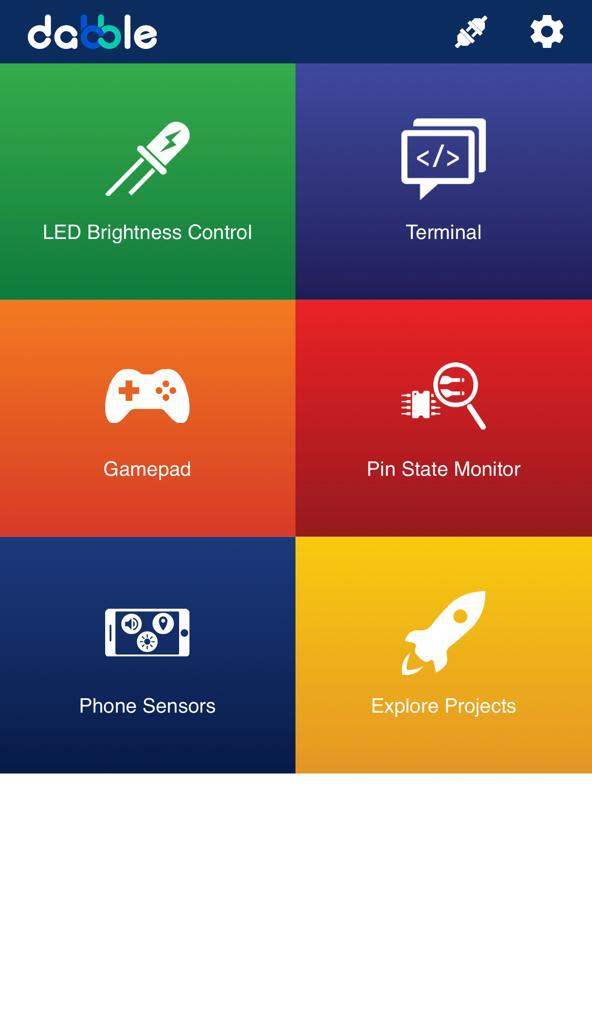
Select the Gamepad option from the Home Screen and we will then use the same gamepad to control our Mecanum Pick and Place.

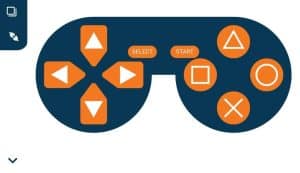
The following blocks represent the different functions that are created to control the Mecanum Pick and Place for different types of motions. We will use the arrow buttons to control the basic movements.( Forward, Backward, Lateral Left, Lateral Right ). We will use custom functions to control the Pick and Place actions. We will use the Triangle button to pick with the help of arms and the Circle button to initiate the placing action (dropping down the object). We will use the Cross button to rotate to the right direction and we will use the Square button to rotate to the left direction. We can use the Select button to stop the Mecanum whenever possible.
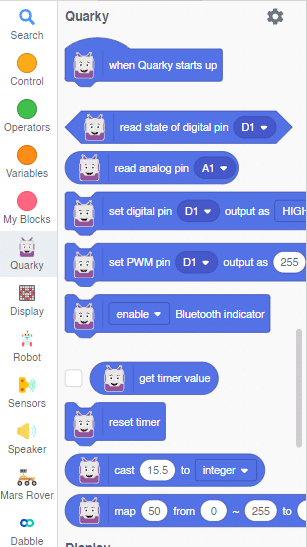
Note: You can always customize each and every function and button, and make your own activities easily. You will have to add the extensions of Mecanum and also of Dabble to access the blocks. To access the basic extensions required, make sure to select the Board as Quarky first.
Initialization
Main Code
You will have to connect the Quarky with the Dabble Application on your device. Make sure Bluetooth is enabled on the device before connecting. Connect the Mecanum to the Dabble application after uploading the code. You will be able to connect by clicking on the plug option in the Dabble Application as seen below. Select that plug option and you will find your Quarky device. Connect by clicking on the respective Quarky.
Forward-Backward Motion:
Circular Right-Left Motion:
Lateral Right-Left Motion:
Pick and Place Mechanism with Dabble:

In this activity, we will control the Mecanum Pick and Place according to our needs using the Dabble application on our own Devices.
We will first understand how to operate Dabble and how to modify our code according to the requirements. The following image is the front page of the Dabble Application.
Select the Gamepad option from the Home Screen and we will then use the same gamepad to control our Mecanum Pick and Place.
The following blocks represent the different functions that are created to control the Mecanum Pick and Place for different types of motions. We will use the arrow buttons to control the basic movements.( Forward, Backward, Lateral Left, Lateral Right ). We will use custom functions to control the Pick and place actions. We will use the Triangle button to initiate the Pick action and the Circle button to initiate the place action. We will use the Cross button to rotate to the right direction and we will use the Square button to rotate to the left direction. We can use the Select button to stop the Mecanum whenever possible.
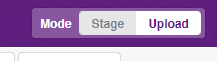
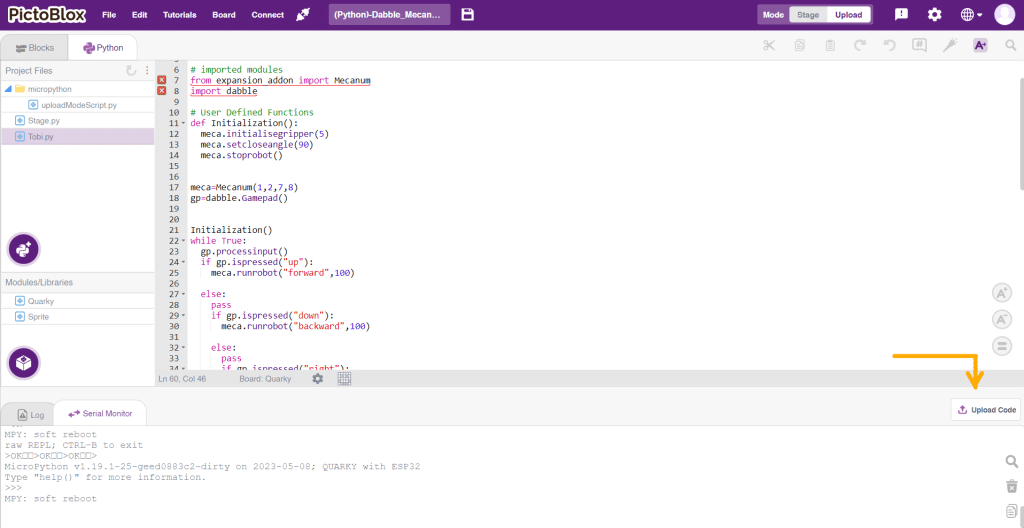
Note: You can always customize each and every function and button, and make your own activities easily. You will have to add the extensions of Mecanum and also of Dabble to access the functions. To access the basic extensions required, make sure to select the Board as Quarky first. Select the Python Coding Environment and on the top right click on the Upload Mode only for the code to work properly.
You will have to connect the Quarky with the Dabble Application on your device. Make sure Bluetooth is enabled on the device before connecting. Connect the Mecanum to the Dabble application after uploading the code. You will be able to connect by clicking on the plug option in the Dabble Application as seen below. Select that plug option and you will find your Quarky device. Connect by clicking on the respective Quarky.
Forward-Backward Motion:
Circular Right-Left Motion:
Lateral Right-Left Motion:
Pick and Place Mechanism with Dabble:

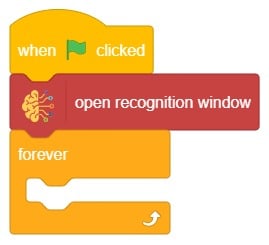
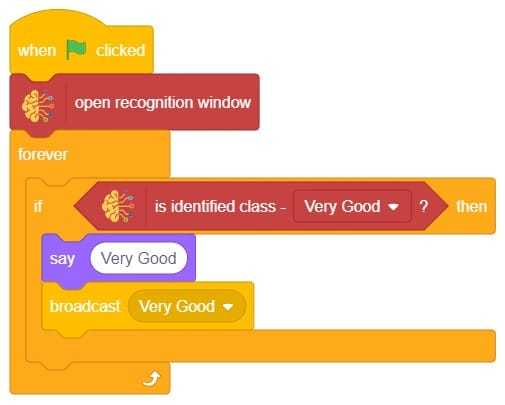
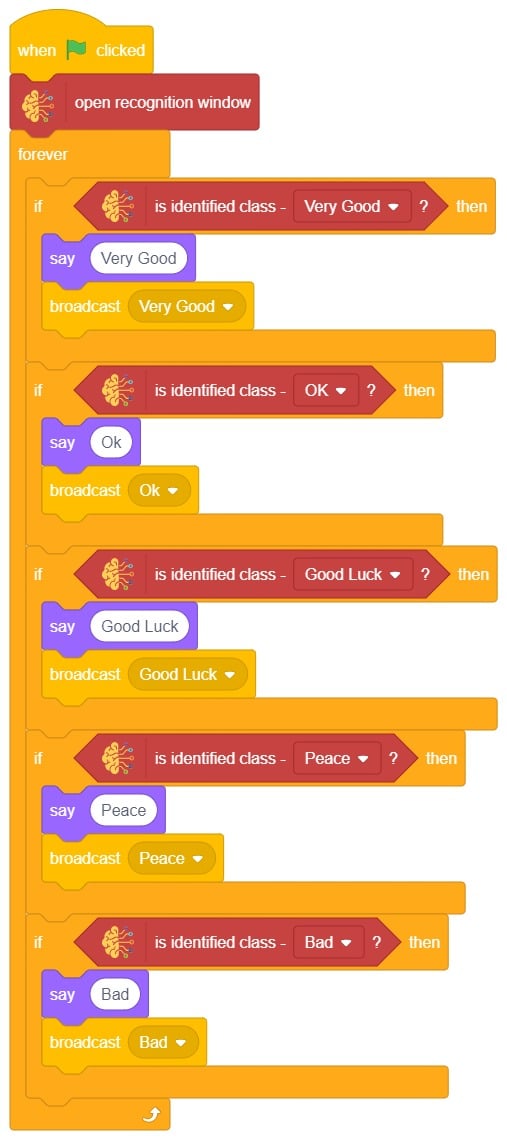
In this example project, we are going to create a machine learning model that can classify different sign messages from the camera feed or image.

The Hand Gesture Classifier is the extension of the ML Environment used for classifying different hand poses into different classes.
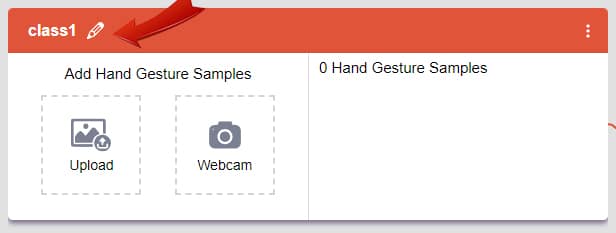
Class is the category in which the Machine Learning model classifies the poses. Similar posts are put in one class.
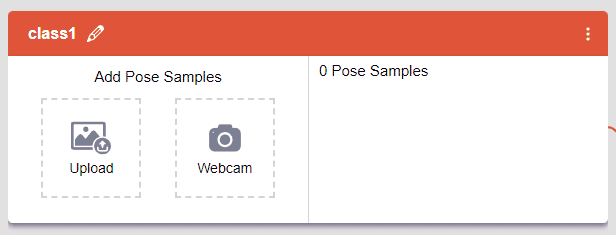
Class is the category in which the Machine Learning model classifies the hand poses. Similar hand poses are put in one class.
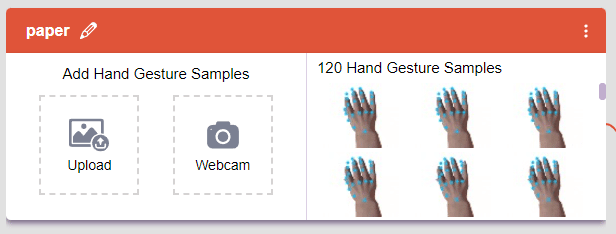
You can perform the following operations to manipulate the data into a class.
If you want to change your camera feed, you can do it from the webcam selector in the top right corner.

After data is added, it’s fit to be used in model training. In order to do this, we have to train the model. By training the model, we extract meaningful information from the hand pose, and that in turn updates the weights. Once these weights are saved, we can use our model to make predictions on data previously unseen.
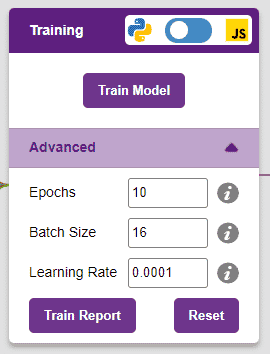
However, before training the model, there are a few hyperparameters that you should be aware of. Click on the “Advanced” tab to view them.
It’s a good idea to train a numeric classification model for a high number of epochs. The model can be trained in both JavaScript and Python. In order to choose between the two, click on the switch on top of the Training panel.

The accuracy of the model should increase over time. The x-axis of the graph shows the epochs, and the y-axis represents the accuracy at the corresponding epoch. Remember, the higher the reading in the accuracy graph, the better the model. The x-axis of the graph shows the epochs, and the y-axis represents the corresponding accuracy. The range of the accuracy is 0 to 1.
To test the model, simply enter the input values in the “Testing” panel and click on the “Predict” button.
The model will return the probability of the input belonging to the classes.
Click on the “Export Model” button on the top right of the Testing box, and PictoBlox will load your model into the Block Coding Environment if you have opened the ML Environment in the Block Coding.
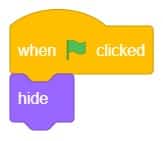
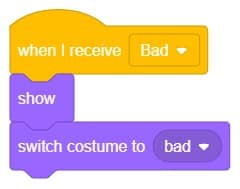
The idea is simple, we’ll add one image of each class in the “costume” column by making one new sprite which will we display on the stage according to input from user. we’ll also change name of the image according to sign class type.
A sign detector robotic arm is a smart robot that can recognize and understand signs or signals in its surroundings. It uses cameras and other sensors to capture visual information and computer algorithms to analyze the signs. The robot can learn different types of signs through machine learning techniques. Once a sign is identified, the robotic arm can perform specific actions based on what the sign means. These robotic arms have many uses, such as helping in healthcare, manufacturing, transportation, and assisting people with communication disabilities. They are an exciting advancement in human-robot interaction, allowing robots to understand and respond to signs, expanding their abilities and applications.
sprite = Sprite('Tobi')

recocards = RecognitionCards()
recocards.video("on flipped")
recocards.enablebox()
recocards.setthreshold(0.6)
roboticArm = RoboticArm(1,2,3,4)

roboticArm.sethome()
while True:
  recocards.analysecamera()
  sign = recocards.classname()
  sprite.say(sign + ' detected')
  if recocards.count() > 0:
	  if 'Turn Left' in sign:
		  roboticArm.movebyinoneaxis(10,"X",1000)

	  if 'Turn Right' in sign:
		  roboticArm.movebyinoneaxis(-10,"X",1000)

	  if 'Go' in sign:
		  roboticArm.movebyinoneaxis(10,"Y",1000)

	  if 'U Turn' in sign:
		  roboticArm.movebyinoneaxis(-10,"Y",1000)
Gesture-controlled grippers revolutionize the way humans interact with robotic systems by allowing the manipulation of robotic grippers through hand gestures. This innovative technology leverages computer vision and machine learning algorithms to interpret and respond to specific hand movements in real-time. By recognizing and analyzing gestures, the system translates them into commands for the gripper, providing users with a natural and intuitive interface for controlling its actions.
Gesture-controlled grippers have wide-ranging applications across the manufacturing, logistics, healthcare, and robotics industries. With a simple wave, pinch, or swipe of the hand, users can trigger actions like grasping, releasing, and repositioning objects the gripper holds.
The Hand Gesture Classifier is the extension of the ML Environment used for classifying different hand poses into different classes.
Follow the steps below:

There are 2 things that you have to provide in a class:
You can perform the following operations to manipulate the data into a class.
After data is added, it’s fit to be used in model training. In order to do this, we have to train the model. By training the model, we extract meaningful information from the hand pose, and that in turn updates the weights. Once these weights are saved, we can use our model to make predictions on data previously unseen.
The accuracy of the model should increase over time. The x-axis of the graph shows the epochs, and the y-axis represents the accuracy at the corresponding epoch. Remember, the higher the reading in the accuracy graph, the better the model. The range of accuracy is 0 to 1.
To test the model, simply enter the input values in the “Testing” panel and click on the “Predict” button.
The model will return the probability of the input belonging to the classes.
Click on the “Export Model” button on the top right of the Testing box, and PictoBlox will load your model into the Python Coding Environment if you have opened the ML Environment in Block Coding.

Gesture-controlled grippers revolutionize the way humans interact with robotic systems by allowing the manipulation of robotic grippers through hand gestures. This innovative technology leverages computer vision and machine learning algorithms to interpret and respond to specific hand movements in real-time. By recognizing and analyzing gestures, the system translates them into commands for the gripper, providing users with a natural and intuitive interface for controlling its actions.
Gesture-controlled grippers have wide-ranging applications across the manufacturing, logistics, healthcare, and robotics industries. With a simple wave, pinch, or swipe of the hand, users can trigger actions like grasping, releasing, and repositioning objects the gripper holds.
The Hand Gesture Classifier is the extension of the ML Environment used for classifying different hand poses into different classes.
Follow the steps below:
There are 2 things that you have to provide in a class:
You can perform the following operations to manipulate the data into a class.
After data is added, it’s fit to be used in model training. In order to do this, we have to train the model. By training the model, we extract meaningful information from the hand pose, and that in turn updates the weights. Once these weights are saved, we can use our model to make predictions on data previously unseen.
The accuracy of the model should increase over time. The x-axis of the graph shows the epochs, and the y-axis represents the accuracy at the corresponding epoch. Remember, the higher the reading in the accuracy graph, the better the model. The range of accuracy is 0 to 1.
To test the model, simply enter the input values in the “Testing” panel and click on the “Predict” button.
The model will return the probability of the input belonging to the classes.
Click on the “Export Model” button on the top right of the Testing box, and PictoBlox will load your model into the Python Coding Environment if you have opened the ML Environment in Python Coding.
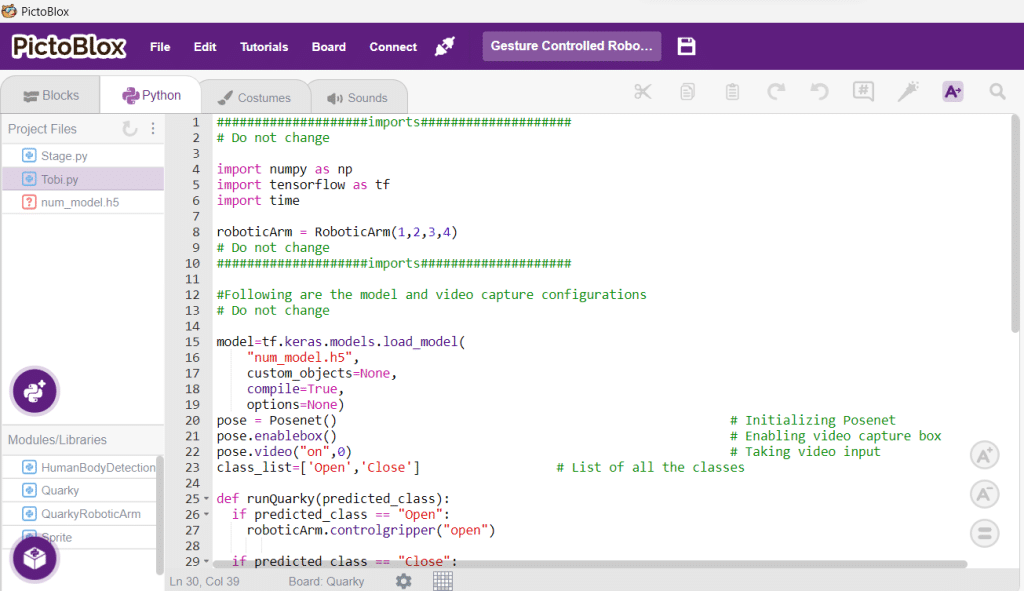
####################imports####################
# Do not change
import numpy as np
import tensorflow as tf
import time
roboticArm = RoboticArm(1,2,3,4)
# Do not change
####################imports####################
#Following are the model and video capture configurations
# Do not change
model=tf.keras.models.load_model(
"num_model.h5",
custom_objects=None,
compile=True,
options=None)
pose = Posenet() # Initializing Posenet
pose.enablebox() # Enabling video capture box
pose.video("on",0) # Taking video input
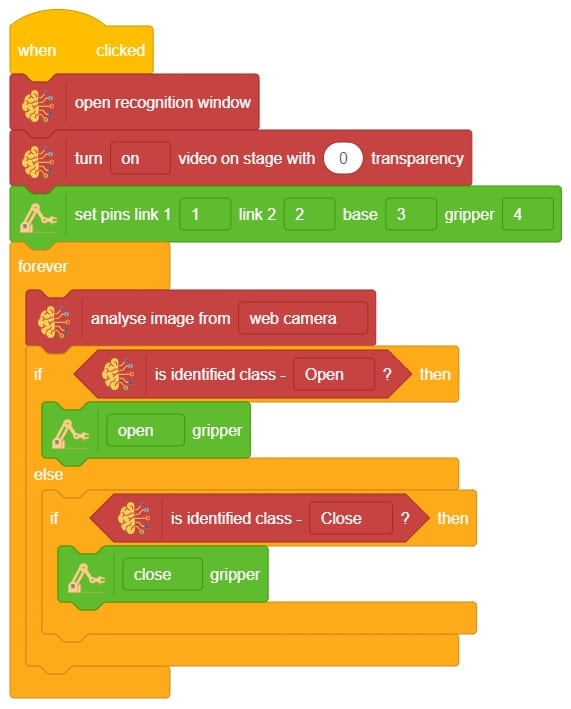
class_list=['Open','Close'] # List of all the classes
def runQuarky(predicted_class):
if predicted_class == "Open":
roboticArm.controlgripper("open")
if predicted_class == "Close":
roboticArm.controlgripper("close")
# Do not change
###############################################
#This is the while loop block, computations happen here
# Do not change
while True:
pose.analysehand() # Using Posenet to analyse hand pose
coordinate_xy=[]
# for loop to iterate through 21 points of recognition
for i in range(21):
if(pose.gethandposition(1,i,0)!="NULL" or pose.gethandposition(2,i,0)!="NULL"):
coordinate_xy.append(int(240+float(pose.gethandposition(1,i,0))))
coordinate_xy.append(int(180-float(pose.gethandposition(2,i,0))))
else:
coordinate_xy.append(0)
coordinate_xy.append(0)
coordinate_xy_tensor = tf.expand_dims(coordinate_xy, 0) # Expanding the dimension of the coordinate list
predict=model.predict(coordinate_xy_tensor) # Making an initial prediction using the model
predict_index=np.argmax(predict[0], axis=0) # Generating index out of the prediction
predicted_class=class_list[predict_index] # Tallying the index with class list
print(predicted_class)
runQuarky(predicted_class)
# Do not change
def runQuarky(predicted_class):
  if predicted_class == "Open":
    roboticArm.controlgripper("open")

  if predicted_class == "Close":
    roboticArm.controlgripper("close")

The project uses face recognition to identify authorized people and opens the door accordingly.
We are using 2 devices in this project:
We will be using Face Detection extension for making the face recognition application.
This code is used to add a new face to a system:
#Create a new Sprite object with the name 'Tobi'
sprite = Sprite('Tobi')

#Create a new Face Detection object
fd = FaceDetection()

#Import the time library
import time

#Set the threshold for face detection to 0.5
fd.setthreshold(0.5)
#Turn off the video feed from the camera
fd.video("off", 0)
#Enable the box to be drawn around the detected face
fd.enablebox()

#Define a function that adds a new face to the system
def addFace():
  #Create a flag to keep track if a new face has been added
  faceFlag = 0

  #Turn on the video feed from the camera
  fd.video("on", 0)
  time.sleep(1)

  #Keep looping until a new face has been added
  while faceFlag == 0:
    #Analyse the camera for a face
    fd.analysecamera()

    #Check if one face has been detected
    if fd.count() == 1:
      #Ask the user which slot the face should be added to
      sprite.input("Select the slot (1 to 10)?")
      #Store the slot number the user provided
      faceSlot = sprite.answer()

      #Ask the user to enter a name for the new face
      sprite.input("Enter the name of the face")
      #Store the name the user provided
      faceName = sprite.answer()

      #Add the face to the system with the provided slot number and name
      fd.addclassfromcamera(faceSlot, faceName)

      #Set the faceFlag to 1 to stop the loop
      faceFlag = 1

  #Turn off the video feed from the camera
  fd.video("off", 0)

#Keep running the loop forever
while True:
  #Check if the 'a' key has been pressed
  if sprite.iskeypressed("a"):
    #If yes, call the addFace() function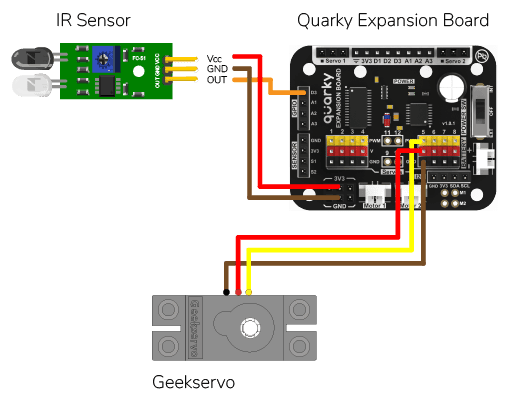
addFace()An Infrared sensor is a type of sensor that senses if something is close to it or not. The IR stands for Infrared sensor. Infrared is the light out of our visible spectrum.
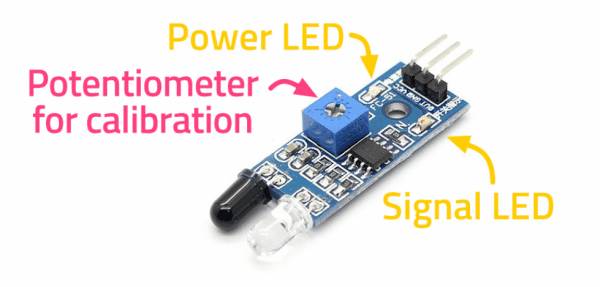
An IR sensor has a white LED (transmitter) and a photodiode (receiver). The transmitter emits IR light, and the receiver detects reflected light from objects within the sensor’s range, which can be adjusted with a potentiometer. The sensor is indicated by two LED indicators, a power LED which is always on, and a signal LED which is on when an object is detected and off when nothing is detected.
The signal LED has two states or situations:
This code creates a program that can add a new face to the system, and then recognize and authenticate the user:
#Create a new Sprite object with the name 'Tobi'
sprite = Sprite('Tobi')

#Create a new Face Detection object
fd = FaceDetection()

#Import the time library
import time

#Create a new Quarky object
quarky = Quarky()

#Create a new Expansion object
expansion = Expansion()
house = IoTHouse()

#Set the threshold for face detection to 0.5
fd.setthreshold(0.5)
#Turn off the video feed from the camera
fd.video("off", 0)
#Enable the box to be drawn around the detected face
fd.enablebox()

#Move a servo on the expansion board to position 5 and move it to 100 degrees
expansion.moveservo(5, 100);

#Define a function that adds a new face to the system
def addFace():
  #Create a flag to keep track if a new face has been added
  faceFlag = 0

  #Turn on the video feed from the camera
  fd.video("on", 0)
  time.sleep(1)

  #Keep looping until a new face has been added
  while faceFlag == 0:
    #Analyse the camera for a face
    fd.analysecamera()

    #Check if one face has been detected
    if fd.count() == 1:
      #Ask the user which slot the face should be added to
      sprite.input("Select the slot (1 to 10)?")
      #Store the slot number the user provided
      faceSlot = sprite.answer()

      #Ask the user to enter a name for the new face
      sprite.input("Enter the name of the face")
      #Store the name the user provided
      faceName = sprite.answer()

      #Add the face to the system with the provided slot number and name
      fd.addclassfromcamera(faceSlot, faceName)

      #Set the faceFlag to 1 to stop the loop
      faceFlag = 1

  #Turn off the video feed from the camera
  fd.video("off", 0)


#Define a function that authenticates the user
def authenticate():
  #Turn on the video feed from the camera
  fd.video("on", 0)
  time.sleep(1)

  #Recognise the face in the camera
  fd.recognisefromstage()

  #Check if one or more face has been detected
  if fd.count() > 0:
    #Loop through all the detected faces
    for i in range(1, fd.count() + 1):
      #Check if the face has been recognised
      if fd.getclassname(i) != "unknown":
        #Speak out the name of the recognised user
        sprite.say("Authorised - " + fd.getclassname(i), 2)

        #Turn off the video feed from the camera
        fd.video("off", 0)

        #Return 1 to indicate the user has been authenticated
        return 1

  #Turn off the video feed from the camera
  fd.video("off", 0)
  #Return 0 to indicate the user has not been authenticated
  return 0

#Keep running the loop forever
while True:
  #Check if the 'a' key has been pressed
  if sprite.iskeypressed("a"):
    #If yes, call the addFace() function
    addFace()

  #Check if the space key has been pressed
  if house.irstatus("D3"):
    #If yes, call the authenticate() function
    if authenticate() == 1:
      #Move the servo to 0 degrees
      expansion.moveservo(5, 0)
      time.sleep(2)
      #Move the servo back to 100 degrees
      expansion.moveservo(5, 100)
In this example, you will understand how the oscillator concept is used to create smooth motions for the Quadruped robot. The oscillator is the primary component for making the smooth movements of Quarky Quadruped like walking or turning.

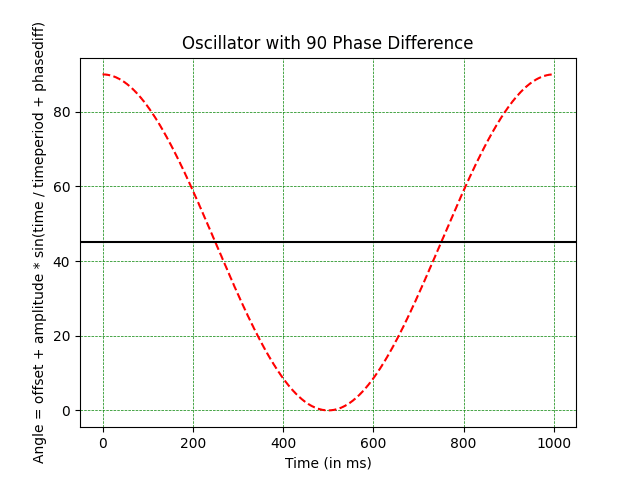
The purpose of the oscillator in the code is to generate a sinusoidal waveform that can be used to control the motion of a servo motor. The parameters of the oscillator are defined by the offset, amplitude, period, and phase difference.
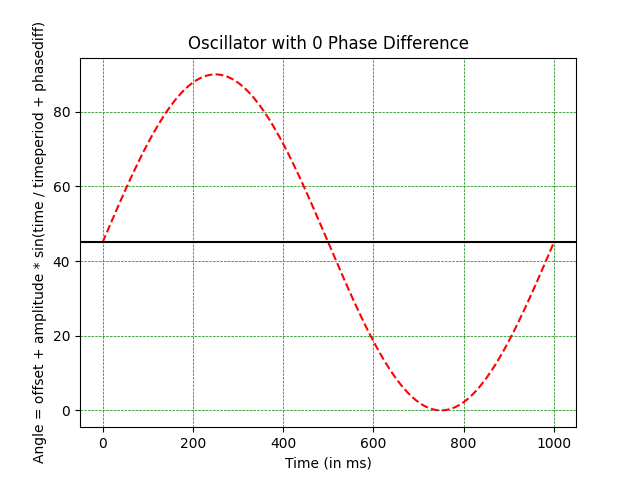
In mathematical terms, the servo angle is calculated using the following formula:
Angle = Offset + Amplitude * sin(Time / Timeperiod + Phasediff)Let’s apply the concept of oscillation to the Quadruped. We want the front right hip servo to oscillate like this:

As you can observe, the following are the oscillator parameters that can be used to get the desired motion:
Look at the parameters carefully and see if you can understand how it works.
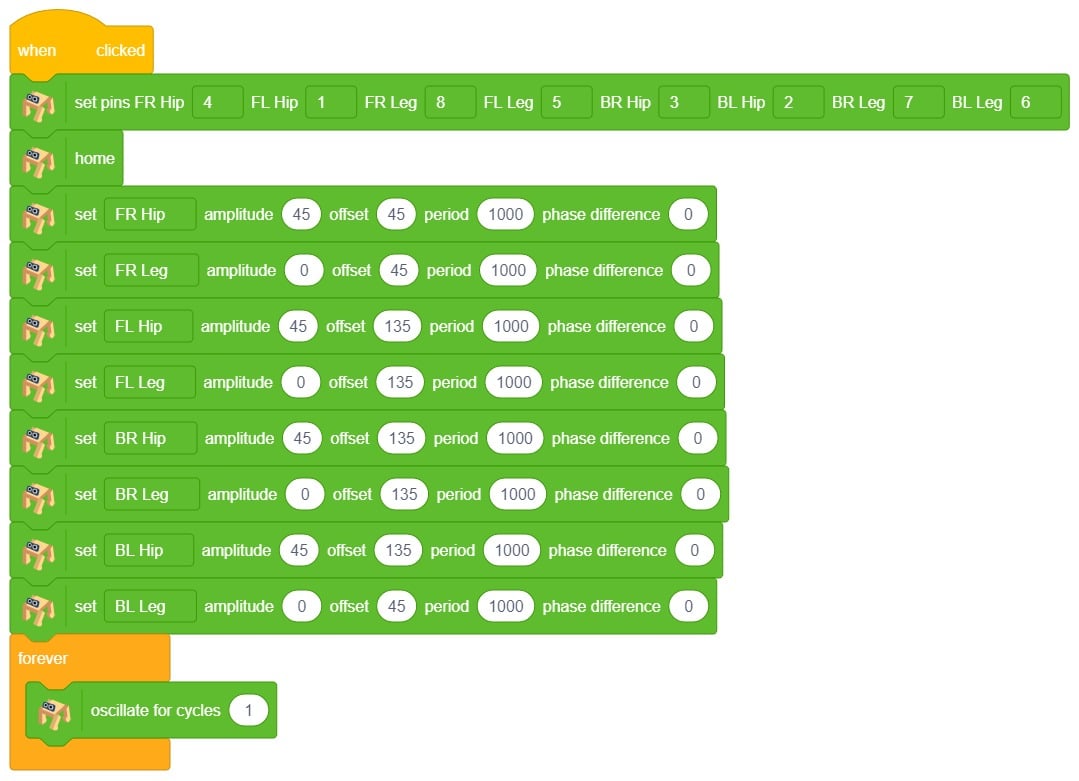
Now to execute the following on Quarky, we will the set () amplitude () offset () period () phase difference () which sets the oscillator parameters for the selected servo motor.

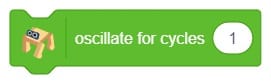
Next, we will use oscillate for cycles () block to execute the oscillator for the complete cycle for the specified cycle times.
Create the following script:
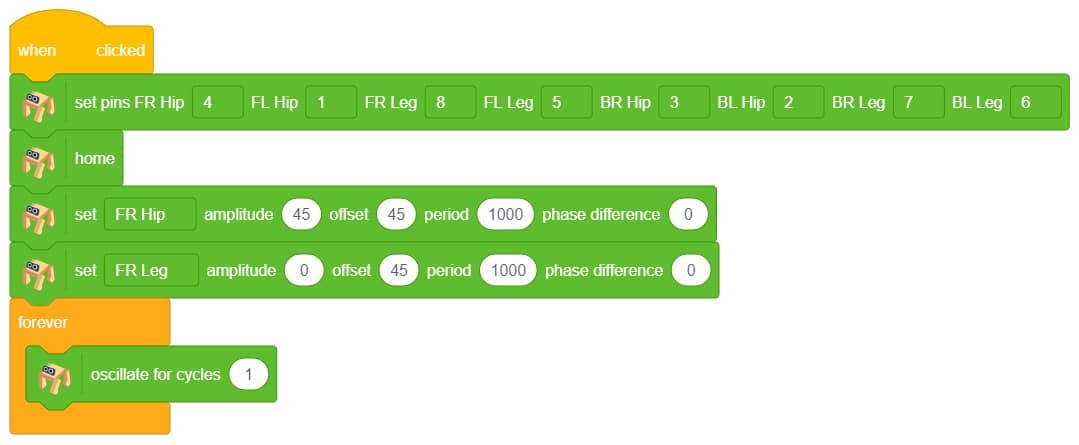
Click on the green flag to test the script:
As you can observe the servo motor start from 45 degrees and do 1 oscillation. You can observe the servo angle here:
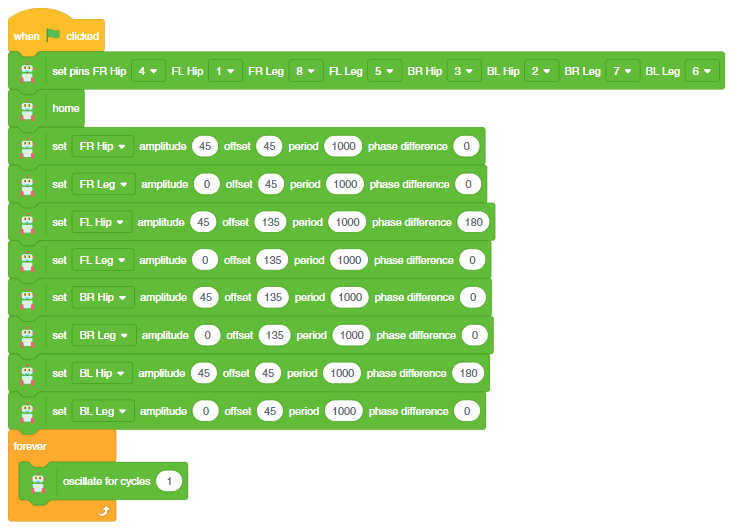
Let’s see how to use the Phase Difference to delay the move.
Create the following script:
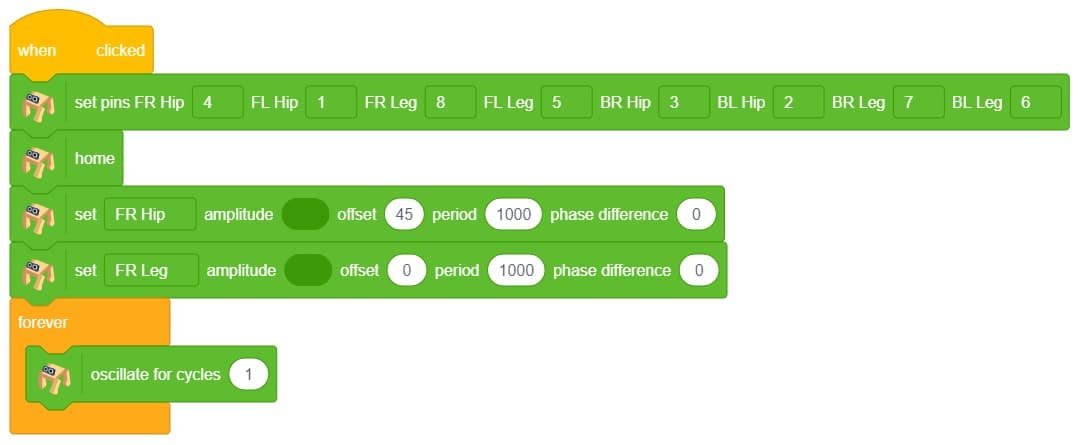
Click on the green flag to test the script:
As you can observe the servo motor start from 90 degrees and do 1 oscillation. You can observe the servo angle here:
Hope you have understood the oscillator. Let’s change the difficulty level and try the oscillator on all servo motors.
Create the script to make the left-right motion:
Let’s decode it. Let us play the motion while keeping the Quadruped in the air.
As you can observe the following movements: All the hip joints are starting from the 45-degree angles and then oscillate. The script of the following is here:
Run the green flag and test the code.

Try to change the parameters and create your actions.

The pose Classifier is the extension of the ML Environment used for classifying different body poses into different classes.
The model works by analyzing your body position with the help of 17 data points.
Class is the category in which the Machine Learning model classifies the poses. Similar posts are put in one class.
There are 2 things that you have to provide in a class:
You can perform the following operations to manipulate the data into a class.
After data is added, it’s fit to be used in model training. To do this, we have to train the model. By training the model, we extract meaningful information from the hand pose, and that in turn updates the weights. Once these weights are saved, we can use our model to predict previously unseen data.
The accuracy of the model should increase over time. The x-axis of the graph shows the epochs, and the y-axis represents the accuracy at the corresponding epoch. Remember, the higher the reading in the accuracy graph, the better the model. The range of accuracy is 0 to 1.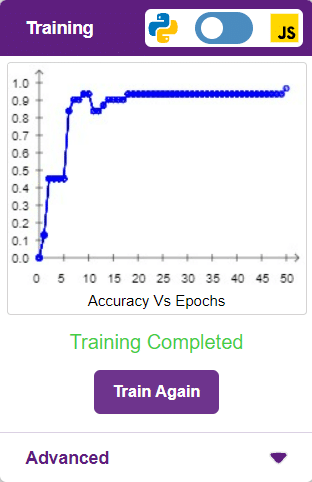
To test the model, simply enter the input values in the “Testing” panel and click on the “Predict” button.
The model will return the probability of the input belonging to the classes.
Click on the “Export Model” button on the top right of the Testing box, and PictoBlox will load your model into the Block Coding Environment if you have opened the ML Environment in the Block Coding.
A Sound-Based Quadruped with Machine Learning refers to a Quadruped robot that can perceive and interact with its environment through sound-based sensing and uses machine-learning techniques to process and analyze the auditory data it receives.
Quadruped robots with machine learning have the potential to greatly enhance the way we interact with machines and each other, making communication more natural and intuitive while also enabling new applications in fields such as healthcare, education, and entertainment.
In this activity, we will use the Machine Learning Environment of the Pictoblox Software. We will use the Audio Classifier of the Machine Learning Environment and create our custom sounds to control the Quadruped.
Follow the steps below to create your own Audio Classifier Model:
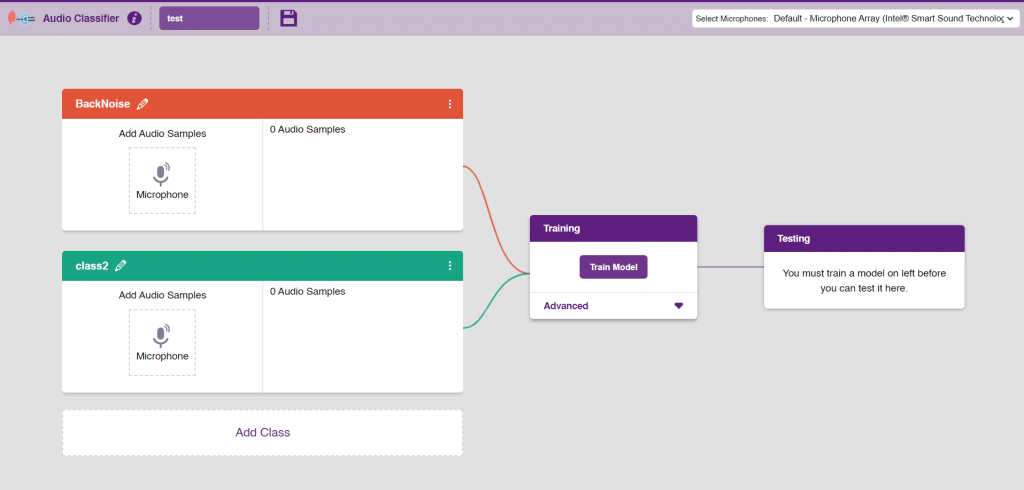
Note: You can add more classes to the projects using the Add Class button.
You can perform the following operations to manipulate the data into a class.

Note: You will only be able to change the class name in the starting before adding any audio samples. You will not be able to change the class name after adding the audio samples in the respective class.
After data is added, it’s fit to be used in model training. To do this, we have to train the model. By training the model, we extract meaningful information from the hand pose, and that in turn updates the weights. Once these weights are saved, we can use our model to make predictions on data previously unseen.
The accuracy of the model should increase over time. The x-axis of the graph shows the epochs, and the y-axis represents the accuracy at the corresponding epoch. Remember, the higher the reading in the accuracy graph, the better the model. The range of accuracy is 0 to 1.
To test the model simply, use the microphone directly and check the classes as shown in the below image:
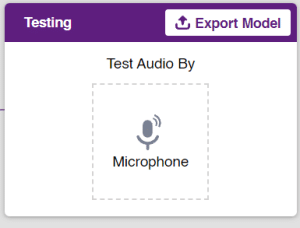
You will be able to test the difference in audio samples recorded from the microphone as shown below:
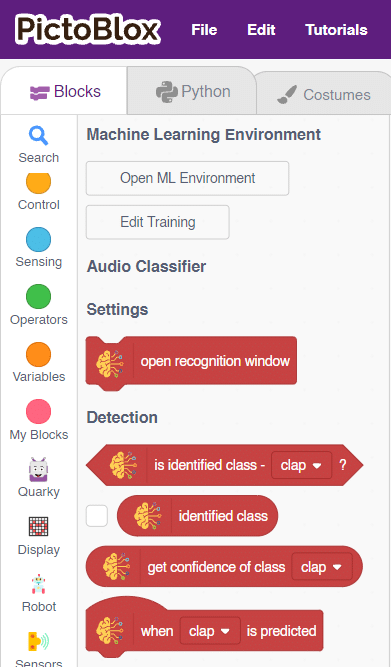
Click on the “Export Model” button on the top right of the Testing box, and PictoBlox will load your model into the Block Coding Environment if you have opened the ML Environment in the Block Coding.
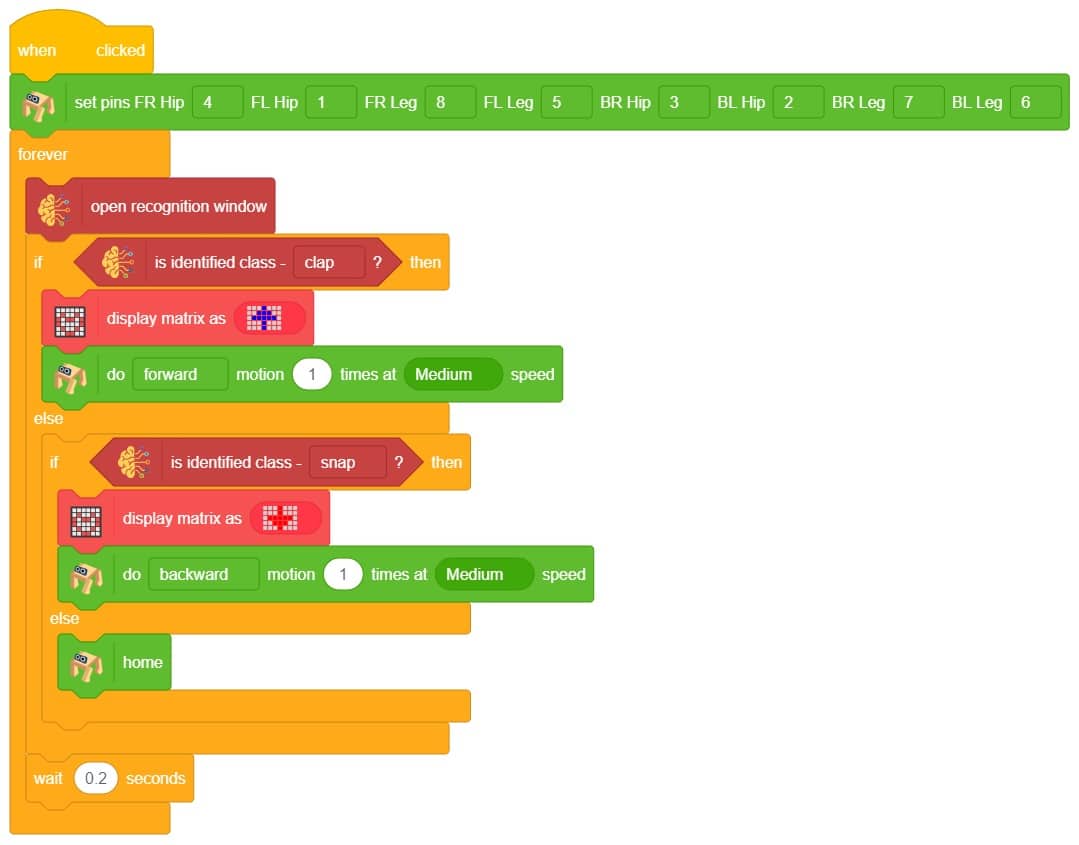
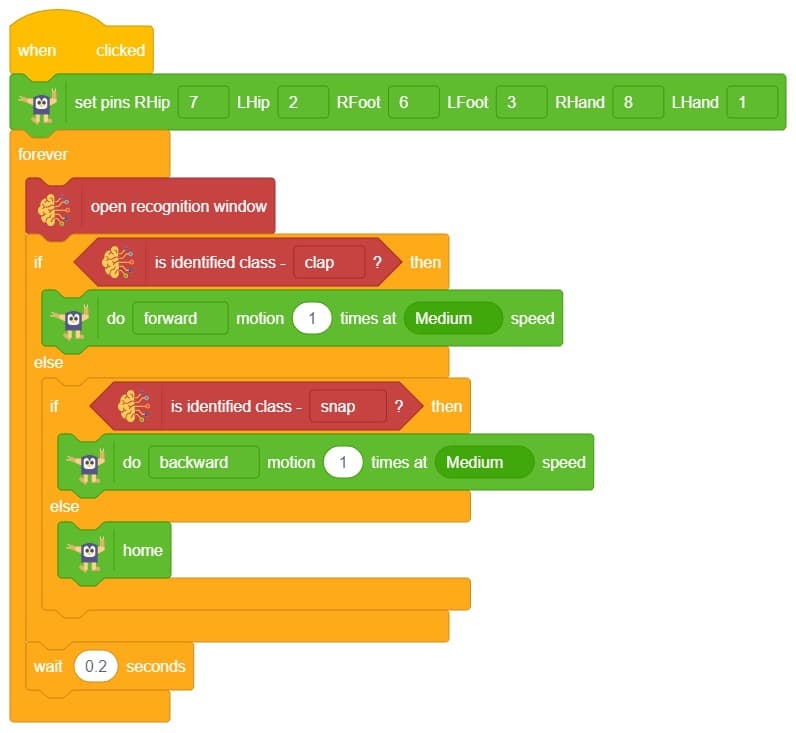
The Quadruped will move according to the following logic:
Note: You can add even more classes with different types of differentiating sounds to customize your control. This is just a small example from which you can build your own Sound Based Controlled Quadruped in a very easy stepwise procedure.


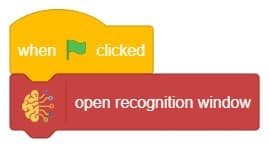
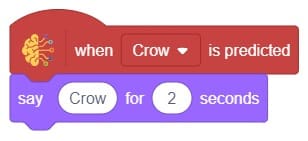
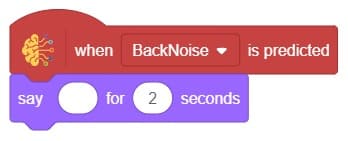
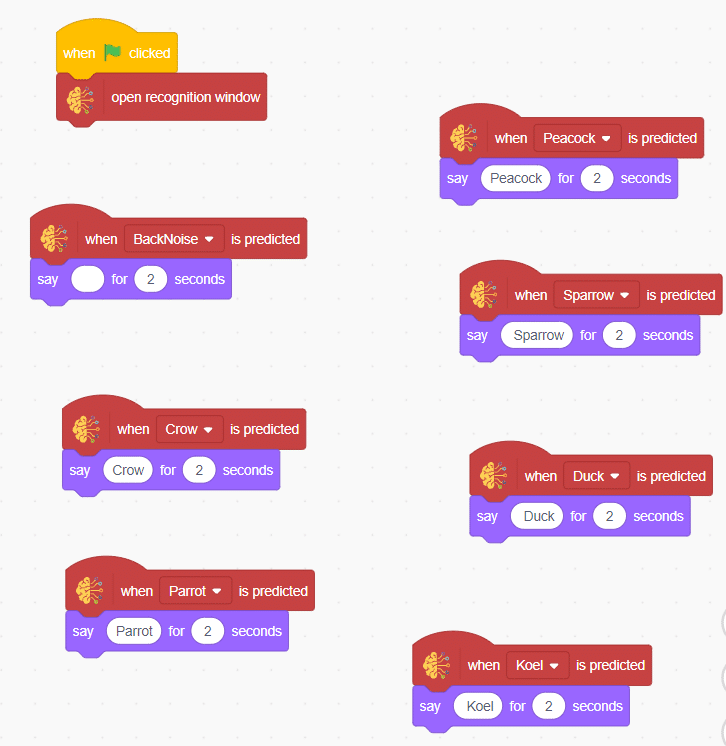
In this example project, we are going to create a machine learning model that can classify different audio messages of birds from the microphone feed of computer.
The Audio Classifier is the extension of the ML Environment used for classifying different birds voice.
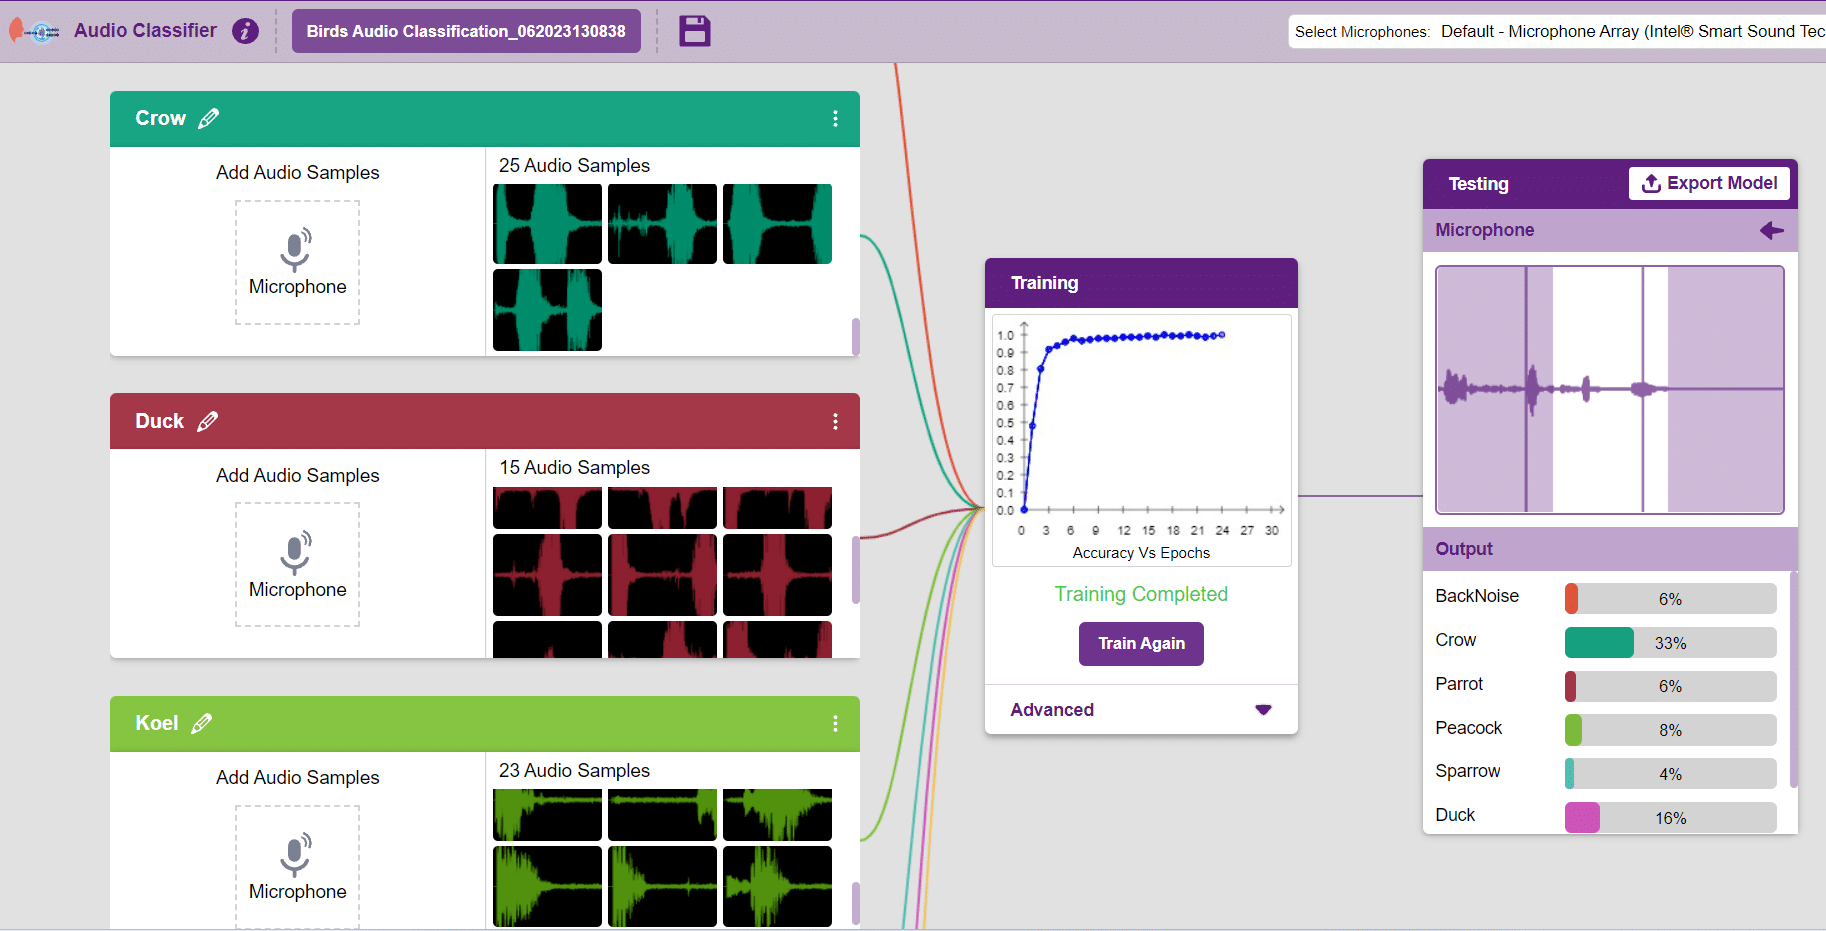
Follow the steps below to create your own Audio Classifier Model:
Note: You can add more classes to the projects using the Add Class button.
You can perform the following operations to manipulate the data into a class.
After data is added, it’s fit to be used in model training. To do this, we have to train the model. By training the model, we extract meaningful information from the hand pose, and that in turn updates the weights. Once these weights are saved, we can use our model to make predictions on data previously unseen.
The accuracy of the model should increase over time. The x-axis of the graph shows the epochs, and the y-axis represents the accuracy at the corresponding epoch. Remember, the higher the reading in the accuracy graph, the better the model. The range of accuracy is 0 to 1.
To test the model simply, use the microphone directly and check the classes as shown in the below image:
You will be able to test the difference in audio samples recorded from the microphone as shown below:
Click on the “Export Model” button on the top right of the Testing box, and PictoBlox will load your model into the Block Coding Environment if you have opened the ML Environment in the Block Coding.
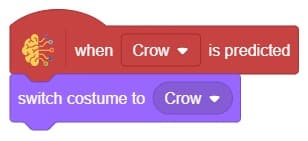
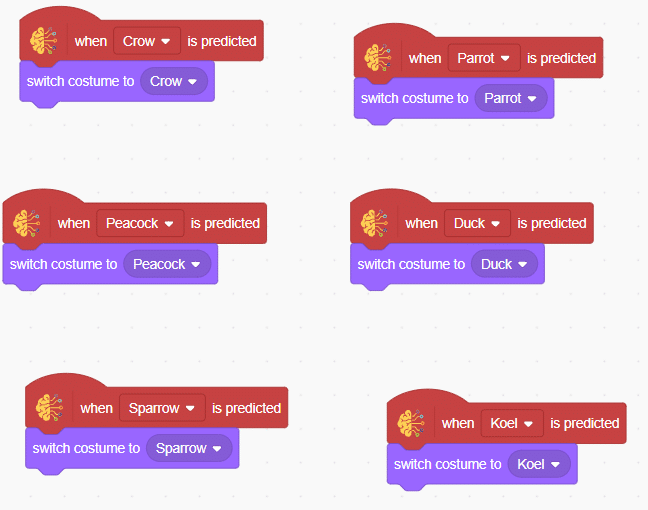
The idea is simple, we’ll add one image of each class in the “costume” column by making one new sprite which will we display on the stage according to input from user. we’ll also change name of the image according to bird class type.
Final Output

A potentiometer is a versatile three-terminal resistor that forms an adjustable voltage divider or variable resistor (rheostat). It consists of two terminals connected to a resistive element and a third terminal connected to an adjustable wiper. The potentiometer can vary the amount of resistance in the circuit based on the wiper’s position.


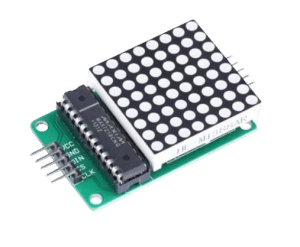
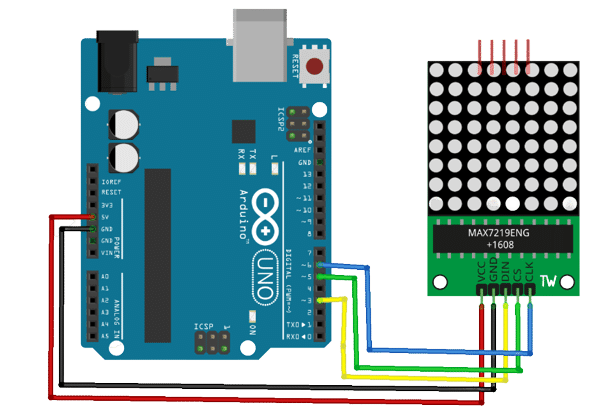
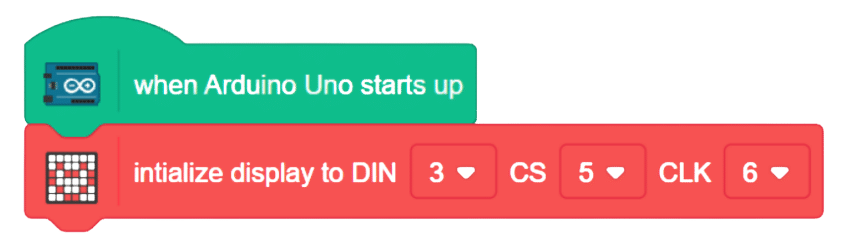
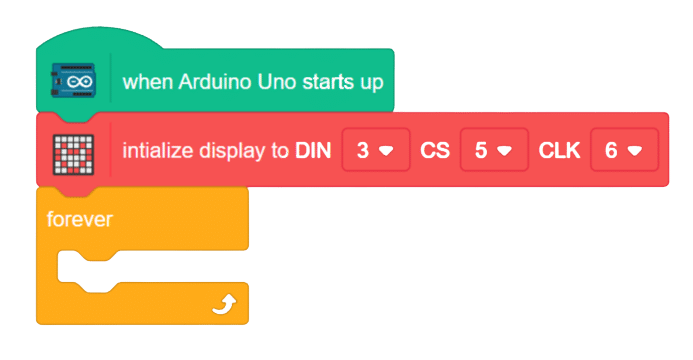
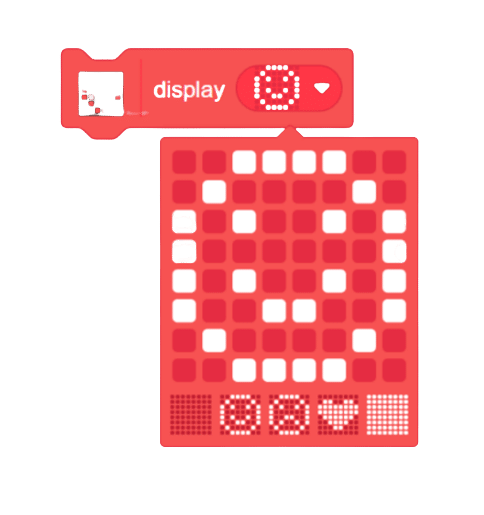
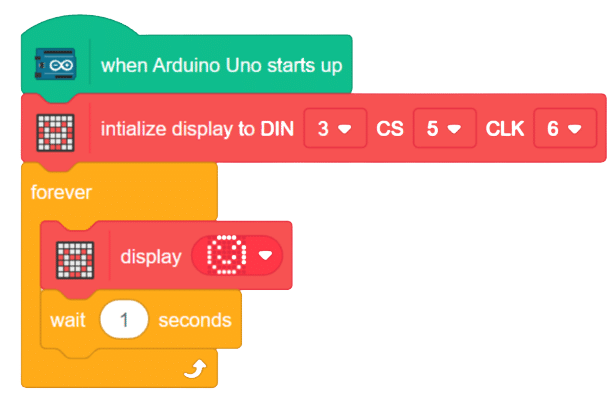
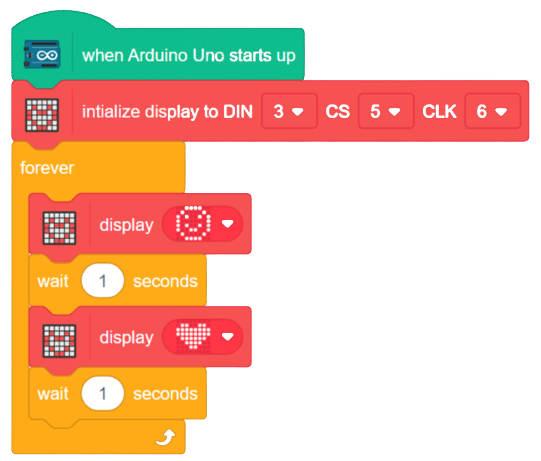
In this project, we will explore how to effectively use the 8×8 LED dot matrix with an Arduino Uno board. The 8×8 LED matrix contains 64 LEDs arranged in an 8×8 grid, forming a versatile display module. By connecting each row and column to digital pins, we can control the LED matrix and showcase a wide array of patterns, emojis, and animations. Additionally, cascading multiple dot matrices together enables us to expand the display without the need for extra pins.
This project demonstrates how to interface an RFID sensor with a Quarky to control the door of an IoT-enabled house using an authorized RFID tag.
RFID is short for “radio-frequency identification” and points to a technology whereby a reader catches digital information encoded in RFID tags. RFID sensors have a lot of pins. You have to connect it according to the following:
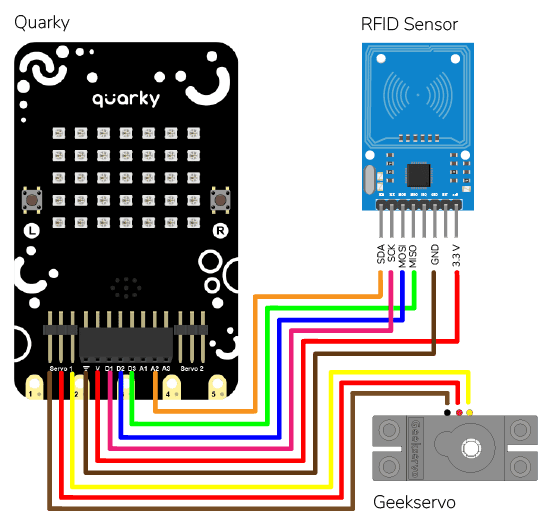
The servo motor is connected to the S1 of Quarky.
The following code makes any RFID Tag a master card that can be authorized for security.
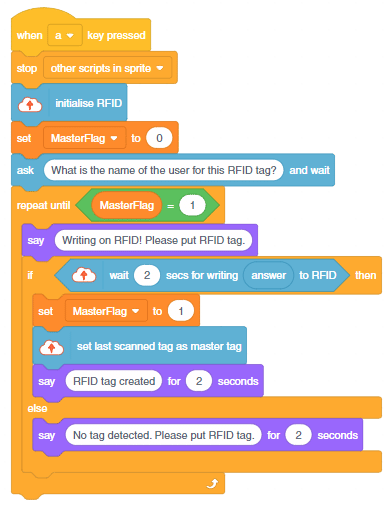
This is how it looks:

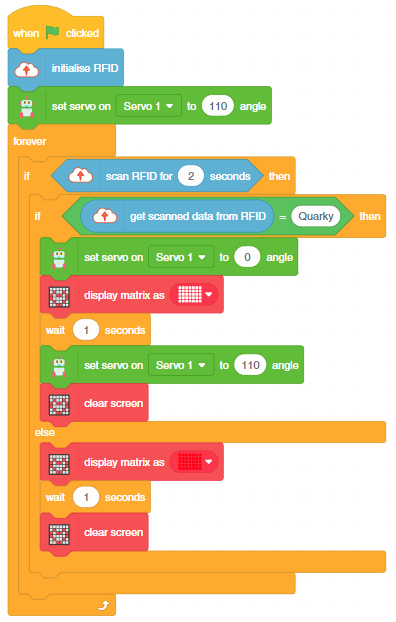
The following code checks the RFID tag and opens the door.
This project demonstrates how to interface an RFID sensor with a Quarky to control the door of an IoT-enabled house using an authorized RFID tag.
RFID is short for “radio-frequency identification” and points to a technology whereby a reader catches digital information encoded in RFID tags. RFID sensors have a lot of pins. You have to connect it according to the following:
The servo motor is connected to the S1 of Quarky.
The following code makes any RFID Tag a master card that can be authorized for security:
# Create a sprite object for 'Tobi'
sprite = Sprite('Tobi')

# Create a Quarky object
quarky = Quarky()

# Create an IoTHouse object
house = IoTHouse()

# Initialise the RFID tag
house.initialiserfid()

# Set a flag to indicate if the RFID tag has been written
MasterFlag = 0

# Ask the user for the name of the user for the RFID tag
sprite.input("What is the name of the user for this RFID tag?")

# Keep looping until the RFID tag is written
while MasterFlag == 0:
  # Ask the user to put the RFID tag
  sprite.say("Writing on RFID! Please put RFID tag.")

  # Try to write the RFID tag to the house
  if house.writetorfid(sprite.answer(), 2):
    # Set the MasterFlag to 1, indicating the RFID tag has been written
    MasterFlag = 1

    # Set the master tag of the RFID
    house.setmaster()

    # Let the user know the RFID tag is created
    sprite.say("RFID tag created", 2)

  # If the RFID tag couldn't be written
  else:
    # Ask the user to put the RFID tag again
    sprite.say("No tag detected, please put RFID tag", 2)
This is how it looks:
This code makes the Quarky open the door when it reads a special RFID card:
# First, we import the time library
import time

# We also create a Quarky object
quarky = Quarky()

# We create an IoTHouse object called 'house'
house = IoTHouse()
# We initialise the RFID of the house object
house.initialiserfid()

# We move the servo of the Quarky object to 100
quarky.moveservo("Servo 1", 100)

# We create a while loop that will go on forever
while True:
  # Check if the RFID is read
  if house.readrfid(3):
    # Check if the scanned data is Quarky
    if (house.readscanneddata() == "Quarky"):
      # Move the servo to 0
      quarky.moveservo("Servo 1", 0)
      # Draw a pattern on the Quarky Display
      quarky.drawpattern("aaaaaaaaaaaaaaaaaaaaaaaaaaaaaaaaaaa")
      # Sleep for 2 seconds
      time.sleep(2)
      # Move the servo to 100
      quarky.moveservo("Servo 1", 100)
      # Clear the display of the Quarky Display
      quarky.cleardisplay()

    # If the scanned data is not Quarky
    else:
      # Draw a different pattern on the Quarky object
      quarky.drawpattern("bbbbbbbbbbbbbbbbbbbbbbbbbbbbbbbbbbb")
      # Sleep for 1 second
      time.sleep(1)
      # Clear the display of the Quarky object
      quarky.cleardisplay()
A Sound-Based Humanoid with Machine Learning refers to a Humanoid robot that can perceive and interact with its environment through sound-based sensing and uses machine-learning techniques to process and analyze the auditory data it receives.
Humanoid robots with machine learning have the potential to greatly enhance the way we interact with machines and each other, making communication more natural and intuitive while also enabling new applications in fields such as healthcare, education, and entertainment.
In this activity, we will use the Machine Learning Environment of the Pictoblox Software. We will use the Audio Classifier of the Machine Learning Environment and create our custom sounds to control the Humanoid.

Follow the steps below to create your own Audio Classifier Model:
Note: You can add more classes to the projects using the Add Class button.
You can perform the following operations to manipulate the data into a class.
Note: You will only be able to change the class name in the starting before adding any audio samples. You will not be able to change the class name after adding the audio samples in the respective class.
After data is added, it’s fit to be used in model training. To do this, we have to train the model. By training the model, we extract meaningful information from the hand pose, and that in turn updates the weights. Once these weights are saved, we can use our model to make predictions on data previously unseen.
The accuracy of the model should increase over time. The x-axis of the graph shows the epochs, and the y-axis represents the accuracy at the corresponding epoch. Remember, the higher the reading in the accuracy graph, the better the model. The range of accuracy is 0 to 1.
To test the model simply, use the microphone directly and check the classes as shown in the below image:
You will be able to test the difference in audio samples recorded from the microphone as shown below:
Click on the “Export Model” button on the top right of the Testing box, and PictoBlox will load your model into the Block Coding Environment if you have opened the ML Environment in the Block Coding.
The Humanoid will move according to the following logic:
 Note: You can add even more classes with different types of differentiating sounds to customize your control. This is just a small example from which you can build your own Sound Based Controlled Humanoid in a very easy stepwise procedure.

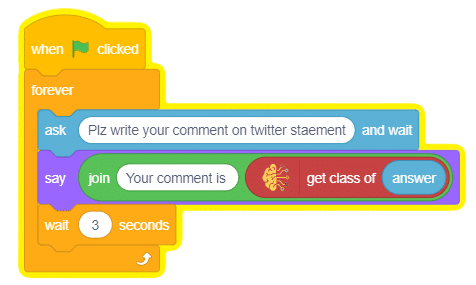
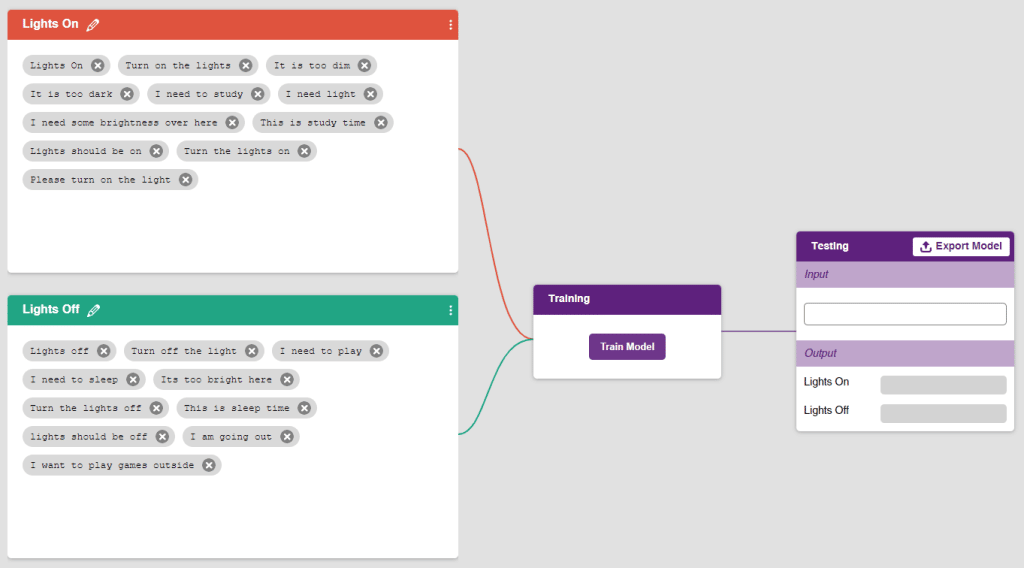
In this example project, we are going to create a machine learning model that can classify the nature of a comment based on the typed comment input by the user.
The Text Classifier is the extension of the ML Environment used for classifying nature of a comment or message which typed by user.
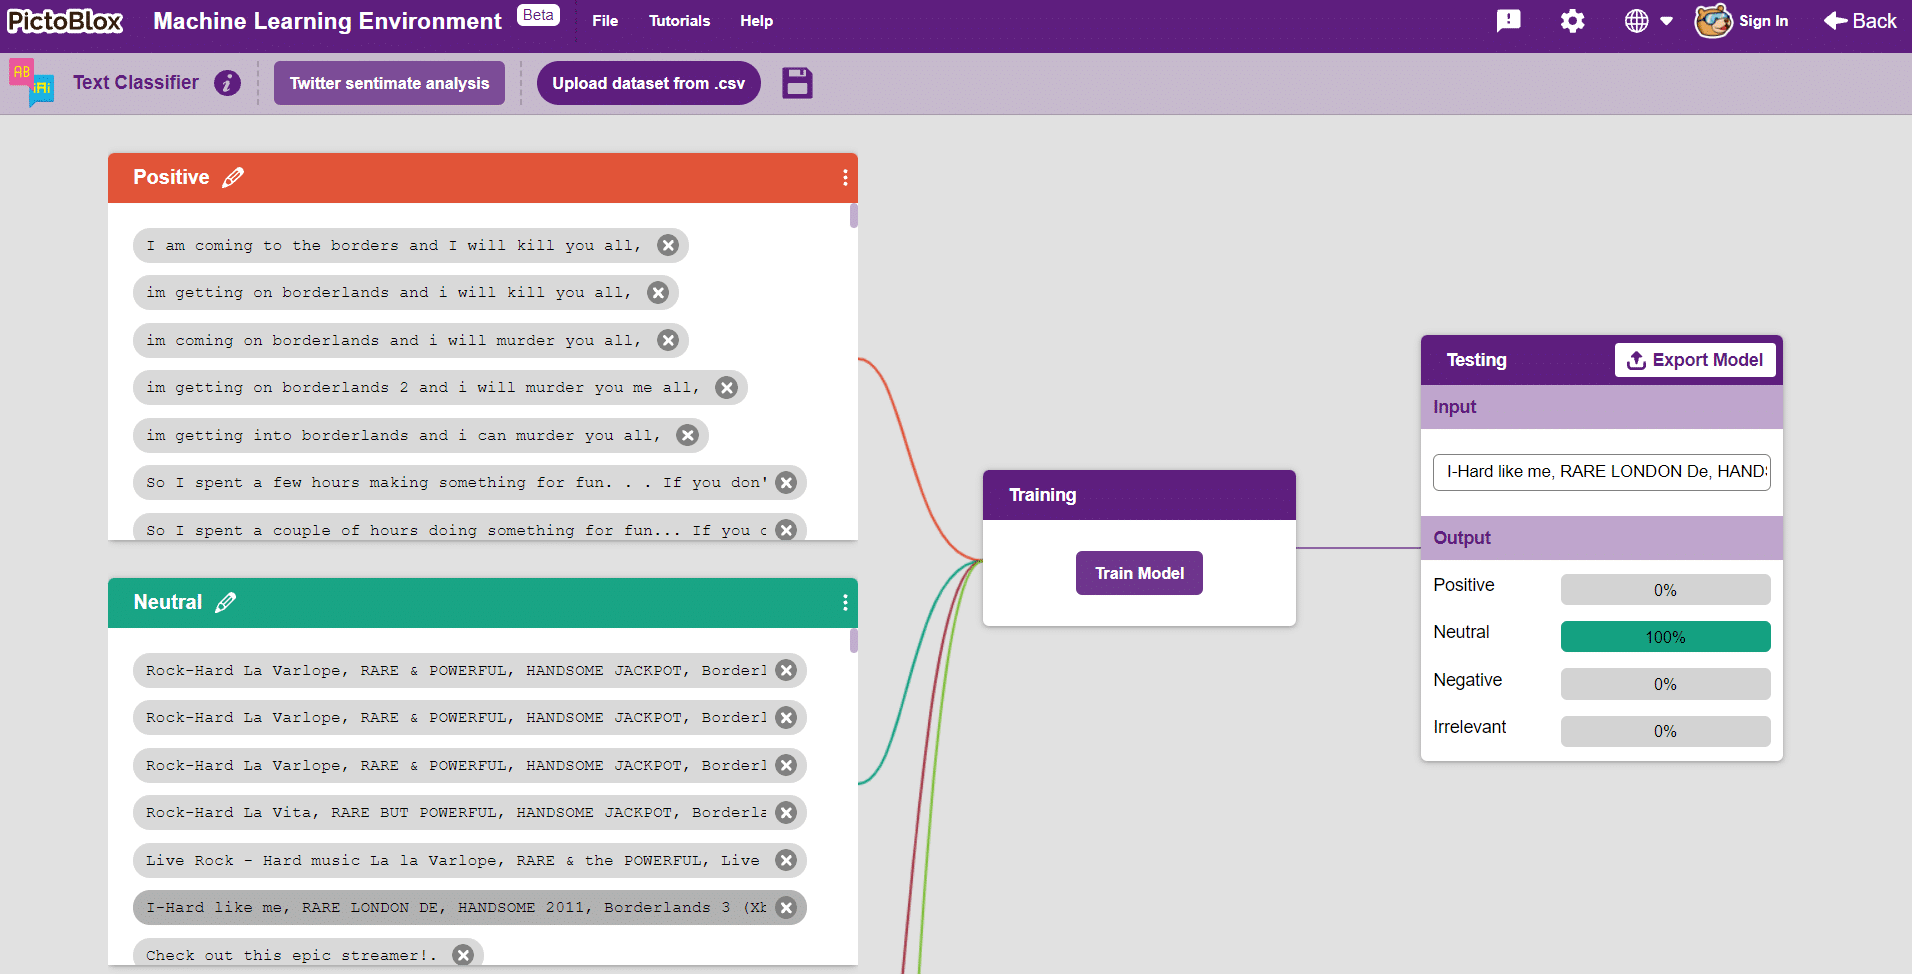

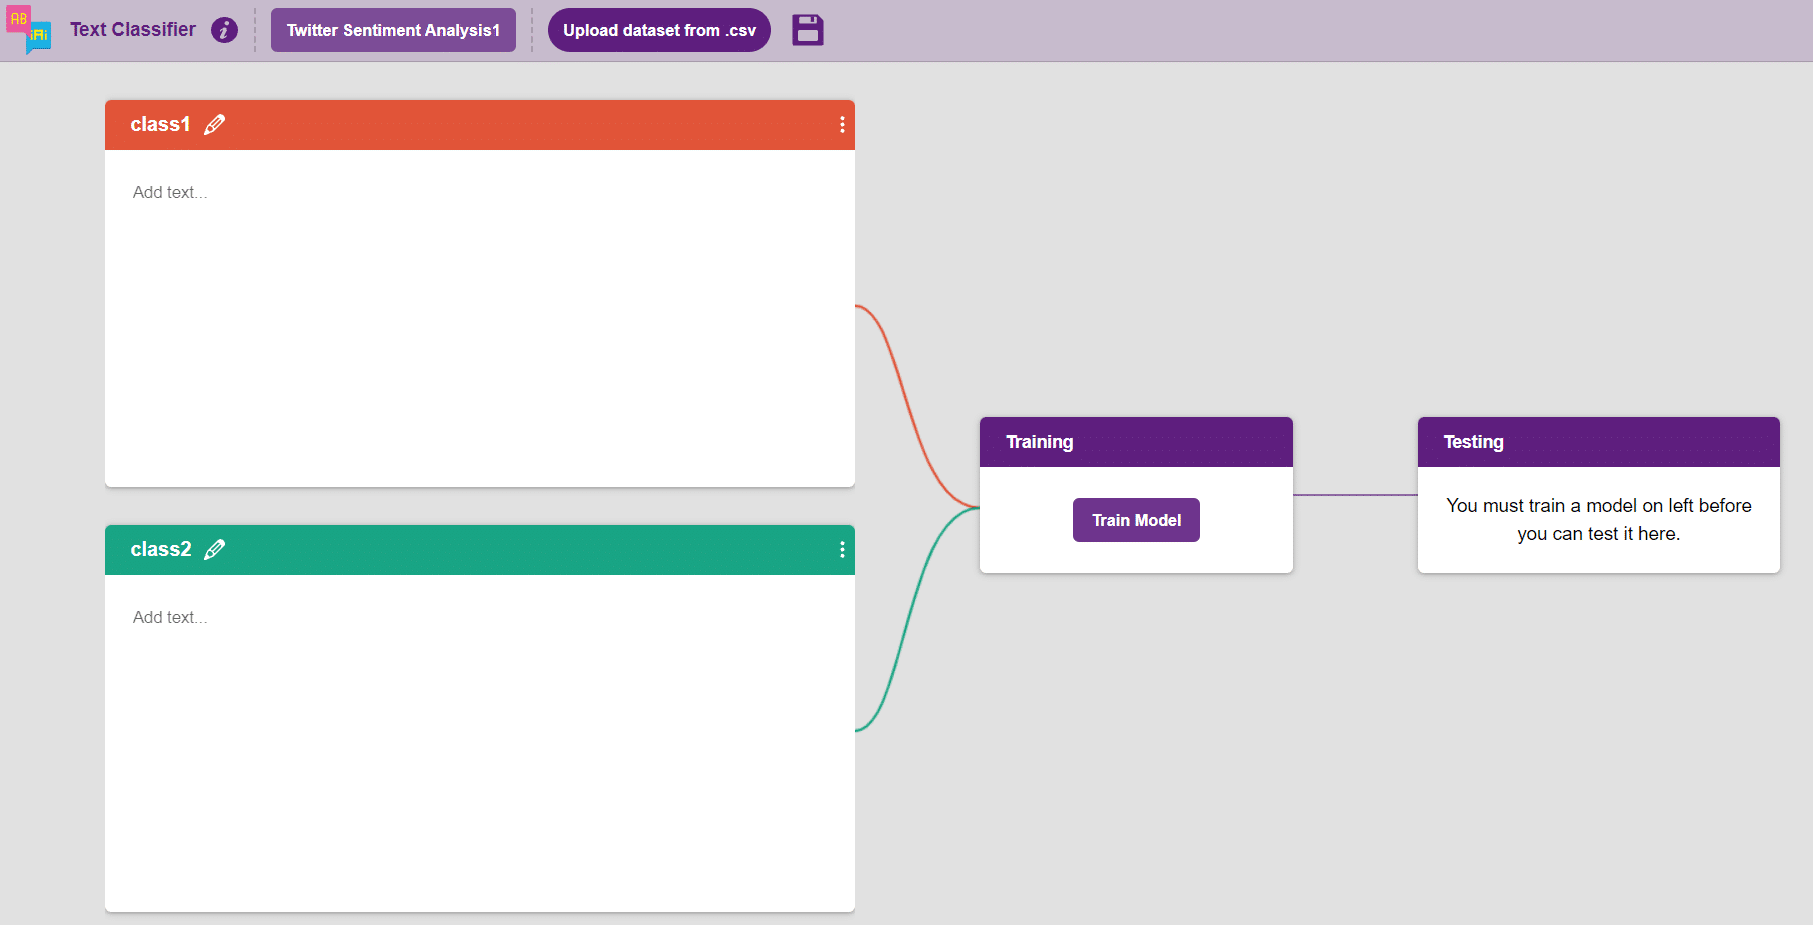
Class is the category in which the Machine Learning model classifies the text. Similar texts are put in one class.
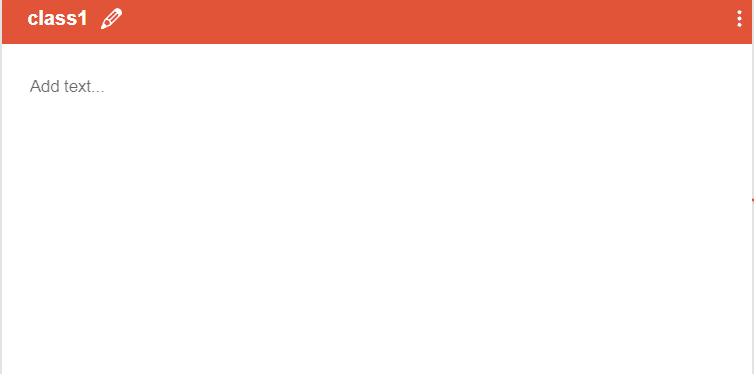
You can perform the following operations to manipulate the data into a class.
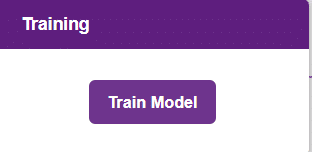
After data is added, it’s fit to be used in model training. In order to do this, we have to train the model. By training the model, we extract meaningful information from the texts, and that in turn updates the weights. Once these weights are saved, we can use our model to make predictions on data previously unseen.
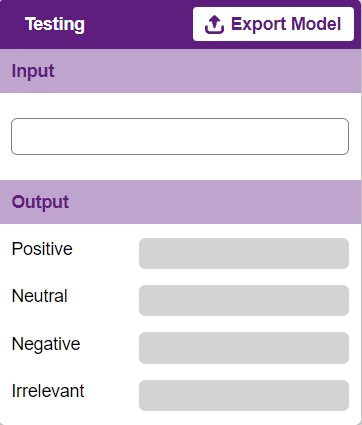
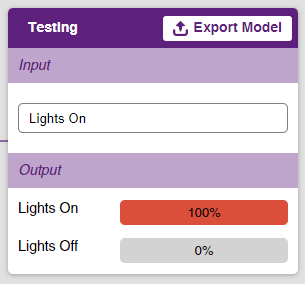
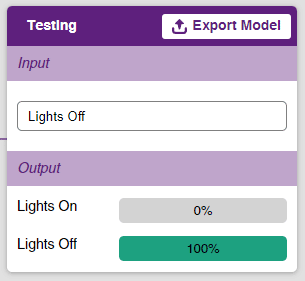
To test the model, simply enter the input values in the “Testing” panel.
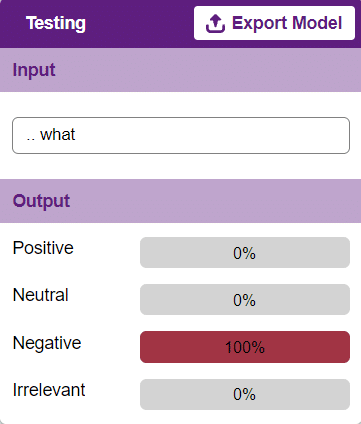
The model will return the probability of the input belonging to the classes.
Click on the “Export Model” button on the top right of the Testing box, and PictoBlox will load your model into the Block Coding Environment if you have opened the ML Environment in the Block Coding.
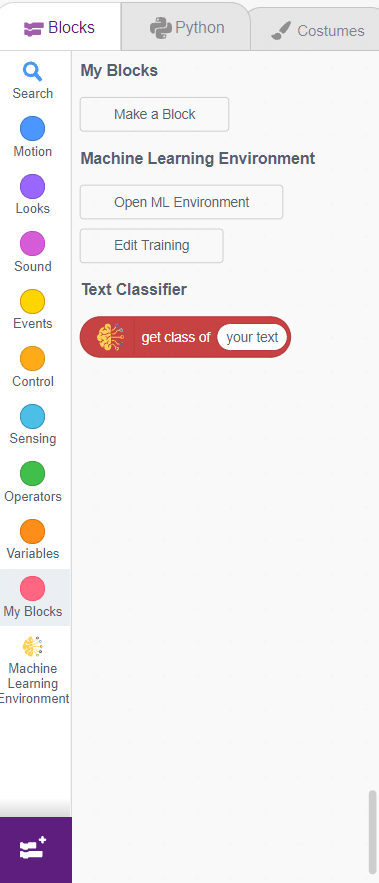
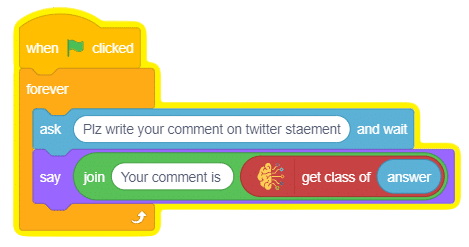
The idea is simple: the user has to write text in the input panel, and Tobi will tell about the nature of the text.

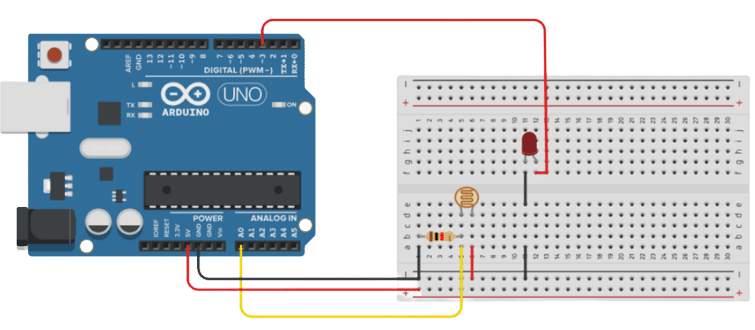
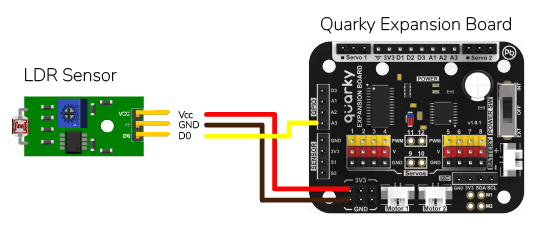
In this example, we are going to learn how to program the Quarky to detect the ambient light reading and make the light turn ON and OFF accordingly.
LDR sensors have 4 pins: GND, VCC, DO, and AO. You have to connect the following 3 pins to the Quarky Expansion Board:
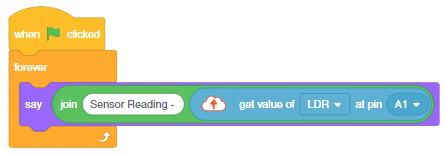
The following script displays the real-time sensor reading. The reading will vary from 0 to 4095.
Connect Quarky and you will start getting the readings.
Download PictoBlox Code: https://pictoblox.page.link/8Brek1NuDSeLBSsH9
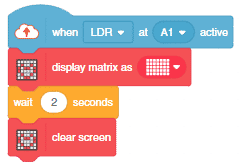
You will notice from the reading that when you put your hands close to the sensor the value is higher. This is because the sensor receives less light and the voltage across the sensor increases. We will create a threshold to identify when the light is low. For the above readings, it will be 2800. Now if the sensor value is greater than 2800, then it is active, meaning that the light is low. We will use it in the next code.
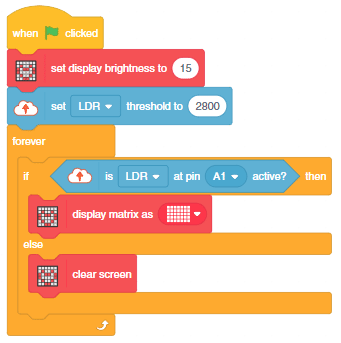
The following code turns the lights ON of the Quarky when the light is low, else the lights are OFF.
Download PictoBlox Code: https://pictoblox.page.link/gS4skqbu9p7LYytYA
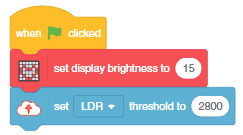
You can also make the automatic lighting work independently of PictoBlox using the Upload Mode. For that switch to upload mode and replace the when green flag clicked block with when Quarky starts up the block.

Click on the Upload Code button.
You can also use when () at () active block to make the same program. The hat block activates when the LDR is active. You must set the threshold for the code to work.
In this example, we are going to learn how to program the Quarky to detect the ambient light reading and make the light turn ON and OFF accordingly.
LDR sensors have 4 pins: GND, VCC, DO, and AO. You have to connect the following 3 pins to the Quarky Expansion Board:
The following script displays the real-time sensor reading. The reading will vary from 0 to 4095.
# Create a Sprite object named 'Tobi'
sprite = Sprite('Tobi')

# Create a Quarky object
quarky = Quarky()

# Create an IoTHouse object
house = IoTHouse()

# Create an infinite loop
while True:
  # Have the Sprite say the LDR value of 'A1' in the IoTHouse
  sprite.say("Sensor Reading - " + str(house.ldrvalue("A1")))
Connect Quarky and you will start getting the readings.
You will notice from the reading that when you put your hands close to the sensor the value is higher. This is because the sensor receives less light and the voltage across the sensor increases. We will create a threshold to identify when the light is low. For the above readings, it will be 2800. Now if the sensor value is greater than 2800, then it is active, meaning that the light is low. We will use it in the next code.
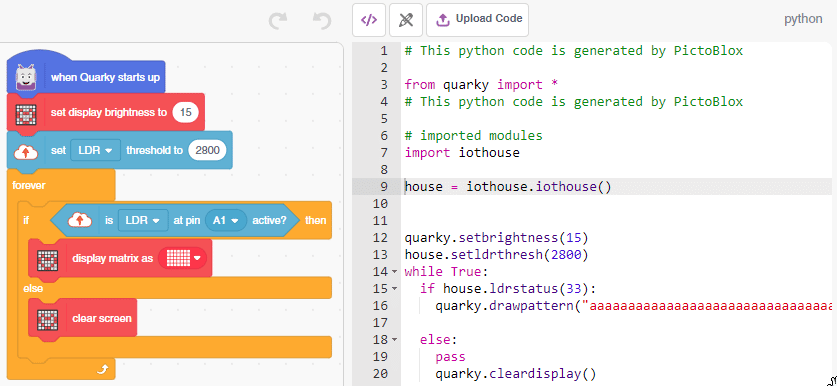
Click on the Upload Code button.
# This code uses two different libraries: 'quarky' and 'iothouse'.
# 'iothouse' is used to detect the light intensity in a room, and 'quarky' is used to control LEDs.

# First, we set the brightness of the LEDs to 15.
from quarky import *
quarky.setbrightness(15)

# Then, we set the light level threshold to 2800.
import iothouse
house = iothouse.iothouse()
house.setldrthreshold(2800)

# Now, the program will check the light level continuously and take action based on the result.
while True:
  # If the light level is below the threshold, the program will draw a pattern on the LEDs.
  if house.ldrstatus("A1"):
    quarky.drawpattern("aaaaaaaaaaaaaaaaaaaaaaaaaaaaaaaaaaa")

  # If the light level is above the threshold, the program will clear the LEDs.
  else:
    quarky.cleardisplay()
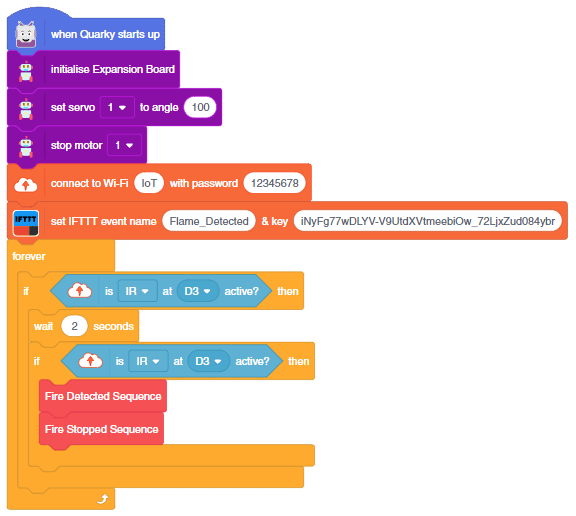
This example demonstrates how to set up the flame sensor with Quarky to detect heat or flame nearby. Later, we create an alarm system triggered with the flame sensor.
Flame sensors have 4 pins: GND, VCC, DO, and AO. You have to connect the following 3 pins to the Quarky Expansion Board:

The sensor also has 2 LEDs – Power and Detection. The desired calibration is achieved when the sensor is inactive when there is no heat or flame nearby and active when the flame is nearby. It is visible on the detection LED.
To calibrate the flame sensor:
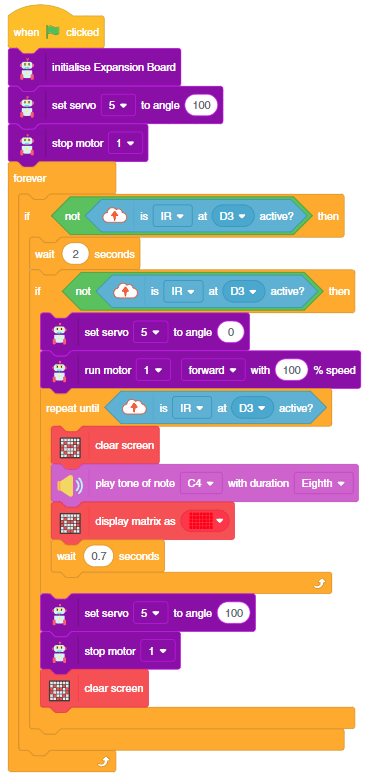
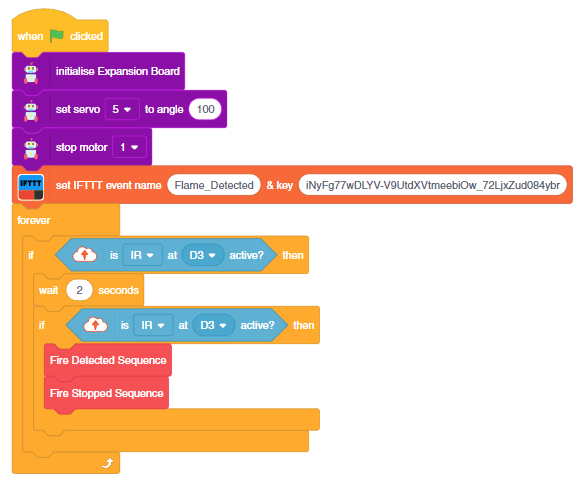
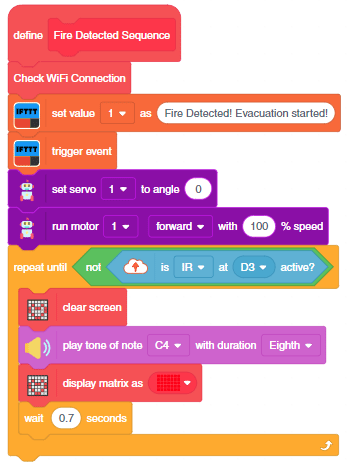
In the project, when heat or flame is detected, the alarm system starts with
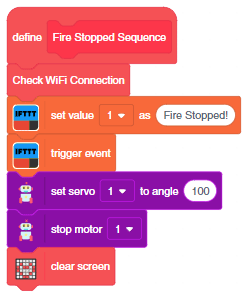
The alarm system will be on until the flame sensor stops detecting the fire.
Connect the following modules to the Quarky Expansion Board:

As an advanced system, we can also send the fire detection alert to the users using IFTTT. For that, we will use IFTTT webhooks.

The following IFTTT sequence is to be created:
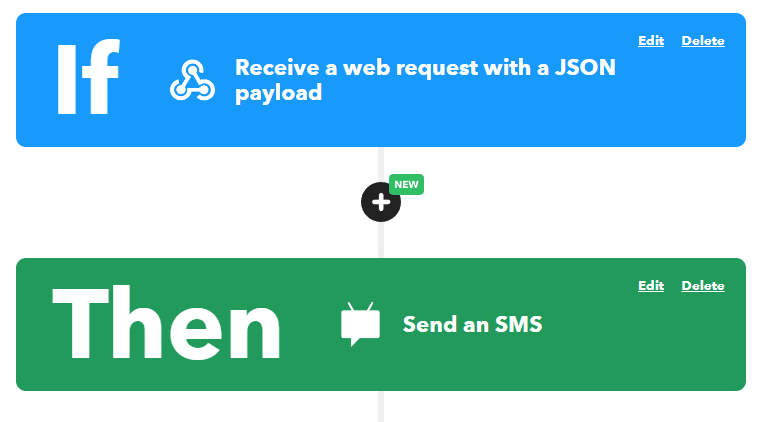
You can learn in detail how to create an IFTTT applet here: https://ai.thestempedia.com/extension/ifttt-webhooks/
You can download the code from here: Flame-Based Alarm System – Stage Mode
You can also make the automatic lighting work independently of PictoBlox using the Upload Mode. For that switch to upload mode and replace the when green flag clicked block with when Quarky starts up the block.
You can download the code from here: Flame-Based Alarm System – Upload Mode
This example demonstrates how to set up the flame sensor with Quarky to detect heat or flame nearby. Later, we create an alarm system triggered with the flame sensor.
Flame sensors have 4 pins: GND, VCC, DO, and AO. You have to connect the following 3 pins to the Quarky Expansion Board:
The sensor also has 2 LEDs – Power and Detection. The desired calibration is achieved when the sensor is inactive when there is no heat or flame nearby and active when the flame is nearby. It is visible on the detection LED.
To calibrate the flame sensor:
In the project, when heat or flame is detected, the alarm system starts with
The alarm system will be on until the flame sensor stops detecting the fire.
Connect the following modules to the Quarky Expansion Board:
# The following code is written to detect a fire in a house using a Quarky robot and Expansion board.
# quarky is an instance of the Quarky class which has functionalities like playing a tone and drawing a pattern on LED Screen
quarky = Quarky()
# quarkyexpansion is an instance of the Expansion class which has functionalities like moving a servo and running a motor
quarkyexpansion = Expansion()
# house is an instance of the IoTHouse class which has functionalities like checking the flame status
house = IoTHouse()
# import time library which has functionalities like sleeping for a certain amount of time
import time

# move the servo connected to pin 5 to 100 degrees
quarkyexpansion.moveservo(5, 100)
# stop the motor connected to pin 1
quarkyexpansion.stopmotor(1)


# define a function which initiate instructions when the flame is detected
def fireDetectedSequence():
  # move the servo connected to pin 5 to 0 degrees
  quarkyexpansion.moveservo(5, 0)
  # run the motor connected to pin 1 in clockwise direction with speed 100
  quarkyexpansion.runmotor(1, 1, 100)
  # keep on checking the flame status of pin D3 in the house, until it is no longer in flame
  while not (house.flamestatus("D3")):
    # clear the display of the Quarky robot
    quarky.cleardisplay()
    # play a tone at C4 pitch for 8 beats
    quarky.playtone("C4", 8)
    # draw red pattern on the Quarky display
    quarky.drawpattern("bbbbbbbbbbbbbbbbbbbbbbbbbbbbbbbbbbb")
    time.sleep(0.7)


# define a function which is initiated when no flame is detected
def fireStopSequence():
  # move the servo connected to pin 5 to 100 degrees
  quarkyexpansion.moveservo(5, 100)
  # stop the motor connected to pin 1
  quarkyexpansion.stopmotor(1)
  # clear the display of the Quarky robot
  quarky.cleardisplay()


while True:
  # keep on checking the flame status of pin D3 in the house
  if not (house.flamestatus("D3")):
    time.sleep(2)
    # again check the flame status of pin D3 in the house
    if not (house.flamestatus("D3")):
      # if flame is detected, run the fireDetectedSequence()
      fireDetectedSequence()
      # and then run the fireStopSequence()
      fireStopSequence()
As an advanced system, we can also send the fire detection alert to the users using IFTTT. For that, we will use IFTTT webhooks.
The following IFTTT sequence is to be created:
You can learn in detail how to create an IFTTT applet here: https://ai.thestempedia.com/extension/ifttt-webhooks/
This code is the continuation of the past code:
# The following code is written to detect a fire in a house using a Quarky robot and Expansion board.
# quarky is an instance of the Quarky class which has functionalities like playing a tone and drawing a pattern on LED Screen
quarky = Quarky()
# quarkyexpansion is an instance of the Expansion class which has functionalities like moving a servo and running a motor
quarkyexpansion = Expansion()
# house is an instance of the IoTHouse class which has functionalities like checking the flame status
house = IoTHouse()
# import time library which has functionalities like sleeping for a certain amount of time
import time
#Create an instance of the IFTTTWebhooks library
ifttt = IFTTTWebhooks()
# move the servo connected to pin 5 to 100 degrees
quarkyexpansion.moveservo(5, 100)
# stop the motor connected to pin 1
quarkyexpansion.stopmotor(1)
#Set the webhook key and event name
ifttt.setifttt("Flame_Detected", "iNyFg77wDLYV-V9UtdXVtmeebiOw_72LjxZud084ybr")
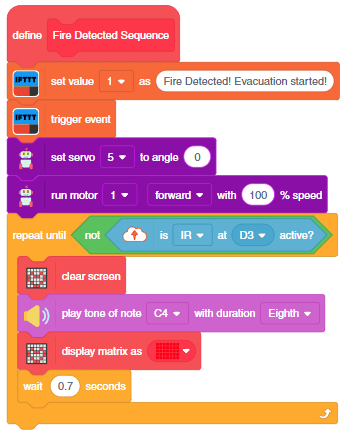
# define a function which initiate instructions when the flame is detected
def fireDetectedSequence():
#Set the message and priority
ifttt.setvalues("Fire Started! Evacuation Started", 1)
ifttt.triggerevent() #Send the event
# move the servo connected to pin 5 to 0 degrees
quarkyexpansion.moveservo(5, 0)
# run the motor connected to pin 1 in clockwise direction with speed 100
quarkyexpansion.runmotor(1, 1, 100)
# keep on checking the flame status of pin D3 in the house, until it is no longer in flame
while not (house.flamestatus("D3")):
# clear the display of the Quarky robot
quarky.cleardisplay()
# play a tone at C4 pitch for 8 beats
quarky.playtone("C4", 8)
# draw red pattern on the Quarky display
quarky.drawpattern("bbbbbbbbbbbbbbbbbbbbbbbbbbbbbbbbbbb")
time.sleep(0.7)
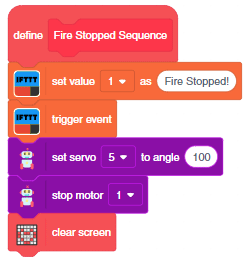
# define a function which is initiated when no flame is detected
def fireStopSequence():
#Set the message and priority
ifttt.setvalues("Fire Stopped", 1)
ifttt.triggerevent() #Send the event
# move the servo connected to pin 5 to 100 degrees
quarkyexpansion.moveservo(5, 100)
# stop the motor connected to pin 1
quarkyexpansion.stopmotor(1)
# clear the display of the Quarky robot
quarky.cleardisplay()
while True:
# keep on checking the flame status of pin D3 in the house
if not (house.flamestatus("D3")):
time.sleep(2)
# again check the flame status of pin D3 in the house
if not (house.flamestatus("D3")):
# if flame is detected, run the fireDetectedSequence()
fireDetectedSequence()
# and then run the fireStopSequence()
fireStopSequence()
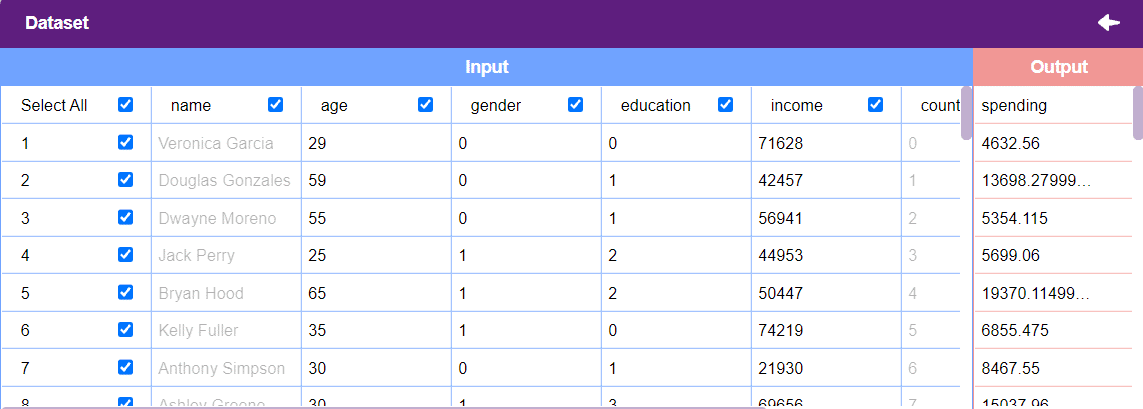
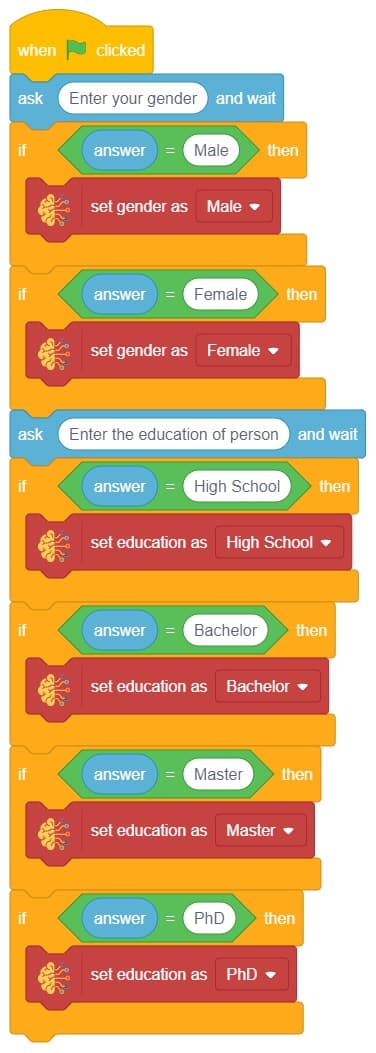
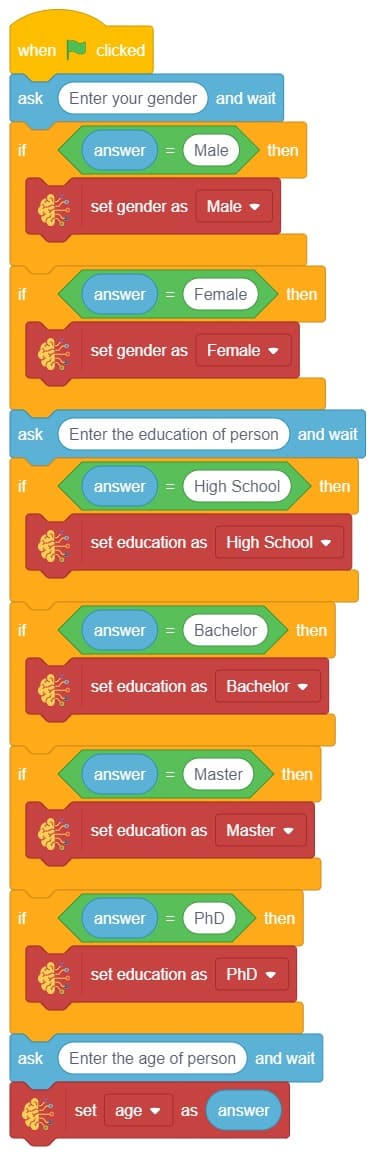
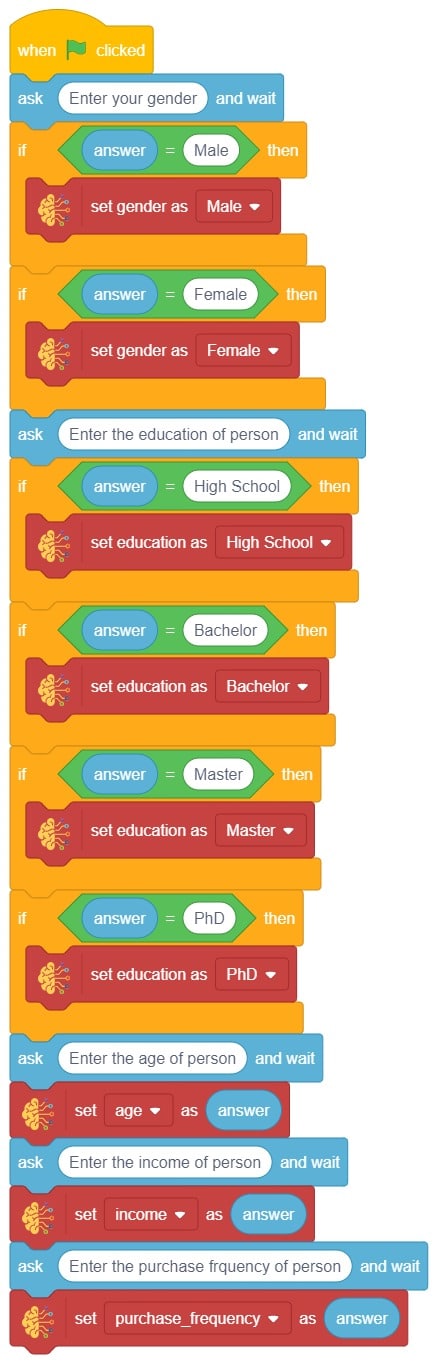
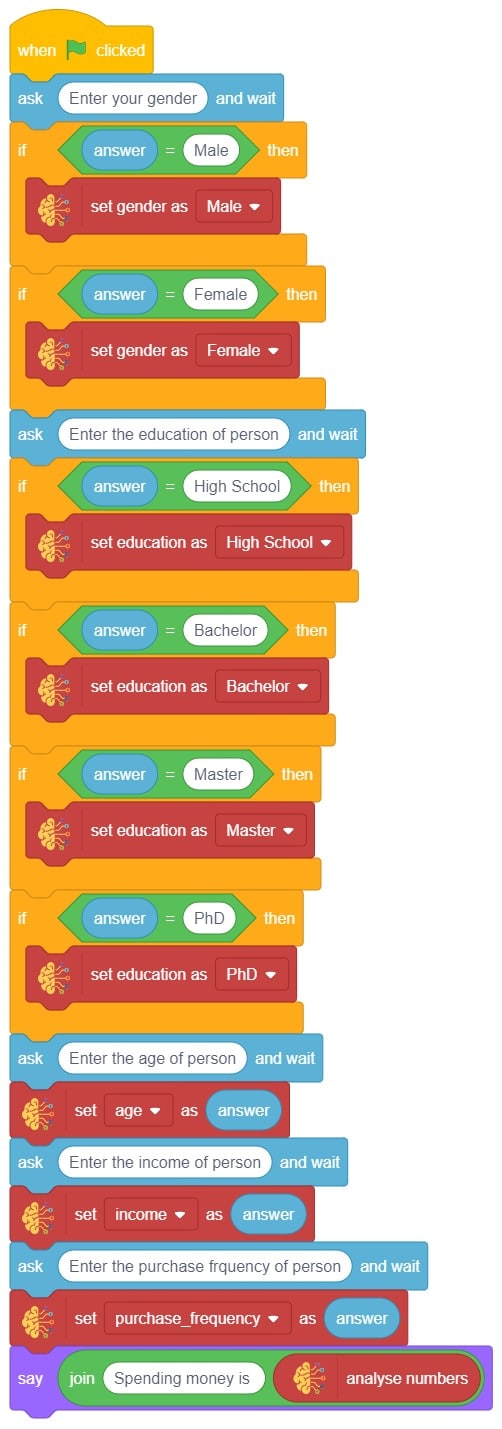
In this example project, we are going to create a Machine Learning Model that can predict the amount of money a customer will spend based on the input details added by the user.
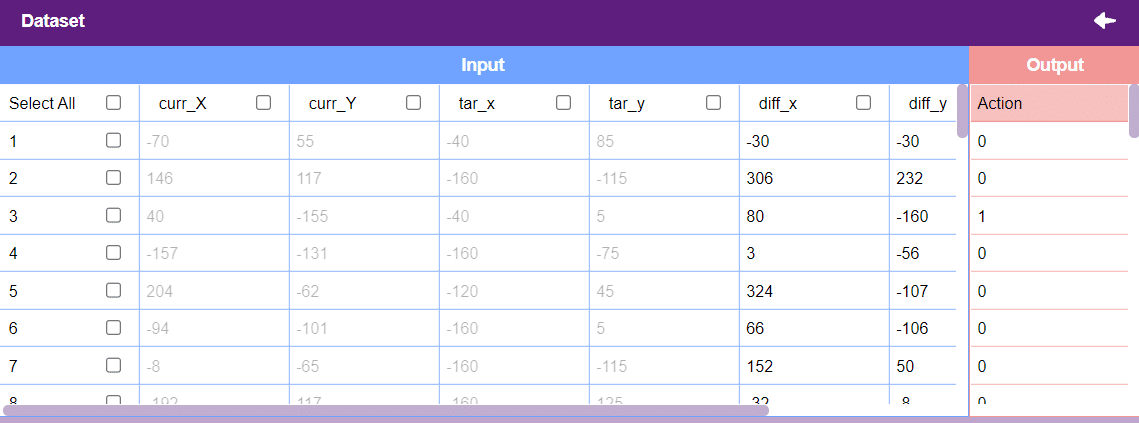
Datasets on the internet are hardly ever fit to directly train on. Programmers often have to take care of unnecessary columns, text data, target columns, correlations, etc. Thankfully, PictoBlox’s ML Environment is packed with features to help us pre-process the data as per our liking.
Let’s create the ML model.
Alert: The Machine Learning Environment for model creation is available in the only desktop version of PictoBlox for Windows, macOS, or Linux. It is not available in Web, Android, and iOS versions.
Follow the steps below:

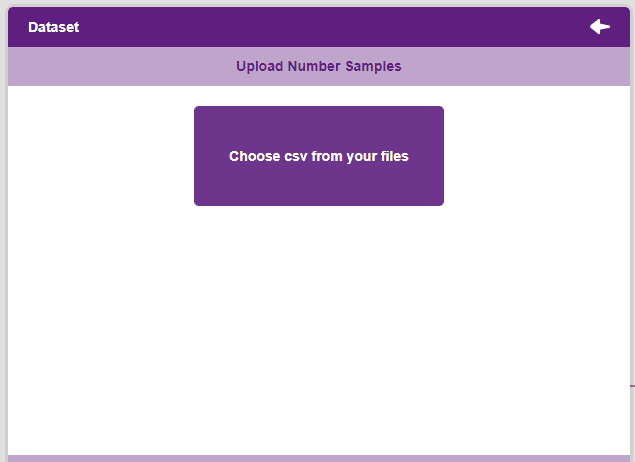
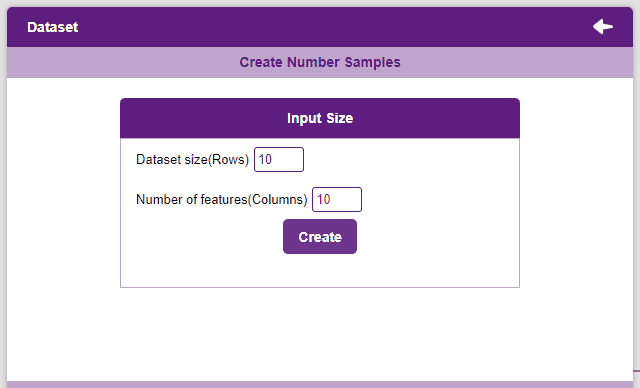
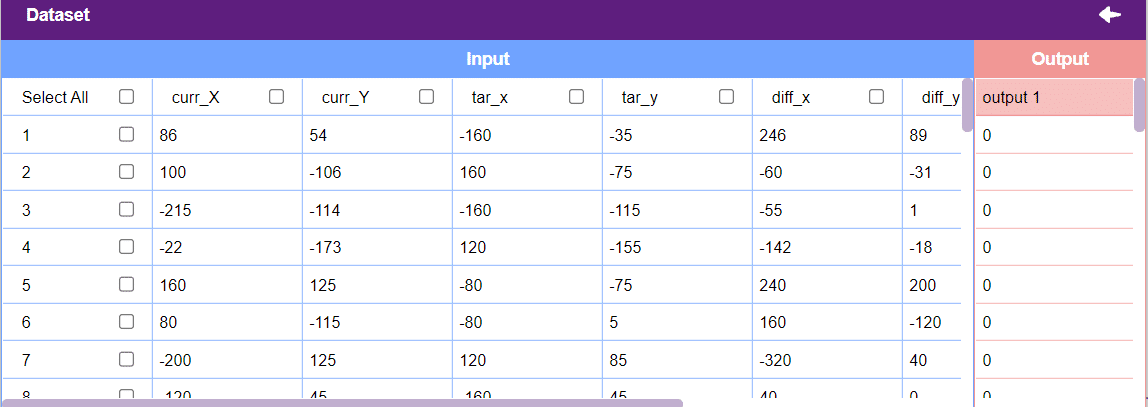
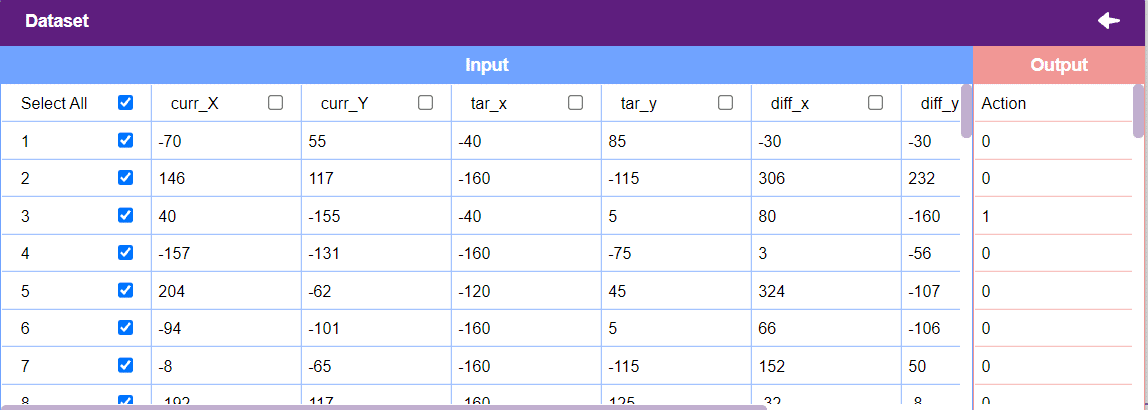
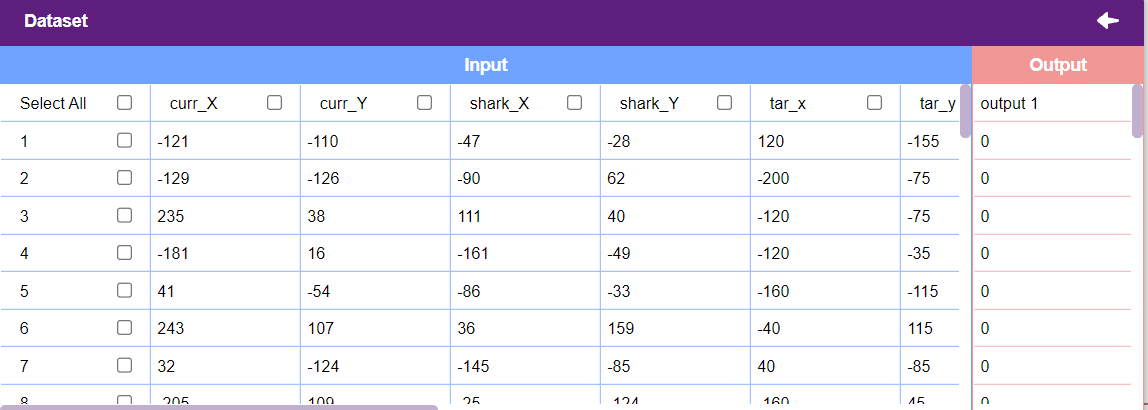
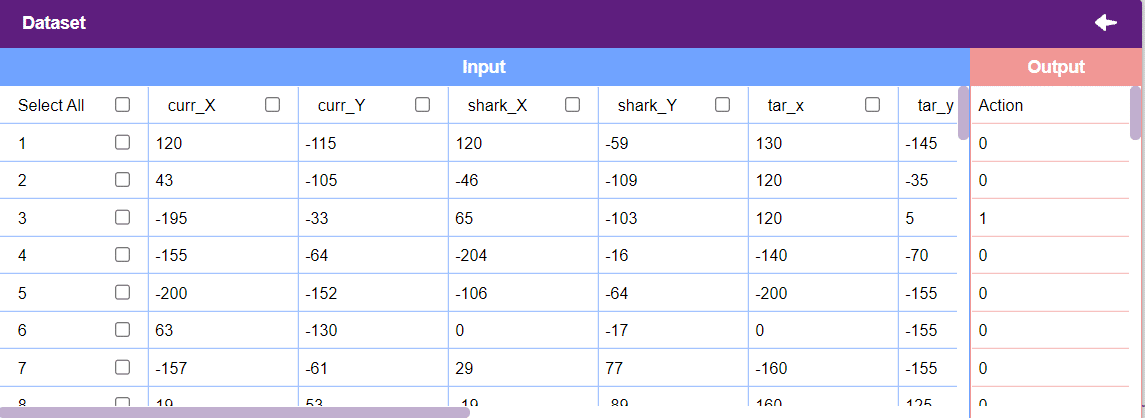
Datasets can either be uploaded or created on the ML Environment. Lets see how it is done.
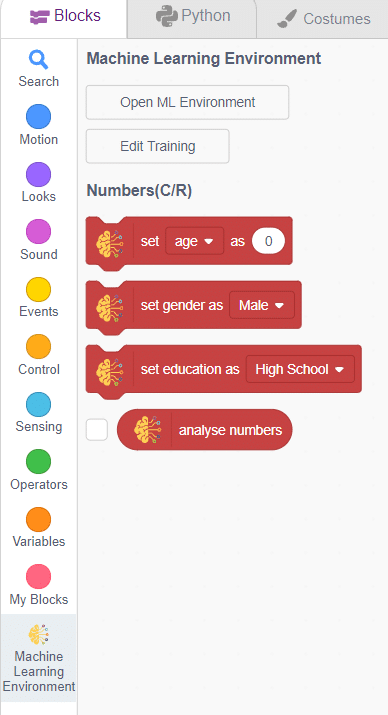
Notes:
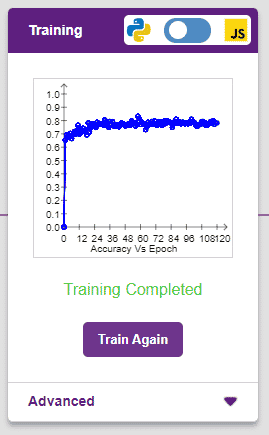
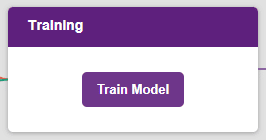
After data is pre-processed and optimized, it’s fit to be used in model training. To train the model, simply click the “Train Model” button found in the “Training” panel.
By training the model, meaningful information is extracted from the numbers, and that in turn updates the weights. Once these weights are saved, the model can be used to make predictions on data previously unseen.
The model’s function is to use the input data and predict the output. The target column must always contain numbers.
However, before training the model, there are a few hyperparameters that need to be understood. Click on the “Advanced” tab to view them.
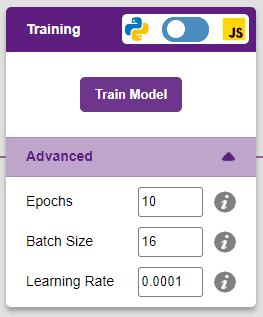
There are three hyperparameters that can be altered in the Numbers(C/R) Extension:
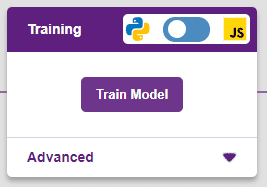
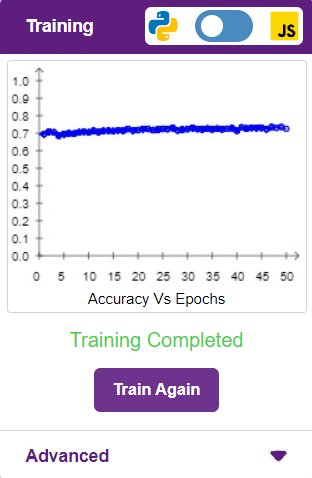
It’s a good idea to train a numeric classification model for a high number of epochs. The model can be trained in both JavaScript and Python. In order to choose between the two, click on the switch on top of the Training panel.
The accuracy of the model should increase over time. The x-axis of the graph shows the epochs, and the y-axis represents the accuracy at the corresponding epoch.
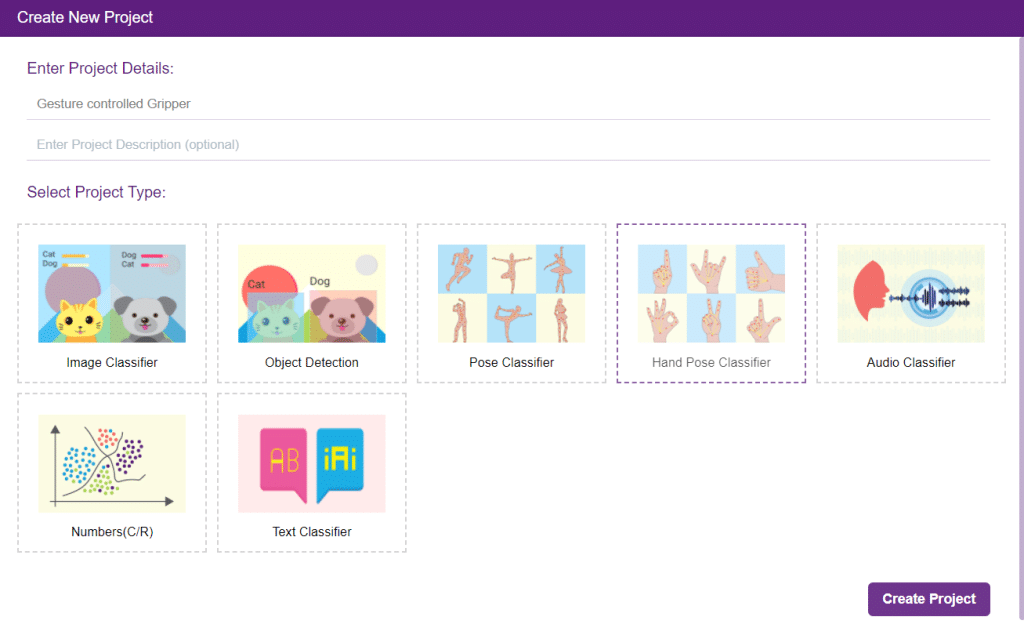
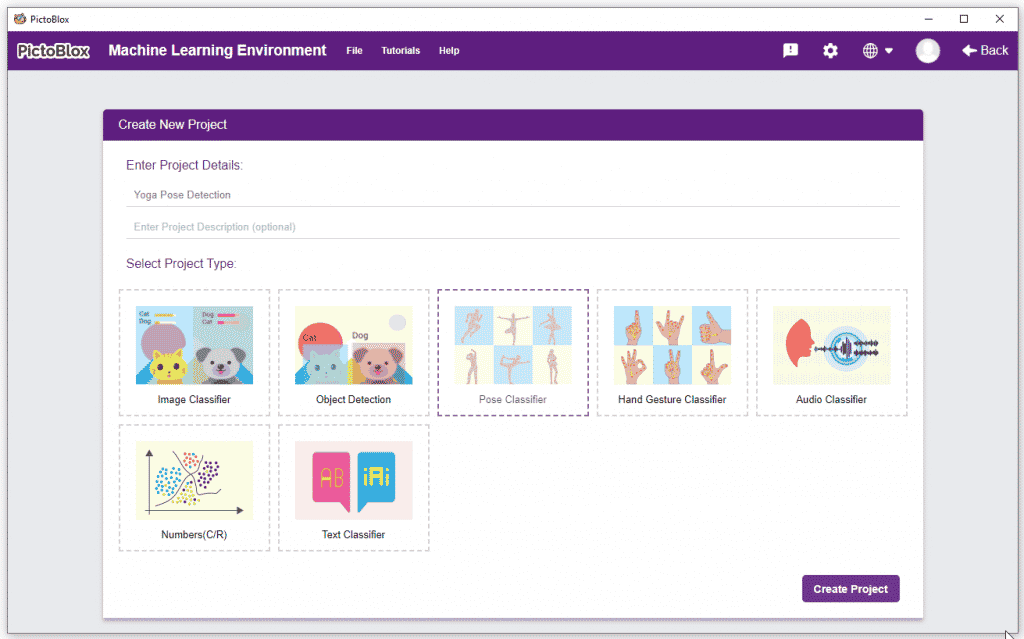
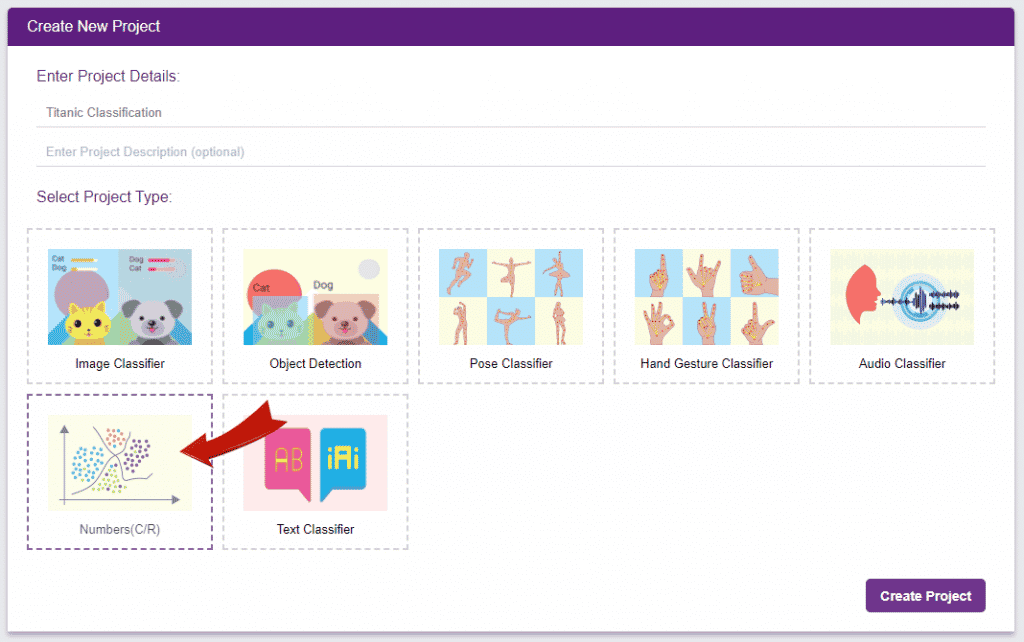
A window will open. Type in a project name of your choice and select the “Numbers(C/R)” extension. Click the “Create Project” button to open the Numbers(C/R) window.
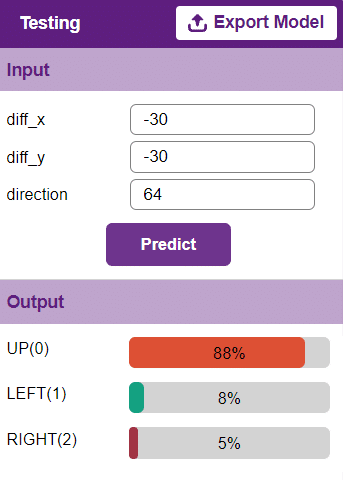
To test the model, simply enter the input values in the “Testing” panel and click on the “Predict” button.
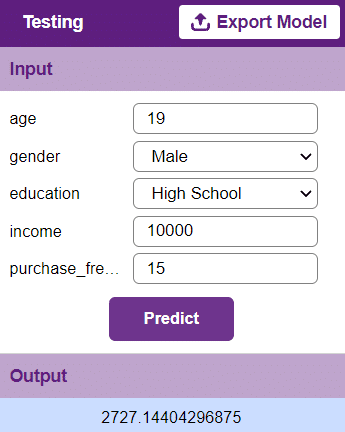
The model will return the probability of the input belonging to the classes.
Click on the “Export Model” button on the top right of the Testing box, and PictoBlox will load your model into the Block Coding Environment if you have opened the ML Environment in the Block Coding.

This project demonstrates how to create a voice–controlled smart plug using natural language processing (NLP), speech recognition, and a relay.

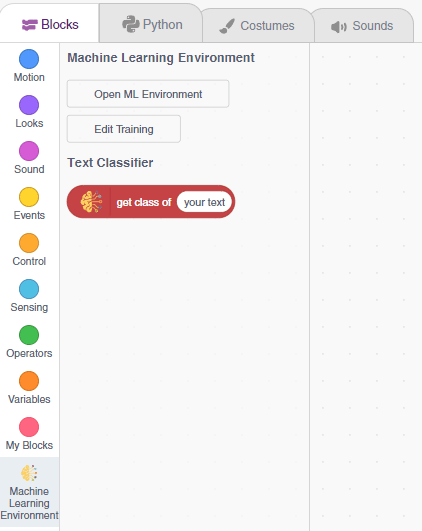
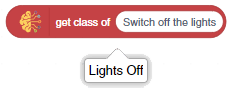
We will use the PictoBlox Machine Learning environment for creating the text classifier.
![]()
Follow the steps to create the model:

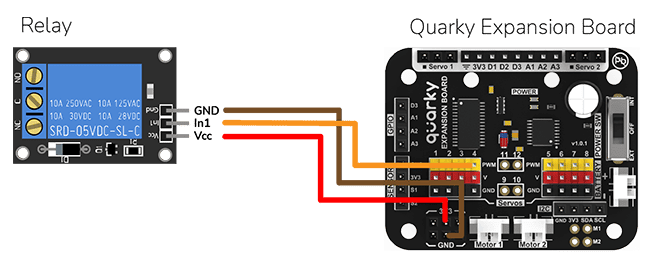
The bulb is connected to the smart plug which is controlled with a relay.
If the relay is ON, the smart switch gets ON, turning on the light. The relay has the following connections:
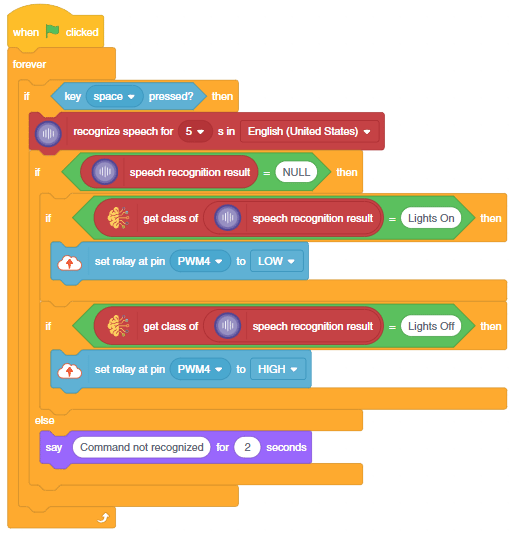
The logic is the following – The Speech Recognition extension converts speech to text, which is then fed into the text classifier block. The text classifier block provides sentiment information, which is used to control the light via the relay.

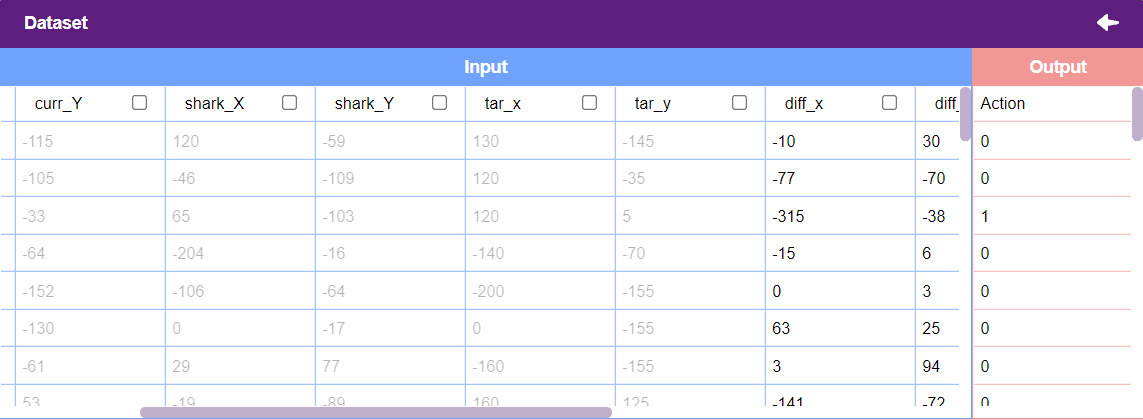
In this example project, we are going to create a Machine Learning Model where fish automatically feed on randomly generated food.
sprite = Sprite('Fish')sprite1 = Sprite('Orange')import random
import time
import tensorflow as tf
import pandas as pd
import os
import mathcurr_x = 4
curr_y = 3
ang_f= 10
mov_f= 5
score = 0
angle = 90sprite.setx(curr_x)
sprite.sety(curr_y)
sprite.setdirection(DIRECTION=90)def settarget(t):
x = random.randrange(-200, 200, t)
y = random.randrange(-155, 155, t)
time.sleep(0.1)
sprite1.setx(x)
sprite1.sety(y)
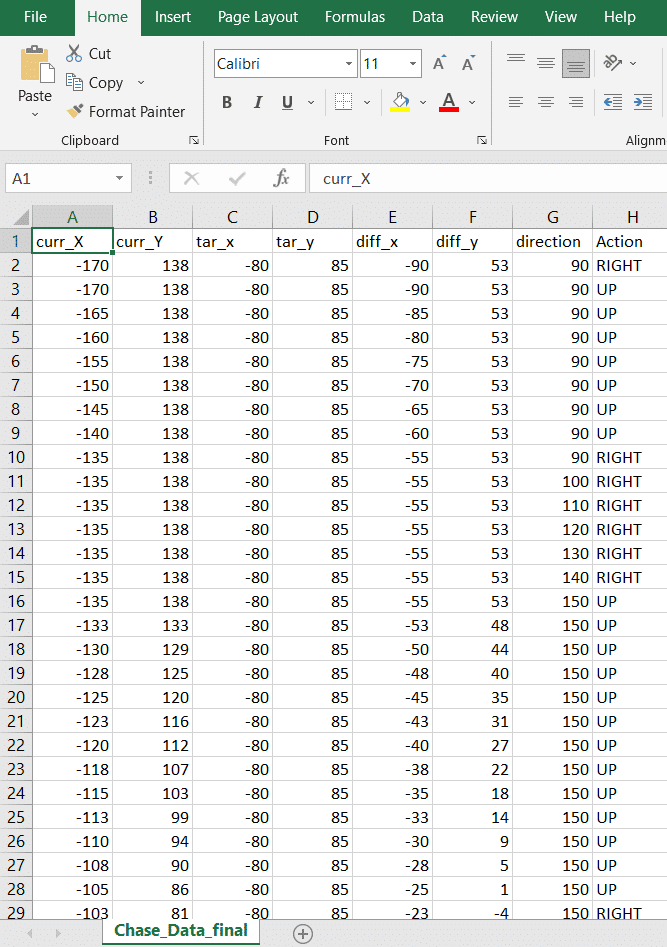
return x, y target_x, target_y = settarget(40) if(os.path.isfile('Chase_Data.csv')):
data=pd.read_csv('Chase_Data.csv')
else:
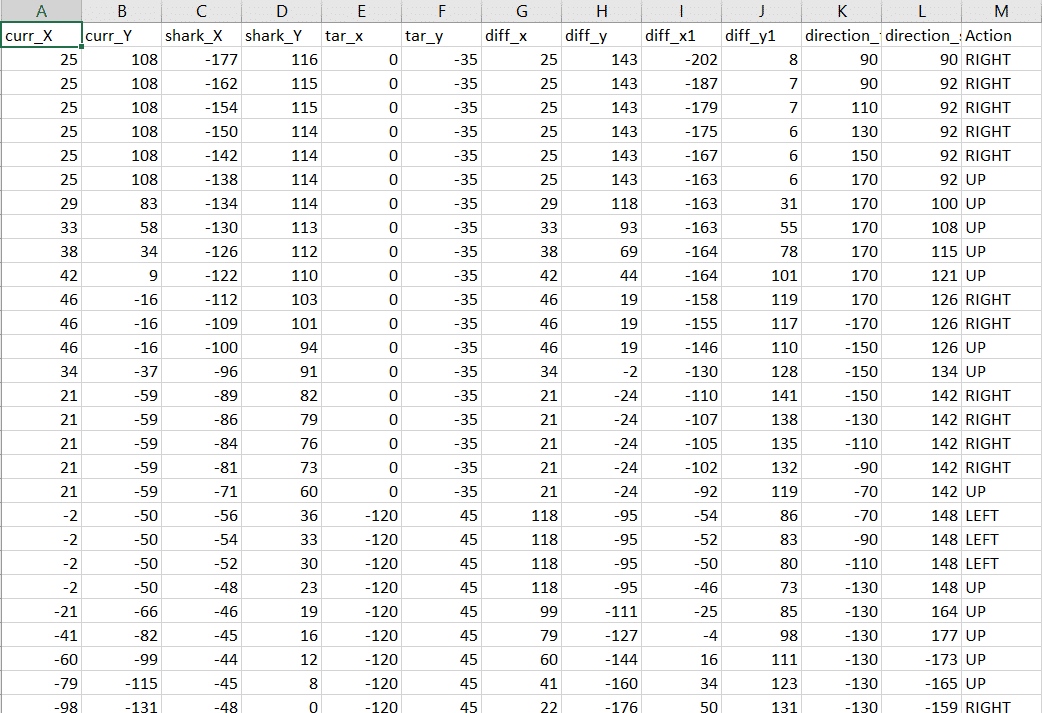
data = pd.DataFrame({"curr_X": curr_x, "curr_Y": curr_y, "tar_x": target_x, "tar_y": target_y, "diff_x":curr_x-target_x, "diff_y":curr_y-target_y, "direction": angle, "Action": "RIGHT"}, index=[0])
while True:if sprite.iskeypressed("up arrow"):
data = data.append({"curr_X": curr_x, "curr_Y": curr_y, "tar_x": target_x, "tar_y": target_y, "diff_x":curr_x-target_x, "diff_y":curr_y-target_y, "direction": angle, "Action": "UP"}, ignore_index=True)
sprite.move(mov_f)if sprite.iskeypressed("left arrow"):
data = data.append({"curr_X": curr_x, "curr_Y": curr_y, "tar_x": target_x, "tar_y": target_y, "diff_x":curr_x-target_x, "diff_y":curr_y-target_y, "direction": angle, "Action": "LEFT"}, ignore_index=True)
angle = angle - ang_f
sprite.setdirection(DIRECTION=angle)
if sprite.iskeypressed("right arrow"):
data = data.append({"curr_X": curr_x, "curr_Y": curr_y, "tar_x": target_x, "tar_y": target_y, "diff_x":curr_x-target_x, "diff_y":curr_y-target_y, "direction": angle, "Action": "RIGHT"}, ignore_index=True)
angle = angle + ang_f
sprite.setdirection(DIRECTION=angle)if(score>0 and score%2==0):
data.to_csv('Chase_Data.csv',index=False)if abs(curr_x-target_x)<20 and abs(curr_y-target_y)<20:
score = score + 1
sprite.say(("your score is: {}".format(score)))if (score >= 40):
print(data)
data.to_csv('Chase Data.csv')
break
target_x, target_y = settargetLED()curr_x=math.floor(sprite.x())
curr_y=math.floor(sprite.y())
time.sleep(0.02)sprite = Sprite('Fish')
sprite1 = Sprite('Orange')
import random
import time
import tensorflow as tf
import pandas as pd
import os
import math
curr_x = -170
curr_y = 138
score=0
ang_f=10
mov_f=5
angle=90
sprite.say(("your score is: {}".format(score)))
sprite.setx(curr_x)
sprite.sety(curr_y)
sprite.setdirection(DIRECTION=90)
def settarget(t):
x = random.randrange(-200, 200, t)
y = random.randrange(-155, 155, t)
time.sleep(0.1)
sprite1.setx(x)
sprite1.sety(y)
return x, y
target_x, target_y = settarget(40)
if(os.path.isfile('Chase_Data.csv')):
  data=pd.read_csv('Chase_Data.csv')
else:
  data = pd.DataFrame({"curr_X": curr_x, "curr_Y": curr_y, "tar_x": target_x, "tar_y": target_y, "diff_x":curr_x-target_x, "diff_y":curr_y-target_y, "direction": angle, "Action": "RIGHT"}, index=[0])
while True:
angle=sprite.direction()
if sprite.iskeypressed("up arrow"):
    data = data.append({"curr_X": curr_x, "curr_Y": curr_y, "tar_x": target_x, "tar_y": target_y, "diff_x":curr_x-target_x, "diff_y":curr_y-target_y, "direction": angle, "Action": "UP"}, ignore_index=True)
    sprite.move(mov_f)
if sprite.iskeypressed("left arrow"):
    data = data.append({"curr_X": curr_x, "curr_Y": curr_y, "tar_x": target_x, "tar_y": target_y, "diff_x":curr_x-target_x, "diff_y":curr_y-target_y, "direction": angle, "Action": "LEFT"}, ignore_index=True)
    angle = angle - ang_f
    sprite.setdirection(DIRECTION=angle)
 if sprite.iskeypressed("right arrow"):
    data = data.append({"curr_X": curr_x, "curr_Y": curr_y, "tar_x": target_x, "tar_y": target_y, "diff_x":curr_x-target_x, "diff_y":curr_y-target_y, "direction": angle, "Action": "RIGHT"}, ignore_index=True)
    angle = angle + ang_f
    sprite.setdirection(DIRECTION=angle)
if(score>0 and score%2==0):
    data.to_csv('Chase_Data.csv',index=False)
if abs(curr_x-target_x)<20 and abs(curr_y-target_y)<20:
    score = score + 1
    sprite.say(("your score is: {}".format(score)))
if (score >= 40):
data.to_csv('Chase_Data.csv',index=False)
break
target_x, target_y = settarget(40)
curr_x=math.floor(sprite.x())
curr_y=math.floor(sprite.y())
time.sleep(0.02)
Datasets on the internet are hardly ever fit to directly train on. Programmers often have to take care of unnecessary columns, text data, target columns, correlations, etc. Thankfully, PictoBlox’s ML Environment is packed with features to help us pre-process the data as per our liking.
Let’s create the ML model.
Alert: The Machine Learning Environment for model creation is available in the only desktop version of PictoBlox for Windows, macOS, or Linux. It is not available in Web, Android, and iOS versions.
Follow the steps below:

Datasets can either be uploaded or created on the ML Environment. Lets see how it is done.
Notes:
After data is pre-processed and optimized, it’s fit to be used in model training. To train the model, simply click the “Train Model” button found in the “Training” panel.
By training the model, meaningful information is extracted from the numbers, and that in turn updates the weights. Once these weights are saved, the model can be used to make predictions on data previously unseen.
The model’s function is to use the input data and predict the output. The target column must always contain numbers.
However, before training the model, there are a few hyperparameters that need to be understood. Click on the “Advanced” tab to view them.
There are three hyperparameters that can be altered in the Numbers(C/R) Extension:
It’s a good idea to train a numeric classification model for a high number of epochs. The model can be trained in both JavaScript and Python. In order to choose between the two, click on the switch on top of the Training panel.
The accuracy of the model should increase over time. The x-axis of the graph shows the epochs, and the y-axis represents the accuracy at the corresponding epoch.
A window will open. Type in a project name of your choice and select the “Numbers(C/R)” extension. Click the “Create Project” button to open the Numbers(C/R) window.
To test the model, simply enter the input values in the “Testing” panel and click on the “Predict” button.
The model will return the probability of the input belonging to the classes.
Click on the “PictoBlox” button, and PictoBlox will load your model into the Python Coding Environment if you have opened the ML Environment in Python Coding.
sprite = Sprite('Fish')sprite1 = Sprite('Orange')import random
import time
import tensorflow as tf
import pandas as pd
import os
import mathcurr_x = -170
curr_y = 138
ang_f= 30
mov_f= 15
score = 0
angle = 90sprite.setx(curr_x)
sprite.sety(curr_y)
sprite.setdirection(DIRECTION=90)def settarget(t):
x = random.randrange(-200, 200, t)
y = random.randrange(-155, 155, t)
time.sleep(0.1)
sprite1.setx(x)
sprite1.sety(y)
return x, y target_x, target_y = settarget(40) def runprediction(diff_x, diff_y, ang):
inputValue=[diff_x, diff_y, ang]
#Input Tensor
inputTensor = tf.expand_dims(inputValue, 0)
#Predict
predict = model.predict(inputTensor)
predict_index = np.argmax(predict[0], axis=0)
#Output
predicted_class = class_list[predict_index]
return predicted_classwhile True: angle=sprite.direction()
move = runprediction(curr_x- target_x, curr_y-target_y, angle)if move == "UP":
sprite.move(mov_f)
curr_x=sprite.x()
curr_y=sprite.y()
if move == "LEFT":
angle = angle - ang_f
sprite.setdirection(DIRECTION=angle)
if move == "RIGHT":
angle = angle + ang_f
sprite.setdirection(DIRECTION=angle)if abs(curr_x-target_x)<20 and abs(curr_y-target_y)<20:
score = score + 1
sprite.say(("your score is: {}".format(score)))
target_x, target_y = settarget()time.sleep(0.02)sprite = Sprite('Fish')
sprite1 = Sprite('Orange')
import random
import time
import numpy as np
import tensorflow as tf
import pandas as pd
import os
import math
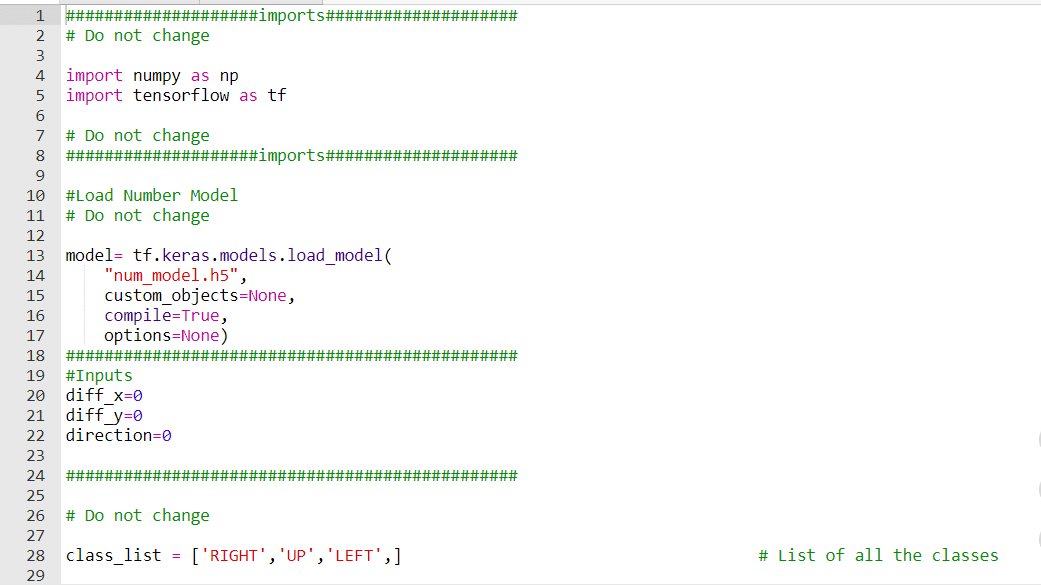
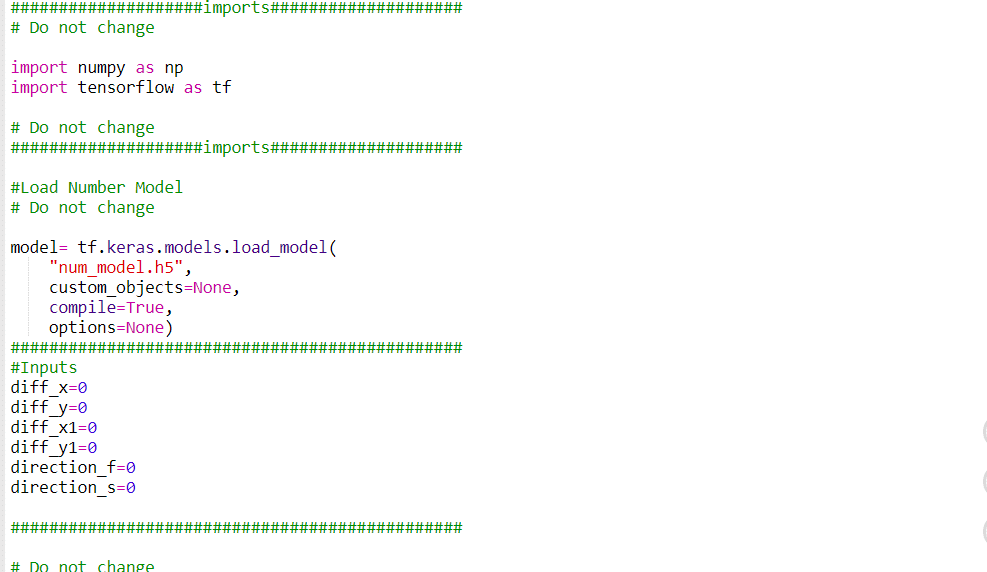
#Load Number Model
model= tf.keras.models.load_model(
"num_model.h5",
custom_objects=None,
compile=True,
options=None)
#List of classes
class_list = ['UP','LEFT','RIGHT',]
curr_x = -170
curr_y = 138
score=0
ang_f=30
mov_f=15
angle=90
sprite.say(("your score is: {}".format(score)))
sprite.setx(-170)
sprite.sety(138)
sprite.setdirection(DIRECTION=90)
def settarget():
x = random.randrange(-200, 200, 1)
y = random.randrange(-155, 155, 1)
time.sleep(0.1)
sprite1.setx(x)
sprite1.sety(y)
return x, y
target_x, target_y = settarget()
def runprediction(diff_x, diff_y, ang):
  inputValue=[diff_x, diff_y, ang]
  #Input Tensor
  inputTensor = tf.expand_dims(inputValue, 0)
  #Predict
  predict = model.predict(inputTensor)
  predict_index = np.argmax(predict[0], axis=0)
  #Output
  predicted_class = class_list[predict_index]
  return predicted_class
while True:
 angle=sprite.direction()
  move = runprediction(curr_x- target_x, curr_y-target_y, angle)
if move == "UP":
    sprite.move(mov_f)
    curr_x=sprite.x()
    curr_y=sprite.y()
  if move == "LEFT":
    angle = angle - ang_f
    sprite.setdirection(DIRECTION=angle)
  if move == "RIGHT":
    angle = angle + ang_f
    sprite.setdirection(DIRECTION=angle)
if abs(curr_x-target_x)<20 and abs(curr_y-target_y)<20:
    score = score + 1
    sprite.say(("your score is: {}".format(score)))
target_x, target_y = settarget()
time.sleep(0.2)
Creating a Machine Learning Model of automated fish feast game can be both complex and time-consuming. Through the steps demonstrated in this project, you can create your own Machine Learning Model of automated game. Once trained, you can export the model into the Python Coding Environment, where you can tweak it further to give you the desired output. Try creating a Machine Learning Model of your own today and explore the possibilities of Number Classifier in PictoBlox!
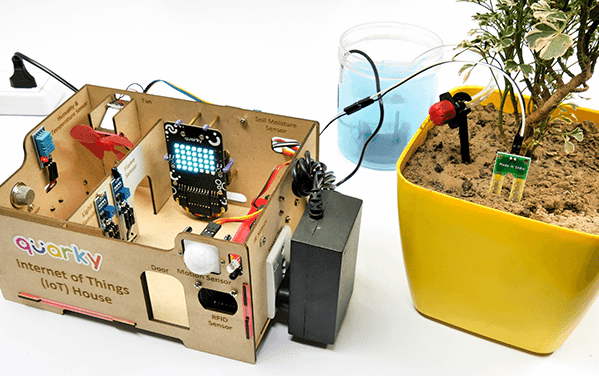
In this example, we will look into the basics of a Drip Irrigation System using the IoT House. With IoT House, you get 2 plant drip irrigation raw equipment.
The drip irrigation system is a type of micro-irrigation of soil that has the potential to save water and nutrients by allowing water to drip slowly to the roots of plants. This leads to the wise use of water and also makes water reach the roots of plants and minimize evaporation. Drip irrigation systems distribute water through a network of valves, pipes, tubing, and emitters. Its efficiency depends on how well the system is designed, installed, maintained, and operated. A simple drip irrigation system is shown below in the figure.

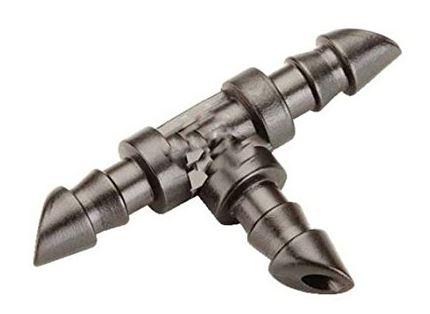
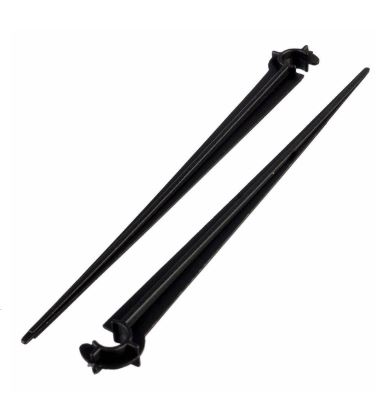
In this project, we will be using an IoT House Drip irrigation kit. This kit consists of various components out of which the following are required in our project


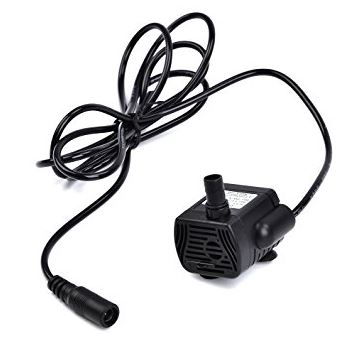
The Water Pump Connected to the Relay: The water pump is controlled by the smart switch of the IoT house which has a relay controlling the state. If the relay is ON, the smart switch gets ON, turning on the water pump. The relay has the following connections:
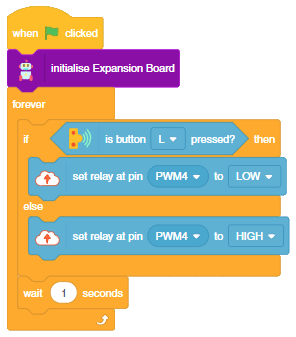
The pump will turn ON when the L button of the Quarky is pressed.
In this example, we will look into the basics of a Drip Irrigation System using the IoT House. With IoT House, you get 2 plant drip irrigation raw equipment.
The drip irrigation system is a type of micro-irrigation of soil that has the potential to save water and nutrients by allowing water to drip slowly to the roots of plants. This leads to the wise use of water and also makes water reach the roots of plants and minimize evaporation. Drip irrigation systems distribute water through a network of valves, pipes, tubing, and emitters. Its efficiency depends on how well the system is designed, installed, maintained, and operated. A simple drip irrigation system is shown below in the figure.
The following tutorials cover how to make the Drip Irrigation System:
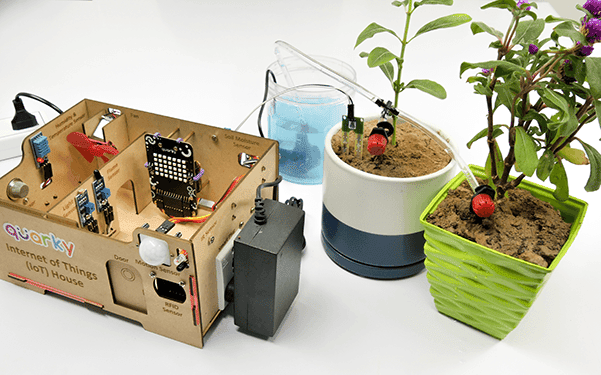
The Water Pump Connected to the Relay: The water pump is controlled by the smart switch of the IoT house which has a relay controlling the state. If the relay is ON, the smart switch gets ON, turning on the water pump. The relay has the following connections:
The while loop will run continuously and check if the left pushbutton on the Quarky is pressed or not. If the left pushbutton is pressed, the relay connected to port 4 will be set to ON, otherwise, it will be set to OFF. After each check, the code will wait for one second before checking again.
#This code creates a Quarky object and an IoTHouse object
quarky = Quarky()
house = IoTHouse()

#This while loop will run continuously
while True:
  #If the left pushbutton on the Quarky is pressed...
  if quarky.readpushbutton("L"):
    #Set relay connected to port 4 to ON
    house.setrelay(0, "pwm4")
  #If the left pushbutton is not pressed...
  else:
    #Set relay connected to port 4 to OFF
    house.setrelay(1, "pwm4")

  #Wait one second before checking the pushbutton again
  time.sleep(1)
The flow of water can be adjusted with the loosening and tightening of the red part of the emitter.
In this example project, we are going to create a Machine Learning Model where shark run by the user and fish automatically feed on randomly generated food while escaping from sharks.

sprite = Sprite('Fish')sprite1 = Sprite('Orange')
sprite2 = Sprite('Shark 2')
sprite3 = Sprite('Button3')import random
import time
import tensorflow as tf
import pandas as pd
import os
import mathcurr_x = 25
curr_y = 108
shark_x=-177
shark_y=116
score=0
chance=5
fish_d=20
fish_m=25
shark_m=4
angle_f=90
angle_s=90sprite.setx(curr_x)
sprite.sety(curr_y)
sprite2.setx(shark_x)
sprite2.sety(shark_y)
sprite.setdirection(DIRECTION=angle_f)
sprite2.setdirection(DIRECTION=angle_s)def settarget(t):
x = random.randrange(-200, 200, t)
y = random.randrange(-155, 155, t)
x1 = random.randrange(-200, 200, t)
y1 = random.randrange(-155, 155, t)
x2 = random.randrange(-200, 200, t)
y2 = random.randrange(-155, 155, t)
time.sleep(0.1)
sprite1.setx(x1)
sprite1.sety(y1)
sprite.setx(x)
sprite.sety(y)
sprite2.setx(x2)
sprite2.sety(y2)
return x, y, x1, y1, x2, y2def settarget1(m):
x = random.randrange(-200, 200, m)
y = random.randrange(-155, 155, m)
time.sleep(0.1)
sprite1.setx(x)
sprite1.sety(y)
return x, y target_x, target_y = settarget(40) target_x, target_y = settarget1(40)
if(os.path.isfile('Chase_Data.csv')):
data=pd.read_csv('Chase_Data.csv')
else:
data = pd.DataFrame({"curr_X": curr_x, "curr_Y": curr_y,"shark_X": shark_x, "shark_Y": shark_y, "tar_x": target_x, "tar_y": target_y, "diff_x":curr_x-target_x, "diff_y":curr_y-target_y, "diff_x1":shark_x-curr_x, "diff_y1":shark_y-curr_y, "direction_f": angle_f, "direction_s": angle_s, "Action": "RIGHT"}, index=[0])while True:sprite2.spriteRequest.requestCommand("motion_pointtowards", {"TOWARDS": "Fish"})
sprite2.move(shark_m)angle_f=sprite.direction()
angle_s=sprite2.direction()
anglef=math.floor(angle_f)
angles=math.floor(angle_s)if sprite.iskeypressed("up arrow"):
data = data.append({"curr_X": curr_x, "curr_Y": curr_y,"shark_X": shark_x, "shark_Y": shark_y, "tar_x": target_x, "tar_y": target_y, "diff_x":curr_x-target_x, "diff_y":curr_y-target_y, "diff_x1":shark_x-curr_x, "diff_y1":shark_y-curr_y, "direction_f": anglef, "direction_s": angles, "Action": "UP"}, ignore_index=True)
sprite.move(fish_m)if sprite.iskeypressed("left arrow"):
data = data.append({"curr_X": curr_x, "curr_Y": curr_y,"shark_X": shark_x, "shark_Y": shark_y, "tar_x": target_x, "tar_y": target_y, "diff_x":curr_x-target_x, "diff_y":curr_y-target_y, "diff_x1":shark_x-curr_x, "diff_y1":shark_y-curr_y, "direction_f": anglef, "direction_s": angles, "Action": "LEFT"}, ignore_index=True)
angle = anglef - fish_d
sprite.setdirection(DIRECTION=angle)
if sprite.iskeypressed("right arrow"):
data = data.append({"curr_X": curr_x, "curr_Y": curr_y,"shark_X": shark_x, "shark_Y": shark_y, "tar_x": target_x, "tar_y": target_y, "diff_x":curr_x-target_x, "diff_y":curr_y-target_y, "diff_x1":shark_x-curr_x, "diff_y1":shark_y-curr_y, "direction_f": anglef, "direction_s": angles, "Action": "RIGHT"}, ignore_index=True)
angle = anglef + fish_d
sprite.setdirection(DIRECTION=angle)if(score>0 and score%2==0):
data.to_csv('Chase_Data.csv',index=False) if abs(shark_x-curr_x)<20 and abs(shark_y-curr_y)<20:
chance= chance-1 if abs(shark_x-curr_x)<20 and abs(shark_y-curr_y)<20:
chance= chance-1
curr_x, curr_y, target_x, target_y, shark_x, shark_y = settarget(40)
sprite3.say(("score: ",score ," and chance: ",chance,""))
if (chance == 0):
data.to_csv('Chase_Data.csv',index=False)
curr_x, curr_y, target_x, target_y, shark_x, shark_y = settarget(40)
chance=5if abs(curr_x-target_x)<20 and abs(curr_y-target_y)<20:
score = score + 1
sprite.say(("your score is: {}".format(score)))if (score >= 40):
print(data)
data.to_csv('Chase Data.csv')
break
target_x, target_y = settarget1() curr_x=math.floor(sprite.x())
curr_y=math.floor(sprite.y())
shark_x=math.floor(sprite2.x())
shark_y=math.floor(sprite2.y())
time.sleep(0.02)sprite = Sprite('Fish')
sprite1 = Sprite('Orange')
sprite2 = Sprite('Shark 2')
sprite3 = Sprite('Button3')
import random
import time
import numpy as np
import tensorflow as tf
import pandas as pd
import os
import math
curr_x = 25
curr_y = 108
shark_x=-177
shark_y=116
score=0
chance=5
fish_d=20
fish_m=25
shark_m=4
angle_f=90
angle_s=90
sprite3.say(("score: ",score ," and chance: ",chance,""))
sprite.setx(curr_x)
sprite.sety(curr_y)
sprite2.setx(shark_x)
sprite2.sety(shark_y)
sprite.setdirection(DIRECTION=angle_f)
sprite2.setdirection(DIRECTION=angle_s)
def settarget(t):
  x = random.randrange(-200, 200, t)
  y = random.randrange(-155, 155, t)
  x1 = random.randrange(-200, 200, t)
  y1 = random.randrange(-155, 155, t)
  x2 = random.randrange(-200, 200, t)
  y2 = random.randrange(-155, 155, t)
  time.sleep(0.1)
  sprite1.setx(x1)
  sprite1.sety(y1)
  sprite.setx(x)
  sprite.sety(y)
  sprite2.setx(x2)
  sprite2.sety(y2)
  return x, y, x1, y1, x2, y2
def settarget1(m):
x = random.randrange(-200, 200, m)
y = random.randrange(-155, 155, m)
time.sleep(0.1)
sprite1.setx(x)
sprite1.sety(y)
return x, y
target_x, target_y = settarget1(40)
if(os.path.isfile('Chase_Data.csv')):
  data=pd.read_csv('Chase_Data.csv')
else:
  data = pd.DataFrame({"curr_X": curr_x, "curr_Y": curr_y,"shark_X": shark_x, "shark_Y": shark_y, "tar_x": target_x, "tar_y": target_y, "diff_x":curr_x-target_x, "diff_y":curr_y-target_y, "diff_x1":shark_x-curr_x, "diff_y1":shark_y-curr_y, "direction_f": angle_f, "direction_s": angle_s, "Action": "RIGHT"}, index=[0])
while True:
# sprite2.pointto()
sprite2.spriteRequest.requestCommand("motion_pointtowards", {"TOWARDS": "Fish"})
 sprite2.move(shark_m)
angle_f=sprite.direction()
angle_s=sprite2.direction()
anglef=math.floor(angle_f)
angles=math.floor(angle_s)
if sprite.iskeypressed("up arrow"):
    data = data.append({"curr_X": curr_x, "curr_Y": curr_y,"shark_X": shark_x, "shark_Y": shark_y, "tar_x": target_x, "tar_y": target_y, "diff_x":curr_x-target_x, "diff_y":curr_y-target_y, "diff_x1":shark_x-curr_x, "diff_y1":shark_y-curr_y, "direction_f": anglef, "direction_s": angles, "Action": "UP"}, ignore_index=True)
    sprite.move(fish_m)
if sprite.iskeypressed("left arrow"):
    data = data.append({"curr_X": curr_x, "curr_Y": curr_y,"shark_X": shark_x, "shark_Y": shark_y, "tar_x": target_x, "tar_y": target_y, "diff_x":curr_x-target_x, "diff_y":curr_y-target_y, "diff_x1":shark_x-curr_x, "diff_y1":shark_y-curr_y, "direction_f": anglef, "direction_s": angles, "Action": "LEFT"}, ignore_index=True)
    angle = anglef - fish_d
    sprite.setdirection(DIRECTION=angle)
if sprite.iskeypressed("right arrow"):
    data = data.append({"curr_X": curr_x, "curr_Y": curr_y,"shark_X": shark_x, "shark_Y": shark_y, "tar_x": target_x, "tar_y": target_y, "diff_x":curr_x-target_x, "diff_y":curr_y-target_y, "diff_x1":shark_x-curr_x, "diff_y1":shark_y-curr_y, "direction_f": anglef, "direction_s": angles, "Action": "RIGHT"}, ignore_index=True)
    angle = anglef + fish_d
    sprite.setdirection(DIRECTION=angle)
if(score>0 and score%2==0):
    data.to_csv('Chase_Data.csv',index=False)
 if abs(shark_x-curr_x)<20 and abs(shark_y-curr_y)<20:
    chance= chance-1
curr_x, curr_y, target_x, target_y, shark_x, shark_y = settarget(40)
sprite3.say(("score: ",score ," and chance: ",chance,""))
if (chance == 0):
data.to_csv('Chase_Data.csv',index=False)
curr_x, curr_y, target_x, target_y, shark_x, shark_y = settarget(40)
chance=5
if abs(curr_x-target_x)<20 and abs(curr_y-target_y)<20:
score = score + 1
sprite3.say(("score: ",score ," and chance: ",chance,""))
if (score >= 50):
data.to_csv('Chase_Data.csv',index=False)
break
target_x, target_y = settarget1(40)
  curr_x=math.floor(sprite.x())
  curr_y=math.floor(sprite.y())
  shark_x=math.floor(sprite2.x())
  shark_y=math.floor(sprite2.y())
  time.sleep(0.02)

Datasets on the internet are hardly ever fit to directly train on. Programmers often have to take care of unnecessary columns, text data, target columns, correlations, etc. Thankfully, PictoBlox’s ML Environment is packed with features to help us pre-process the data as per our liking.
Let’s create the ML model.
Alert: The Machine Learning Environment for model creation is available in the only desktop version of PictoBlox for Windows, macOS, or Linux. It is not available in Web, Android, and iOS versions.
Follow the steps below:
Datasets can either be uploaded or created on the ML Environment. Lets see how it is done.
Notes:
After data is pre-processed and optimized, it’s fit to be used in model training. To train the model, simply click the “Train Model” button found in the “Training” panel.
By training the model, meaningful information is extracted from the numbers, and that in turn updates the weights. Once these weights are saved, the model can be used to make predictions on data previously unseen.
The model’s function is to use the input data and predict the output. The target column must always contain numbers.
However, before training the model, there are a few hyperparameters that need to be understood. Click on the “Advanced” tab to view them.
There are three hyperparameters that can be altered in the Numbers(C/R) Extension:
It’s a good idea to train a numeric classification model for a high number of epochs. The model can be trained in both JavaScript and Python. In order to choose between the two, click on the switch on top of the Training panel.
The accuracy of the model should increase over time. The x-axis of the graph shows the epochs, and the y-axis represents the accuracy at the corresponding epoch.
A window will open. Type in a project name of your choice and select the “Numbers(C/R)” extension. Click the “Create Project” button to open the Numbers(C/R) window.
To test the model, simply enter the input values in the “Testing” panel and click on the “Predict” button.
The model will return the probability of the input belonging to the classes.
Click on the “PictoBlox” button, and PictoBlox will load your model into the Python Coding Environment if you have opened the ML Environment in Python Coding.
sprite = Sprite('Fish')sprite1 = Sprite('Orange')
sprite2 = Sprite('Shark 2')
sprite3 = Sprite('Button3')import random
import time
import tensorflow as tf
import pandas as pd
import os
import mathcurr_x = 25
curr_y = 108
shark_x=-177
shark_y=116
score=0
chance=5
fish_d=20
fish_m=35
shark_m=25
shark_d= 20
angle_f=90
angle_s=90sprite.setx(curr_x)
sprite.sety(curr_y)
sprite2.setx(shark_x)
sprite2.sety(shark_y)
sprite.setdirection(DIRECTION=angle_f) sprite2.setdirection(DIRECTION=angle_s)def settarget1(t):
x = random.randrange(-200, 200, t)
y = random.randrange(-155, 155, t)
x1 = random.randrange(-200, 200, t)
y1 = random.randrange(-155, 155, t)
x2 = random.randrange(-200, 200, t)
y2 = random.randrange(-155, 155, t)
time.sleep(0.1)
sprite1.setx(x1)
sprite1.sety(y1)
sprite.setx(x)
sprite.sety(y)
sprite2.setx(x2)
sprite2.sety(y2)
return x, y, x1, y1, x2, y2def settarget(m):
x = random.randrange(-200, 200, m)
y = random.randrange(-155, 155, m)
time.sleep(0.1)
sprite1.setx(x)
sprite1.sety(y)
return x, y target_x, target_y = settarget(40)def runprediction(diff_x, diff_y, diff_x1, diff_y1, ang1, ang2):
inputValue=[diff_x, diff_y, diff_x1, diff_y1, ang1, ang2]
#Input Tensor
inputTensor = tf.expand_dims(inputValue, 0)
#Predict
predict = model.predict(inputTensor)
predict_index = np.argmax(predict[0], axis=0)
#Output
predicted_class = class_list[predict_index]
return predicted_classWhile True :if sprite.iskeypressed("up arrow"):
sprite2.move(shark_m)
shark_x=sprite2.x()
shark_y=sprite2.y() if sprite.iskeypressed("left arrow"):
angles = angle_s - shark_d
sprite2.setdirection(DIRECTION=angles)
if sprite.iskeypressed("right arrow"):
angles = angle_s + shark_d
sprite2.setdirection(DIRECTION=angles)angle_f=sprite.direction()
angle_s=sprite2.direction()
move = runprediction(curr_x- target_x, curr_y-target_y, shark_x-curr_x, shark_y-curr_y, angle_f, angle_s)if move == "UP":
sprite.move(fish_m)
curr_x=sprite.x()
curr_y=sprite.y()
if move == "LEFT":
angle = angle_f - fish_d
sprite.setdirection(DIRECTION=angle)
if move == "RIGHT":
angle = angle_f + fish_d
sprite.setdirection(DIRECTION=angle) if abs(shark_x-curr_x)<20 and abs(shark_y-curr_y)<20:
chance= chance-1 if abs(shark_x-curr_x)<20 and abs(shark_y-curr_y)<20:
chance= chance-1
curr_x, curr_y, target_x, target_y, shark_x, shark_y = settarget1(40)
sprite3.say(("score: ",score ," and chance: ",chance,""))
if (chance == 0):
chance=5if abs(curr_x-target_x)<20 and abs(curr_y-target_y)<20:
score = score + 1
sprite.say(("your score is: {}".format(score)))
target_x, target_y = settarget(4)sprite = Sprite('Fish')
sprite1 = Sprite('Orange')
sprite2 = Sprite('Shark 2')
sprite3 = Sprite('Button3')
import random
import time
import numpy as np
import tensorflow as tf
import pandas as pd
import os
import math
#Load Number Model
model= tf.keras.models.load_model(
"num_model.h5",
custom_objects=None,
compile=True,
options=None)
#List of classes
class_list = ['UP','RIGHT','LEFT',]
curr_x = 25
curr_y = 108
shark_x=-177
shark_y=116
score=0
chance=5
fish_d=20
fish_m=35
shark_m=25
shark_d=20
angle_f=90
angle_s=90
sprite3.say(("score: ",score ," and chance: ",chance,""))
sprite.setx(curr_x)
sprite.sety(curr_y)
sprite2.setx(shark_x)
sprite2.sety(shark_y)
sprite.setdirection(DIRECTION=angle_f) sprite2.setdirection(DIRECTION=angle_s)
def settarget1(t):
  x = random.randrange(-200, 200, t)
  y = random.randrange(-155, 155, t)
  x1 = random.randrange(-200, 200, t)
  y1 = random.randrange(-155, 155, t)
  x2 = random.randrange(-200, 200, t)
  y2 = random.randrange(-155, 155, t)
  time.sleep(0.1)
  sprite1.setx(x1)
  sprite1.sety(y1)
  sprite.setx(x)
  sprite.sety(y)
  sprite2.setx(x2)
  sprite2.sety(y2)
  return x, y, x1, y1, x2, y2
def settarget(m):
x = random.randrange(-200, 200, m)
y = random.randrange(-155, 155, m)
time.sleep(0.1)
sprite1.setx(x)
sprite1.sety(y)
return x, y
target_x, target_y = settarget(40)
def runprediction(diff_x, diff_y, diff_x1, diff_y1, ang1, ang2):
  inputValue=[diff_x, diff_y, diff_x1, diff_y1, ang1, ang2]
  #Input Tensor
  inputTensor = tf.expand_dims(inputValue, 0)
  #Predict
  predict = model.predict(inputTensor)
  predict_index = np.argmax(predict[0], axis=0)
  #Output
  predicted_class = class_list[predict_index]
  return predicted_class
while True:
if sprite.iskeypressed("up arrow"):
    sprite2.move(shark_m)
    shark_x=sprite2.x()
    shark_y=sprite2.y()
  if sprite.iskeypressed("left arrow"):
    angles = angle_s - shark_d
    sprite2.setdirection(DIRECTION=angles)

  if sprite.iskeypressed("right arrow"):
    angles = angle_s + shark_d
    sprite2.setdirection(DIRECTION=angles)
angle_f=sprite.direction()
angle_s=sprite2.direction()
move = runprediction(curr_x- target_x, curr_y-target_y, shark_x-curr_x, shark_y-curr_y, angle_f, angle_s)
if move == "UP":
    sprite.move(fish_m)
    curr_x=sprite.x()
    curr_y=sprite.y()

if move == "LEFT":
    angle = angle_f - fish_d
    sprite.setdirection(DIRECTION=angle)

if move == "RIGHT":
    angle = angle_f + fish_d
    sprite.setdirection(DIRECTION=angle)
 if abs(shark_x-curr_x)<20 and abs(shark_y-curr_y)<20:
    chance= chance-1
curr_x, curr_y, target_x, target_y, shark_x, shark_y = settarget1(40)
sprite3.say(("score: ",score ," and chance: ",chance,""))
if (chance == 0):
chance=5
if abs(curr_x-target_x)<35 and abs(curr_y-target_y)<35:
score = score + 1
sprite3.say(("score: ",score ," and chance: ",chance,""))
target_x, target_y = settarget(4)
time.sleep(0.2)
Creating a Machine Learning Model of “Shark Attack: Hungry for Fish” game can be both complex and time-consuming. Through the steps demonstrated in this project, you can create your own Machine Learning Model of automated game. Once trained, you can export the model into the Python Coding Environment, where you can tweak it further to give you the desired output. Try creating a Machine Learning Model of your own today and explore the possibilities of Number Classifier in PictoBlox!
This example demonstrates how to use the Soil Moisture sensor to detect the moisture in the soil and water the plant using the drip system. The system will water the plant when the moisture of the soil is low.
The following tutorials cover how to make the Drip Irrigation System:
We are using 2 devices in this project:

The project has 3 scripts:
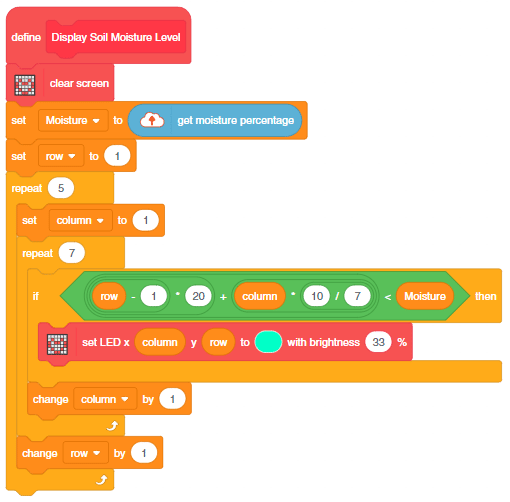
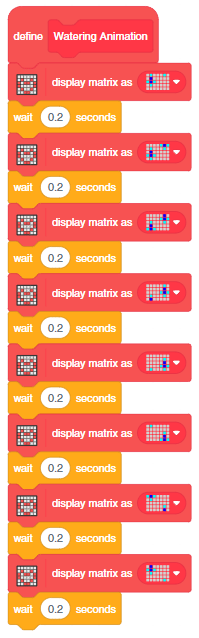
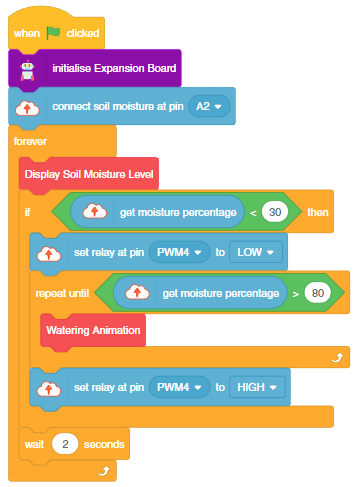
You can also make the script work independently of PictoBlox using the Upload Mode. For that switch to upload mode and replace the when green flag clicked block with when Quarky starts up the block.
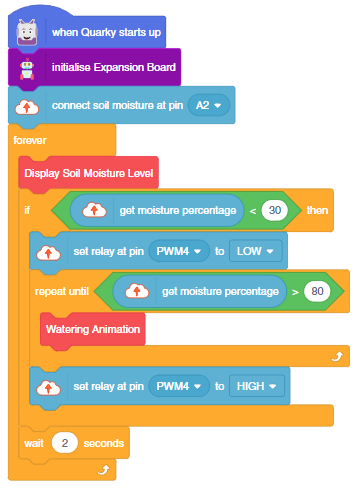
This example demonstrates how to use the Soil Moisture sensor to detect the moisture in the soil and water the plant using the drip system in PictoBlox Python Environment. The system will water the plant when the moisture of the soil is low.
The following tutorials cover how to make the Drip Irrigation System:
We are using 2 devices in this project:
The code does the following:
# Create an instance of the Quarky class called quarky
quarky = Quarky()

# Create an instance of the IoTHouse class called house
house = IoTHouse()

# Import the time library which contains functions for working with time
import time


# Create a function called Display_Soil_Moisture_Level which will display the soil moisture level on the Quarky
def Display_Soil_Moisture_Level():
  # Clear the display on Quarky
  quarky.cleardisplay()
  # Read the moisture level from the IoTHouse
  Moisture = house.readmoisture()
  # Iterate through each row and column of the display
  for row in range(1, 6):
    for column in range(1, 8):
      # If the current row and column number is less than the moisture level
      # Turn on the corresponding LED on Quarky
      if ((((row - 1) * 20) + (column * (10 / 7))) < Moisture):
        quarky.setled(column, row, [0, 255, 0], 33)


# Create a function called Watering_Animation to display a watering animation on the Quarky
def Watering_Animation():
  # Draw the first pattern on Quarky
  quarky.drawpattern("jfjjjfjjdjjjjjfdfjjjjjfjjjjjjjjjjjj")
  time.sleep(0.2)
  # Draw the second pattern on Quarky
  quarky.drawpattern("jjjjfdfjfjjjfjjdjjjjjfdfjjjjjfjjjjj")
  time.sleep(0.2)
  # Draw the third pattern on Quarky
  quarky.drawpattern("jjjjjdjjjjjfdfjfjjjfjjdjjjjjfdfjjjj")
  time.sleep(0.2)
  # Draw the fourth pattern on Quarky
  quarky.drawpattern("jjjjjfjjjjjjdjjjjjfdfjfjjjfjjdjjjjj")
  time.sleep(0.2)
  # Draw the fifth pattern on Quarky
  quarky.drawpattern("jjjjjjjjjjjjfjjjjjjdjjjjjfdfjfjjjfj")
  time.sleep(0.2)
  # Draw the sixth pattern on Quarky
  quarky.drawpattern("jfjjjjjjjjjjjjjjjjjfjjjjjjdjjjjjfdf")
  time.sleep(0.2)
  # Draw the seventh pattern on Quarky
  quarky.drawpattern("fdfjjjjjfjjjjjjjjjjjjjjjjjfjjjjjjdj")
  time.sleep(0.2)
  # Draw the eighth pattern on Quarky
  quarky.drawpattern("jdjjjjjfdfjjjjjfjjjjjjjjjjjjjjjjjfj")
  time.sleep(0.2)


# Set the moisture pin on the IoT House to A2
house.setmoisturepin("A2")

# Create an infinite loop
while True:
  # Call the Display_Soil_Moisture_Level function
  Display_Soil_Moisture_Level()

  # If the moisture level is below 30
  if (house.readmoisture() < 30):
    # Turn on the relay 0 on the IoTHouse
    house.setrelay(0, "pwm4")
    # Create a loop which will run until the moisture level is above 80
    while not ((house.readmoisture() > 80)):
      # Call the Watering_Animation function twice
      Watering_Animation()
    # Turn off the relay 0 on the IoTHouse
    house.setrelay(1, "pwm4")
  # Pause for 2 seconds
  time.sleep(2)
You can also make the script work independently of PictoBlox using the Upload Mode. For that switch to upload mode and replace the when green flag clicked block with when Quarky starts up the block.
Only the object initialization changes in the Upload Mode.
# Create an instance of the Quarky class called quarky
from quarky import *

# Create an instance of the IoTHouse class called house
import iothouse
house = iothouse.iothouse()

# Import the time library which contains functions for working with time
import time

# Create a function called Display_Soil_Moisture_Level which will display the soil moisture level on the Quarky
def Display_Soil_Moisture_Level():
  # Clear the display on Quarky
  quarky.cleardisplay()
  # Read the moisture level from the IoTHouse
  Moisture = house.readmoisture()
  # Iterate through each row and column of the display
  for row in range(1, 6):
    for column in range(1, 8):
      # If the current row and column number is less than the moisture level
      # Turn on the corresponding LED on Quarky
      if ((((row - 1) * 20) + (column * (10 / 7))) < Moisture):
        quarky.setled(column, row, [0, 255, 0], 33)


# Create a function called Watering_Animation to display a watering animation on the Quarky
def Watering_Animation():
  # Draw the first pattern on Quarky
  quarky.drawpattern("jfjjjfjjdjjjjjfdfjjjjjfjjjjjjjjjjjj")
  time.sleep(0.2)
  # Draw the second pattern on Quarky
  quarky.drawpattern("jjjjfdfjfjjjfjjdjjjjjfdfjjjjjfjjjjj")
  time.sleep(0.2)
  # Draw the third pattern on Quarky
  quarky.drawpattern("jjjjjdjjjjjfdfjfjjjfjjdjjjjjfdfjjjj")
  time.sleep(0.2)
  # Draw the fourth pattern on Quarky
  quarky.drawpattern("jjjjjfjjjjjjdjjjjjfdfjfjjjfjjdjjjjj")
  time.sleep(0.2)
  # Draw the fifth pattern on Quarky
  quarky.drawpattern("jjjjjjjjjjjjfjjjjjjdjjjjjfdfjfjjjfj")
  time.sleep(0.2)
  # Draw the sixth pattern on Quarky
  quarky.drawpattern("jfjjjjjjjjjjjjjjjjjfjjjjjjdjjjjjfdf")
  time.sleep(0.2)
  # Draw the seventh pattern on Quarky
  quarky.drawpattern("fdfjjjjjfjjjjjjjjjjjjjjjjjfjjjjjjdj")
  time.sleep(0.2)
  # Draw the eighth pattern on Quarky
  quarky.drawpattern("jdjjjjjfdfjjjjjfjjjjjjjjjjjjjjjjjfj")
  time.sleep(0.2)


# Set the moisture pin on the IoT House to A2
house.setmoisturepin("A2")

# Create an infinite loop
while True:
  # Call the Display_Soil_Moisture_Level function
  Display_Soil_Moisture_Level()

  # If the moisture level is below 30
  if (house.readmoisture() < 30):
    # Turn on the relay 0 on the IoTHouse
    house.setrelay(0, "pwm4")
    # Create a loop which will run until the moisture level is above 80
    while not ((house.readmoisture() > 80)):
      # Call the Watering_Animation function twice
      Watering_Animation()

    # Turn off the relay 0 on the IoTHouse
    house.setrelay(1, "pwm4")
  # Pause for 2 seconds
  time.sleep(2)


Copyright 2025 – Agilo Research Pvt. Ltd. All rights reserved – Terms & Condition | Privacy Policy