The block reports the selected field data from the last read request from ThingSpeak.
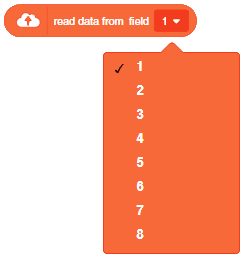
The block reports the selected field data from the last read request from ThingSpeak.

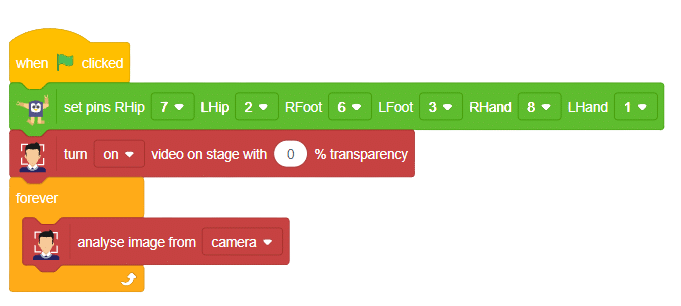
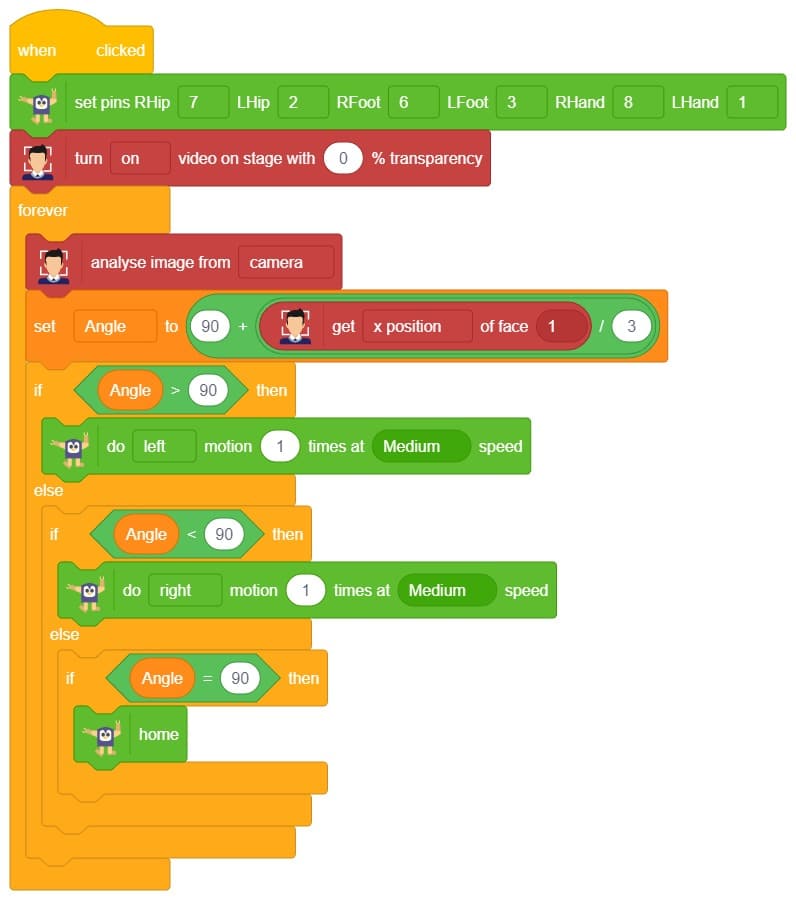
One of the most fascinating activities is face tracking, in which the Quarky can detect a face and move its head in the same direction as yours. How intriguing it sounds, so let’s get started with the coding for a face-tracking robot.
sprite = Sprite('Tobi')
quarky=Quarky()
import time
import math
humanoid = Humanoid(7,2,6,3,8,1)
fd = FaceDetection()
fd.video("on", 0)
fd.enablebox()
fd.setthreshold(0.5)
time.sleep(1)
Angle=0
while True:
fd.analysestage()
for i in range(fd.count()):
sprite.setx(fd.x(i + 1))
sprite.sety(fd.y(i + 1))
sprite.setsize(fd.width(i + 1))
Angle=fd.width(i + 1)
angle=int(float(Angle))
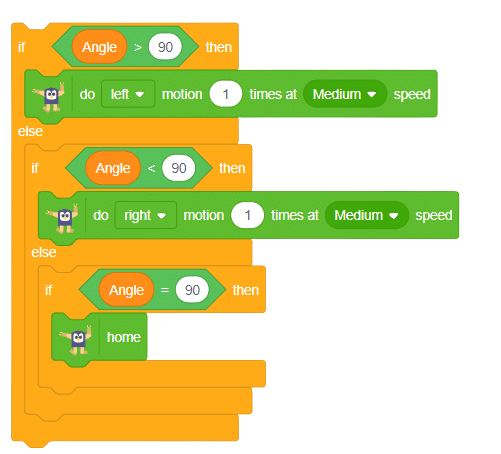
if angle>90:
humanoid.move("left",1000,3)
elif angle<90:
humanoid.move("right",1000,3)
time.sleep(1)
else:
humanoid.home()
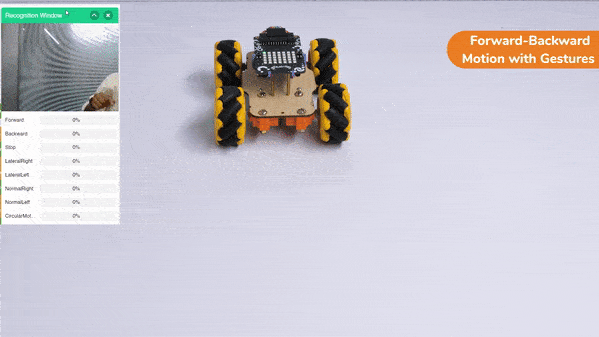
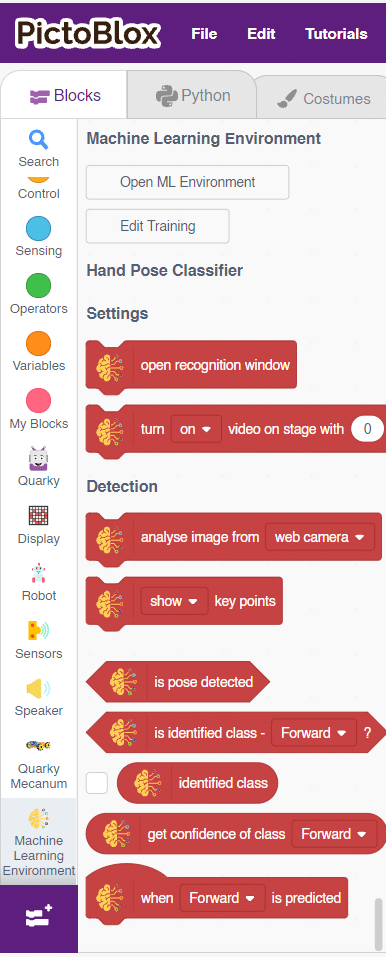
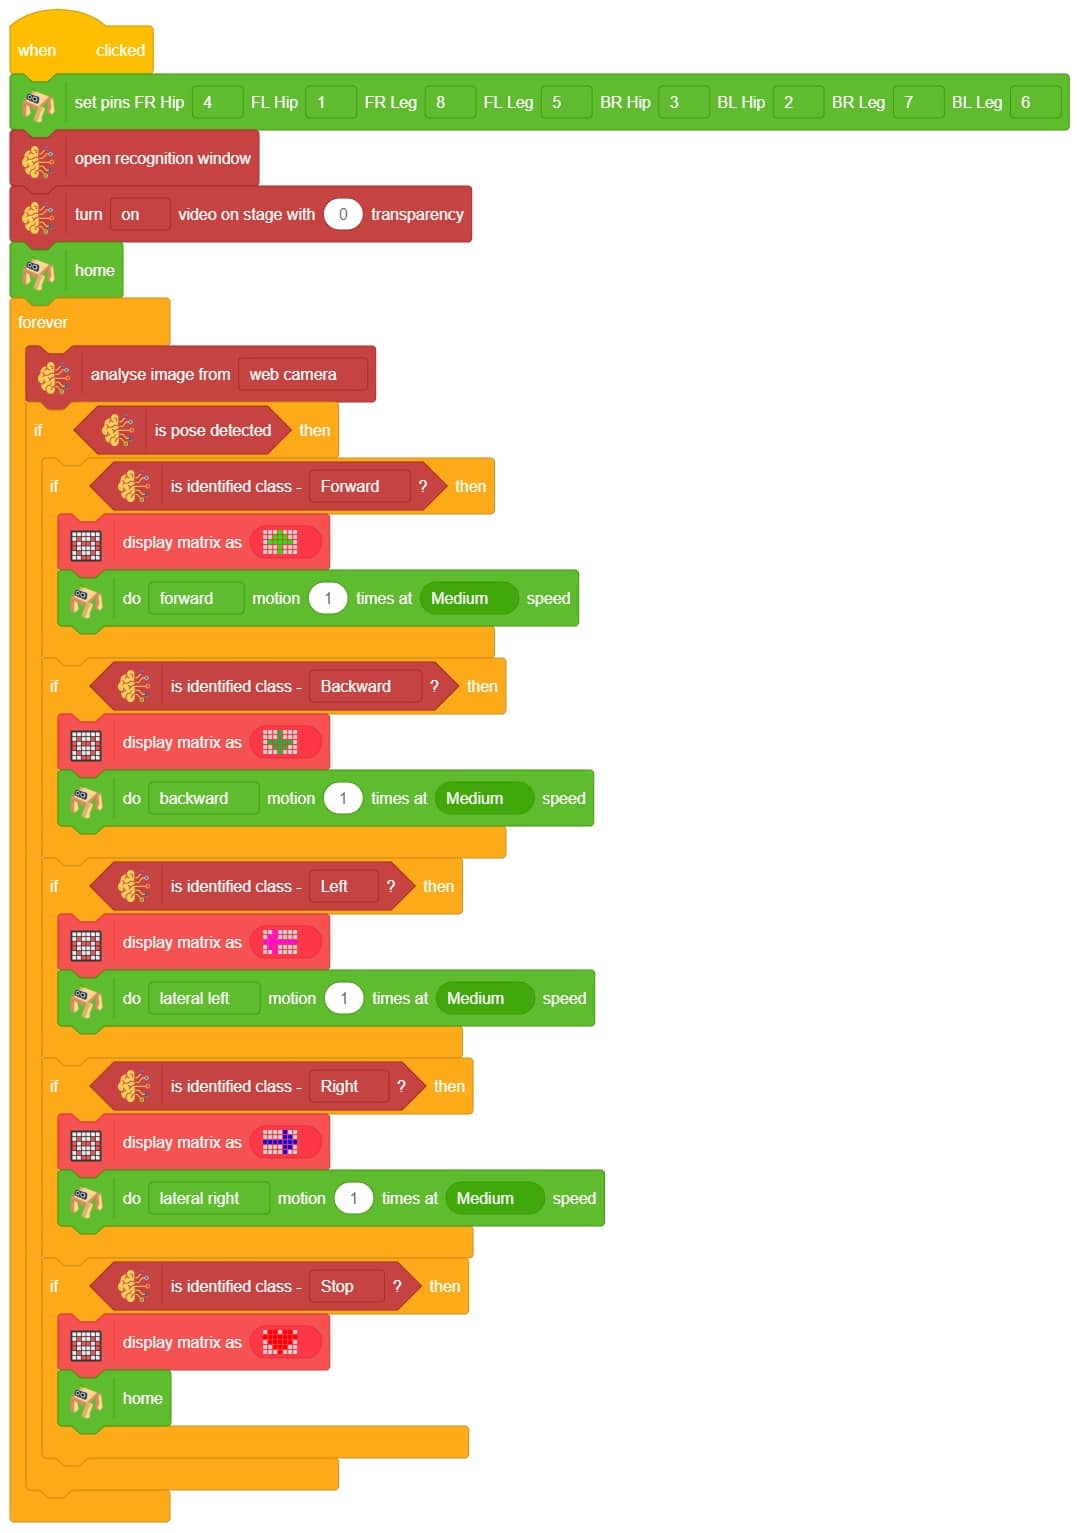
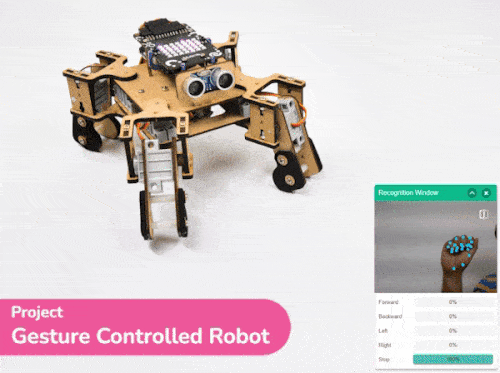
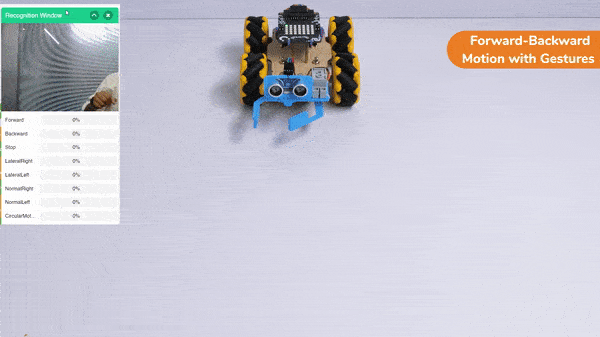
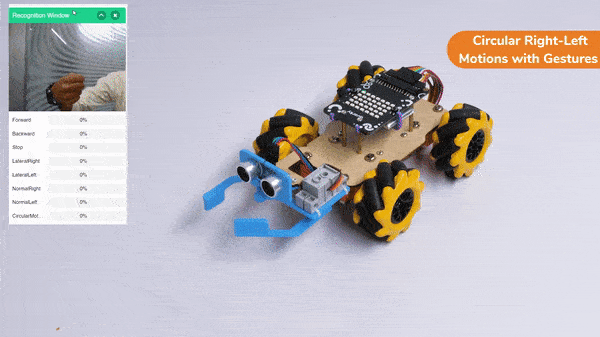
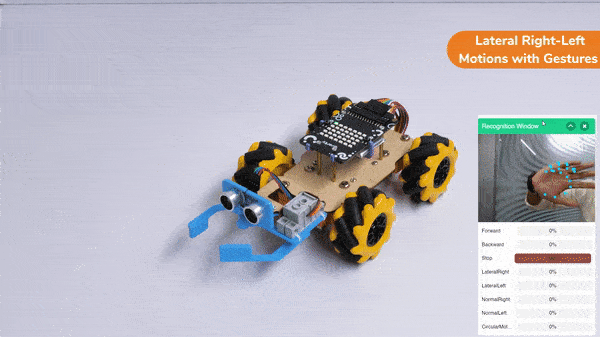
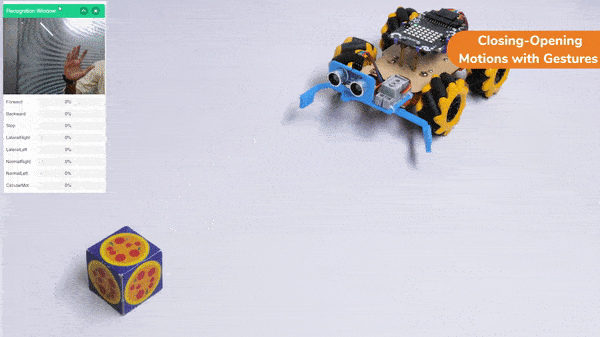
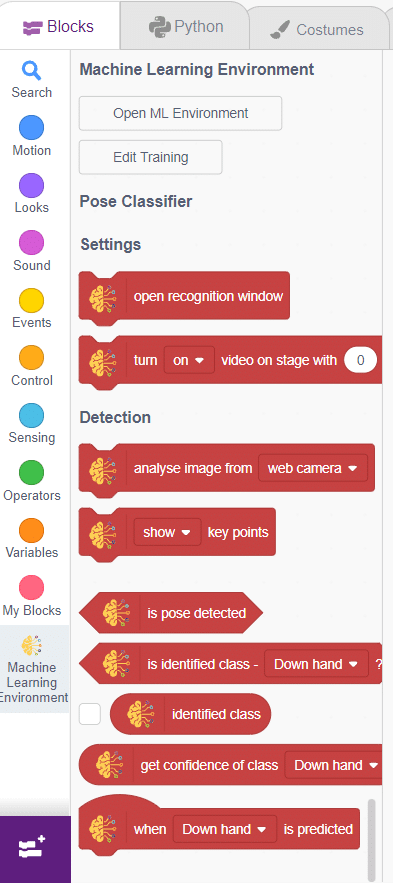
This project demonstrates how to use Machine Learning Environment to make a machine–learning model that identifies the hand gestures and makes the Mecanum move accordingly.
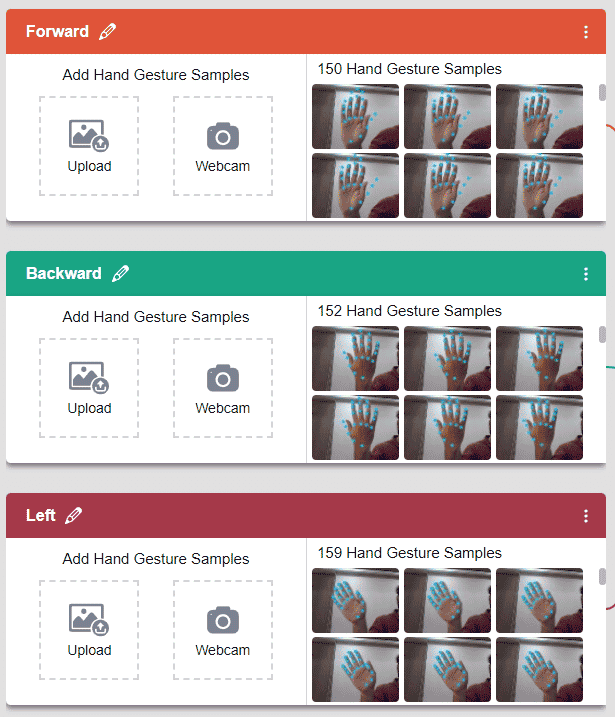
We are going to use the Hand Classifier of the Machine Learning Environment. The model works by analyzing your hand position with the help of 21 data points. We will add in total 8 different classes to operate the different motions of the Mecanum Robot with the help of the ML Environment of the Pictoblox Software.
Follow the steps below:


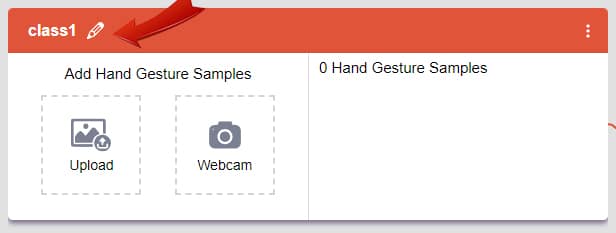
There are 2 things that you have to provide in a class:


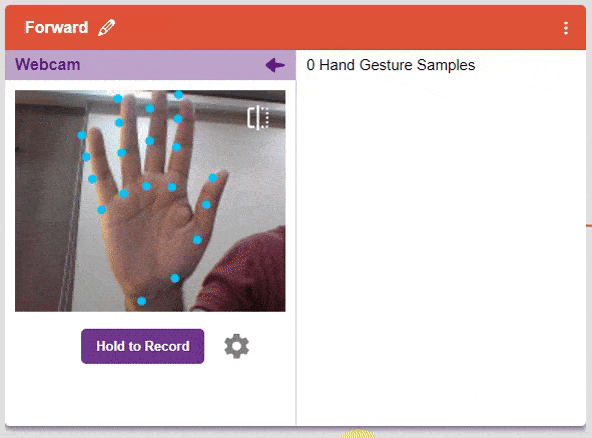
You can perform the following operations to manipulate the data into a class.
After data is added, it’s fit to be used in model training. In order to do this, we have to train the model. By training the model, we extract meaningful information from the hand pose, and that in turn updates the weights. Once these weights are saved, we can use our model to make predictions on data previously unseen.

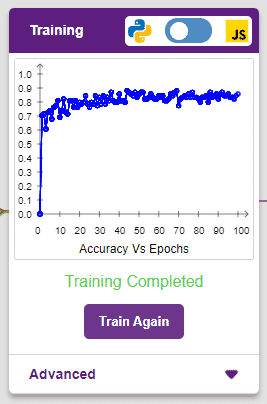
The accuracy of the model should increase over time. The x-axis of the graph shows the epochs, and the y-axis represents the accuracy at the corresponding epoch. Remember, the higher the reading in the accuracy graph, the better the model. The range of the accuracy is 0 to 1.

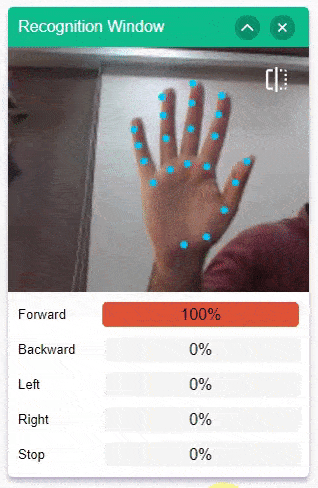
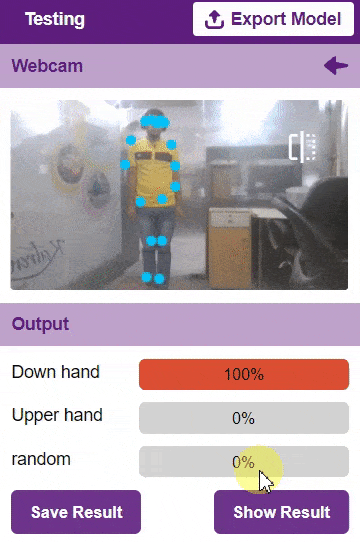
To test the model, simply enter the input values in the “Testing” panel and click on the “Predict” button.
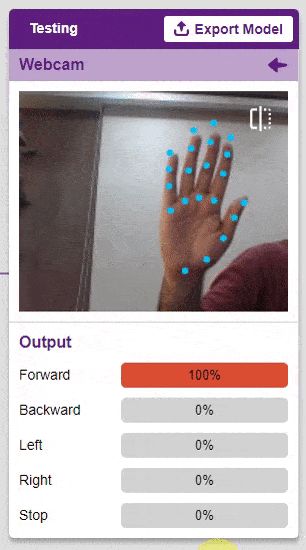
The model will return the probability of the input belonging to the classes.
Click on the “Export Model” button on the top right of the Testing box, and PictoBlox will load your model into the Block Coding Environment if you have opened the ML Environment in the Block Coding.
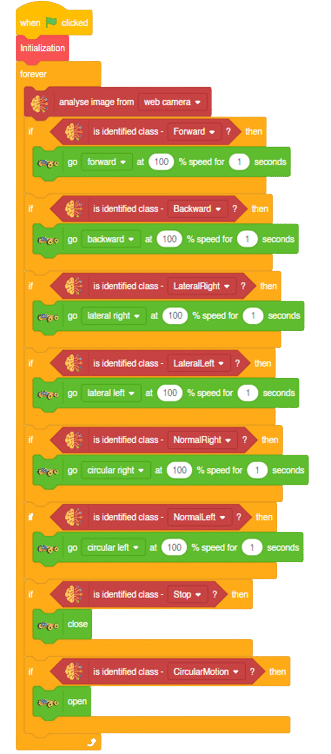
The mecanum will move according to the following logic:
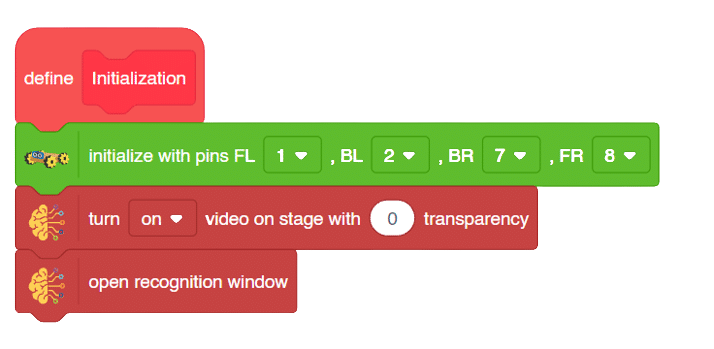
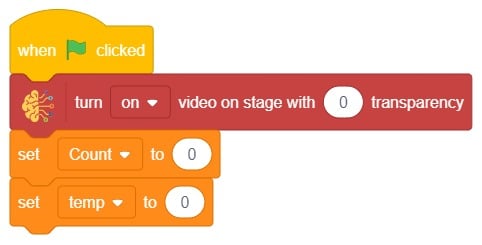
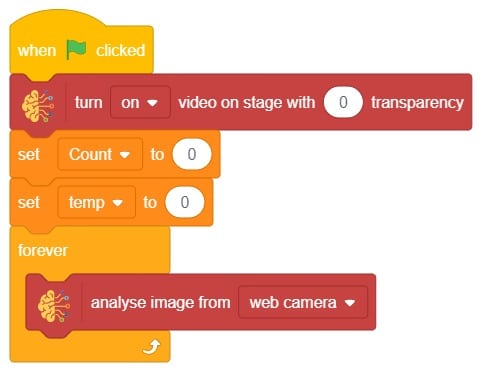
Initialization
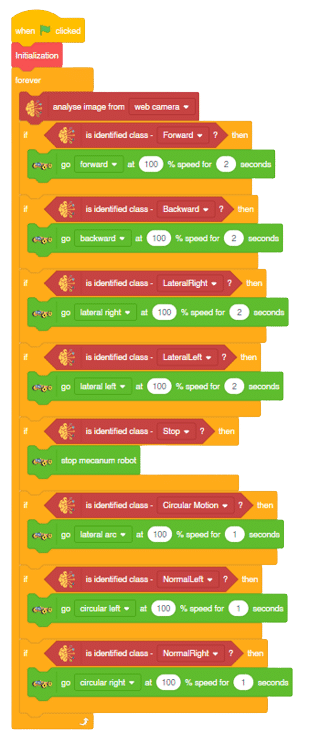
Forward-Backward Motions:

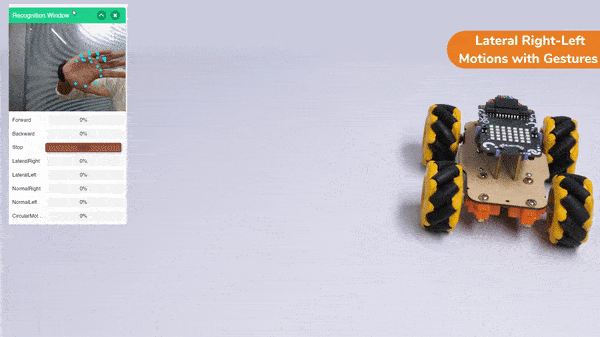
Lateral Right-Left Motions:
Circular Right-Left Motions:

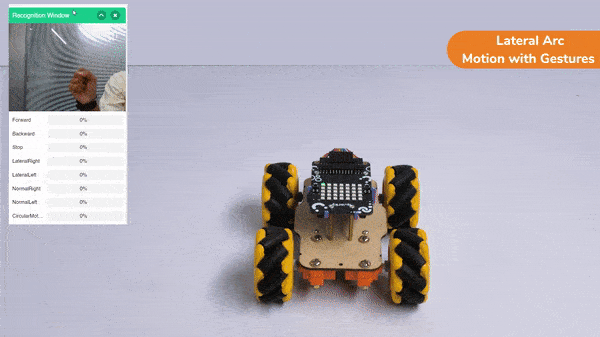
Lateral Arc Motion:
This project demonstrates how to use Machine Learning Environment to make a machine–learning model that identifies the hand gestures and makes the Mecanum move accordingly.
We are going to use the Hand Classifier of the Machine Learning Environment. The model works by analyzing your hand position with the help of 21 data points. We will add in total 8 different classes to operate the different motions of the Mecanum Robot with the help of the ML Environment of the Pictoblox Software.
Follow the steps below:
There are 2 things that you have to provide in a class:
You can perform the following operations to manipulate the data into a class.
After data is added, it’s fit to be used in model training. In order to do this, we have to train the model. By training the model, we extract meaningful information from the hand pose, and that in turn updates the weights. Once these weights are saved, we can use our model to make predictions on data previously unseen.
The accuracy of the model should increase over time. The x-axis of the graph shows the epochs, and the y-axis represents the accuracy at the corresponding epoch. Remember, the higher the reading in the accuracy graph, the better the model. The range of the accuracy is 0 to 1.
To test the model, simply enter the input values in the “Testing” panel and click on the “Predict” button.
The model will return the probability of the input belonging to the classes.
Click on the “Export Model” button on the top right of the Testing box, and PictoBlox will load your model into the Python Coding Environment if you have opened the ML Environment in the Python Coding.
The mecanum will move according to the following logic:
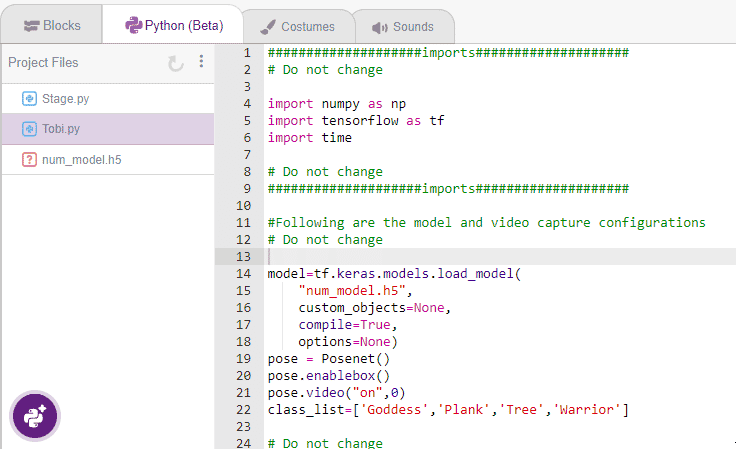
The following code appears in the Python Editor of the selected sprite.
####################imports####################
# Do not change

import numpy as np
import tensorflow as tf
import time

# Do not change
####################imports####################

#Following are the model and video capture configurations
# Do not change

model=tf.keras.models.load_model(
    "num_model.h5",
    custom_objects=None,
    compile=True,
    options=None)
pose = Posenet()                                                    # Initializing Posenet
pose.enablebox()                                                    # Enabling video capture box
pose.video("on",0)                                                  # Taking video input
class_list=['Forward','Backward','Stop','LateralRight','LateralLeft','NormalRight','NormalLeft','CircularMotion']                  # List of all the classes
meca=Mecanum(1,2,7,8)
def runmecanum(predicted_class):
  if pose.ishanddetected():
    if predicted_class=="Forward":
      meca.runtimedrobot("forward",100,2)
    if predicted_class=="Backward":
      meca.runtimedrobot("backward",100,2)
    if predicted_class=="Stop":
      meca.stoprobot()
    if predicted_class=="LateralRight":
      meca.runtimedrobot("lateral right",100,2)
    if predicted_class=="LateralLeft":
      meca.runtimedrobot("lateral left",100,2)
    if predicted_class=="NormalRight":
      meca.runtimedrobot("circular right",100,1)
    if predicted_class=="NormalLeft":
      meca.runtimedrobot("circular left",100,1)
    if predicted_class=="CircularMotion":
      meca.runtimedrobot("lateral arc",100,1)

# Do not change
###############################################

#This is the while loop block, computations happen here
# Do not change

while True:
  pose.analysehand()                                             # Using Posenet to analyse hand pose
  coordinate_xy=[]

    # for loop to iterate through 21 points of recognition
  for i in range(21):
    if(pose.gethandposition(1,i,0)!="NULL"  or pose.gethandposition(2,i,0)!="NULL"):
      coordinate_xy.append(int(240+float(pose.gethandposition(1,i,0))))
      coordinate_xy.append(int(180-float(pose.gethandposition(2,i,0))))
    else:
      coordinate_xy.append(0)
      coordinate_xy.append(0)

  coordinate_xy_tensor = tf.expand_dims(coordinate_xy, 0)        # Expanding the dimension of the coordinate list
  predict=model.predict(coordinate_xy_tensor)                    # Making an initial prediction using the model
  predict_index=np.argmax(predict[0], axis=0)                    # Generating index out of the prediction
  predicted_class=class_list[predict_index]                      # Tallying the index with class list
  print(predicted_class)
  runmecanum(predicted_class)
# Do not changedef runmecanum(predicted_class):
if pose.ishanddetected():
if predicted_class=="Forward":
meca.runtimedrobot("forward",100,2)
if predicted_class=="Backward":
meca.runtimedrobot("backward",100,2)
if predicted_class=="Stop":
meca.stoprobot()
if predicted_class=="LateralRight":
meca.runtimedrobot("lateral right",100,2)
if predicted_class=="LateralLeft":
meca.runtimedrobot("lateral left",100,2)
if predicted_class=="NormalRight":
meca.runtimedrobot("circular right",100,1)
if predicted_class=="NormalLeft":
meca.runtimedrobot("circular left",100,1)
if predicted_class=="CircularMotion":
meca.runtimedrobot("lateral arc",100,1)Forward-Backward Motions:
Lateral Right-Left Motions:
Circular Right-Left Motions:
Lateral Arc Motion:
A face-tracking robot is a type of robot that uses sensors and algorithms to detect and track human faces in real-time. The robot’s sensors, such as cameras or infrared sensors, capture images or videos of the surrounding environment and use computer vision techniques to analyze the data and identify human faces.
Face-tracking robots have many potential applications, including in security systems, entertainment, and personal robotics. For example, a face-tracking robot could be used in a museum or amusement park to interact with visitors, or in a home as a companion robot that can recognize and follow the faces of family members.
One of the most fascinating activities is face tracking, in which the Quadruped can detect a face and move its head in the same direction as yours. How intriguing it sounds, so let’s get started with the coding for a face-tracking Quadruped robot.
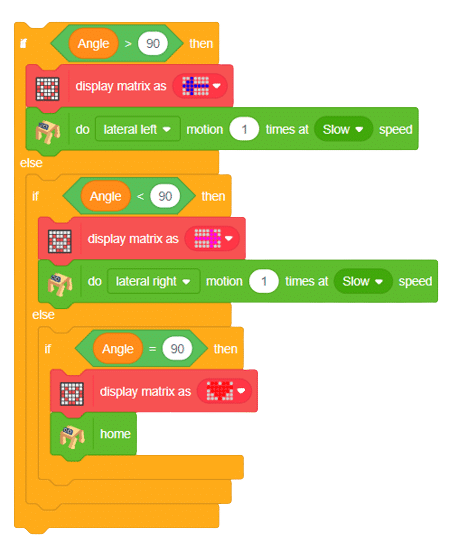

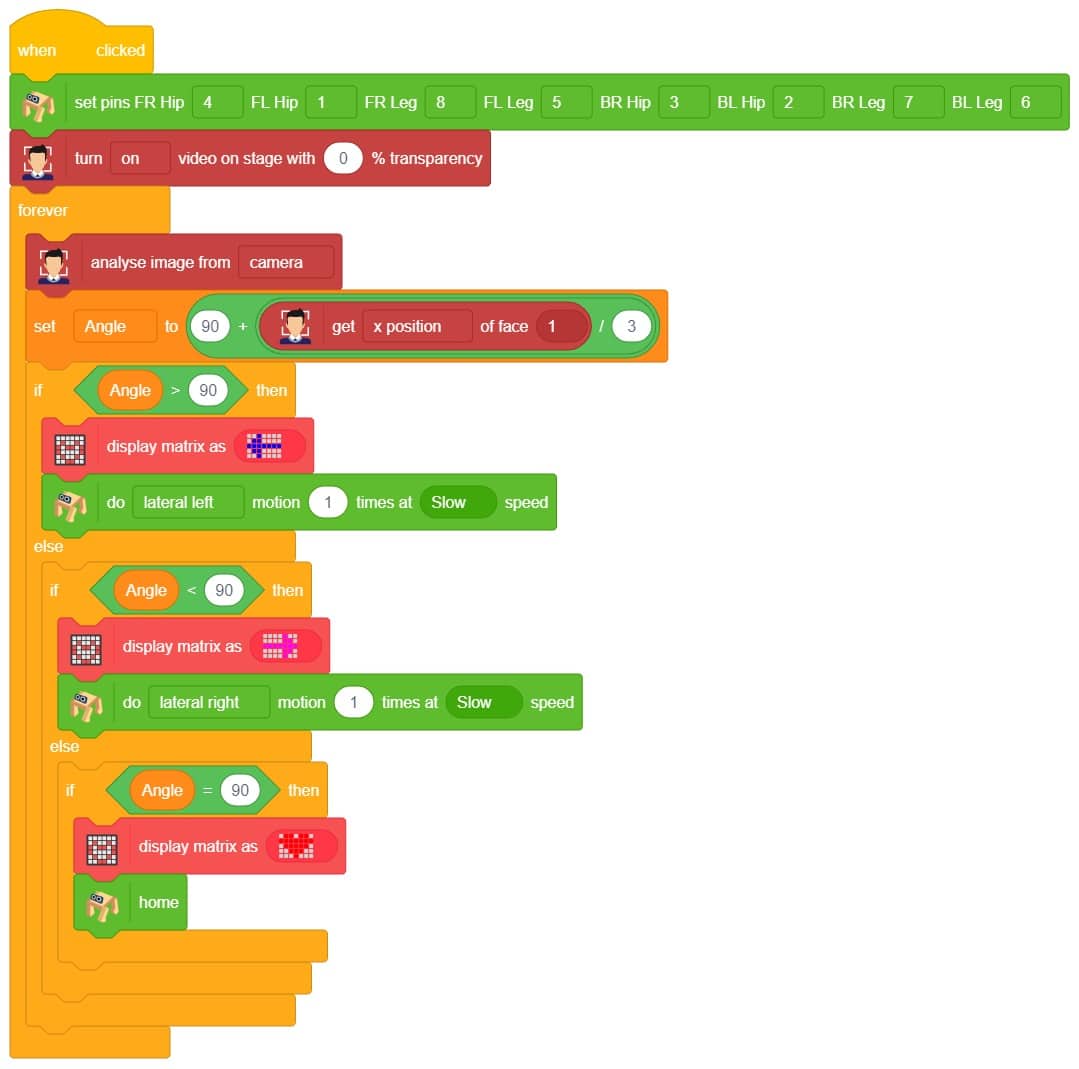
Our next step is to check whether it is working right or not. Whenever your face will come in front of the camera, it should detect it and as you move to the right or left, the head of your Quadruped robot should also move accordingly.
![]()

Are you looking to add some fun and expressiveness to your conversations? Look no further! I’m here to help you convert any word or phrase into a colorful array of emojis. Whether you want to spice up your messages, or social media posts, or simply bring a smile to someone’s face, I’ve got you covered.
Just type in the word or phrase you want to transform, and I’ll generate a delightful sequence of emojis that capture the essence of your text. Emojis are a universal language that transcends words from happy faces to animals, objects, and everything in between.
So, let’s get started and infuse your text with a touch of emoji magic! 🎉🔥
This code allows the user to interact with the sprite and provide emojis, which are then transformed into a response using the ChatGPT model. The sprite then speaks the generated response using the provided emojis.
sprite = Sprite('Tobi')
gpt = ChatGPT()


sprite.input("Please provide a world that i can convert into an emojis")
answer=sprite.answer()

gpt.movieToemoji(answer)
result=gpt.chatGPTresult()
sprite.say(result,5)

Welcome to the Noun Detector! This powerful tool utilizes the capabilities of ChatGPT and leverages the spaCy library to identify and extract nouns from text. By employing advanced natural language processing techniques, the Noun Detector analyzes sentences and highlights the essential elements that represent people, places, objects, or concepts.
Noun Detector is designed to excel at identifying and extracting nouns from text. Experience the Noun Detector’s capabilities firsthand and unlock the power of noun extraction in your language-processing endeavors. Try it out and witness the precision and efficiency of this invaluable tool!
sprite = Sprite('Tobi')

quarky=Quarky()
gpt = ChatGPT()

gpt.askOnChatGPT("AIAssistant", "Genrate simple random sentence for me")
result=gpt.chatGPTresult()
gpt.getgrammerfromtext("GrammerNoun",result)
noun=gpt.chatGPTresult()

sprite.say(result,5)
print(result)
print(noun)


sprite.input("Indentify and write the noun in sentance")
answer= str(sprite.answer())

if the answer in noun:
  sprite.say("You have a strong understanding of noun concepts. Well done!",5)
else:
  sprite.say("Please check the terminal for the correct answer as your response is incorrect",5)

The Synonyms and Antonyms Word Converter is a powerful tool powered by the ChatGPT extension that allows users to effortlessly find synonyms and antonyms for words. It harnesses the capabilities of the advanced language model to provide accurate and contextually relevant word alternatives.
With the Synonyms and Antonyms Word Converter, you can expand your vocabulary, enhance your writing, and improve your communication skills. Whether you’re a writer seeking more expressive language or a student looking to diversify your word choices, this tool is designed to assist you in finding suitable alternatives quickly and easily.
Using the ChatGPT extension, the Synonyms and Antonyms Word Converter engage in interactive conversations, making it an intuitive and user-friendly tool. By providing a word as input, you can receive a list of synonyms or antonyms, depending on your preference, helping you to diversify your language and convey your ideas with precision.
sprite = Sprite('Tobi')
gpt = ChatGPT()
str2 = ""
var2=""

sprite.input("Please provide a word for which you would like to find synonyms and antonyms")
answer= str(sprite.answer())

gpt.getsynonymsAntonymsfromText("Synonyms",answer)
str1=gpt.chatGPTresult()


for i in str1:
    if not i.isdigit():
        str2 += i

print("Synonyms words are:", str2)

gpt.getsynonymsAntonymsfromText("Antonyms",answer)
var1=gpt.chatGPTresult()

for j in var1:
    if not j.isdigit():
        var2 += j

print("Antonyms words are:", var2)


robotic arm playing chess is a great example of how robots and AI can work together to do complex tasks. Chess is a game that needs smart thinking and careful moves. The robotic arm is like a human arm and can move pieces on the chessboard.
The robotic arm has different parts like joints, actuators, sensors, and a gripper. The joints let the arm move in different ways, just like a human arm. The actuators control the arm’s movements, so it can make precise and planned moves during the game.
The robotic arm uses AI and computer vision to play chess. The AI algorithms study the chessboard, figure out where the pieces are, and decide on the best moves. They consider things like how valuable each piece is and where they are on the board. The arm’s sensors tell it where it is, so it can pick up the pieces and put them in the right places accurately.
When the AI finds the best move, the robotic arm carefully grabs the chosen piece, lifts it up, and puts it on the right square of the chessboard. The gripper has sensors to handle the pieces gently and not damage them.
The robotic arm playing chess is an amazing example of how robots, AI, and computer vision can work together. It shows how we can use complex algorithms and physical abilities to do tasks that people usually do. This technology can be useful in many fields like manufacturing, logistics, and healthcare, where we need precise and automated movements.
In summary, a robotic arm playing chess is a cool combination of robotics, AI, and computer vision. It can make smart and accurate moves on a chessboard. It’s a big achievement in robotics and shows how automation and AI can do complex tasks in different industries.


An automatic robotic arm is a mechanical device that imitates a human arm. It can be programmed and used in many industries. The arm consists of linked parts that can move and rotate, enabling it to do various tasks. Technology advancements like AI and machine learning have led to more advanced robotic arms. These arms can adapt and work autonomously. As a result, they are now widely used across industries and play a crucial role in automation systems.

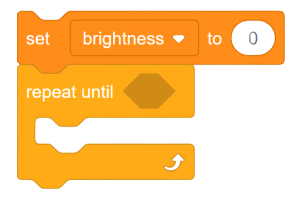
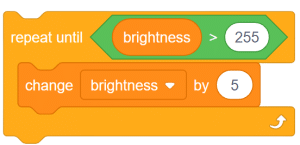
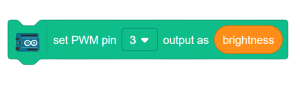
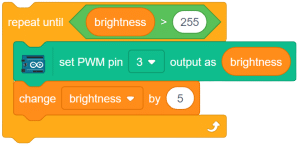
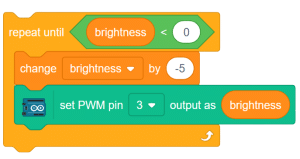
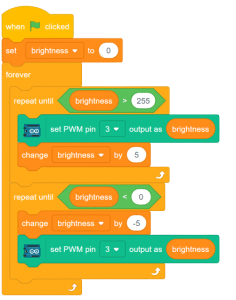
Pulse Width Modulation (PWM) is a powerful signal that allows precise control over voltage values and the time for each voltage level. By selectively choosing voltage values and durations, PWM signals can be fine-tuned to meet specific requirements. In PWM signals, the time lengths for the LOW and HIGH states of the pulse can vary, as depicted in the figure below. PWM has various applications and is commonly used to control LEDs and DC motors.
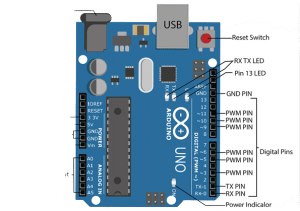
Arduino boards have 14 digital input/output pins, six of which can be utilized as PWM outputs (indicated with a dash on the board). The Digital-to-Analog Converter (DAC) channel of Arduino is an 8-bit register, enabling voltage values ranging from 0 to 255 (corresponding to 0V and 5V, respectively).
Analog signals have variable magnitudes throughout their cycles. Examples of analog signals include the output of smoke sensors and soil moisture sensors. In Arduino, PWM pins can be used to generate analog signals as output.

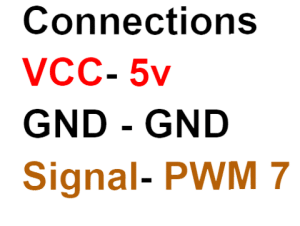
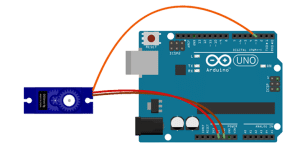
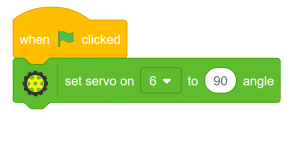
Servo motors are part of a closed-loop system and are comprised of several parts namely a control circuit, servo motor, shaft, potentiometer, drive gears, amplifier and either an encoder or resolver. A servo motor is a self-contained electrical device, that rotate parts of a machine with high efficiency and with great precision. The output shaft of this motor can be moved to a particular angle, position and velocity that a regular motor does not have.

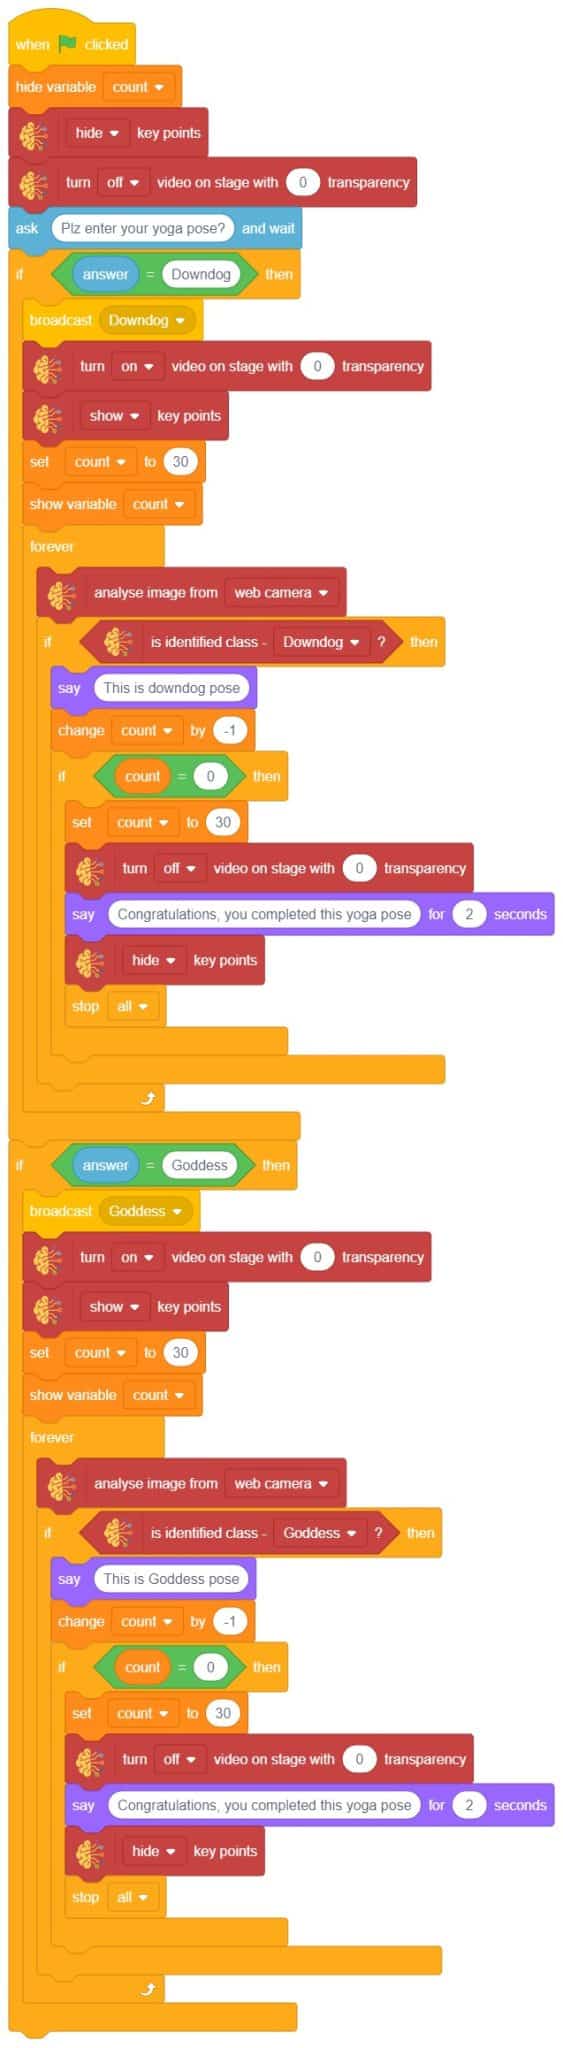
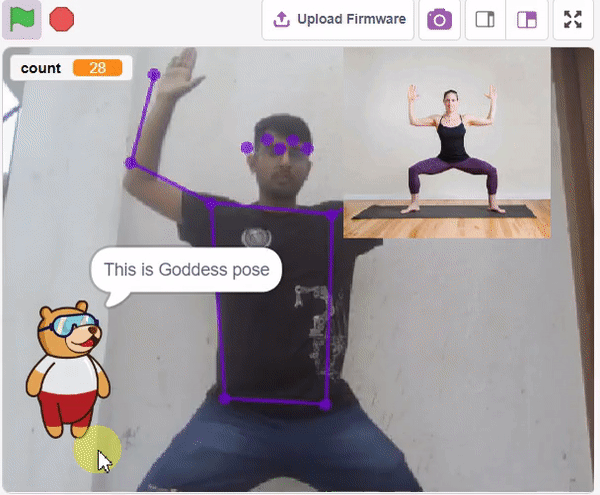
The idea is simple, we’ll add one image of each class in the “costume” column by making one new sprite which will we display on the stage according to input from user. we’ll also change name of the image according to pose.

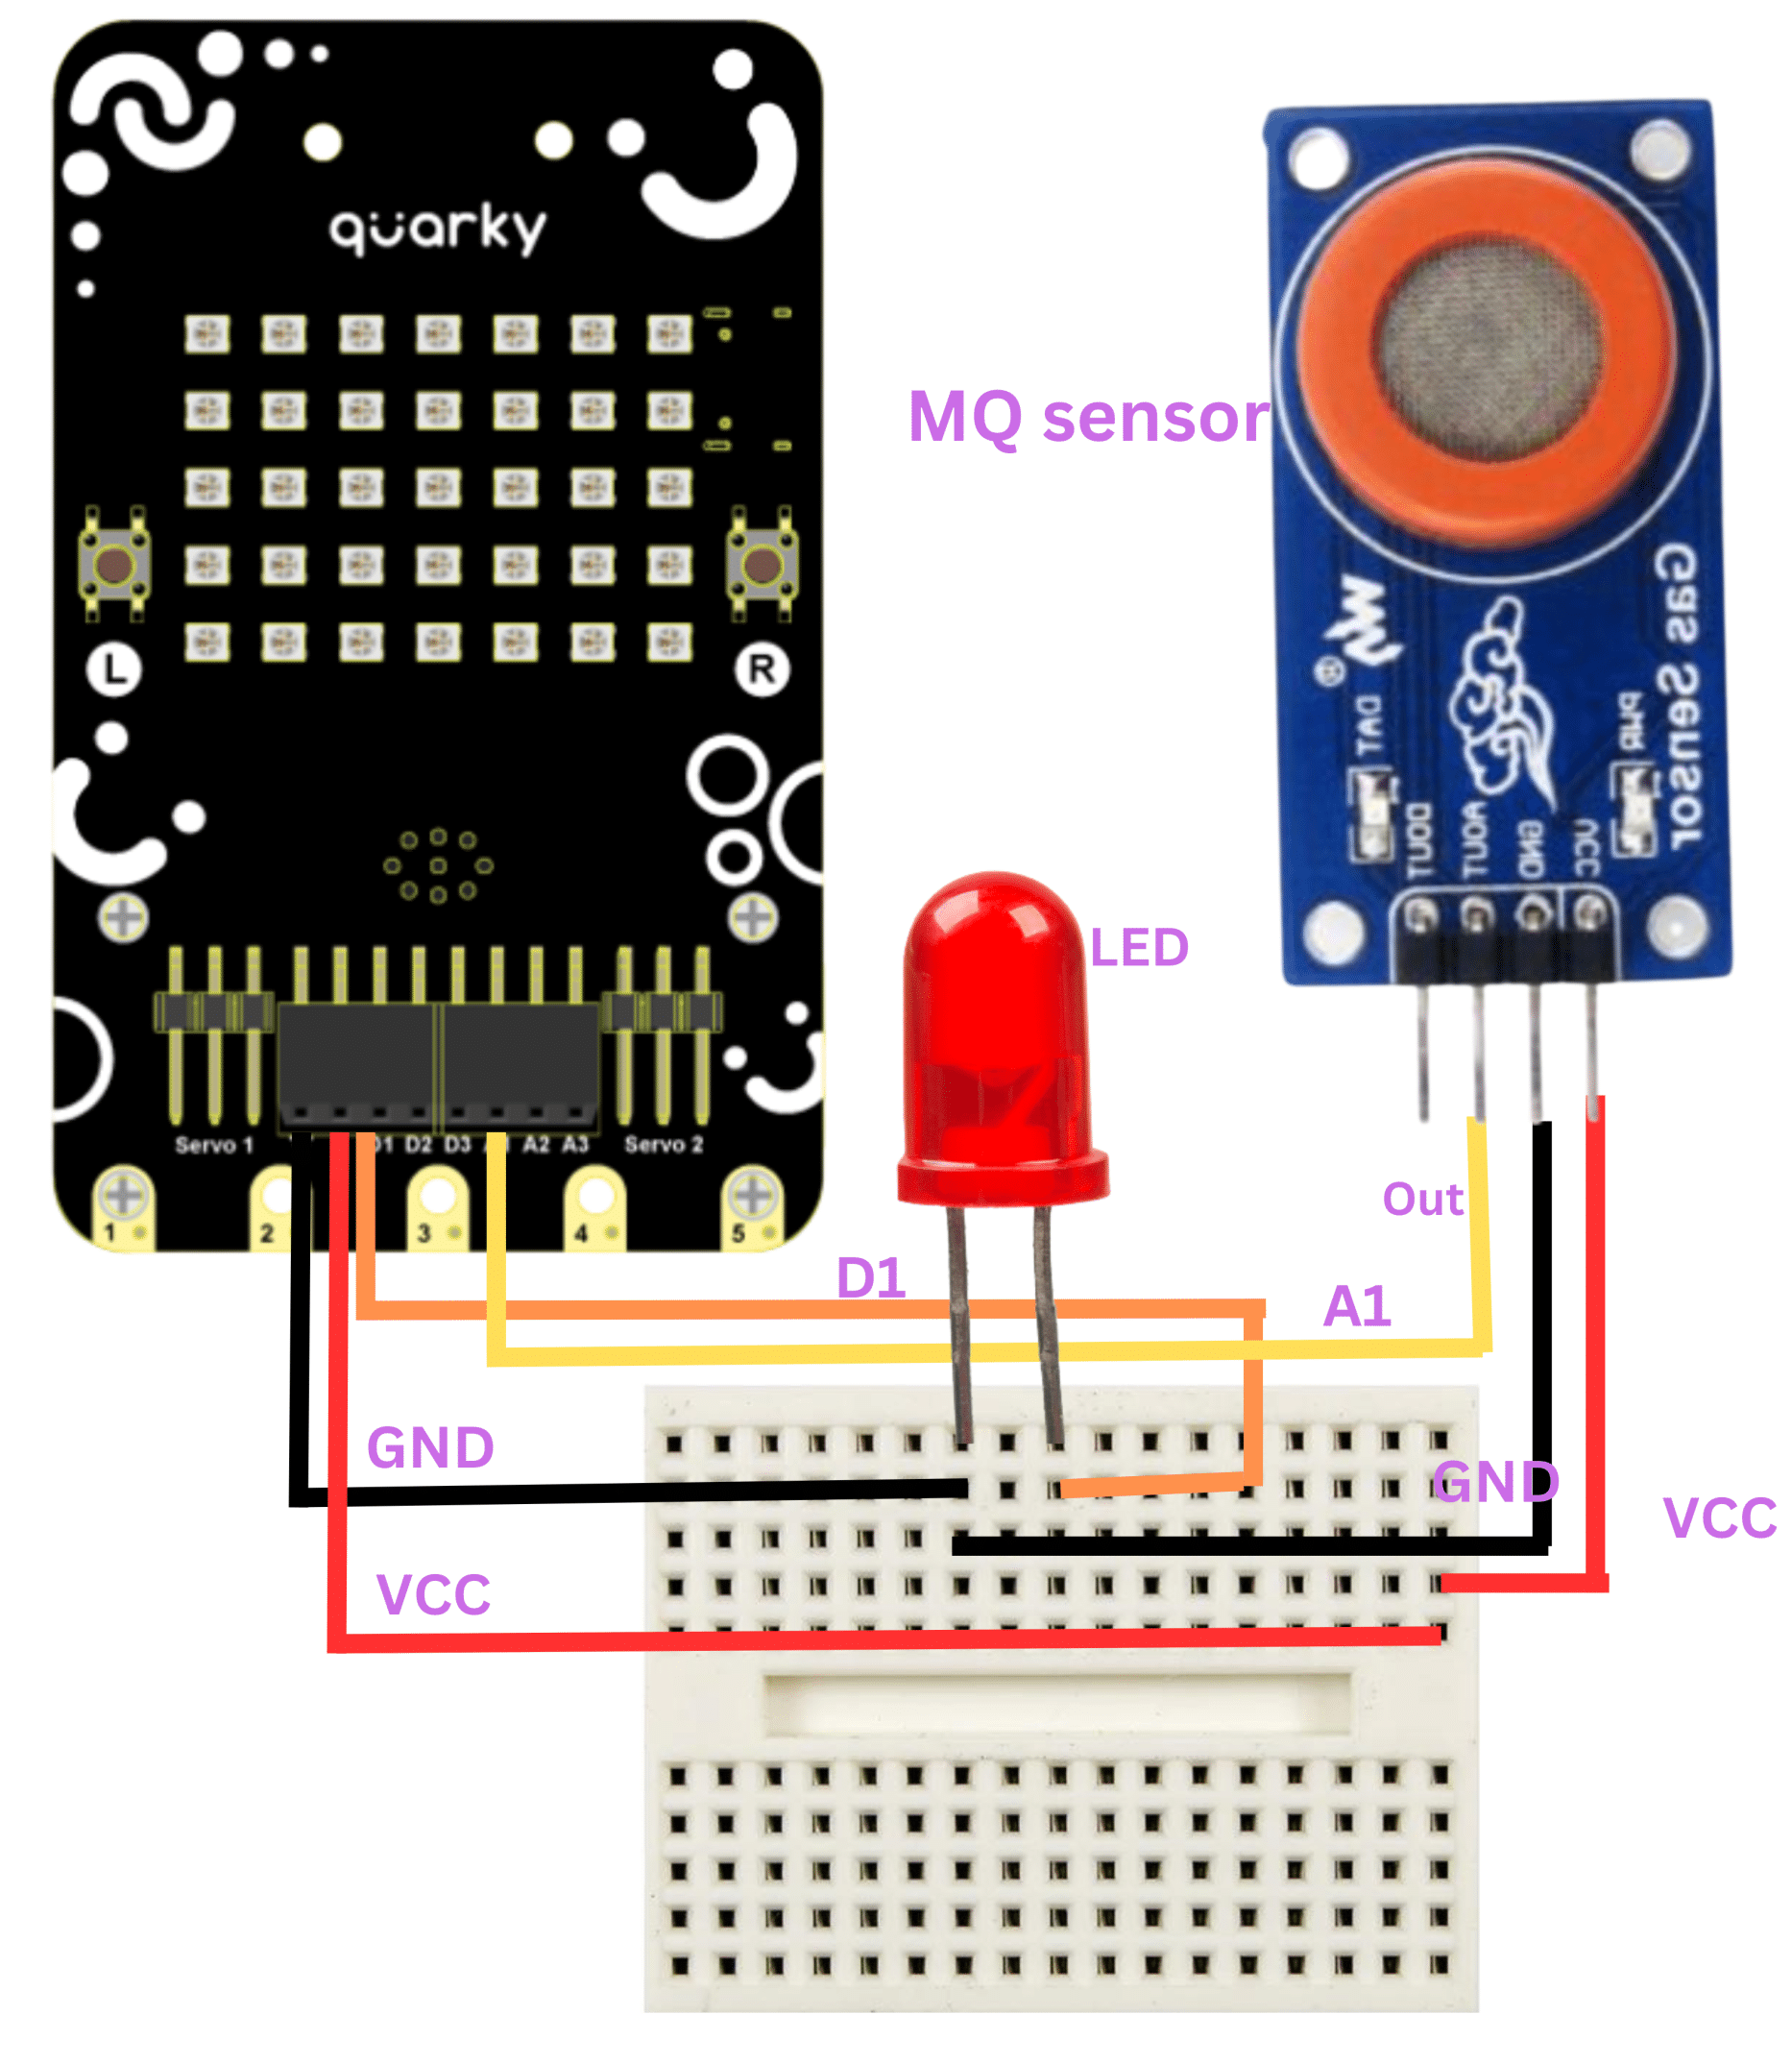
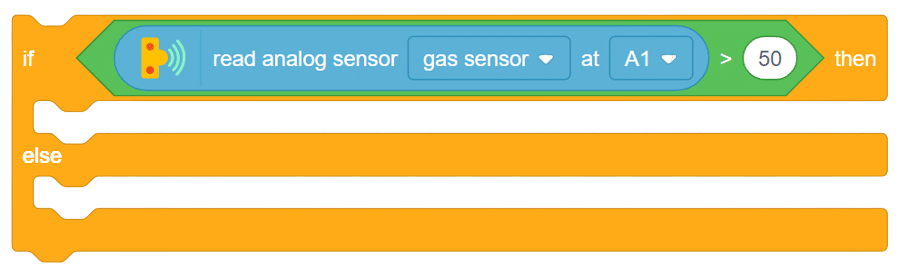
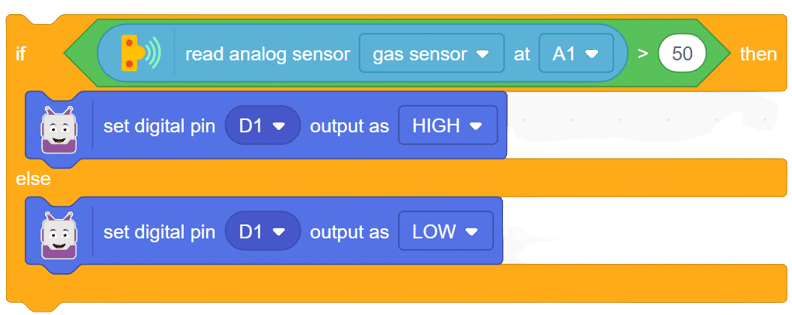
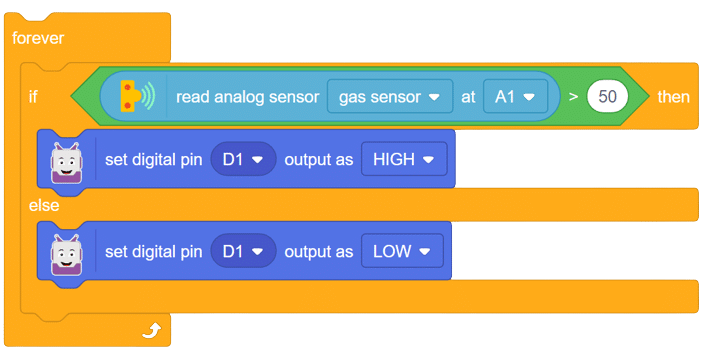
The MQ series of sensors comprises a range of gas detectors used to detect multiple gases like CO2, LPG, CO, and more. These sensors find applications in various scenarios, from detecting fire-induced smoke in buildings to detecting gas leaks, making them crucial for mining and other industries.
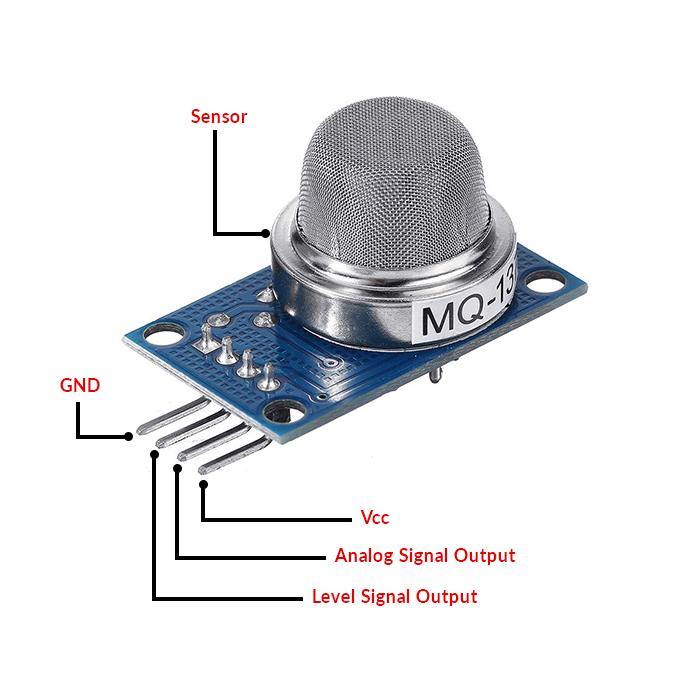
In this example, we will interface an MQ sensor with Quarky to specifically detect the presence of alcohol. Our objective is to detect alcohol levels and trigger an alarm if they exceed a certain limit. Let’s embark on this exciting journey of gas detection with Quarky!
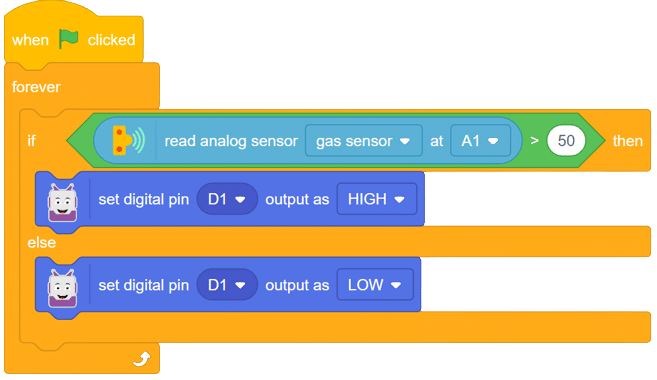
With this exciting project, you have learned how to interface an MQ sensor with Quarky to detect alcohol gas levels. Explore the diverse applications of MQ sensors, from detecting smoke in buildings to monitoring gas leaks in industrial settings. Create your own gas detection system with Quarky, and unleash the potential of gas sensing technology! Keep experimenting, and the world of robotics and AI will become your playground!
Output gifs are need to be updated.
Steps:
Script

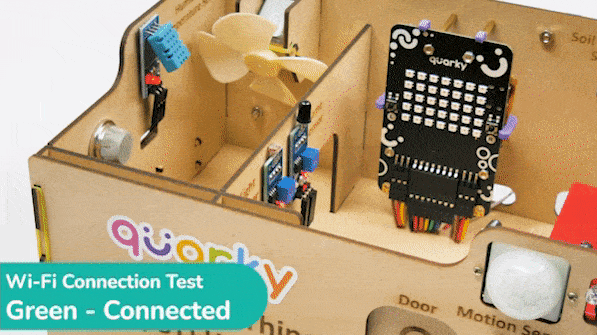
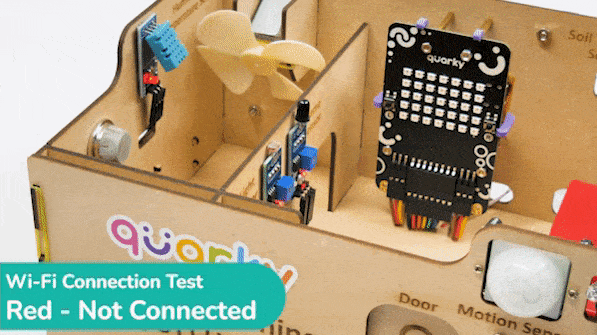
In this example, we look at how to establish and see if the Wi-Fi is connected to Quarky or not.
The following code can be used for it:
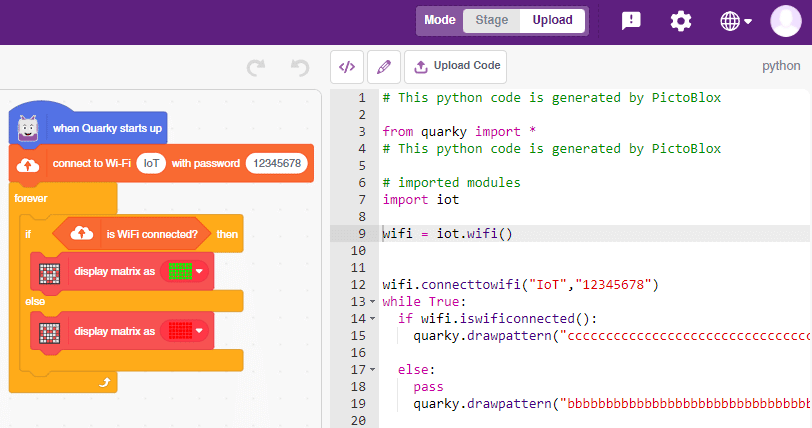
The following code is generated by PictoBlox:
# This python code is generated by PictoBlox

from quarky import *
# This python code is generated by PictoBlox

# imported modules
import iot

wifi = iot.wifi()


wifi.connecttowifi("IoT","12345678")
while True:
	if wifi.iswificonnected():
		quarky.drawpattern("ccccccccccccccccccccccccccccccccccc")

	else:
		pass
		quarky.drawpattern("bbbbbbbbbbbbbbbbbbbbbbbbbbbbbbbbbbb")

This project demonstrates how to use Machine Learning Environment to make a machine–learning model that identifies the hand gestures and makes the Quadruped move accordingly. learning model that identifies the hand gestures and makes the qudruped move accordingly.
We are going to use the Hand Classifier of the Machine Learning Environment. The model works by analyzing your hand position with the help of 21 data points.
Follow the steps below:

There are 2 things that you have to provide in a class:
You can perform the following operations to manipulate the data into a class.
We are going to use the Hand Classifier of the Machine Learning Environment.
After data is added, it’s fit to be used in model training. In order to do this, we have to train the model. By training the model, we extract meaningful information from the hand pose, and that in turn updates the weights. Once these weights are saved, we can use our model to make predictions on data previously unseen.
The accuracy of the model should increase over time. The x-axis of the graph shows the epochs, and the y-axis represents the accuracy at the corresponding epoch. Remember, the higher the reading in the accuracy graph, the better the model. The range of the accuracy is 0 to 1.
The model will return the probability of the input belonging to the classes.You will have the following output coming from the model.
The Quadruped will move according to the following logic:
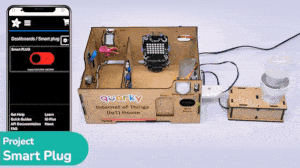
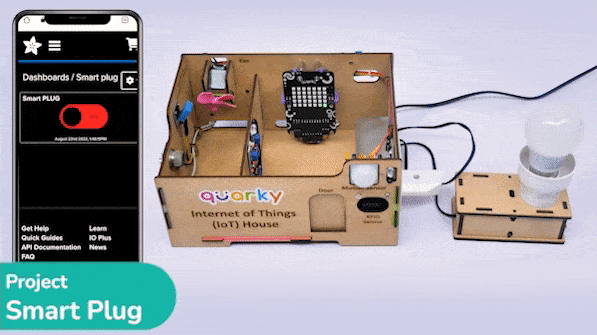
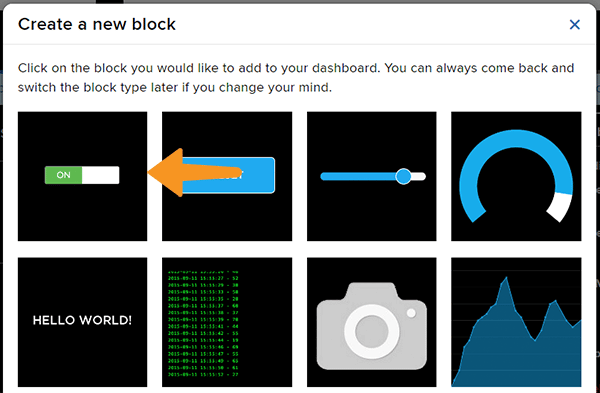
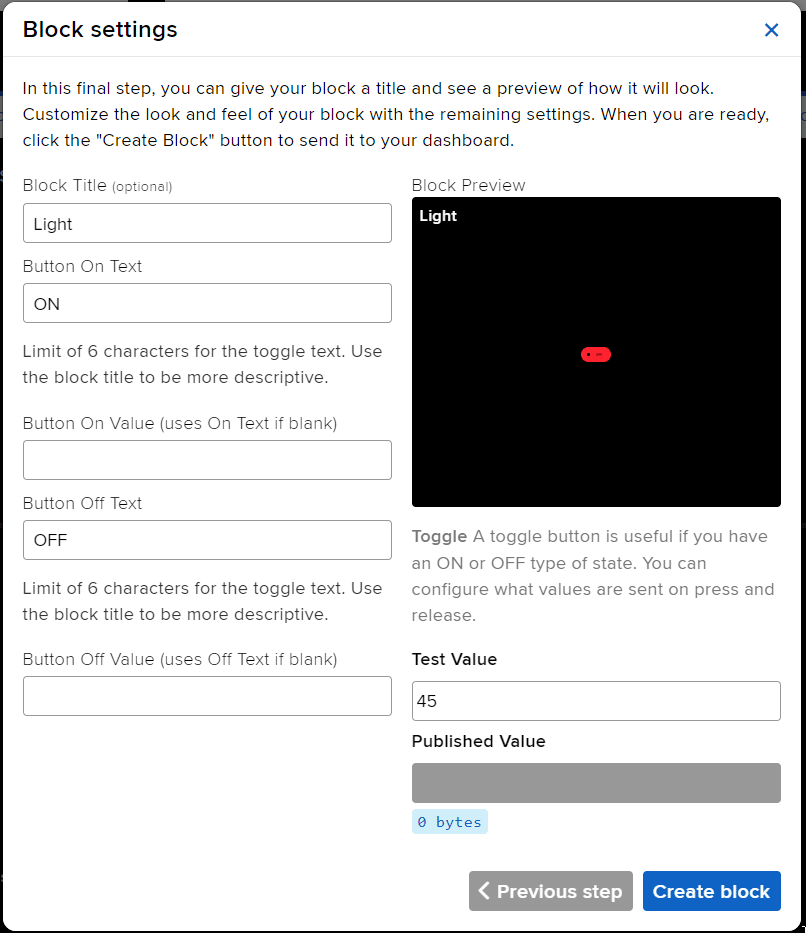
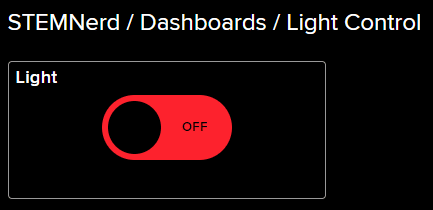
The project demonstrates how to create a smart plug that can be controlled by an IoT device and that can retrieve information from the cloud. The smart plug can be used to turn lights ON and OFF.
We will be using Adafruit IO for creating a switch on the cloud. Follow the instructions:
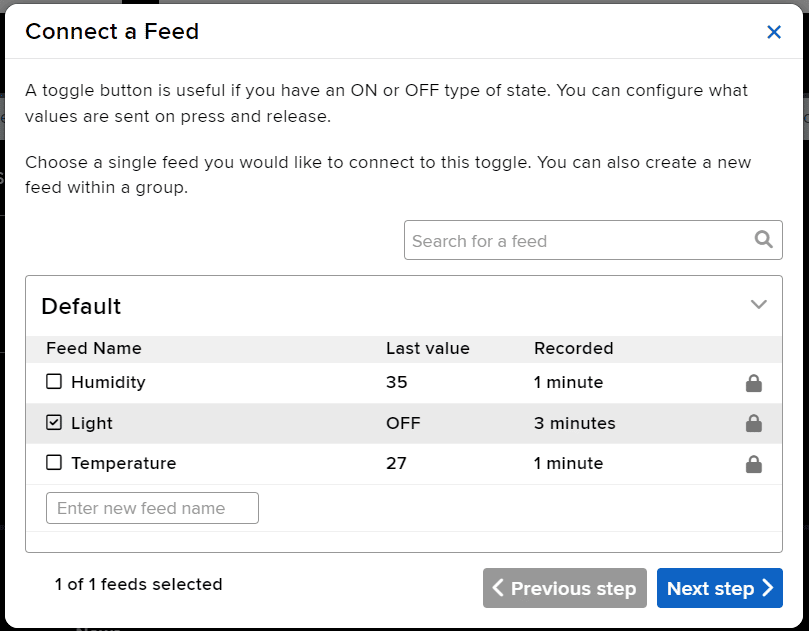
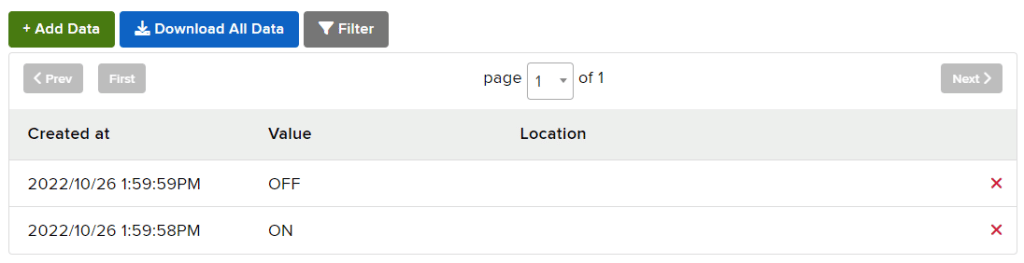
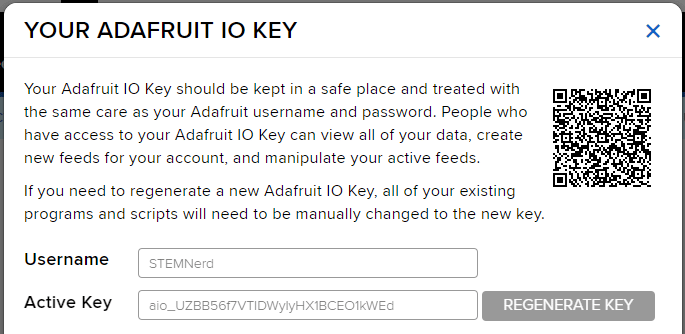
You can find the information about your account once you log in from here:

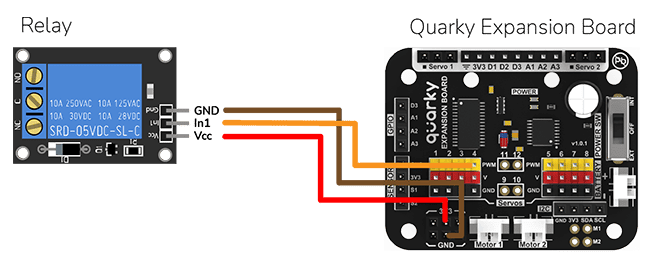
The bulb is connected to the smart plug which is controlled with a relay.
If the relay is ON, the smart switch gets ON, turning on the light. The relay has the following connections:
This Python code connects to Adafruit IO using the given credentials and checks if the light is ON or OFF. If the light is ON, then the code sets the relay to 0 (ON) and sets the LED to white with a brightness of 100. If the light is OFF, then the code sets the relay to 1 (OFF) and sets the LED to black with a brightness of 100. The code runs in an infinite loop to continuously check the status of the light.
#This code is used to control the light in an IOT house.
#The code connects to Adafruit IO using the given credentials and checks if the light is "ON" or "OFF".
#If the light is "ON" then the code sets the relay to 0 (ON) and sets the LED to white with a brightness of 100.
#If the light is "OFF" then the code sets the relay to 1 (OFF) and sets the LED to black with a brightness of 100.

quarky = Quarky() #Creating an object for the Quarky class

adaio = AdaIO() #Creating an object for the AdaIO class
house = IoTHouse() #Creating an object for the IoTHouse class

adaio.connecttoadafruitio("STEMNerd", "aio_UZBB56f7VTIDWyIyHX1BCEO1kWEd") # Connecting to Adafruit IO using the given credentials

while True: # Loop that runs forever
  if (adaio.getdata("Light") == "ON"): #Checking if the light is "ON"
    house.setrelay(0, "pwm4") # Setting the relay to 0
    quarky.setled(1, 1, [255, 255, 255], 100) #Setting the LED to white with a brightness of 100

  if (adaio.getdata("Light") == "OFF"): #Checking if the light is "OFF"
    house.setrelay(1, "pwm4") # Setting the relay to 1
    quarky.setled(1, 1, [0, 0, 0], 100) #Setting the LED to black with a brightness of 100
You can also make the IoT Enabled Smart Plug work independently of PictoBlox using the Upload Mode. For that switch to upload mode and replace the when green flag clicked block with when Quarky starts up the block.

This code connects to a wifi network and an Adafruit IO account, creates an object for the IoTHouse class, and then sets a relay and LED based on the data from the Adafruit IO account. The loop runs forever and will always check if the wifi is connected and if the light is “ON“ or “OFF“. If the wifi is not connected, it will set the LED to red.
from quarky import *

# Connect to a wifi network
import iot
import iothouse
wifi = iot.wifi()
wifi.connecttowifi("IoT", "12345678")

# Connect to an adafruit IO account
adaio = iot.AdaIO()
adaio.connecttoadafruitio("STEMNerd", "aio_UZBB56f7VTIDWyIyHX1BCEO1kWEd")

#Creating an object for the IoTHouse class
house = iothouse.iothouse()

while True:  # Loop that runs forever
  # Check if the wifi is connected
  if wifi.iswificonnected():
    if (adaio.getdata("Light") == "ON"):  #Checking if the light is "ON"
      house.setrelay(0, "pwm4")  # Setting the relay to 0
      quarky.setled(1, 1, [255, 255, 255], 100)  #Setting the LED to white with a brightness of 100

    if (adaio.getdata("Light") == "OFF"):  #Checking if the light is "OFF"
      house.setrelay(1, "pwm4")  # Setting the relay to 1
      quarky.setled(1, 1, [0, 0, 0], 100)  #Setting the LED to black with a brightness of 100

  else:
    # Set LED 1 to red
    quarky.setled(1, 1, [255, 0, 0], 100)
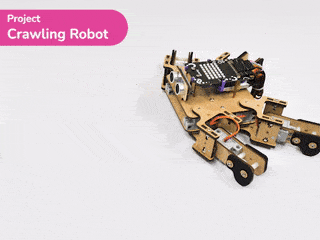
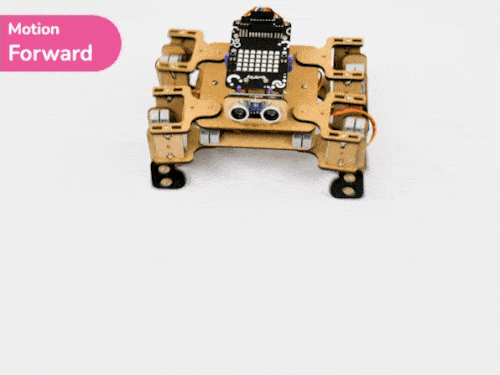
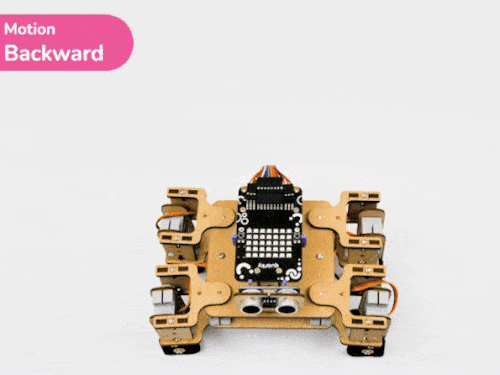
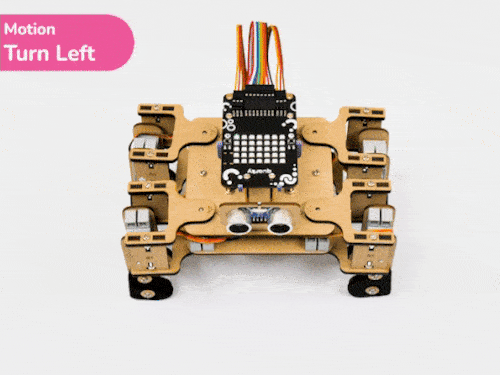
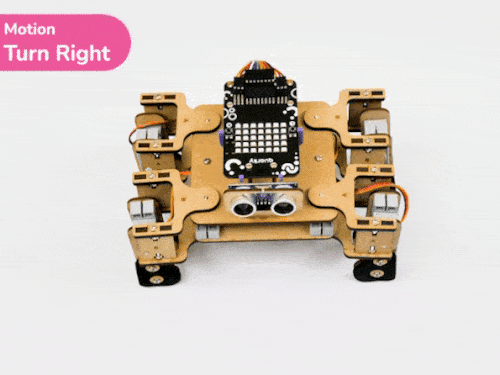
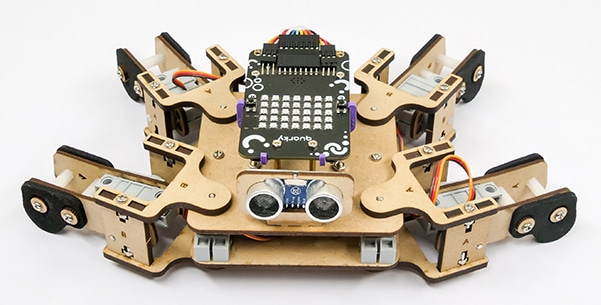
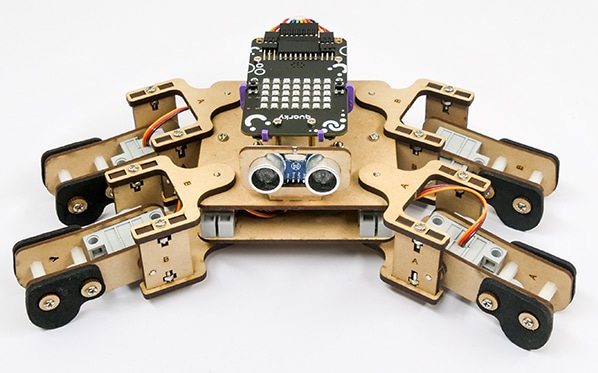
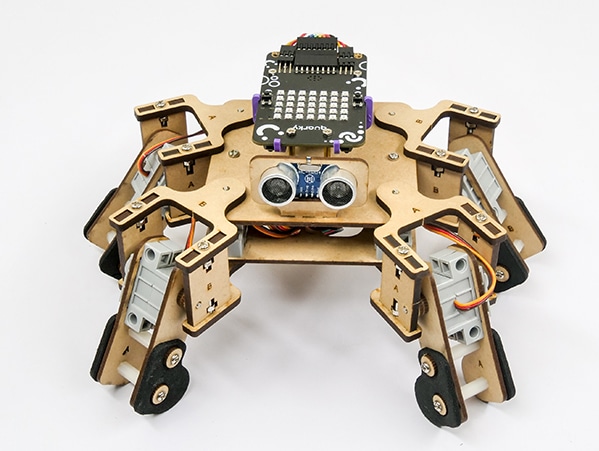
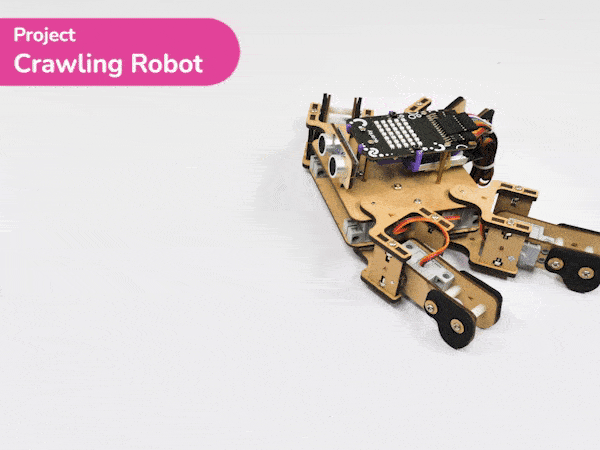
The project demonstrates how to make the crawling motion with Quadruped using individual servo control.

For this project, we are using the set servos () () () () () () () () at () speed block that sets the servo motors of the quadruped to the specified angles at the specified speed.
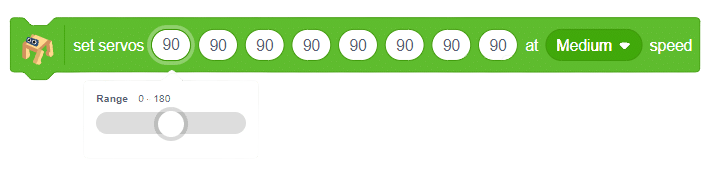
There are four positions of the robot we are going to make to create the crawling motion:


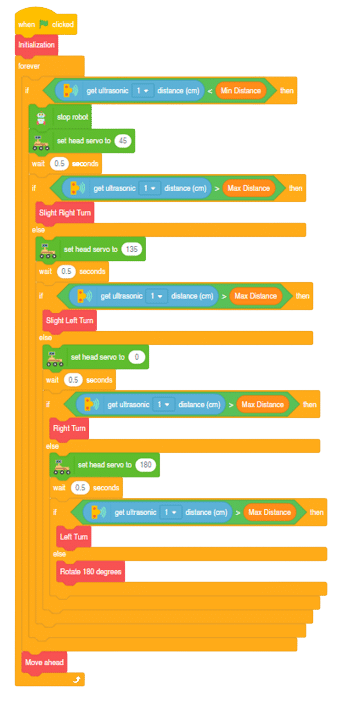
This project of obstacle avoidance is for a robot that will move around and look for obstacles. It uses an ultrasonic sensor to measure the distance. If the distance is less than 20 cm, it will stop and look in both directions to see if it can move forward. If it can, it will turn left or right. If not, it will make a U-turn.
Main Functions:
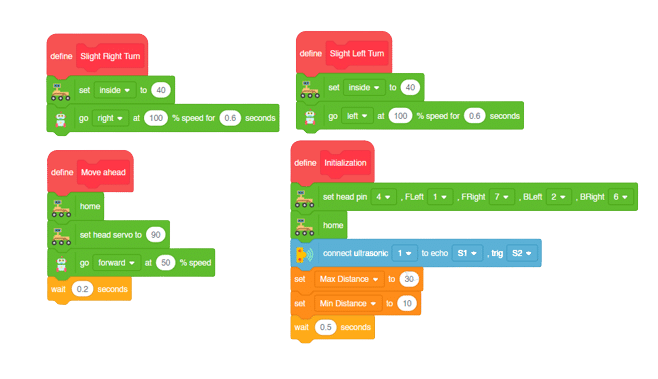
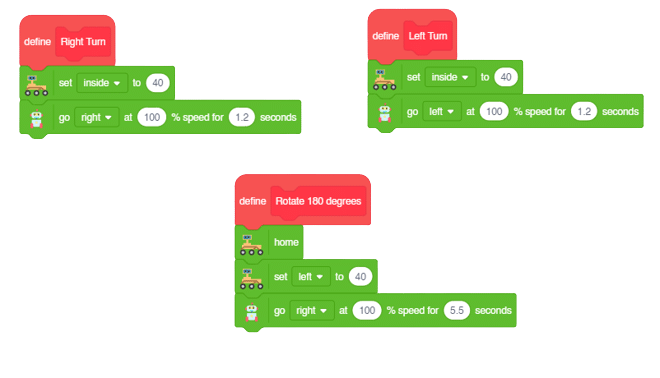
Final Main Logic:


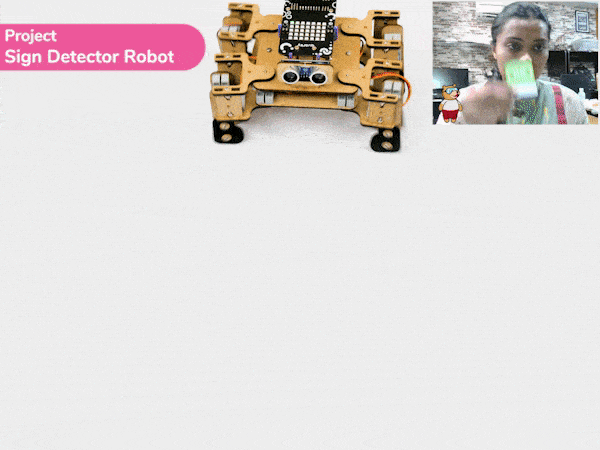
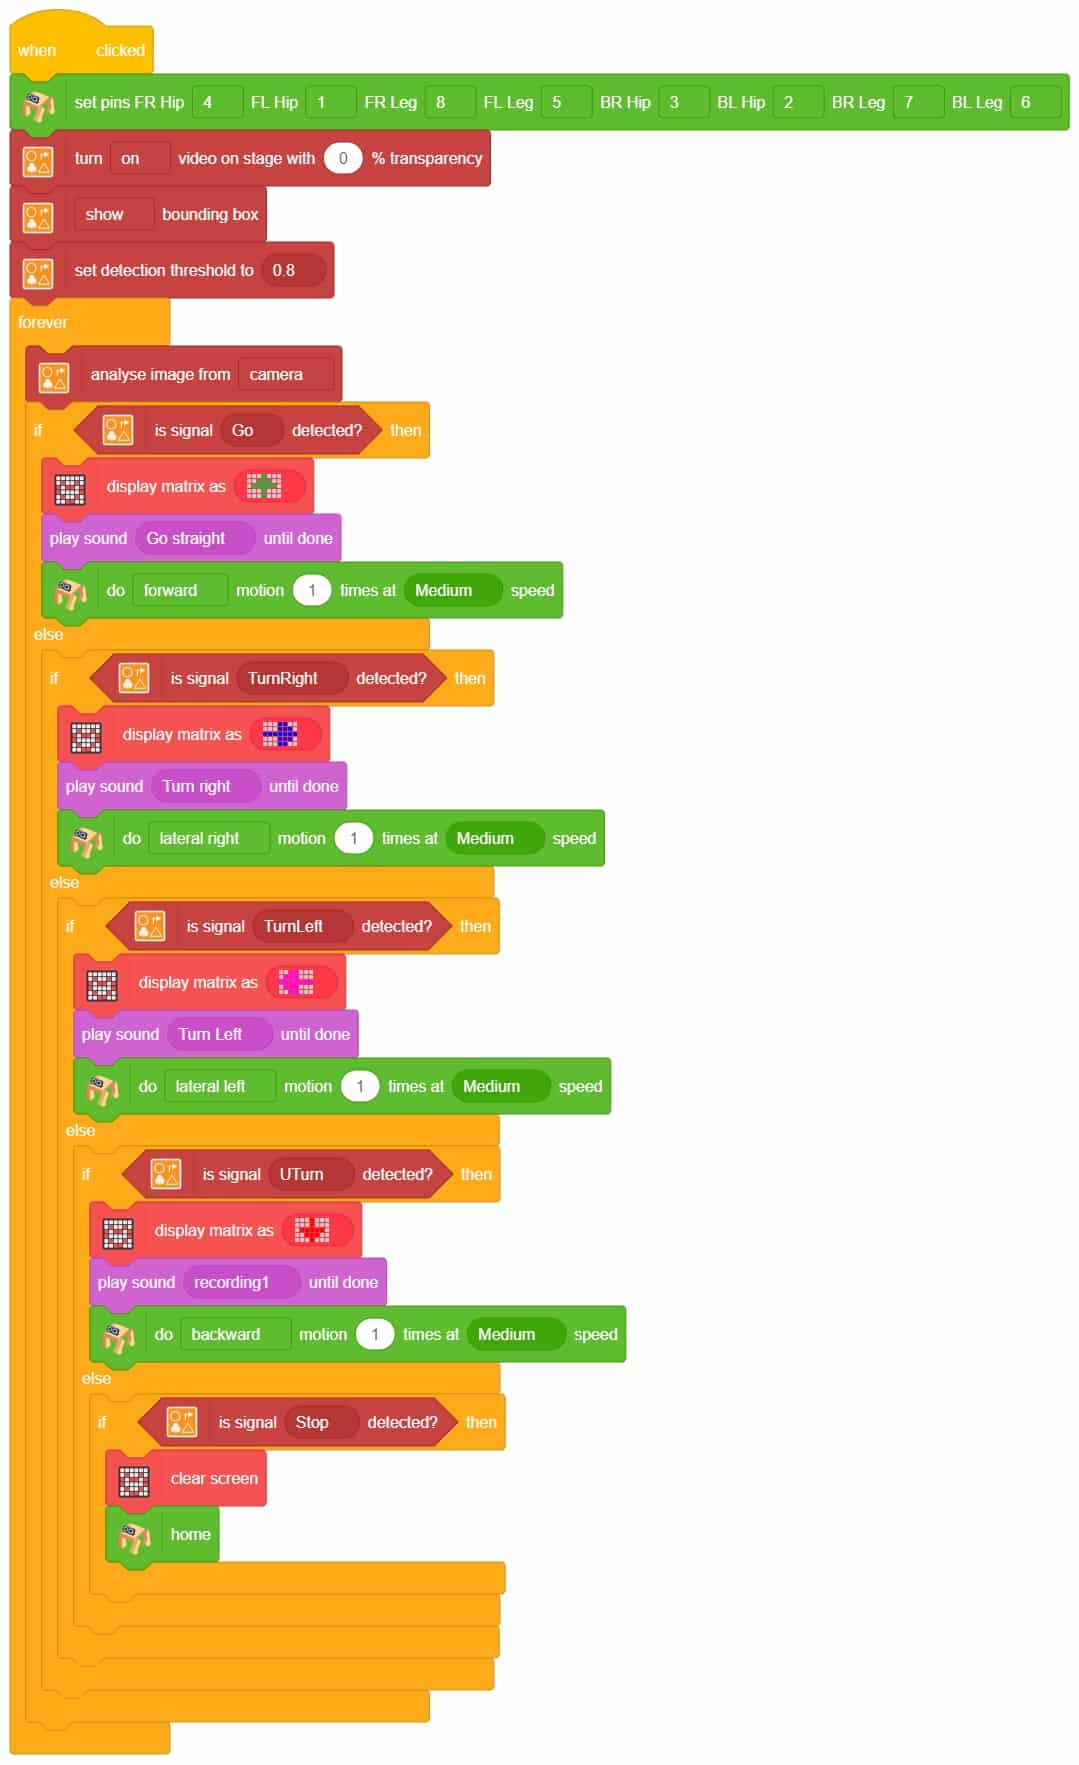
A sign detector humanoid robot is a robot that can recognize and interpret certain signs or signals, such as hand gestures or verbal commands, given by a human. The robot uses sensors, cameras, and machine learning algorithms to detect and understand the sign, and then performs a corresponding action based on the signal detected.
These robots are often used in manufacturing, healthcare, and customer service industries to assist with tasks that require human-like interaction and decision making.
sprite = Sprite('Tobi')
quarky = Quarky()


import time
humanoid = Humanoid(7, 2, 6, 3, 8, 1)
recocards = RecognitionCards()
recocards.video("on flipped")
recocards.enablebox()
recocards.setthreshold(0.6)

while True:
  recocards.analysecamera()
  sign = recocards.classname()
  sprite.say(sign + ' detected')
  if recocards.count() > 0:
    if 'Go' in sign:
      humanoid.move("forward", 1000, 1)

    if 'Turn Left' in sign:
      humanoid.move("backward", 1000, 1)

    if 'Turn Right' in sign:
      humanoid.move("left", 1000, 1)

    if 'U Turn' in sign:
      humanoid.move("backward", 1000, 1)


This project demonstrates how to use Machine Learning Environment to make a machine–learning model that identifies hand gestures and makes the Mars Rover move accordingly.
We are going to use the Hand Classifier of the Machine Learning Environment. The model works by analyzing your hand position with the help of 21 data points.
Follow the steps below:
There are 2 things that you have to provide in a class:
You can perform the following operations to manipulate the data into a class.
After data is added, it’s fit to be used in model training. In order to do this, we have to train the model. By training the model, we extract meaningful information from the hand pose, and that in turn updates the weights. Once these weights are saved, we can use our model to make predictions on data previously unseen.
The accuracy of the model should increase over time. The x-axis of the graph shows the epochs, and the y-axis represents the accuracy at the corresponding epoch. Remember, the higher the reading in the accuracy graph, the better the model. The range of the accuracy is 0 to 1.
To test the model, simply enter the input values in the “Testing” panel and click on the “Predict” button.
The model will return the probability of the input belonging to the classes.
Click on the “Export Model” button on the top right of the Testing box, and PictoBlox will load your model into the Python Coding Environment if you have opened the ML Environment in Python Coding.
The following code appears in the Python Editor of the selected sprite.
####################imports####################
# Do not change

import numpy as np
import tensorflow as tf
import time
sprite=Sprite('Tobi')
import time
quarky = Quarky()
rover = MarsRover(4, 1, 7, 2, 6)
# Do not change
####################imports####################

#Following are the model and video capture configurations
# Do not change

model=tf.keras.models.load_model(
    "num_model.h5",
    custom_objects=None,
    compile=True,
    options=None)
pose = Posenet()                                                    # Initializing Posenet
pose.enablebox()                                                    # Enabling video capture box
pose.video("on",0)                                                  # Taking video input
class_list=['forward','backward','left','right','stop']                  # List of all the classes
def runQuarky(predicted_class):
    if pose.ishanddetected():
      if predicted_class == "forward":
        rover.home()
        rover.setinangle(0)
        quarky.runtimedrobot("F",100,3)
      if predicted_class == "backward":
        rover.home()
        rover.setinangle(0)
        quarky.runtimedrobot("B",100,3)
      if predicted_class == "left":
        rover.home()
        rover.setinangle(40)
        quarky.runtimedrobot("L",100,3)
      if predicted_class == "right":
        rover.home()
        rover.setinangle(40)
        quarky.runtimedrobot("R",100,3)
      if predicted_class == "stop":
        quarky.stoprobot()
    else:
      quarky.stoprobot()

# Do not change
###############################################

#This is the while loop block, computations happen here
# Do not change

while True:
  pose.analysehand()                                             # Using Posenet to analyse hand pose
  coordinate_xy=[]

    # for loop to iterate through 21 points of recognition
  for i in range(21):
    if(pose.gethandposition(1,i,0)!="NULL"  or pose.gethandposition(2,i,0)!="NULL"):
      coordinate_xy.append(int(240+float(pose.gethandposition(1,i,0))))
      coordinate_xy.append(int(180-float(pose.gethandposition(2,i,0))))
    else:
      coordinate_xy.append(0)
      coordinate_xy.append(0)

  coordinate_xy_tensor = tf.expand_dims(coordinate_xy, 0)        # Expanding the dimension of the coordinate list
  predict=model.predict(coordinate_xy_tensor)                    # Making an initial prediction using the model
  predict_index=np.argmax(predict[0], axis=0)                    # Generating index out of the prediction
  predicted_class=class_list[predict_index]                      # Tallying the index with class list
  print(predicted_class)
  runQuarky(predicted_class)

  # Do not change
def runQuarky(predicted_class):
    if pose.ishanddetected():
      if predicted_class == "forward":
        rover.home()
        rover.setinangle(0)
        quarky.runtimedrobot("F",100,3)
      if predicted_class == "backward":
        rover.home()
        rover.setinangle(0)
        quarky.runtimedrobot("B",100,3)
      if predicted_class == "left":
        rover.home()
        rover.setinangle(40)
        quarky.runtimedrobot("L",100,3)
      if predicted_class == "right":
        rover.home()
        rover.setinangle(40)
        quarky.runtimedrobot("R",100,3)
      if predicted_class == "stop":
        quarky.stoprobot()
    else:
      quarky.stoprobot()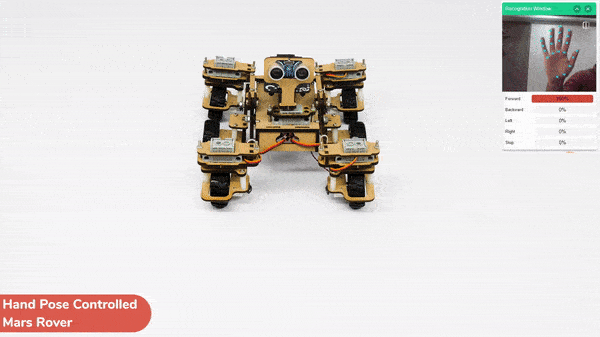
A face-tracking robot is a type of robot that uses sensors and algorithms to detect and track human faces in real time. The robot’s sensors, such as cameras or infrared sensors, capture images or videos of the surrounding environment and use computer vision techniques to analyze the data and identify human faces.
Face-tracking robots have many potential applications, including in security systems, entertainment, and personal robotics. For example, a face-tracking robot could be used in a museum or amusement park to interact with visitors, or in a home as a companion robot that can recognize and follow the faces of family members.
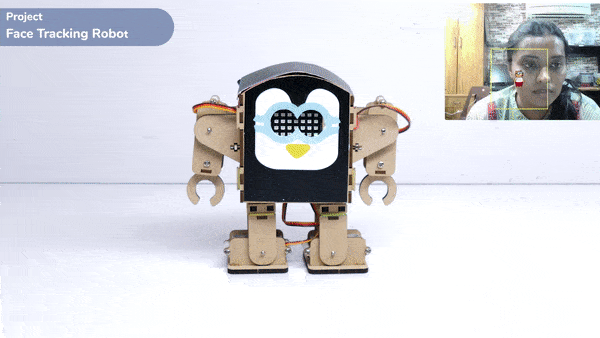
One of the most fascinating activities is face tracking, in which the Humanoid can detect a face and move its head in the same direction as yours. How intriguing it sounds, so let’s get started with the coding for a face-tracking Humanoid robot.

Our next step is to check whether it is working right or not. Whenever your face will come in front of the camera, it should detect it and as you move to the right or left, the head of your Humanoid robot should also move accordingly.

In this activity, we will try to create a new Machine Learning model that will be able to identify and detect different types of hand poses and that can help us to control the Mecanum Gripper Robot. This activity can be quite fun and by knowing the process, you can develop your own customized hand pose classifier model easily!
We will use the same model that we have created in the previous Hand Pose Controlled Mecanum model to avoid any misdirection and confusion.
Note: You can always create your own model and use it to perform any type of functions as per your choice. This example proves the same point and helps you understand well the concept of Machine Learning models and environment.
Follow the steps below:
There are 2 things that you have to provide in a class:
You can perform the following operations to manipulate the data into a class.
After data is added, it’s fit to be used in model training. In order to do this, we have to train the model. By training the model, we extract meaningful information from the hand pose, and that in turn updates the weights. Once these weights are saved, we can use our model to make predictions on data previously unseen.
The accuracy of the model should increase over time. The x-axis of the graph shows the epochs, and the y-axis represents the accuracy at the corresponding epoch. Remember, the higher the reading in the accuracy graph, the better the model. The range of the accuracy is 0 to 1.
To test the model, simply enter the input values in the “Testing” panel and click on the “Predict” button.
The model will return the probability of the input belonging to the classes.
Click on the “Export Model” button on the top right of the Testing box, and PictoBlox will load your model into the Block Coding Environment if you have opened the ML Environment in the Block Coding.
The mecanum will move according to the following logic:
Initialization
Main Code
Forward-Backward Motion:
Circular Right-Left Motion:
Lateral Right-Left Motions:
Gripper Mechanism with Hand Gestures:
In this activity, we will try to create a new Machine Learning model that will be able to identify and detect different types of hand poses and that can help us to control the Mecanum Gripper Robot. This activity can be quite fun and by knowing the process, you can develop your own customized hand pose classifier model easily!
We will use the same model that we have created in the previous Hand Pose Controlled Mecanum model to avoid any misdirection and confusion.
Note: You can always create your own model and use it to perform any type of functions as per your choice. This example proves the same point and helps you understand well the concept of Machine Learning models and environment.
Follow the steps below:

There are 2 things that you have to provide in a class:
You can perform the following operations to manipulate the data into a class.
After data is added, it’s fit to be used in model training. In order to do this, we have to train the model. By training the model, we extract meaningful information from the hand pose, and that in turn updates the weights. Once these weights are saved, we can use our model to make predictions on data previously unseen.
The accuracy of the model should increase over time. The x-axis of the graph shows the epochs, and the y-axis represents the accuracy at the corresponding epoch. Remember, the higher the reading in the accuracy graph, the better the model. The range of the accuracy is 0 to 1.
To test the model, simply enter the input values in the “Testing” panel and click on the “Predict” button.
The model will return the probability of the input belonging to the classes.
Click on the “Export Model” button on the top right of the Testing box, and PictoBlox will load your model into the Python Coding Environment if you have opened the ML Environment in the Python Coding.
The mecanum will move according to the following logic:
Logical Code:
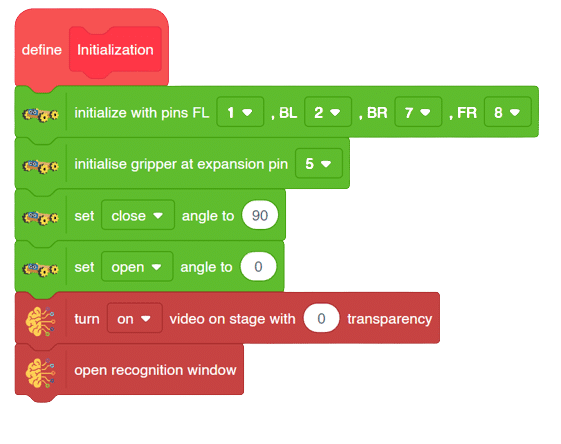
meca=Mecanum(1,2,7,8)
meca.initialisegripper(5)
meca.setcloseangle(90)
meca.setopenangle(0)

def runmecanum(predicted_class):
  if pose.ishanddetected():
    if predicted_class=="Forward":
      meca.runtimedrobot("forward",100,2)
    if predicted_class=="Backward":
      meca.runtimedrobot("backward",100,2)
    if predicted_class=="Stop":
      meca.closearm()
    if predicted_class=="LateralRight":
      meca.runtimedrobot("lateral right",100,2)
    if predicted_class=="LateralLeft":
      meca.runtimedrobot("lateral left",100,2)
    if predicted_class=="NormalRight":
      meca.runtimedrobot("circular right",100,1)
    if predicted_class=="NormalLeft":
      meca.runtimedrobot("circular left",100,1)
    if predicted_class=="CircularMotion":
      meca.openarm()
Final Code
####################imports####################
# Do not change

import numpy as np
import tensorflow as tf
import time

# Do not change
####################imports####################

#Following are the model and video capture configurations
# Do not change

model=tf.keras.models.load_model(
    "num_model.h5",
    custom_objects=None,
    compile=True,
    options=None)
pose = Posenet()                                                    # Initializing Posenet
pose.enablebox()                                                    # Enabling video capture box
pose.video("on",0)                                                  # Taking video input
class_list=['Forward','Backward','Stop','LateralRight','LateralLeft','NormalRight','NormalLeft','CircularMotion']                  # List of all the classes
meca=Mecanum(1,2,7,8)
meca.initialisegripper(5)
meca.setcloseangle(90)
meca.setopenangle(0)

def runmecanum(predicted_class):
  if pose.ishanddetected():
    if predicted_class=="Forward":
      meca.runtimedrobot("forward",100,2)
    if predicted_class=="Backward":
      meca.runtimedrobot("backward",100,2)
    if predicted_class=="Stop":
      meca.closearm()
    if predicted_class=="LateralRight":
      meca.runtimedrobot("lateral right",100,2)
    if predicted_class=="LateralLeft":
      meca.runtimedrobot("lateral left",100,2)
    if predicted_class=="NormalRight":
      meca.runtimedrobot("circular right",100,1)
    if predicted_class=="NormalLeft":
      meca.runtimedrobot("circular left",100,1)
    if predicted_class=="CircularMotion":
      meca.openarm()
# Do not change
###############################################

#This is the while loop block, computations happen here
# Do not change

while True:
  pose.analysehand()                                             # Using Posenet to analyse hand pose
  coordinate_xy=[]

    # for loop to iterate through 21 points of recognition
  for i in range(21):
    if(pose.gethandposition(1,i,0)!="NULL"  or pose.gethandposition(2,i,0)!="NULL"):
      coordinate_xy.append(int(240+float(pose.gethandposition(1,i,0))))
      coordinate_xy.append(int(180-float(pose.gethandposition(2,i,0))))
    else:
      coordinate_xy.append(0)
      coordinate_xy.append(0)

  coordinate_xy_tensor = tf.expand_dims(coordinate_xy, 0)        # Expanding the dimension of the coordinate list
  predict=model.predict(coordinate_xy_tensor)                    # Making an initial prediction using the model
  predict_index=np.argmax(predict[0], axis=0)                    # Generating index out of the prediction
  predicted_class=class_list[predict_index]                      # Tallying the index with class list
  print(predicted_class)
  runmecanum(predicted_class)
  # Do not change
Forward-Backward Motion:
Circular Right-Left Motion:
Lateral Right-Left Motions:
Gripper Mechanism with Hand Gestures:
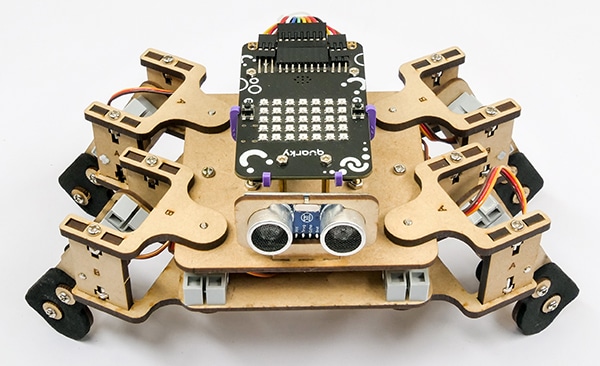
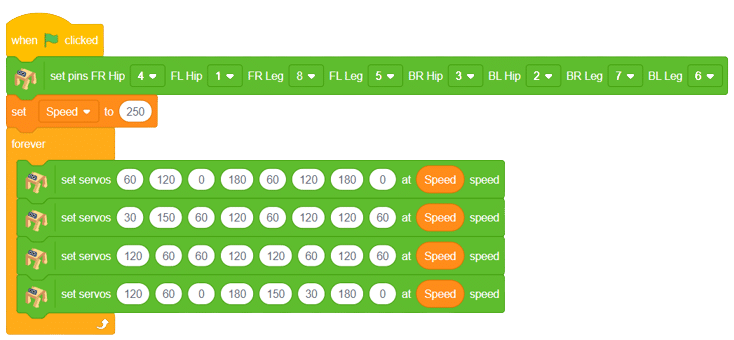
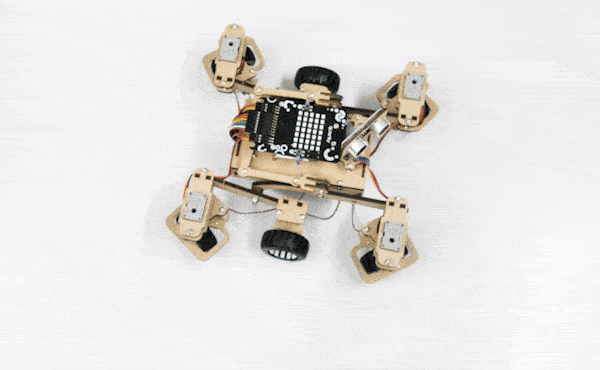
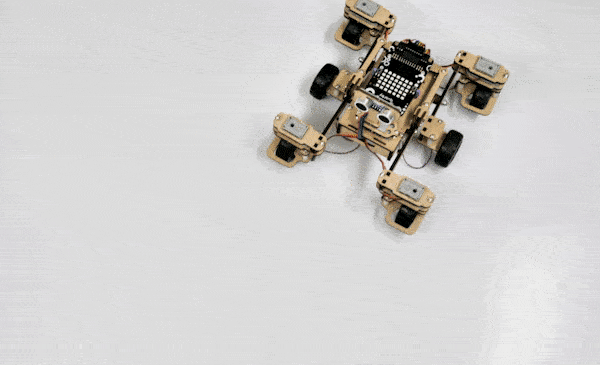
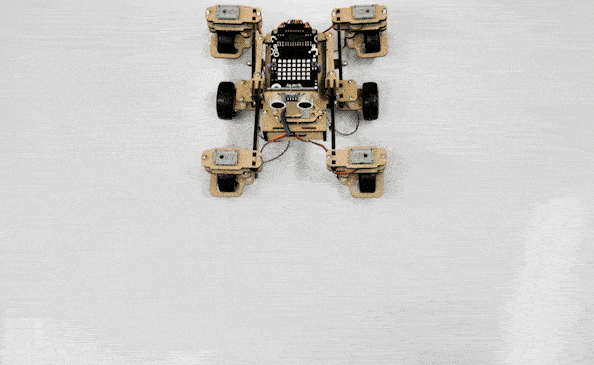
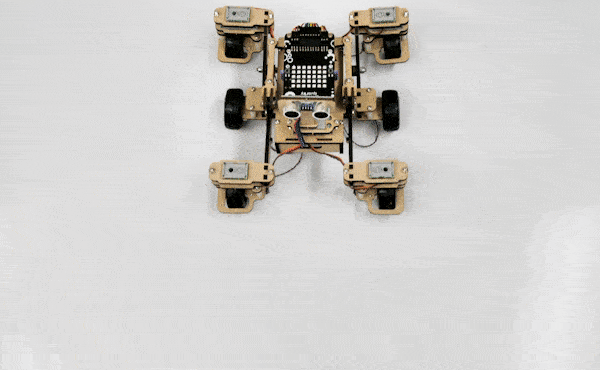
The project demonstrates how to make the crawling motion with Quadruped using individual servo control.
There are four positions of the robot we are going to make to create the crawling motion:
quad.moveall([60,120,0,180,60,120,180,0],Speed)
quad.moveall([30,150,60,120,60,120,120,60],Speed)
quad.moveall([120,60,60,120,120,60,120,60],Speed)
quad.moveall([120,60,0,180,150,30,180,0],Speed)
sprite = Sprite('Tobi')
quarky = Quarky()

quad=Quadruped(4,1,8,5,3,2,7,6)

Speed = 250
while True:
	quad.moveall([60,120,0,180,60,120,180,0],Speed)
	quad.moveall([30,150,60,120,60,120,120,60],Speed)
	quad.moveall([120,60,60,120,120,60,120,60],Speed)
	quad.moveall([120,60,0,180,150,30,180,0],Speed)
A sign detector Quadruped robot is a robot that can recognize and interpret certain signs or signals, such as hand gestures or verbal commands, given by a human. The robot uses sensors, cameras, and machine learning algorithms to detect and understand the sign, and then performs a corresponding action based on the signal detected.
These robots are often used in manufacturing, healthcare, and customer service industries to assist with tasks that require human-like interaction and decision-making.

Welcome to the world of Synonyms and Antonyms! Here, you can effortlessly explore alternative words that share similar or opposite meanings to a given term. Expand your vocabulary and enhance your language skills by diving into the vast realm of synonyms and antonyms.
Discover the richness of language as you uncover words that convey similar meanings and delve into the contrasting concepts that evoke different emotions. With the ChatGPT extension, you’ll have access to an immersive and interactive experience. Simply ask for synonyms or antonyms, and ChatGPT will provide you with a variety of options, broadening your understanding of word relationships.


The Chatbox with ChatGPT Extension is a versatile tool that enables developers to integrate AI-driven conversations into their applications. It leverages the power of the ChatGPT model to create interactive and intelligent chat experiences. With this extension, you can build chatbots, virtual assistants, or conversational agents that understand and respond to user inputs naturally.
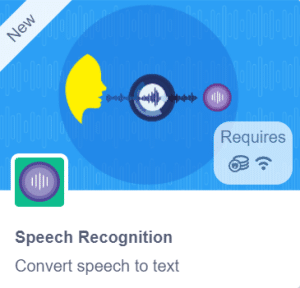
The code creates a character named “Tobi” and uses speech recognition to understand spoken commands. It then asks a question to the AI assistant (ChatGPT) and displays the response on the screen, converts it into speech, and makes the character “Tobi” speak the response.
sprite = Sprite('Tobi')
gpt = ChatGPT()
speech = TexttoSpeech()
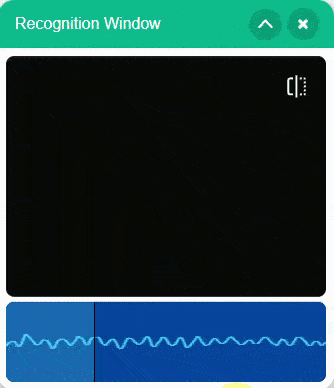
sr = SpeechRecognition()
ts = TexttoSpeech()
sr.analysespeech(4, "en-US")
command = sr.speechresult()
answer = command.lower()
# sprite.input("Provide a valid word")
# answer= str(sprite.answer())
gpt.askOnChatGPT("AIAssistant", answer)
# Ask on chatGPT other OPTION "friendAI" "sarcasticAI"
result=gpt.chatGPTresult()
print(result)
speech.speak(result)
sprite.say(result,5)

I asked ChatGPT for a joke, and it responded with an interesting response.


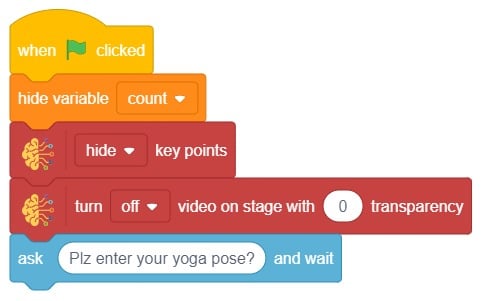
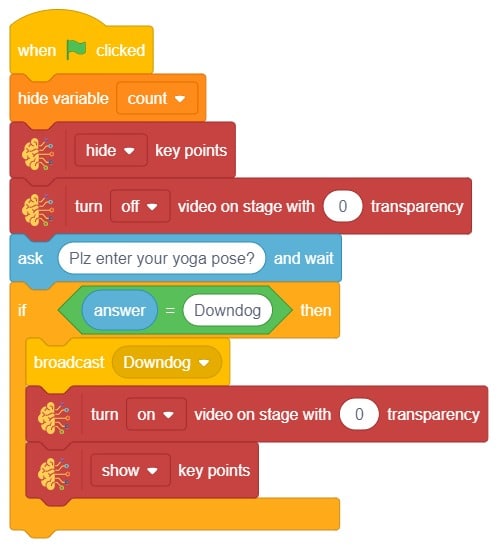
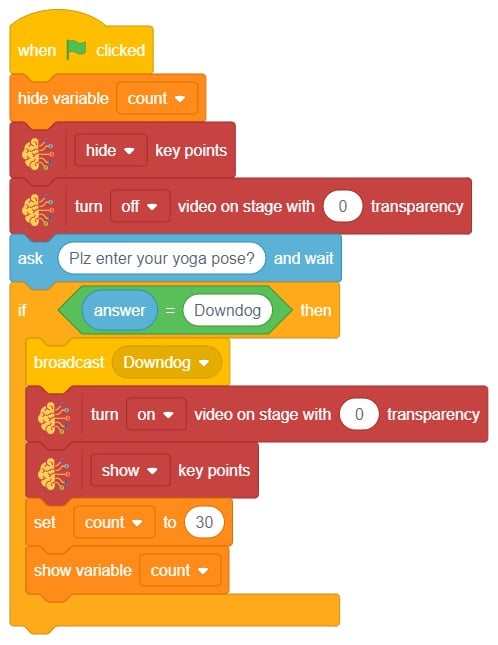
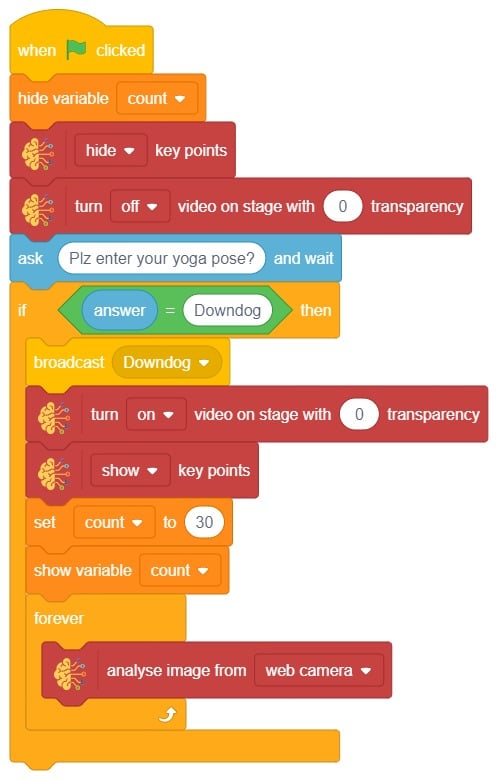
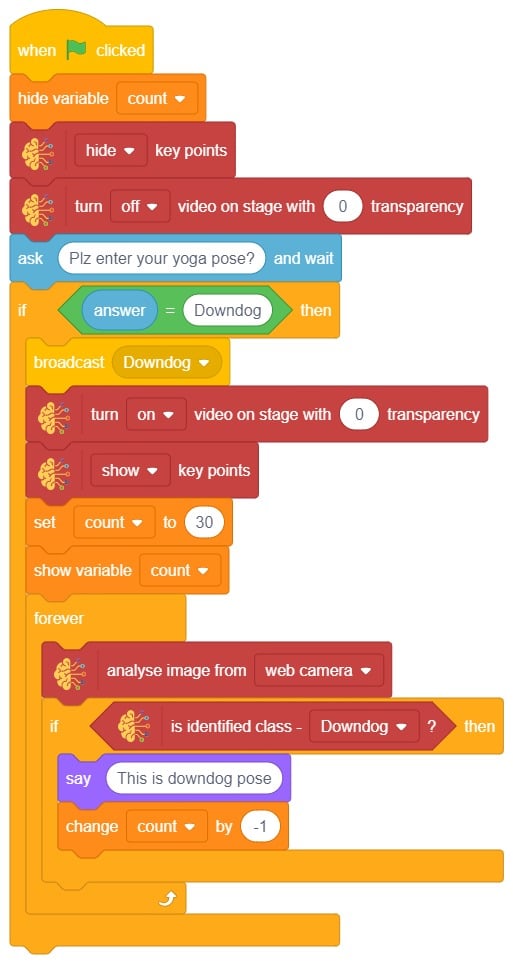
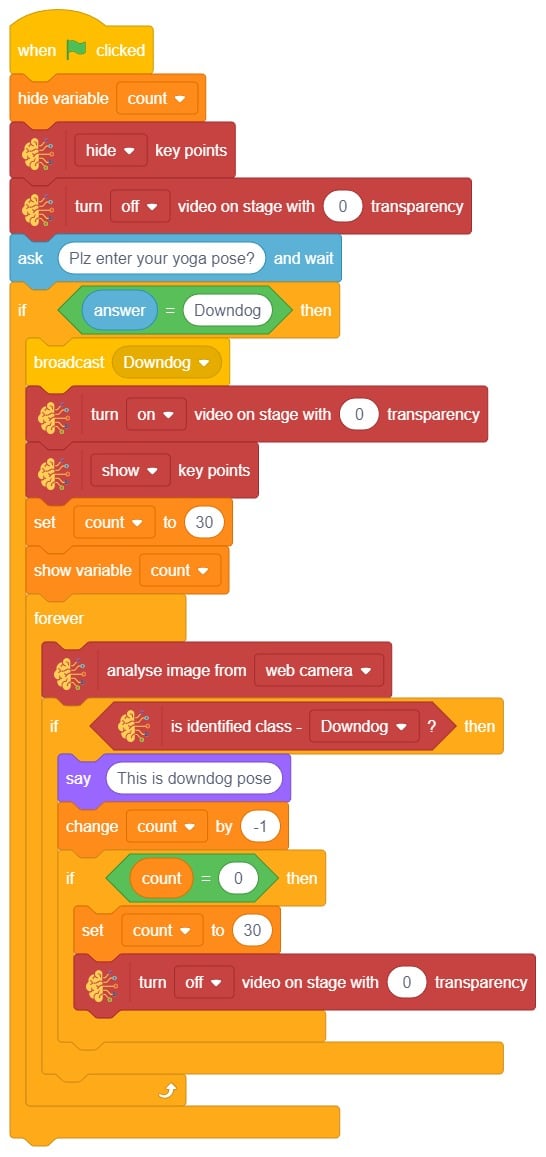
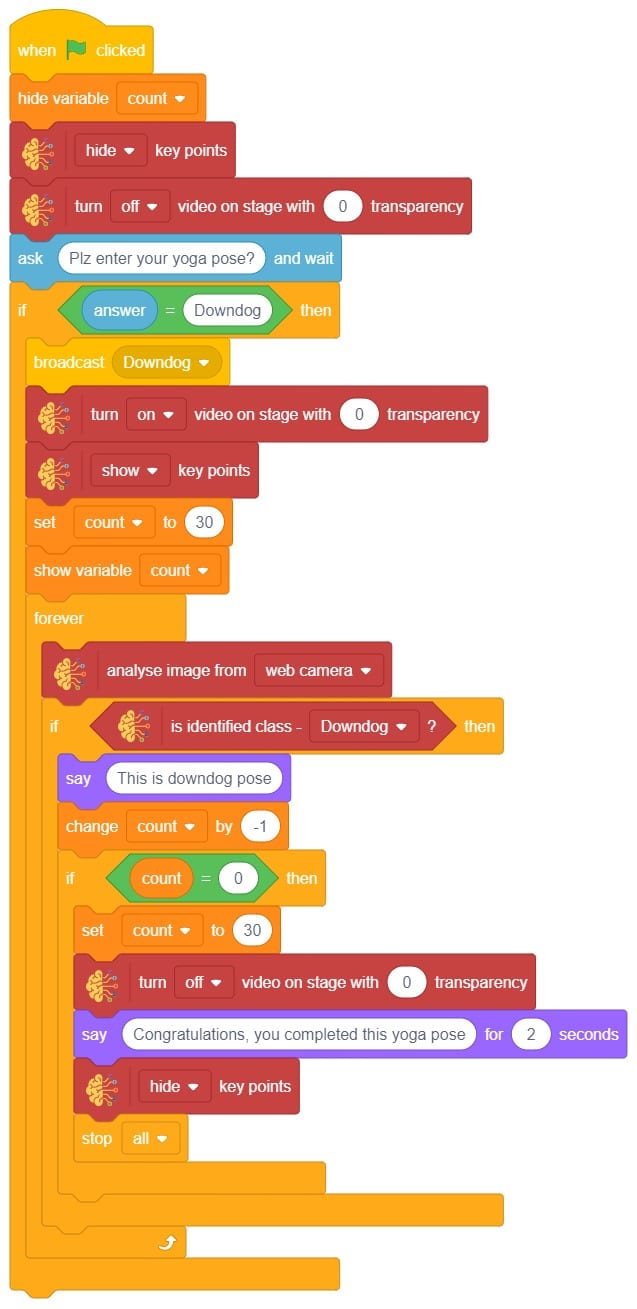
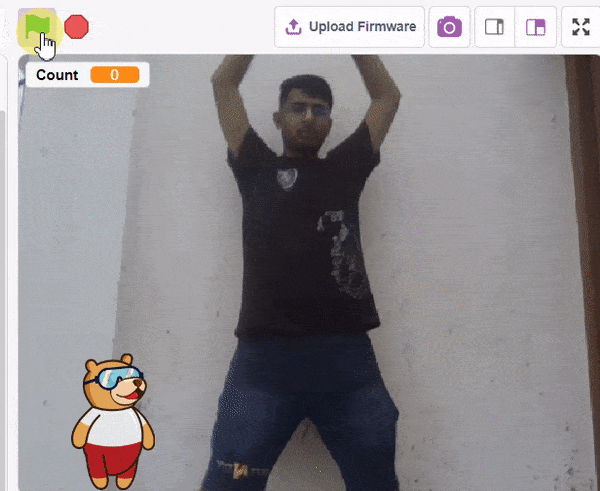
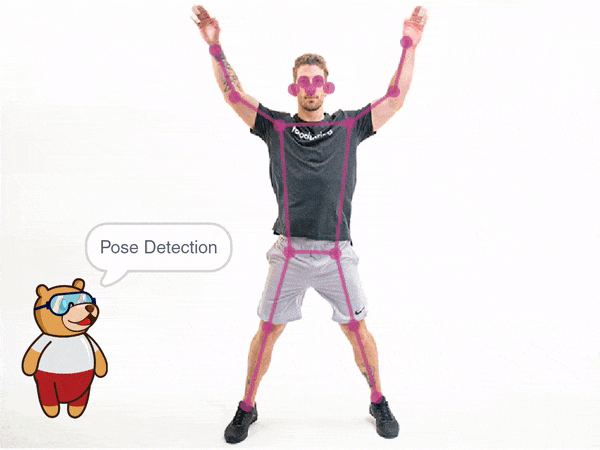
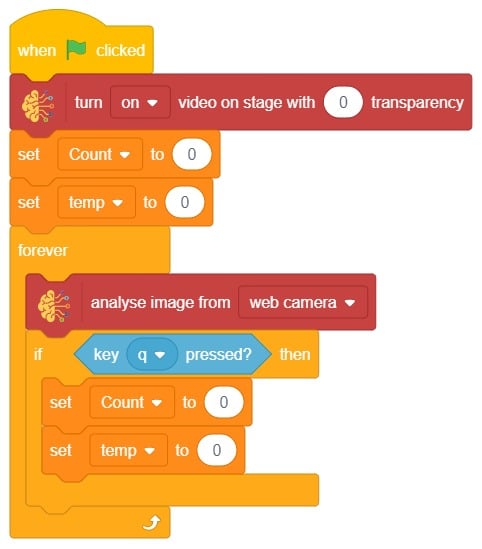
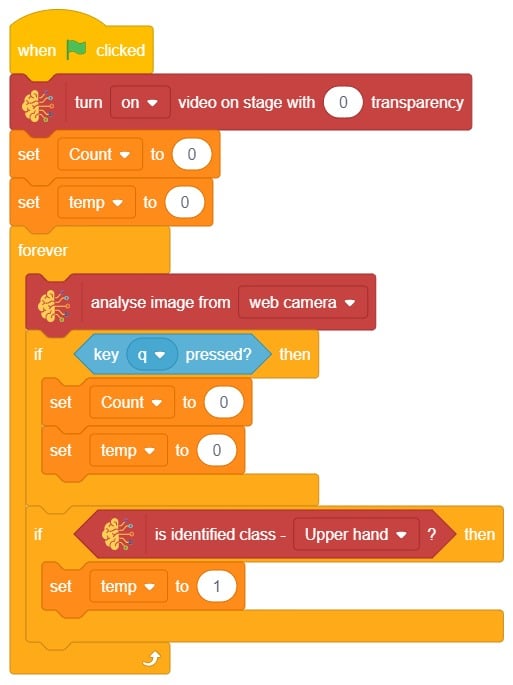
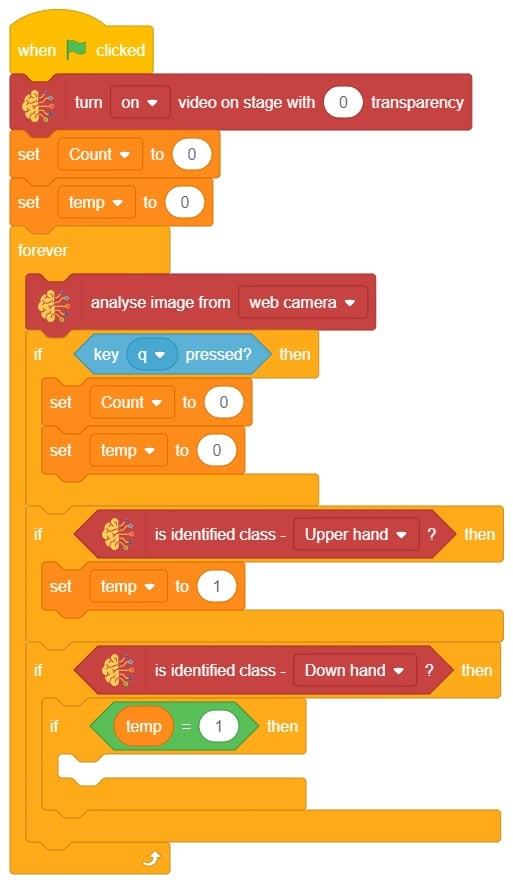
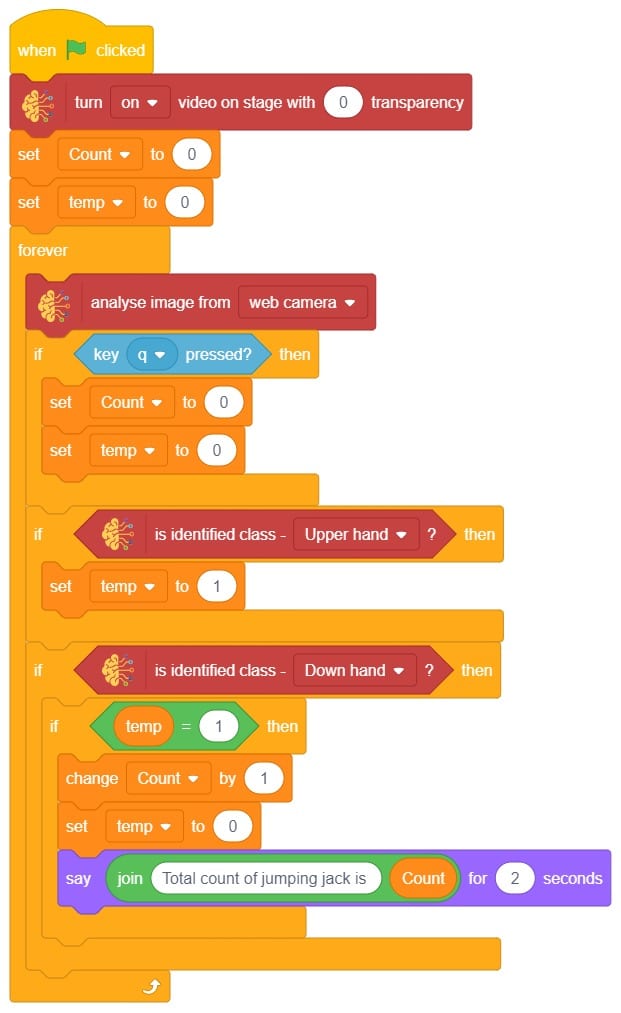
In this example project, we are going to create a machine learning model that can count the number of jumping jack activities from the camera feed.
The pose Classifier is the extension of the ML Environment used for classifying different body poses into different classes.
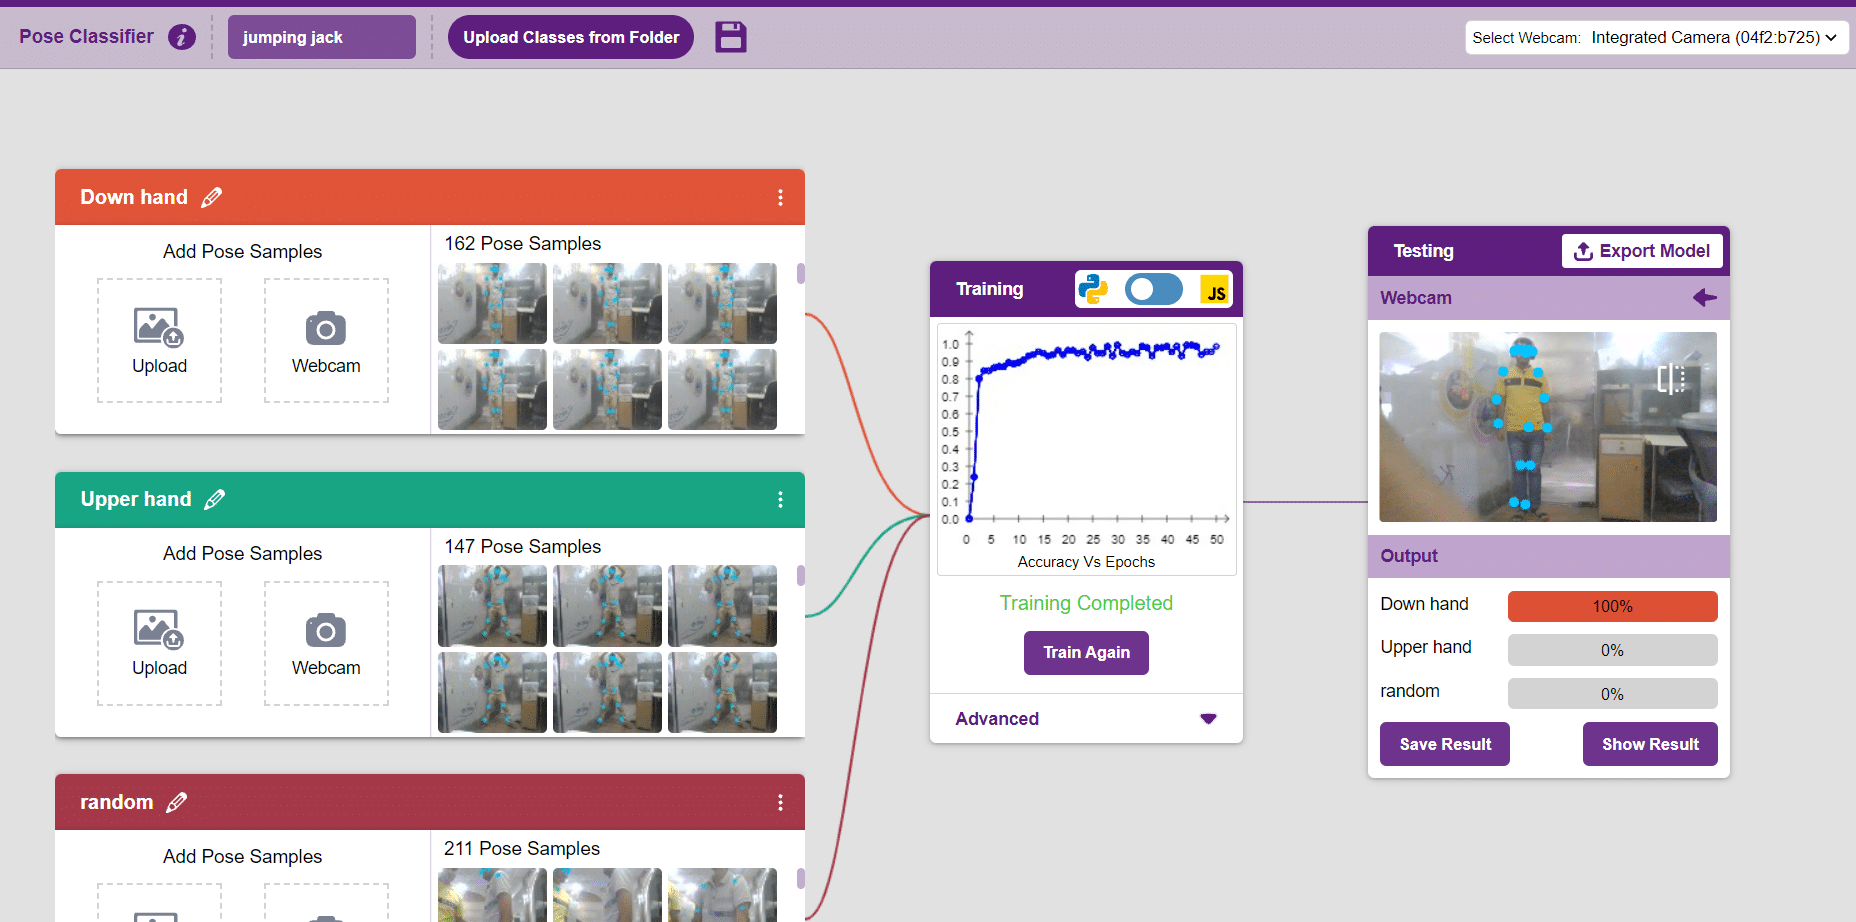 The model works by analyzing your body position with the help of 17 data points.
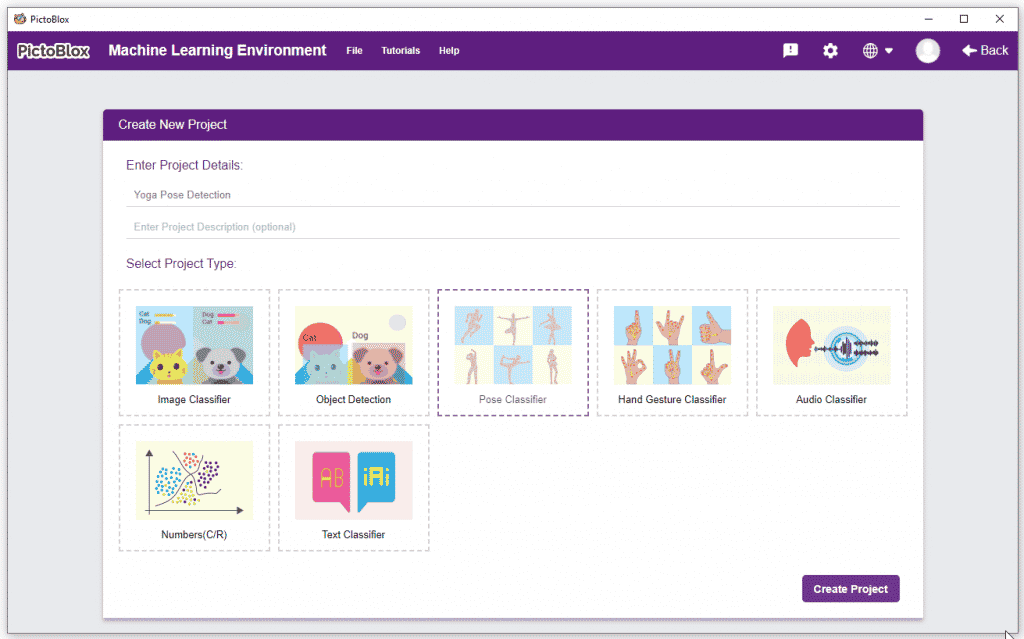
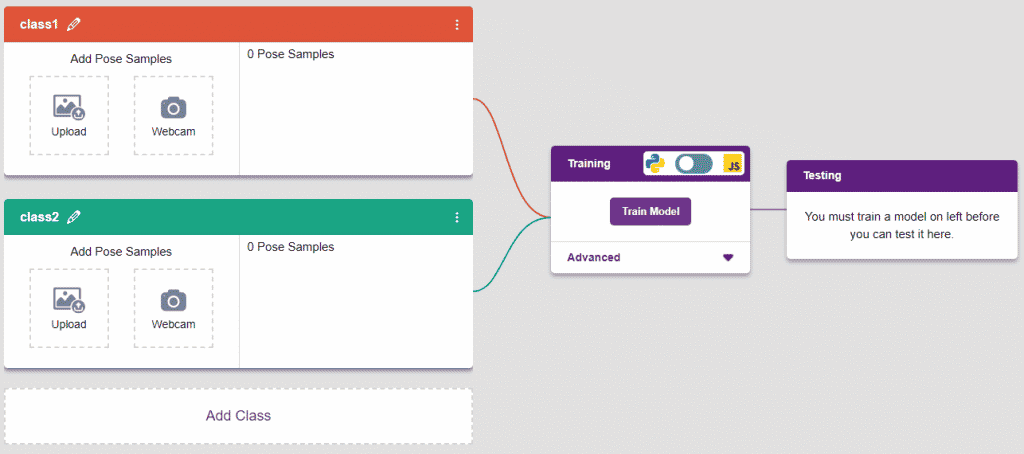
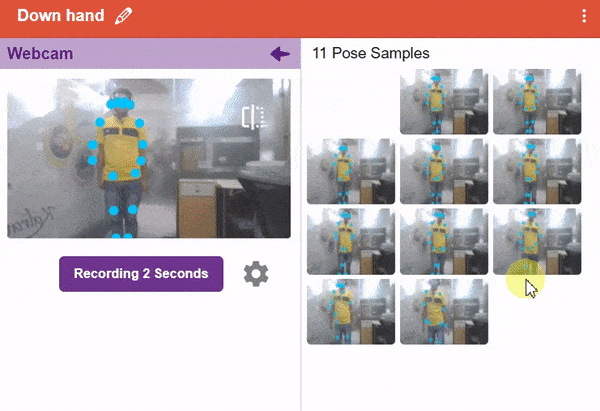
Class is the category in which the Machine Learning model classifies the poses. Similar posts are put in one class.
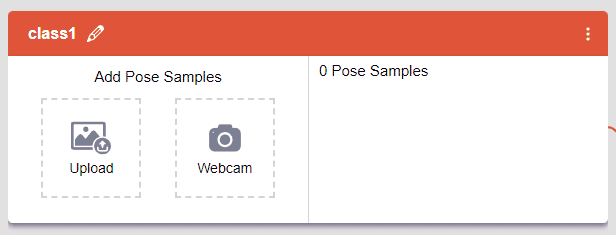
There are 2 things that you have to provide in a class:
You can perform the following operations to manipulate the data into a class.
After data is added, it’s fit to be used in model training. To do this, we have to train the model. By training the model, we extract meaningful information from the hand pose, and that in turn updates the weights. Once these weights are saved, we can use our model to predict previously unseen data.
The accuracy of the model should increase over time. The x-axis of the graph shows the epochs, and the y-axis represents the accuracy at the corresponding epoch. Remember, the higher the reading in the accuracy graph, the better the model. The range of accuracy is 0 to 1.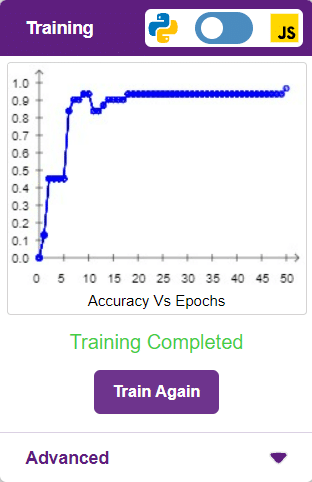
To test the model, simply enter the input values in the “Testing” panel and click on the “Predict” button.
The model will return the probability of the input belonging to the classes.
Click on the “Export Model” button on the top right of the Testing box, and PictoBlox will load your model into the Block Coding Environment if you have opened the ML Environment in the Block Coding.
The idea is simple, after running code we will do jumping jack activity in front of camera and tobi sprite will say counting of jumping jack.
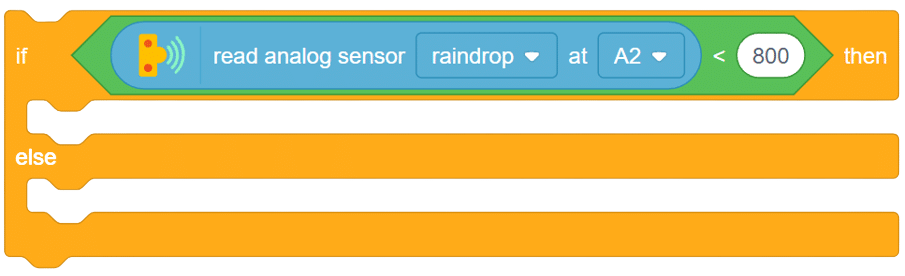
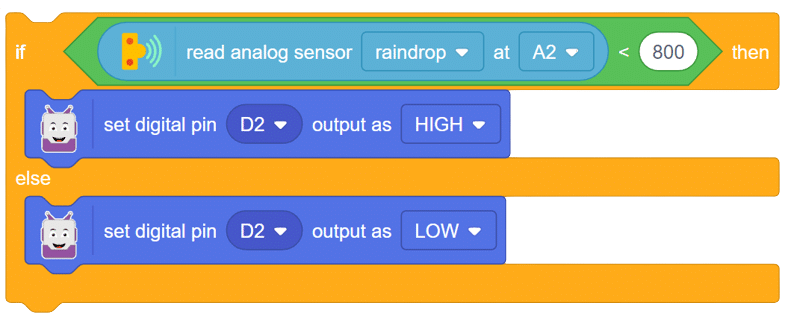
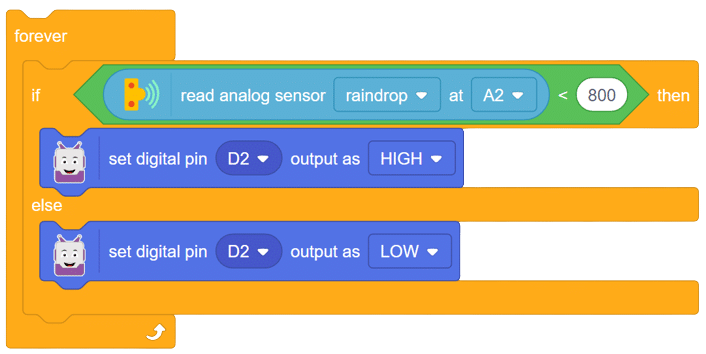
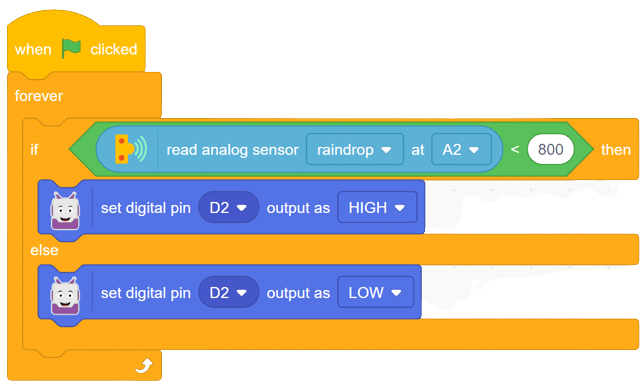
The raindrop sensor is an analog-type sensor that effectively measures changes in resistance when it encounters water. This property makes it an ideal choice for detecting rain and water presence in various applications. While typically designed with two pins, there are also versions available with a controller module, effectively converting it into a three-pin sensor for enhanced functionality.
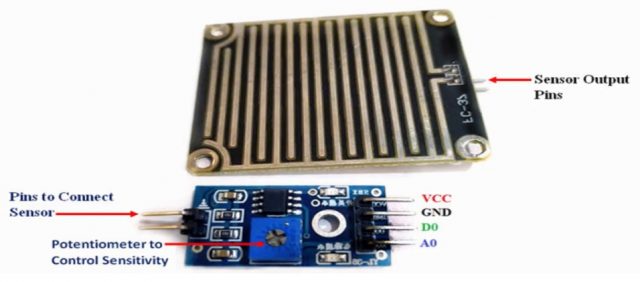
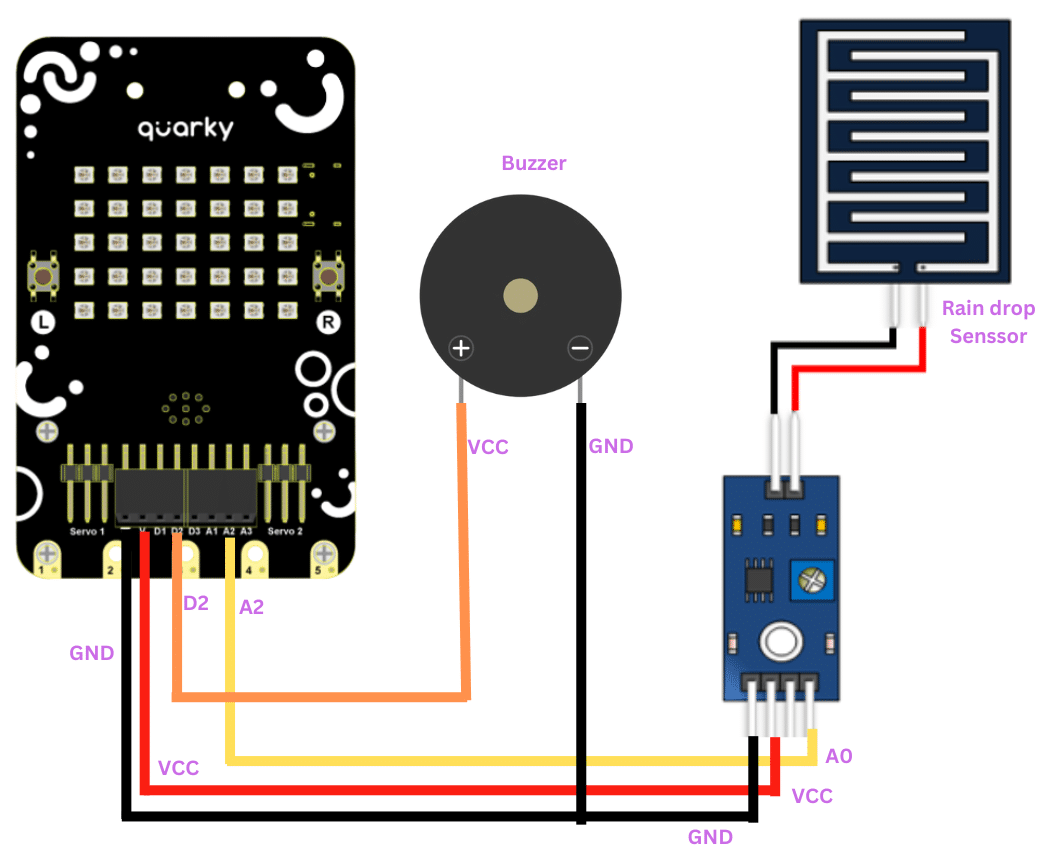
To set up the raindrop sensor circuit, make the following connections:


Copyright 2025 – Agilo Research Pvt. Ltd. All rights reserved – Terms & Condition | Privacy Policy