Deprecated: Required parameter $query follows optional parameter $post in /var/www/html/wp-content/plugins/elementor-extras/modules/breadcrumbs/widgets/breadcrumbs.php on line 1215
calibrate left shoulder () right shoulder () left hand () right hand () - PictoBlox Block |
Table of Contents
[BlocksExtension]

Warning: Undefined array key "pp_wrapper_link" in /var/www/html/wp-content/plugins/powerpack-elements/extensions/wrapper-link.php on line 194

Warning: Undefined array key "pp_wrapper_link_enable" in /var/www/html/wp-content/plugins/powerpack-elements/extensions/wrapper-link.php on line 196

Warning: Undefined array key "pp_custom_cursor_icon" in /var/www/html/wp-content/plugins/powerpack-elements/extensions/custom-cursor.php on line 350

Warning: Undefined array key "pp_custom_cursor_text" in /var/www/html/wp-content/plugins/powerpack-elements/extensions/custom-cursor.php on line 351

Warning: Undefined array key "pp_custom_cursor_target" in /var/www/html/wp-content/plugins/powerpack-elements/extensions/custom-cursor.php on line 352

Warning: Undefined array key "pp_custom_cursor_css_selector" in /var/www/html/wp-content/plugins/powerpack-elements/extensions/custom-cursor.php on line 353

Warning: Undefined array key "pp_custom_cursor_enable" in /var/www/html/wp-content/plugins/powerpack-elements/extensions/custom-cursor.php on line 355

calibrate left shoulder () right shoulder () left hand () right hand ()

calibrate arm servos bloxk

Description

Calibrate left leg () right leg () left foot () right foot () is a stack block available in Humanoid Robot extension for evive and other Arduino boards. This block should be included every time you work with the humanoid robot for the first time as it calibrates the angles of all the four servo motors of the arm(2 servos of shoulder + 2 servos of hands) and saves it in the memory of evive.

evive Notes Icon
Note: Please make sure that all the servos are at 90° such that both the arms are straight.

Input Parameters

  1. Enter the error angle of the left shoulder servo.
  2. Enter the error angle of the right shoulder servo.
  3. Enter the error angle of the left-hand servo.
  4. Enter the error angle of the right-hand servo.
evive Notes Icon
Note: This block is available in both Stage and Upload mode.

Example

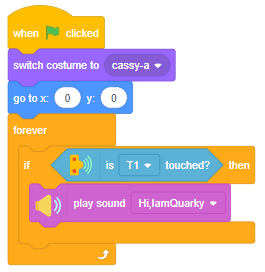
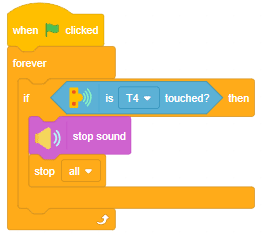
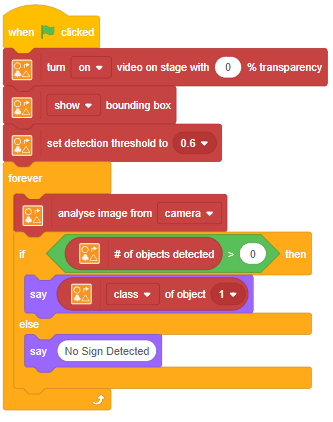
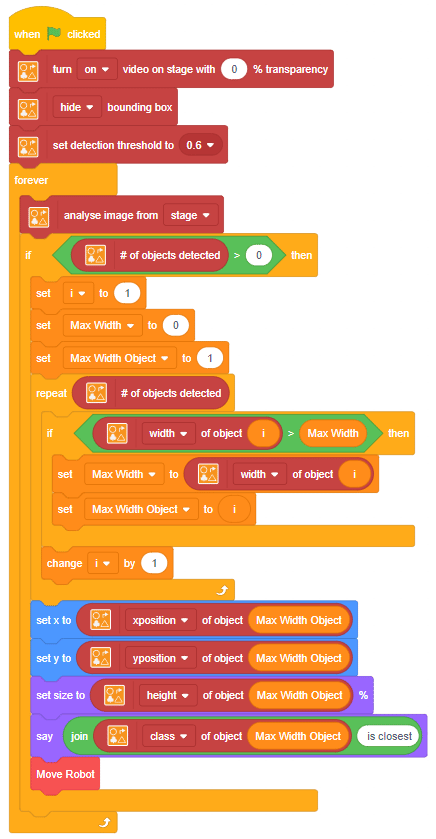
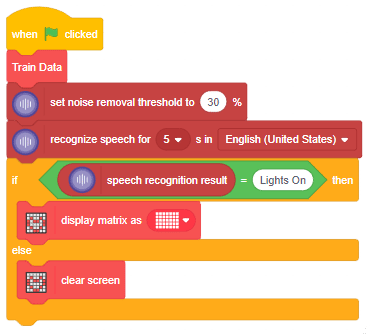
Here, in the given script, we’ll be calibrating both the arms of the humanoid robot i.e. two servos of shoulders and two hands of feet before working it. Write the script given below to calibrate it. Run the script by clicking on the green flag. If the humanoid robot is straight, keep the angles as 0° in the calibrate angles blocks. If it is not straight, then change their respective values and run the script. Use the trial and error method to calibrate the servos.calibrate arm servos block examples

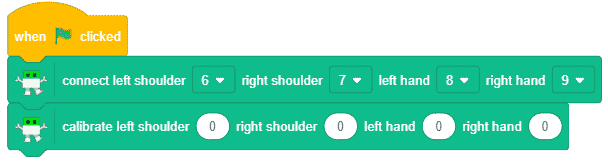
Run the script every time you calibrate a part.

Example

The example demonstrates using the Quarky touch display to make touch piano.

Script


Output

Touch-Numbers

Read More
The example demonstrates how to run different actions with the Quarky touch sensor to make a disco party in PictoBlox.

Script

Output

Read More
The example demonstrates how to use an ultrasonic sensor with Quarky.

Connections

Now we will connect the Ultrasonic Sensor to the Robot. The sensor and the robot have the following pins:

  1. Ultrasonic Sensor Pins:
    1.  VCC
    2. GND
    3. Trig
    4. Echo
  2. Quarky Pins:
    1. GND
    2. V
    3. D1
    4. D2

We will start with connecting the ultrasonic sensor with Quarky using the 4 set wire provided in the kit. But, first, make the connection in the following way:

  • First, connect the VCC of the ultrasonic sensor with the V pin on the Quarky.
  • Connect the GND of the ultrasonic sensor with the Ground pin on the Quarky.
  • Connect Trig of the ultrasonic sensor with D1 pin on the Quarky.
  • Finally, connect the Echo of the ultrasonic sensor with the D2 pin on the Quarky.

Script

Output

Read More
The example demonstrates how to make the sprite movement with Quarky buttons.

Code

sprite = Sprite('Tobi')
quarky=Quarky()

while True:
  if quarky.readpushbutton("L"):
    sprite.move(-10)
  elif quarky.readpushbutton("R"):
    sprite.move(10)

Output

Read More
The example demonstrates using the Quarky touch display to make a touch piano in the Python Coding Mode.

Code

sprite = Sprite('Tobi')
quarky = Quarky()

while True:
  if quarky.ispadtouched("T1"):
    quarky.drawpattern("bbbjjbjjbjjbbjjbjjjbjjbjjjbjjbjjbbb")
    quarky.playtone("C4", 8)

  if quarky.ispadtouched("T2"):
    quarky.drawpattern("cccjcccjcjjjjcjcjjcccjcjjcjjjcjjccc")
    quarky.playtone("D4", 8)

  if quarky.ispadtouched("T3"):
    quarky.drawpattern("fffjfffjfjjjjfjfjjfffjfjjjjfjfjjfff")
    quarky.playtone("E4", 8)

  if quarky.ispadtouched("T4"):
    quarky.drawpattern("dddjdjdjdjjdjdjdjjdddjdjjjjdjdjjjjd")
    quarky.playtone("F4", 8)

  if quarky.ispadtouched("T5"):
    quarky.drawpattern("gggjgggjgjjgjjjgjjgggjgjjjjgjgjjggg")
    quarky.playtone("G4", 8)

Output

Read More
The example demonstrates how to use an ultrasonic sensor with Quarky.

Connections

Now we will connect the Ultrasonic Sensor to the Robot. The sensor and the robot have the following pins:

We will start with connecting the ultrasonic sensor with Quarky using the 4 set wire provided in the kit. But, first, make the connection in the following way:

  • First, connect the VCC of the ultrasonic sensor with the V pin on the Quarky.
  • Connect the GND of the ultrasonic sensor with the Ground pin on the Quarky.
  • Connect Trig of the ultrasonic sensor with D1 pin on the Quarky.
  • Finally, connect the Echo of the ultrasonic sensor with the D2 pin on the Quarky.

Code

sprite = Sprite('Tobi')
quarky = Quarky()

quarky.setultrasonicpins(1, 18, 19)
while True:
  sprite.say(quarky.getdistance(1))


Output

Read More
The example demonstrates how to run different actions with the Quarky touch sensor to make a disco party in Python Coding Environment.

Code

sprite = Sprite('Cassy Dance')
quarky = Quarky()

import time

sprite.switchcostume('cassy-a')
sprite.gotoxy(0, 0)

while True:
  if quarky.ispadtouched("T1"):
    quarky.playsound("QuarkyIntro")

  if quarky.ispadtouched("T2"):
    quarky.showpattern("party colors")

  if quarky.ispadtouched("T3"):
    time.sleep(0.2)
    sprite.nextcostume()

  if quarky.ispadtouched("T4"):
    quarky.stopaudio()

Output

Read More
A waste management system that will differentiate the waste based on its type. If it detects biodegradable waste, the LEDs Quarky’s matrix will turn green. If it’s non-biodegradable waste, the LEDs will turn blue.

Script

Output

Read More
The example demonstrates how to run an object detection on the stage and show all the objects with confidence.

Script

Output

  1. Detection at 0.3
  2. Detection at 0.5
  3. Detection at 0.8
Read More
The example demonstrates how to detect persons on the stage with different confidence thresholds.

Script

Output

Read More
waste
A waste management system that will differentiate the waste based on its type in Python Coding Environment. If it detects biodegradable waste, the LEDs Quarky’s matrix will turn green. If it’s non-biodegradable waste, the LEDs will turn blue.

Code

sprite = Sprite('Tobi')
od = ObjectDetection()
speech = TexttoSpeech()
quarky = Quarky()

od.video("on", 1)
od.enablebox()
od.setthreshold(0.5)

speech.setvoice('alto')
speech.setlanguage('en')

while True:
  od.analysecamera()
  
  if od.isdetected('banana'):
    quarky.drawpattern("ccccccccccccccccccccccccccccccccccc")
    speech.speak("Biodegradable Waste")
  
  if od.isdetected('bottle'):
    quarky.drawpattern("fffffffffffffffffffffffffffffffffff")
    speech.speak("Non Biodegradable Waste")

Output

waste

Read More
The example demonstrates how to run an object detection on the stage and show all the objects with confidence.

Code

sprite = Sprite('Square Box')
obj = ObjectDetection()

obj.disablebox()
obj.setthreshold(0.5)
obj.analysestage()

sprite.gotoxy(0, 0)
sprite.setsize(100)
sprite.say(str(obj.count()) + " Object Detected", 2)

for object in range(1, obj.count() + 1):
  sprite.setx(obj.x(object))
  sprite.sety(obj.y(object))
  sprite.setsize(obj.width(object))
  sprite.say(obj.classname(object) + " with " + str(obj.confidence(object)), 2)

Output

  1. Detection at 0.3
  2. Detection at 0.5
  3. Detection at 0.8
Read More
The example demonstrates how to detect persons on the stage with different confidence thresholds.

Code

sprite = Sprite('Tobi')
obj = ObjectDetection()

obj.enablebox()
sprite.gotoxy(-180, -110)
sprite.setsize(100)

obj.setthreshold(0.3)
obj.analysestage()
sprite.say(str(obj.detectedcount("person")) + " Person Detected at 0.3 Threshold", 2)

obj.setthreshold(0.5)
obj.analysestage()
sprite.say(str(obj.detectedcount("person")) + " Person Detected at 0.5 Threshold", 2)

obj.setthreshold(0.9)
obj.analysestage()
sprite.say(str(obj.detectedcount("person")) + " Person Detected at 0.9 Threshold", 2)

Output

Read More
The examples show how to use Pose Recognition in PictoBlox to count the number of body parts detected in the body.

Script

Output

Read More
The example demonstrates how to use hand recognition and pen extensions to make an air draw game.

Script

Output

Read More
The example demonstrates how to use hand recognition to track the different parts of the fingers.

Script

Output

Read More
The example demonstrates how to use human body detection to track the nose and make someone clown.

Script

Output

Read More
The example demonstrates how to use hand recognition to track the different parts of the fingers in Python Coding Environment.

Code

thumb = Sprite('Thumb')
index = Sprite('Index')
middle = Sprite('Middle')
ring = Sprite('Ring')
pinky = Sprite('Pinky')

hand = Posenet()
hand.video("on", 0)
hand.enablebox()

thumb.switchcostume("ball-a")
thumb.setsize(50)
index.switchcostume("ball-b")
index.setsize(50)
middle.switchcostume("ball-c")
middle.setsize(50)
ring.switchcostume("ball-d")
ring.setsize(50)
pinky.switchcostume("ball-e")
pinky.setsize(50)

while True:
  hand.analysehand()
  
  if hand.ishanddetected():
    thumb.setx(hand.gethandposition(1, 4))
    thumb.sety(hand.gethandposition(2, 4))
    thumb.show()
    
    index.setx(hand.gethandposition(1, 8))
    index.sety(hand.gethandposition(2, 8))
    index.show()
    
    middle.setx(hand.gethandposition(1, 12))
    middle.sety(hand.gethandposition(2, 12))
    middle.show()
    
    ring.setx(hand.gethandposition(1, 16))
    ring.sety(hand.gethandposition(2, 16))
    ring.show()
    
    pinky.setx(hand.gethandposition(1, 20))
    pinky.sety(hand.gethandposition(2, 20))
    pinky.show()
  
  else:
    thumb.hide()
    index.hide()
    middle.hide()
    ring.hide()
    pinky.hide()

Output

Read More
The examples show how to use Pose Recognition in PictoBlox to count the number of body parts detected in the body in Python Coding Environment.

Code

sprite = Sprite('Tobi')
pose = Posenet()

pose.video("on", 0)
pose.enablebox()

while True:
  pose.analysecamera()
  bodyPartCount = 0
  
  for i in range(21):
    if pose.isdetected(i, 1):
      bodyPartCount += 1
  
  sprite.say(str(bodyPartCount) + " Parts Detected")

Output

Read More
The example demonstrates how to use human body detection to track the nose and make someone clown.

Code

sprite = Sprite('Ball')
pose = Posenet()

pose.video("on", 0)
pose.enablebox()

while True:
  pose.analysestage()
  
  if (pose.isdetected(0, 1)):
    sprite.setx(pose.x(0, 1))
    sprite.sety(pose.y(0, 1))
    sprite.show()
  
  else:
    sprite.hide()

Output

Read More
The example demonstrates how to use hand recognition and pen extensions to make an air draw game in the Python Coding Environment.

Code

sprite = Sprite('Pencil')

hand = Posenet()
pen = Pen()

hand.video("on", 0)
hand.disablebox()

pen.clear()
pen.setcolor([0, 255, 0])
pen.setsize(2)

while True:
  hand.analysehand()
  if hand.ishanddetected():
    if sprite.iskeypressed("space"):
      pen.down()
      sprite.setx(hand.gethandposition(1, 8))
      sprite.sety(hand.gethandposition(2, 8))
    else:
      pen.up()

Output

Read More
The example demonstrates how to use sign detection and make the Quarky show the detection on the LED.

Script

Output

Read More
The example demonstrates how to implement sign detection in PictoBlox.

Script

Output

Read More
The example demonstrates how to find the closest sign from multiple sign detection and make the decision accordingly.

Script

Output

Read More
The example demonstrates how to make an object-tracking robot.

Script

Output

Read More
Speech Recognition
The example demonstrates how to make smart home automation for light control using NLP and Speech Recognition.

Script

Output

Read More
The example demonstrates how to make a QR Code reader.

Script

Output

Read More
The example demonstrates how to make a QR Code reader in the Python Coding Environment.

Code

sprite = Sprite('Square Box')
qr = QRCodeScanner()

qr.video("on flipped", 0)
qr.disablebox()

while True:
  qr.analysecamera()
  if qr.isdetected():
    sprite.setx(qr.xpos("center"))
    sprite.sety(qr.ypos("center"))
    sprite.setdirection(qr.angle())
    sprite.say(qr.codedata())
    sprite.show()
  else:
    sprite.hide()

Output

Read More
The example demonstrates how to make a sprite be fixed to a point but can rotate. The wand is hanging like a pendulum.

The example demonstrates how to make a sprite be fixed to a point but can rotate. The wand is hanging like a pendulum.

The center of the wand in the costume is the point of rotation.

The following code creates the simulation of the pendulum.

Output

Read More
In this example, you understand the effect of the density, roughness, and bounce properties of the sprites. The ball falls from the top randomly, and the bell is fixed but can rotate. 

In this example, you understand the effect of the density, roughness, and bounce properties of the sprites. The ball falls from the top randomly, and the bell is fixed but can rotate.

Script of Bell

The bell center is changed to make it swing from the top.

Script for Ball

This script creates clones of the ball every 0.5 seconds.

This script assigns the properties of the clone.

Output

We will change the density of the bell and the ball in the block – set sprite density () roughness () bounce (). This will result in different simulations.

  1. Bell is very light and the balls are very heavy: The inertia of the balls will affect the bell too much.
  2. Bell is very light and balls are also very light: The bell is less affected by the ball. Gradually the bell slows down.
  3. Bell is very heavy and the balls are very light: The bell is not affected at all. The balls are thrown without adding any effect on the bell.
  4. Bell is very heavy and the balls are also very heavy: Same as option 2 – The bell is less affected by the ball. Gradually the bell slows down.
Read More
All articles loaded
No more articles to load
[PictoBloxExtension]