Deprecated: Required parameter $query follows optional parameter $post in /var/www/html/wp-content/plugins/elementor-extras/modules/breadcrumbs/widgets/breadcrumbs.php on line 1215
Physics Engine - Blocks, Python Functions, Projects | PictoBlox Extension
[PictoBloxExtension]

Physics Engine

physics
Extension Description
Add physics to simulate the real-life simulation.

Introduction

What is Physics Engine?

Physics Engine is a 2D rigid body simulation library for making games and animations. Programmers can use it in their games to make objects move in realistic ways and make the projects more interactive. From the game engine’s point of view, the physics engine is just a system for procedural animation.

Accessing Physics Engine in Block Coding

Following is the process to add Physics Engine capability to the PictoBlox Project.

  1. Open PictoBlox and create a new file.
  2. Select the coding environment as Block Coding.
  3. Next, click on the Add Extension button and add the Physics Engine extension.
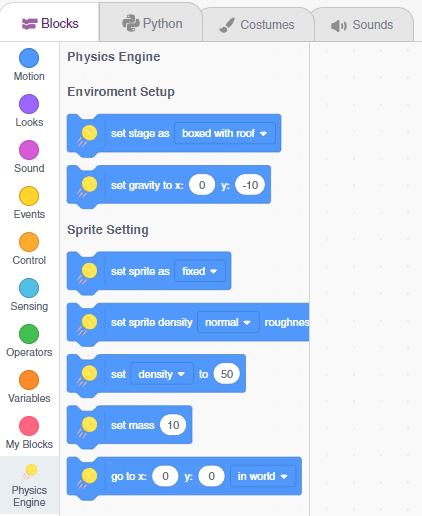
  4. You can find the Physics Engine blocks available in the project.

Core Concepts

Physics Engine works with several fundamental concepts and objects. We briefly define these objects here and more details are given later in the block definitions and examples.

  1. Shape: A shape is a 2D geometrical sprite, such as a circle or polygon or the sprite shape.
  2. Rigid body: A chunk of matter that is so strong that the distance between any two bits of matter on the chunk is constant. They are hard like a diamond. In the following discussion, we use body interchangeably with rigid body.
  3. Fixture: A fixture binds a shape to a body and adds material properties such as density, friction, and restitution. A fixture puts a shape into the collision system (broad phase) so that it can collide with other shapes.
  4. Constraint: A constraint is a physical connection that removes degrees of freedom from bodies. A 2D body has 3 degrees of freedom (two translation coordinates and one rotation coordinate). If we take a body and pin it to the wall (like a pendulum) we have constrained the body to the wall. At this point the body can only rotate about the pin, so the constraint has removed 2 degrees of freedom.
  5. Contact constraint: A special constraint designed to prevent penetration of rigid bodies and to simulate friction and restitution. You do not create contact constraints; they are created automatically by Physics Engine.
  6. World: A physics world is a collection of bodies, fixtures, and constraints that interact together. Box2D supports the creation of multiple worlds, but this is usually not necessary or desirable.
  7. Solver: The physics world has a solver that is used to advance time and resolve contact and joint constraints. The Box2D solver is a high-performance iterative solver that operates in order N time, where N is the number of constraints.
  8. Continuous collision: The solver advances bodies in time using discrete time steps.
Read More

PictoBlox Blocks

The block initializes a TM1637 4×7 segment display module by assigning two boundaries, CLK and DIO, to two digital pins of an Arduino board. The module can then be used to display numbers, characters, and symbols using the 4×7 segment display.
This block is used to move the robotic arm from its current position to a specific X, Y, and Z coordinate position over a specified period of time. This block first moves in the X axis, then the Y axis, and lastly Z axis to reach the desired point.
This block is designed to program the robotic arm to move in a circle in the specified Y plane over a period of time. The user must specify the circle’s center position along the X and Z axes, as well as the radius of the circle. The robot arm then calculates all the points it needs to travel in the XYZ coordinates and travels to them one by one.
Set the pins for the left, middle, and right IR sensors to enable line following. Note: For 3 IR Sensors, the threshold is set by the potentiometers on the sensors as they work with digital value.
Changes the speed of the sprite movement. Speed can be set as slow, normal and fast.
Changes the current costume of the sprite to the next one.
Stops all the movement and actions of the quarky.
Turns off all the LED of the quarky display.
Changes the speed of the wizbot. Speed can be set as slow, normal and fast.
Stops any sound or music playing from the script.
This block is used to draw the outline or a filled rectangle with rounded corners. It takes the following parameters as input: fill/draw, starting coordinates, width, height, the radius at corners and color. It draws a rectangle rounded at edges where the radius is input by the user.
The block returns the value of analog pins available in the connected hardware. Analog reading is of 10-bit resolution, hence the range of value is 0 to 1023. This range is mapped to the voltage of the pin (normally 0 to 5V). If the value received is 512, the voltage value will be around 2.5V.
The block allows the user to control actuators such as DC motors and servo motors from the Motor control module of the Dabble app.
This block moves the robotic arm’s end-effector to the specified X, Y, and Z position in a line in the specified time. Whenever we use this block, the robotic arm breaks the line from one position to another position in smaller lines and follow them.
This block is to assign custom leg actions and movements to our Humanoid Robot.
The block glides sprite to the specified X and Y position in the specified duration. This block has animation in its movement.
The block changes the backdrop to the next in the list of backdrops, but if the current backdrop is the last in the list, the block will loop to the first.
The block sets its sprite’s volume to the specified amount. It only affects the sprite (or the Stage) that the block is in.
It activates in a clone when it gets created.
The block checks if the computer mouse’s primary button is activated (being clicked).
The block returns the number of objects identified with the specified object class.
The block subtracts the second value from the first and reports the result.
The block can delete the item inputted from the specified list.
This block is used to analyze the image received as input from the camera, for human hand detection.
The () recognition result block reports the landmark and the image description identified in the image.
The get () of face () block reports the following attributes of the face: x position, y position, width and height.
The block returns whether the specified signal is detected in the analysis or not.
The function returns the time data of the location when data capture, sunrise, or sunset happens.
The block reports the project’s tempo. This block can be displayed as a Stage monitor. As this block holds how long drums and notes will be played, it is useful in music projects where they must sense how long an instrument will be playing.
The block sets the Pen Size to the given number. The pen draws a trail of circles. The diameter of the circle, in pixels, is equal to the pen size.
All articles loaded
No more articles to load

Block Coding Examples

There are no block coding examples for the extension to show.
Table of Contents