Deprecated: Required parameter $query follows optional parameter $post in /var/www/html/wp-content/plugins/elementor-extras/modules/breadcrumbs/widgets/breadcrumbs.php on line 1215
Program Quarky Mecanum Robot with PictoBlox and Python
[Mecanum]

Programming the Quarky Mecanum with Python in PictoBlox

Description
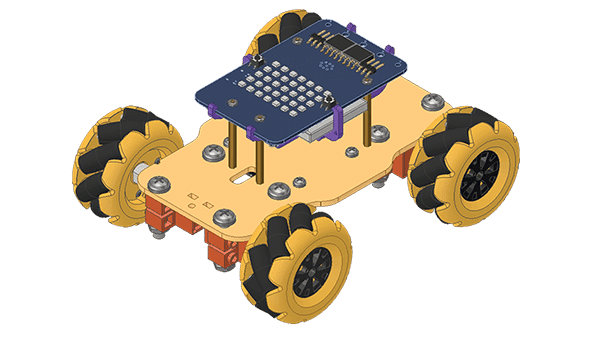
In this lesson, learn how to program the Quarky Mecanum robot with PictoBlox and Python in both Stage and Upload modes. Understand the functions provided in the Quarky Mecanum library, and see how to control the robot’s motors, pick-and-place robot, and gripper robot.

PictoBlox also provides the ability to program the Quarky Mecanum using Python in Desktop / Laptop versions. Let’s see how you can do it in this lesson.
PictoBlox

With PictoBlox, you can program the Quarky Mecanum!

If you haven’t installed PictoBlox, please follow the instructions:


Warning: Undefined array key "pp_wrapper_link" in /var/www/html/wp-content/plugins/powerpack-elements/extensions/wrapper-link.php on line 194

Warning: Undefined array key "pp_wrapper_link_enable" in /var/www/html/wp-content/plugins/powerpack-elements/extensions/wrapper-link.php on line 196

Warning: Undefined array key "pp_custom_cursor_icon" in /var/www/html/wp-content/plugins/powerpack-elements/extensions/custom-cursor.php on line 350

Warning: Undefined array key "pp_custom_cursor_text" in /var/www/html/wp-content/plugins/powerpack-elements/extensions/custom-cursor.php on line 351

Warning: Undefined array key "pp_custom_cursor_target" in /var/www/html/wp-content/plugins/powerpack-elements/extensions/custom-cursor.php on line 352

Warning: Undefined array key "pp_custom_cursor_css_selector" in /var/www/html/wp-content/plugins/powerpack-elements/extensions/custom-cursor.php on line 353

Warning: Undefined array key "pp_custom_cursor_enable" in /var/www/html/wp-content/plugins/powerpack-elements/extensions/custom-cursor.php on line 355
The function closes the gripper for the Quarky Gripper Robot.
Syntax: closearm()
The function executes the oscillator according to stored parameters for the servo motor and the current time.
Syntax: executeoscillator()
The function reports the analog reading of the Gas sensor connected to the selected pin. The value will vary between 0 to 4095.
Syntax: gassensorvalue(pin = “A1”)
The function creates a Python object for the Thingspeak library.
Syntax: thingspeak()
The function takes the desired angle values and sets the pick and place arm to those angles.
Syntax: setarmangle(angle = 90)
This function moves the end-effector to the specified position of the chosen axis while keeping the other two axes in their current positions.
Syntax: roboticArm.gotoinoneaxis(POSITION = 150, AXIS = “x”, TIME = 1000)
PID control of line follower is a method consisting of proportional, integral, and derivative functions to improve the robot’s movement. 
Syntax: setPIDconstantparameter(kp = 0.8, ki = 0.01, kd = 0.2)
This function returns the y position of the face detected. You can specify the face for which the value is needed. The position is mapped with the stage coordinates.
Syntax: y(face = 1)
The block points its sprite towards the mouse-pointer. This changes the sprite’s direction and rotates the sprite.
Syntax: pointto()
This function resets all 7 graphic effects.
Syntax: cleareffects()
The function sets the timer’s value back to 0. 
Syntax: resettimer()
The function executes the oscillator according to stored parameters for the servo motor and the current angle specified in the block.
Syntax: executesscillatorat(angle = 90)
The function sets the threshold for the gas sensor. Threshold helps users decide whether the sensor is active or not. If the sensor value is greater than the threshold value, the sensor is active, or else it is inactive.
Syntax: setgasthreshold(threshold_value = 1500)
The function connects the PictoBlox to the ThinkSpeak Channel with the specified write and the read API keys. Without this function, other functionality does not work related to ThinkSpeak.
Syntax: ts.connecttothingspeak(channel_ID = 1234567, read_API = “readAPI”, write_API = “writeAPI”)
The block sets the oscillator parameters for the selected servo motor.
Syntax: setoscillationparameters(servo name = “RHip”, amplitude = 30, offset = 90, time period = 1000, phase difference = 0)
This function moves the servo motors of a pick and place robot to the angle specified by the user, allowing the robot to pick up an object.
Syntax: pick()
This function moves a robotic arm’s end-effector along a given axis by a specified amount over a given time. All other axes will remain constant.
Syntax: roboticArm.movebyinoneaxis(DISTANCE = 10, AXIS = “x”, TIME = 1000)
This function is used for set the Base Speed, Min Speed and Max Speed of motors for line following and turn.
Syntax: setPIDspeedparameter(base = 40, min = 0, max = 80)
This function returns the width of the face detected. You can specify the face for which the value is needed. The position is mapped with the stage coordinates.
Syntax: width(face = 1)
The function moves its sprite costume center’s X position by the specified amount.
Syntax: changex(delta_x = 10)
If the sprite is hidden, it will show the sprite. If the sprite is already showing, nothing will change.
Syntax: show()
The function reports the number of days (and fractions of a day) since 00:00:00 1 January 2000 (UTC).
Syntax: dayssince2000()
The function set the specified steering orientation to the specific servo motor angle. Orientations – Straight, Left and Right.
Syntax: setsteeringangle(orientation = “S”)
The function connects the soil moisture sensor to the specified pin. Once initialized, other moisture sensor-related functions can be used.
Syntax: setmoisturepin(pin = “A1”)
The function resets the oscillator parameter for all the servo motors.
Syntax: resetoscillationparameters()
This function moves the servo motors of a pick and place robot to the angle specified by the user, allowing the robot to place down an object.
Syntax: place()
This function takes in a servo type, an angle, and a time value as inputs and sets the servo to the given angle in the specified amount of time.
Syntax: roboticArm.setservoangleto(SERVO = “link1”, ANGLE = 90, TIME = 1000)
This function starts line following with the PID algorithm, stopping at a checkpoint based on the IR threshold; set PID speed, constants, and adjust parameters for best performance.
Syntax: dolinefollowingwithPID(next_checkpoint = 1)
This function returns the height of the face detected. You can specify the face for which the value is needed. The position is mapped with the stage coordinates.
Syntax: height(face = 1)
The function changes the selected sprite’s X position to a specified value.
Syntax: setx(x = -240)
All articles loaded
No more articles to load

Connecting Quarky with PictoBlox

Let’s begin by first connecting Quarky to PictoBlox. Follow the steps below for connecting Quarky to PictoBlox:

    1. First, connect Quarky to your laptop using a USB cable.
    2. Next, open PictoBlox on your desktop.
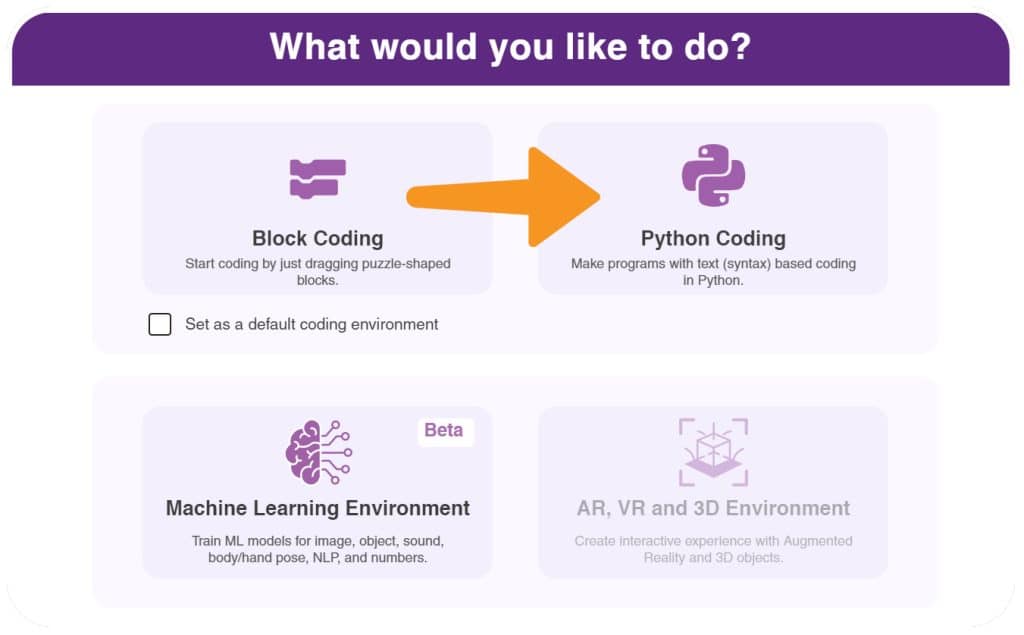
    3. After that, select Python Coding as your coding environment.
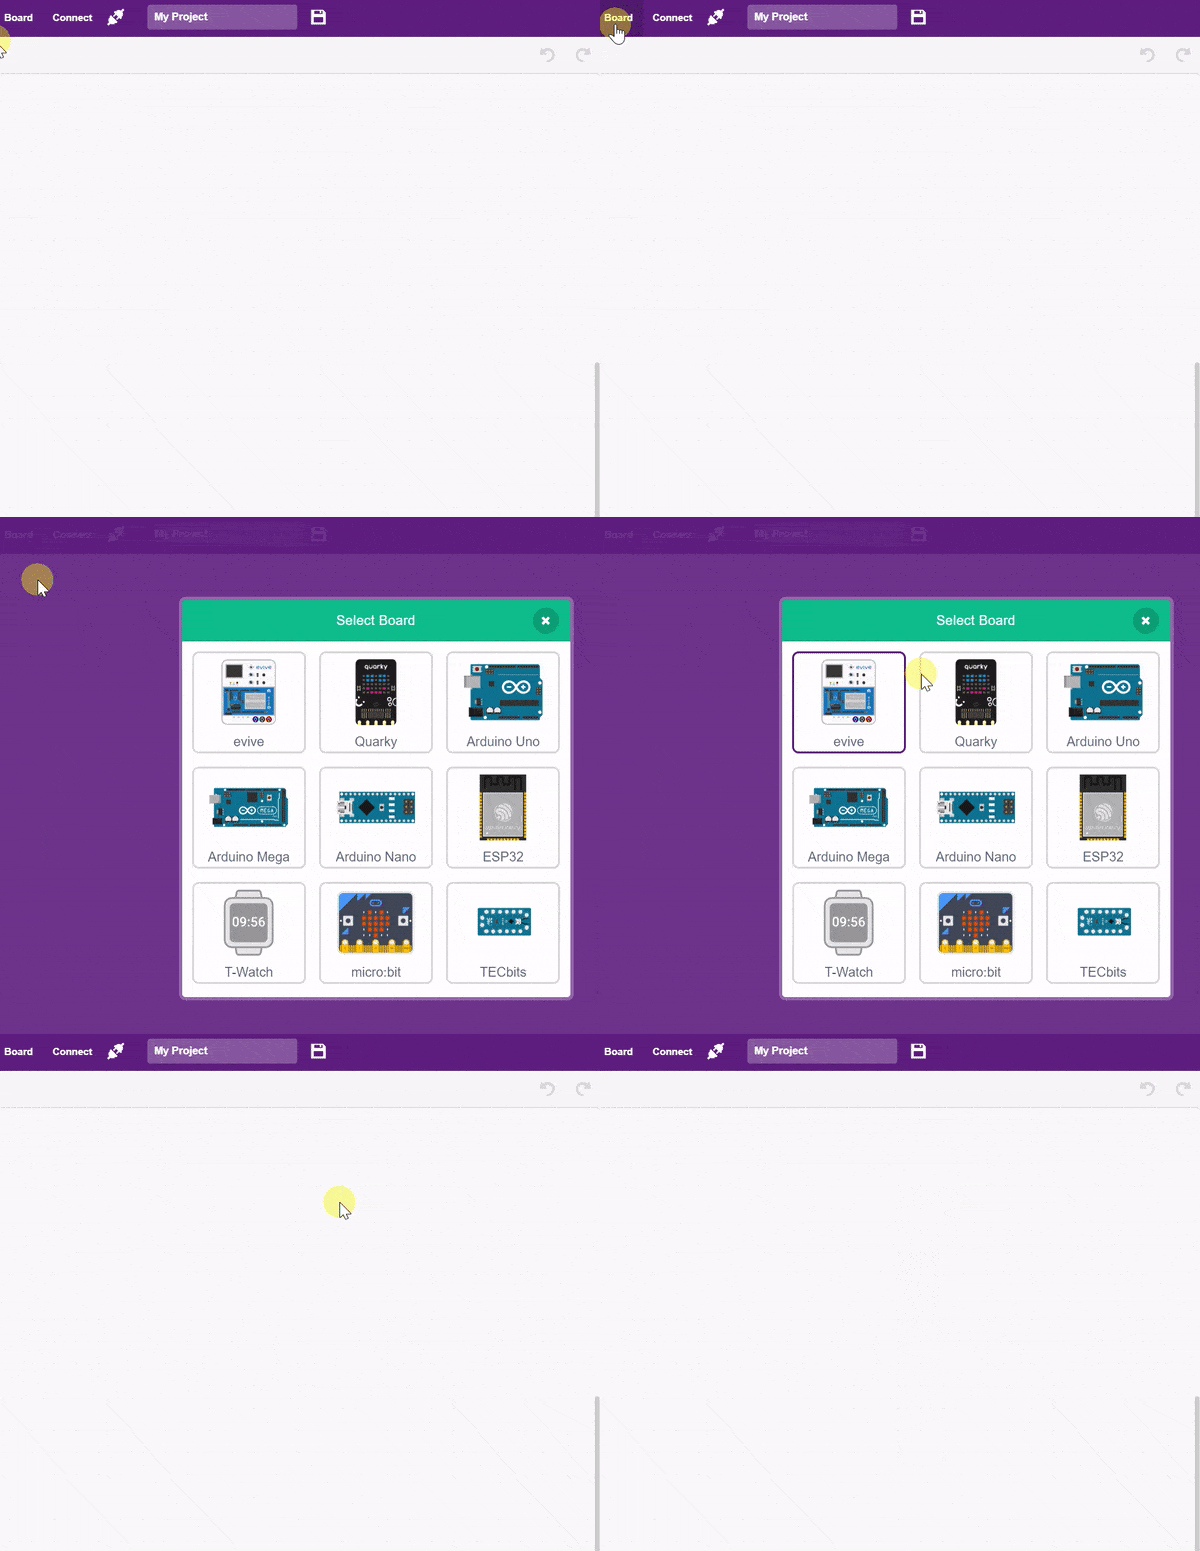
    4. Then, click the Board button in the toolbar and select Board as Quarky.
    5. Next, select the appropriate Serial port if the Quarky is connected via USB or the Bluetooth Port if you want to connect Quarky via Bluetooth and press Connect.
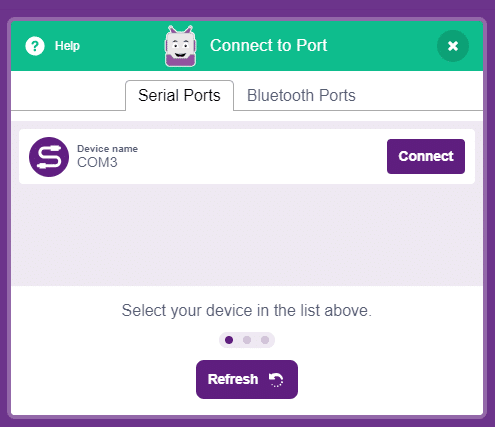
      COM Port
    6. Click on the Upload Firmware button. This will upload the latest firmware in Quarky.
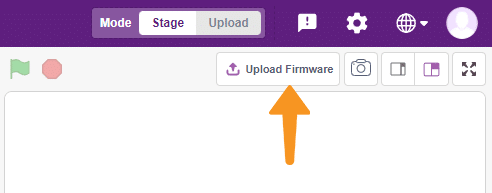
      Note: If your device already has the latest firmware, then PictoBlox will show the message – Firmware is already updated. For learning more you can refer to this tutorial: https://ai.thestempedia.com/docs/quarky/quarky-toubleshooting/updating-quarky-firmaware-with-pictoblox/
    7. Once the firmware is uploaded, Quarky starts the Getting Started program. This runs only for the first time. Run through it.

And voila! Quarky is now connected to PictoBlox.

Quarky Mecanum Python Library for Stage Mode

Stage mode is one of the two modes you can write your programs in PictoBlox. In this mode, you can write scripts for the sprite and boards to interact with sprites in real-time. If you disconnect the board with PictoBlox, you cannot interact with the board anymore.

You can toggle between the upload mode and stage mode using the button on the top right side of PictoBlox.

In Python, use the following object declaration to use Python functions in Stage Mode:

meca = Mecanum(1, 2, 7, 8)

Quarky Mecanum Python Library for Upload Mode

Upload mode allows you to write scripts and upload them to the board so that you can use them even when it is not connected to your computer, for example, you need to upload a script for making moving robots. In this case, Quarky will run offline according to the program and it cannot interact with the stage.

In Python, use the following object declaration to use Python functions in Upload Mode:

from quarky import *
from expansion_addon import Mecanum
meca = Mecanum(1, 2, 7, 8)

Python Functions

The following functions are available for use in the Quarky Mecanum library:


Warning: Undefined array key "pp_wrapper_link" in /var/www/html/wp-content/plugins/powerpack-elements/extensions/wrapper-link.php on line 194

Warning: Undefined array key "pp_wrapper_link_enable" in /var/www/html/wp-content/plugins/powerpack-elements/extensions/wrapper-link.php on line 196

Warning: Undefined array key "pp_custom_cursor_icon" in /var/www/html/wp-content/plugins/powerpack-elements/extensions/custom-cursor.php on line 350

Warning: Undefined array key "pp_custom_cursor_text" in /var/www/html/wp-content/plugins/powerpack-elements/extensions/custom-cursor.php on line 351

Warning: Undefined array key "pp_custom_cursor_target" in /var/www/html/wp-content/plugins/powerpack-elements/extensions/custom-cursor.php on line 352

Warning: Undefined array key "pp_custom_cursor_css_selector" in /var/www/html/wp-content/plugins/powerpack-elements/extensions/custom-cursor.php on line 353

Warning: Undefined array key "pp_custom_cursor_enable" in /var/www/html/wp-content/plugins/powerpack-elements/extensions/custom-cursor.php on line 355
The function closes the gripper for the Quarky Gripper Robot.
Syntax: closearm()
The function executes the oscillator according to stored parameters for the servo motor and the current time.
Syntax: executeoscillator()
The function reports the analog reading of the Gas sensor connected to the selected pin. The value will vary between 0 to 4095.
Syntax: gassensorvalue(pin = “A1”)
The function creates a Python object for the Thingspeak library.
Syntax: thingspeak()
The function takes the desired angle values and sets the pick and place arm to those angles.
Syntax: setarmangle(angle = 90)
This function moves the end-effector to the specified position of the chosen axis while keeping the other two axes in their current positions.
Syntax: roboticArm.gotoinoneaxis(POSITION = 150, AXIS = “x”, TIME = 1000)
PID control of line follower is a method consisting of proportional, integral, and derivative functions to improve the robot’s movement. 
Syntax: setPIDconstantparameter(kp = 0.8, ki = 0.01, kd = 0.2)
This function returns the y position of the face detected. You can specify the face for which the value is needed. The position is mapped with the stage coordinates.
Syntax: y(face = 1)
The block points its sprite towards the mouse-pointer. This changes the sprite’s direction and rotates the sprite.
Syntax: pointto()
This function resets all 7 graphic effects.
Syntax: cleareffects()
The function sets the timer’s value back to 0. 
Syntax: resettimer()
The function executes the oscillator according to stored parameters for the servo motor and the current angle specified in the block.
Syntax: executesscillatorat(angle = 90)
The function sets the threshold for the gas sensor. Threshold helps users decide whether the sensor is active or not. If the sensor value is greater than the threshold value, the sensor is active, or else it is inactive.
Syntax: setgasthreshold(threshold_value = 1500)
The function connects the PictoBlox to the ThinkSpeak Channel with the specified write and the read API keys. Without this function, other functionality does not work related to ThinkSpeak.
Syntax: ts.connecttothingspeak(channel_ID = 1234567, read_API = “readAPI”, write_API = “writeAPI”)
The block sets the oscillator parameters for the selected servo motor.
Syntax: setoscillationparameters(servo name = “RHip”, amplitude = 30, offset = 90, time period = 1000, phase difference = 0)
This function moves the servo motors of a pick and place robot to the angle specified by the user, allowing the robot to pick up an object.
Syntax: pick()
This function moves a robotic arm’s end-effector along a given axis by a specified amount over a given time. All other axes will remain constant.
Syntax: roboticArm.movebyinoneaxis(DISTANCE = 10, AXIS = “x”, TIME = 1000)
This function is used for set the Base Speed, Min Speed and Max Speed of motors for line following and turn.
Syntax: setPIDspeedparameter(base = 40, min = 0, max = 80)
This function returns the width of the face detected. You can specify the face for which the value is needed. The position is mapped with the stage coordinates.
Syntax: width(face = 1)
The function moves its sprite costume center’s X position by the specified amount.
Syntax: changex(delta_x = 10)
If the sprite is hidden, it will show the sprite. If the sprite is already showing, nothing will change.
Syntax: show()
The function reports the number of days (and fractions of a day) since 00:00:00 1 January 2000 (UTC).
Syntax: dayssince2000()
The function set the specified steering orientation to the specific servo motor angle. Orientations – Straight, Left and Right.
Syntax: setsteeringangle(orientation = “S”)
The function connects the soil moisture sensor to the specified pin. Once initialized, other moisture sensor-related functions can be used.
Syntax: setmoisturepin(pin = “A1”)
The function resets the oscillator parameter for all the servo motors.
Syntax: resetoscillationparameters()
This function moves the servo motors of a pick and place robot to the angle specified by the user, allowing the robot to place down an object.
Syntax: place()
This function takes in a servo type, an angle, and a time value as inputs and sets the servo to the given angle in the specified amount of time.
Syntax: roboticArm.setservoangleto(SERVO = “link1”, ANGLE = 90, TIME = 1000)
This function starts line following with the PID algorithm, stopping at a checkpoint based on the IR threshold; set PID speed, constants, and adjust parameters for best performance.
Syntax: dolinefollowingwithPID(next_checkpoint = 1)
This function returns the height of the face detected. You can specify the face for which the value is needed. The position is mapped with the stage coordinates.
Syntax: height(face = 1)
The function changes the selected sprite’s X position to a specified value.
Syntax: setx(x = -240)
All articles loaded
No more articles to load

Conclusion

In conclusion, PictoBlox is a powerful coding environment that allows you to program the Quarky Mecanum Robot with Python in both Stage and Upload modes. The Quarky Mecanum library provides several functions that can be used to control the robots motors, pickandplace robot, and gripper robot. With the help of PictoBlox, you can easily program and control the Quarky Mecanum robot!

Table of Contents